Overview 5inch IPS Display for Raspberry Pi, DPI interface, no Touch, 800×480
Features 5inch IPS screen, 800×480 hardware resolution Standard Raspberry Pi 40PIN GPIO extension header, Compatible with Raspberry Pi 2B/3B/3B+/3A+/4B/Zero/Zero W/Zero WH and further versions The LCD is directly driven by Raspberry Pi DPI interface, refresh rate up to 60Hz Supports systems like Raspbian, Ubuntu MATE, OSMC… Supports future version which is backward compatible Backlight can be turned off to lower power consumption Compact size, suit for various projects
Package Contains (Weight: 0.155 kg) 5inch 800×480 IPS LCD x1 RGB LCD HAT (B) x1 LCD stand (small size) x1
Installation
Unscrew the 8 screws from the back of the device using a small philips screwdriver.
Remove the back of the case and open being careful of the speaker cables (there will be enough cable to open length-wise. Also be careful of the headphone port, it has a little piece of plastic that will break if you don’t tease it loose out to the left.
When removing the back controller PCB, you’ll have to pull these apart with a little more force than you’d expect. Just tease it off from each quadrant until it comes loose. This is due to the straight-in connector that connects both PCBs.
Lift the little plastic lever that keeps the ribbon connector for the LCD secured to the PCB, then pull the ribbon connector straight out away from the port.
Pop out the screen from the case and replace it with the new one (remember to remove the screen protector, or at least pull the tab enough that it will be on the outside of the case later).
Insert the new ribbon cable, push the plastic clip/lever back down and then put the ‘sandwich’ of the two PCBs back together and press it down to ensure the straight edge connector is back in place (you can press harder later once you have the case back on).
Turn on and test – be careful not to short anything. If you do not see LEDs lit or anything on the screen, then the straight edge connector for the 2 boards is not connected. Re-set the board and press harder.
Pop the case back on and screw the 8 screws back in. Enjoy!
Red – screw holes (ignore the cyan one at the bottom, it should be red) Cyan square – the straight edge connector for the PCB sandwich Purple – look closely, on the left is the little brown lever/clip, and the ribbon cable pushes directly in
Hand 386 Hardware Specification
Processor
Intel 386 SX 40 MHz CPU
Chipset
M6117D SoC platform / M1217 chipset
Graphics
Chips F65535 VGA graphics for up to 640 x 480 at 256 colors
RAM / Storage
8MB RAM, 1GB CF card connected to IDE adaptor
Sound
Yamaha YMF262-M OPL3 sound card
Ports
PS/2 mouse and keyboard, 8-bit ISA extension, VGA out, 3.5mm audio, USB (disk access), DC input (5V, 2A)
Dimensions
150 x 130 x 16 mm (5.9 x 5.1 x 0.6-inches)
Frequently Asked Questions:
1. Benefits of an IPS screen upgrade: An IPS screen typically offers wider viewing angles and superior color accuracy compared to TN panels. This results in a more vibrant and consistent display, which can enhance the viewing experience, especially for devices where visual quality is a priority.
2. Compatibility issues or additional modifications: Upgrading to an IPS screen may require specific compatibility checks, such as connector types and power requirements. While some devices are straightforward “plug and play” upgrades, others might need minor modifications or adapters to ensure the new screen works properly.
3. Power consumption and battery life impacts: IPS screens often have slightly higher power consumption than TN panels due to their backlighting technology and the way they process images. This could lead to a reduction in battery life, though the extent of the impact can vary depending on the screen’s efficiency and the device’s overall power management.
I recently picked up an NEC MobilePro 900C from eBay, after my usual late night rabbit holing. I used to have a Jornada 720 way back in the day, and had an unhealthy fascination for UMPC/small form factor computers. I noticed that a lot of the content available for the NEC started to fall off the Internet. I decided to grab one, figure a bunch of things out, and create a stable and easy repository of all the information and software to get the most out of the device, at least within the boundary of my journey.
Hardware, software, flashing, updates, programming, Linux. Hoping to centralize all that info here, and if I can – cross compile and get later versions of Linux packages running.
Downloads
Most of these files and tools are abandoned or very difficult to find. If you have a copyright issue, please contact me.
The Microsoft .NET Compact Framework 3.5 Redistributable contains the common language runtime and class libraries built for the .NET Compact Framework.
The Microsoft .NET Compact Framework 1.0 SP3 Redistributable includes everything you need to run .NET Compact Framework applications, including the Common Language Runtime and the .NET Compact Framework class library.
The Microsoft .NET Compact Framework 2.0 SP2 Redistributable contains the common language runtime and class libraries built for the .NET Compact Framework.
This HPC:Factor package contains the Full runtime component set for executing Visual Basic CE applications on your Windows CE .net based Mobile Device. This download is for the Host extractable CAB version of the redistributable. You will need to soft reset your Handheld PC after installing this update.
This HPC:Factor package contains the Full runtime component set for executing Visual Basic CE applications on your Windows CE .net based Mobile Device. This download is for the Host ActiveSync installer version of the redistributable. You will need to soft reset your Handheld PC after installing this update.
This HPC:Factor package contains the minimal basic runtime component set for executing Visual Basic CE applications on your Windows CE .net based Mobile Device. This download is for the Host extractable CAB version of the redistributable. You will need to soft reset your Handheld PC after installing this update.
This HPC:Factor package contains the minimal basic runtime component set for executing Visual Basic CE applications on your Windows CE .net based Mobile Device. This download is for the Host ActiveSync installer version of the redistributable. You will need to soft reset your Handheld PC after installing this update.
HPC2000 ROM Image for the MobilePro 900 Series. Note that this is the ROM Image only and does not include the required v4.10 bootloader update which must be installed before HPC2000 can be flashed to the device
This new version of the Windows Mobile Device Center contains key improvements and new features to support Windows Mobile 6 devices. The Windows Mobile Device Center 6.1 is only supported on Windows Vista.
This new version of the Windows Mobile Device Center contains key improvements and new features to support Windows Mobile 6 devices. The Windows Mobile Device Center 6.1 is only supported on Windows Vista.
The Windows CE: Standard SDK, in conjunction with the Microsoft eMbedded Visual C++ 4.0 SP2, deliver a complete development environment for creating applications for devices based on Microsoft Windows CE 4.2.
System Requirements: Supported Operating Systems: Windows 2000 Service Pack 2, Windows XP eMbedded Visual C++ 4.0 SP2
Running the SDK To run this SDK, you should have one of the following systems installed on your desktop computer: Microsoft Windows NT 4.0 with Service Pack 5 Microsoft Windows 2000 Microsoft Windows 98 What’s New for the Handheld PC 2000 SDK Among the new features for the Handheld PC 2000 SDK are improved Host Serial Port support, improved ITL communications handshaking, Ethernet support for connection to Microsoft® ActiveSync™ 3.1, and a Startup Wizard. Windows CE Compatibility: Windows CE 3.00 (Handheld PC 2000)
Windows CE development Embedded Visual C++ Integrated Development Environments (IDE) for Windows CE .net and CE 5.0.
The Microsoft eMbedded Visual C++ 4.0 tool delivers a complete desktop development environment for creating applications and system components for Windows CE .NET-powered devices. With new capabilities like C++ exception handling, Run Time Type Information (RTTI), include STL library components, and a plethora of new debugger functionality, eMbedded Visual C++ 4.0 provides you with the power and flexibility to create the most advanced applications for Windows CE .NET. Use the following CD key when installing this software: TRT7H-KD36T-FRH8D-6QH8P-VFJHQ Note: To target for Windows CE 5.0 you must install SP4
Service Pack 4 (SP4) allows existing eVC4 users to target Windows CE 5.0 based devices. In addition to supporting the new Windows CE 5.0 platform, SP4 is cumulative in nature and includes support for Windows CE 4.0, 4.1 and 4.2 based platforms as well. This download must be installed on top of existing eVC4 installations.
A library for developing Windows applications and UI components. Extends ATL (Active Template Library) with a set of classes for controls, dialogs, frame windows, GDI objects and more. This version provides support for Visual Studio 2005, Windows XP & CE.
Custom ROM
Overview
– cmonex’s rom version 2.0, update with the included updater bootloader ONLY. – flash this only if you already have bootloader version 4.10!!!! you can check your version information in the NEC firmware info applet in control panel on your 900c. – if you have bootloader 4.5.1-6., the link to upgrade and info on upgrading is here: official roms and info page
important: – read this entire page – flashing instructions are included in the package!
Important Information
here are some of the official roms. latest version for ce.net 4.2 (OS 2.02) and for hpc2000 (OS v6.0). they are converted to flashable format. there are RAM OS images and some other stuff too now! also available is a special package for downgrading a 900c to hpc2000! that downgrade is v6.0
if you have a 900 or 900c with non booting OS then please pay special attention.
on the download page you will be required to select your current firmware information (bootloader and OS) before proceeding to the download. please try to do it as precisely as you can, and if you have more than one device, do it separately for each of them.
Updating/Flashing
There are three main methods to flash a nec 900/900c and two advanced ones. also there is the option for jtagging.
Update by Serial Cable
Can be used by hpc2000 and cenet bootloaders too, but one word of warning: has been tested only with bootloader version 3.0 and 4.10. (basically, the oldest and the latest ones, lol.)
copy the needed files (SABOOT.NB0 or XIP.BIN) to a CF card formatted to FAT16. insert that card in the 900/900c.
make sure the COM port you’re going to use is disabled in activesync etc.
run your terminal program (hyperterminal is built in in XP)
select 115kbps and software xon/xoff flow control. no parity, 8 bits and stop bits 1.
connect your 900/900c with the serial cable
to test, turn your 900/900c on (or if it was on, then off and on again!) (as long as you have a bootable OS) you should get 1 line on your terminal, the bootloader announcing itself as bsquare bootloader for MP900 or similar.
hard reset your 900/900c. watch the terminal while it is booting. when it tells you to press ESC, do so, be quick.
the bootmenu comes up.
type 1 if you want to update bootloader type 2 if you want to update OS type 3 if you want to load OS (i.e. exit from the menu)
hidden menu:
type 91 if you want to ethernet flash. filename is boot.bin type 93 if you want to load RAM OS off a cf card. filename is XIP.BIN (or NK.zip/gz maybe) (92 isn’t implemented)
…and press enter!
troubleshooting:
if the update is not done, then try another CF card.
if the flashing process of the OS image stops for whatever reason, hard reset the device and restart the flashing process.
Update by Updater Bootloader
Can be used on any 900/900c, the only limitation is that your OS has to be bootable and that you make sure you flash an OS version that matches your bootloader version!
how to flash with the updater bootloader (update.exe, UPDBL.NB0, UPDBLHPC.NB0)
Important to know before starting:
when you use update.exe, make sure your bootloader matches the OS you are going to flash.
if you have a hpc2000 bootloader (version 3.x), you must flash a hpc2000 OS.
if you have a ce.net bootloader (version 4.x), you must flash a cenet OS or a hpc2000 OS specifically made for bootloader 4.10 or flash both the bootloader and matching OS at the same time!
Instructions:
format a CF card (size at least 64mb) to FAT16 (xp calls it FAT),
use normal format (not quick), then unzip the needed files to its root.
you must do this even if the card was already fat16.
if you currently do not have bootloader version 4.10, make sure you also copy the SABOOT.NB0 from the package, to update the bootloader to 4.10.
to check your bootloader version, go to control panel on your 900 or 900c, and read NEC firmware info applet.
if you do not have bootloader version 4.10, copy the SABOOT.NB0 from the package to the card, this is mandatory.
if you already have bootloader 4.10, do not copy SABOOT.NB0 to the card.
if every file is copied OK, hardreset the 900/900c by removing all batteries and AC.
do not insert CF card yet.
reinsert batteries, put the 900/900c on AC (mandatory), boot to the (old) OS,
then insert the CF card and run update.exe on the CF card. that’s it. it will take about 6 minutes in total.
Troubleshooting:
if the update is not done, then try another CF card.
if the flashing process of the OS image stops for whatever reason, go and use the C+F keys method (detailed on this site) to reflash. in this case please do not have a SABOOT.NB0 on the card again!!
Update by C+F Keys
WARNING: can only be used with bootloader version 4.10!!!!!!!!!! (the OS version does not matter)
DO NOT USE THIS WITH ANY BOOTLOADER OTHER THAN 4.10. you’ve been warned!
instructions:
format (fully) a CF card that is at least 64 MB. use FAT16 (xp just calls that FAT)!
you must format the card even if it was already FAT16!
NOW CONFIRM YOU HAVE BOOTLOADER VERSION 4.10. the next steps will help you.
go to control panel on your 900c, NEC firmware info applet and read the bootloader version there.
if it is not version 4.10, you stop here and do not go further. you need the external updater bootloader to flash anything.
if you have 4.10, you can now copy XIP.BIN to card. this is the OS image.
insert the card in the 900c.
hard reset 900c by removing all power (main battery, backup battery, ac adapter)
before reinserting main battery (do not touch backup battery yet!) or ac adapter (easier), press and hold C and F keys on the 900c.
make sure the battery lock is locked.
give power to the 900c while still holding the keys until the 900c switchs on – on its own! no need to press the power key.
if it doesn’t switch on within 5 secs, release the keys and it will turn on then (again on its own).
it should tell you that it is searching for bootloader update. of course it won’t find this file so it will continue searching for OS update, which should be found on the card. it will flash it in automatically.
when the process is completed, it should boot the OS automatically. eject card, don’t forget to reformat it again! that’s all!
NOTE: i don’t recommend doing a bootloader flash with this, unless you are absolutely sure you have bootloader 4.10, generally you should just do an OS image flash.
Troubleshooting:
if the update is not done, then try another CF card.
if the flashing process of the OS image stops for whatever reason, restart and repeat the process from step 8.
There are two more methods. they are not for the normal user under normal circumstances, however they enable extra access, hacking, etc. or maybe even unbricking.
Ethernet Flash
Good for some unbricking. every bootloader has this, hpc2000 and cenet too. serial cable required to initialize the procedure.
How to load an image over ethernet
introduction.
this is an advanced way of loading an image onto the 900/900c! based on standard eboot. should work with any bootloader version. BUT tested only with 4.10 and 3.0 so far. this means version 4.5.1-6 might or might not be able to do it properly. (probably would work.)
what you need is
serial cable
ne2000 compatible ethernet card that actually works, 10mbps gives you a better chance. i use a socket LPE.
you DON’T need a CF card, that’s special about this.
tftp client or platform builder. for tftp, tallsoft has a nice free gui client that works.
image file packaged up in flashable format, but named boot.bin or nk.bin (not xip.bin). this is not a bootloader image (i.e. not flashed in place of the existing bootloader).
OR
there is an alternative hackish method that doesn’t need serial (does need all the other stuff however) but this alternative method is not suitable for saving bricks. detailed below.
MORE INFORMATION
what is this useful for? may be able to unbrick a 900c with the buggy bootloader 4.5.1-6 as long as the bootloader is intact enough. and definitely can unbrick a 900c with bootloader 3.0 (this combination reads the CF cards wrong on some 900c’s so cannot flash properly). this has been tested. or, you can avoid flashing the whole NOR even when you just want to update a small part of it.
THE METHODS: as you can see, the first half of the procedure is similar to the serial updating. so you need the serial cable. you can use platform builder or a tftp client.
platform builder 4.2 works for both hpc2000 and cenet bootloaders. gives you more control over the process, you can jump to the image after download. this doesn’t matter so much with a cenet bootloader, but greatly matters with hpc2000 bootloaders because those won’t try to boot anything from RAM after a soft reset.
a tftp client is easier to setup (also no need to download GB’s for platform builder), but is suitable only for ce.net and only if you load the image in place of the default kernel.
method without serial requires a special hacked version of bootloader 4.10 (can run on hpc2000 or cenet 900 too) and a hacked update.exe. separate steps for it are described below (scroll down to end of this whole desc).
DOWNLOAD FORMATS:
file name: the file name to load is NK.BIN if using platform builder, otherwise boot.bin. this is in the normal flashable format (MS BIN).
flash vs load: the bootloaders i’ve tested seem to allow for downloading full OS images and flashing them right away (you definitely need platform builder for that one) or just loading into RAM. whether they are flashed or just loaded depend on the BIN header start addresses. between 0x80000000-0x82000000 and 0x84000000-0x86000000 it will be flashed in, between 0x90000000-0x94000000 it will be just loaded into RAM. the bootloader does NOT check whether the image being downloaded has start addresses in bootloader or OS area or RAM. it will just do its job. hence, extreme caution has to be applied! do not try downloading random images because if they have a start (or end) address somewhere between 0x80000000-0x80040000 or 0x84000000-0x84040000, the existing bootloader code will likely be overwritten with invalid code. if it is between 0x80040000-0x80080000 or 0x84040000-0x84080000, it will just damage the boot splashscreen. anything higher than that, will damage the OS only.
loading only: you can load kernel (if the bootloader is cenet) or any other code if it is suitable for the environment (hardware initialization etc.). in this way, the addresses in the BIN headers have to be RAM addresses. so no loading of an ordinary OS image that way. it has to be a RAM OS. the addresses should also be higher in RAM than the bootloader itself – i.e. can be 0x900E0000, or anything higher than 0x901B0000 or 0x90190000 (depending on bootloader version, 3.x or 4.x) or higher. not recommended to try any addresses (up to and including end address) between 0x90160000 and 0x901B0000/0x90190000! if you load a ce.net kernel image (useful for testing without having to flash), the kernel will stay in RAM properly after a soft reset too, that’s comfortable.
good thing: you can download and flash a partial OS image too. only the corresponding blocks will be flashed. the rest will stay untouched. (more info on block size later, but probably 0x40000 bytes at most.) for example you can download and flash an OS without updating the kernel.
not tested/confirmed: the images with RAM addresses probably aren’t flashed, just loaded into RAM but don’t take my word for that. i have only downloaded stuff with higher addresses then bootloader end in RAM (updater bootloader and kernel images). warning here: if you aren’t in the mood to risk bricking the device, no code should be downloaded to between 0x90060000 and 0x900E0000 and between 0x90160000-0x901B0000 except unmodified normal bootloader (but i bet it would crash the current bootloader anyway).
more not tested: so far, i have not been able to download a NK.BIN with the cenet kernel attached to its end. but OS only (without kernel), works fine.
UNBRICKING: you can also load the updater bootloader for example! suitable for saving bricks. note: since it has been found how to flash an OS BIN over ethernet, the updater bootloader may not be needed any more for this. anyway here is the method with the updater bootloader: you simply need to load the updater bootloader (start address: 0x900E0000) packaged into a BIN while having a properly named OS image file (BIN too) on an inserted CF card. to unbrick a 900c with hpc2000 bootloader on it, you must use platform builder, not a tftp client. reasons: 1) if you load the updater bootloader, you need to execute it somehow. only PB can send the command for that (or maybe there is a way to simulate that, this is to be checked out!) 2) if you want to flash an OS image right away, again you need a PB command. do not try loading the modified normal bootloader this way (that is for ethernet without serial).
here is the updater bootloader image for this purpose: http://hpcmonex.net/nec900/files/specupdaterbootl.zip note: the OS image to be placed on CF card for flashing by this bootloader has to be named XIR.BIN (not XIP.BIN). due to this, you can use this for RAM OS load method too.
GENERAL STEPS:
(after making sure your battery is not low, or if AC adapter is attached), insert the ne2000 card. you can physically connect it to the network now or later but definitely before you enter your selection in the bootmenu. the network can be, for example, a normal LAN with a router (that’s what i have).
have the tftp client ready – or platform builder 4.2. platform builder has to be running and waiting in the connect settings menu where you can select the device. information on platform builder setup is detailed after the description of these steps. as for the tftp client setup: you have to use port 980 and file name boot.bin when uploading!
make sure the COM port you’re going to use is disabled in activesync etc.
run your terminal program (hyperterminal is built in in XP)
select 115kbps and software xon/xoff flow control. no parity, 8 bits and stop bits 1.
connect your 900/900c with the serial cable
to test (as long as you have a bootable OS), turn your 900/900c on (or if it was on, then off and on again!) you should get 1 line on your terminal, the bootloader announcing itself as bsquare bootloader for MP900 or similar.
hard reset your 900/900c. watch the terminal while it is booting. when it tells you to press ESC, do so, be quick.
the bootmenu comes up. you won’t see anything referring to the ethernet flashing, it is in a hidden menu:
simply type the number 91. and press enter.
watch the terminal, verify the card connected to the network properly. if you use a tftp client, note the IP address in the terminal. note: with bootloader 4.10, i was able to get DHCP easily. not so with bootloader 3.0, but it offered me a selection of IP, so i entered it manually and that worked.
when you see in the terminal that the bootloader started sending the BOOTME message, you can start the upload in the tftp client after specifying the IP. or select the device in platform builder (should appear in the device list at this point) and then start the download.
when the upload/download/whatever finished, it should be ready to execute the downloaded image (if it was a RAM image). with the tftp client, you can only play with kernel download. you are unable to send the jump to image command, so soft reset the device manually if you are running bootloader 4.10. (the bootloader will not overwrite the newly loaded kernel.) if you have platform builder you can jump to it right away.
you first have to get platform builder 4.2 if you don’t have it. spare a couple of GB’s of space on your disk for it. send me an email if you cannot find the download for the evaluation version – Unable to find this too
make a workspace. this is needed to be able to connect. just go to File/New Platform and click through the steps in the wizard. (some minimalist OS will be fine.)
now you are ready to connect to the 900/900c. do not have the device in bootloader mode yet.
copy your file named NK.BIN to the release dir of your OS. you can usually find it here: \path for platform builder install\CE420\PUBLIC\yourworkspacename\RelDir\Release
go to Target menu/Configure Remote Connection (as image001 shows)
add a connection. configure it as you see it in image002: ethernet selected for download.
go to the settings tab and configure it as in image003. then go back to first tab (services) and click on “configure…” beside the ethernet selection for download. leave PB waiting there.
now you can go to bootloader mode on your 900/900c. have it connect to the LAN and let it start sending the bootme’s. now you see something like in image004. select this new device in the list. click OK.
be quick!!! close the whole settings window, and now select Target menu/Download/Initialize as shown in image005.
it will then pop up a download window as shown in image006 – then pops up another dialog asking about KITL. say NO to it!
wait until the download finishes… as in image007 🙂
after the 900/900c finished executing the downloaded image, etc. etc., you can now close platform builder but first make sure you disconnect as shown in image008. otherwise, if you connect the 900c later again to ethernet, it won’t not enter BOOTME sending mode, instead told me it was not going to boot from DOC (the internal flash disk). there must be something platform builder managed to set. +13.: to be sure, i included image009-010-011 for additional settings to show how my copy of PB is setup. may not matter.
STEPS WITH NO SERIAL CABLE:
tested only on cenet OS so far (but tested with original 900). quite hack-ish but works. 🙂 based on the normal 4.10 bootloader (cenet).
place update.exe, UPDBL.NB0 (rename it to UPDBLHPC.NB0 if current OS is hpc2000) on your 900/900c. preferably on a CF card. they have to be in the same folder or root.
insert the ne2000 card NOW. also place the 900/900c on AC (may be edited later to eliminate this requirement)
run test_com.exe and type this command in it: w a001e838 1
exit testcom
run update.exe
as soon as you ran it, and while the display still has not changed, you must press and hold R and F keys for a couple of seconds. (it may be edited later to omit this step)
release them after screen goes black
it should now boot to ethernet flash mode, screen should say so.
wait a couple of seconds to allow it to find the card and then DHCP to pick up an IP, maybe 10-15 seconds or so.
from here refer to step 12-13 in general steps and/or platform builder setup…
…with the exception that most of the time it will not be able to boot a downloaded kernel (even if done with platform builder). you must press the soft reset button to get it running (this is due to the method being too hackish right now).
last note: without a serial cable you can’t see how the flashing is going so just wait like 6-7 mins before rebooting.
load ram OS (boot off CF card!). works with any bootloader, but you don’t need the serial cable for bootloaders with a version number higher than 4.5.1, which means 4.5.1-6 and 4.10. click here for description
+1. as for jtag, this requires quite a few things and should only be used if the bootloader got corrupt. can of course be used on any 900 or 900c. click here for description
ROM Differences
The following table outlines the application differences between the final release of the MobilePro 900 HPC2000 ROM, the final release of the official CE 4.2 .net ROM and the community ROM image Cmonex v2.0.
MobilePro 900
MobilePro 900C
Windows CE 3.0 (HPC2000)
Windows CE 4.2 .net
Creator
NEC
NEC
CmoneX
Browser
Internet Explorer CE 4.01
Internet Explorer CE 6.0
Internet Explorer CE 6.0
MSXML 2.0
MSXML 3.0 SP1
MSXML 3.0 SP1
Windows Media ActiveX Control
Windows Media ActiveX Control
ftxBrowser
Office Productivity
Pocket Word (spell checker)
Wordpad Microsoft Word Viewer
Pocket Word (spell checker & word count) Microsoft Word Viewer
Pocket Excel
Excel Viewer NECSAM Spreadsheet
Pocket Excel Microsoft Excel Viewer
Pocket PowerPoint (viewer)
PowerPoint Viewer
Microsoft PowerPoint Viewer
Pocket Access
Pocket Outlook: Inbox
Inbox
Inbox
Pocket Outlook: Calendar
bSquare Calendar
bSquare Calendar
Pocket Outlook: Contacts
bSquare Contacts
bSquare Contacts
Pocket Outlook: Tasks
bSquare Tasks
bSquare Tasks
Calculator (Paper-tape display)
Calculator (no Paper-tape display)
Calculator (Paper-tape display)
World Clock
World Clock (CE 4.2 version)
World Clock (HPC2000 version)
Inkwriter
Inkwriter
PDF
Ansyr Primer 3.1 Viewer
Microsoft PDF Viewer
Microsoft PDF Viewer
Multimedia
Windows Media Player for H/PC 1.2
Windows Media Player 9.0
Windows Media Player 9.0
Microsoft Image Viewer
Microsoft Image Viewer
Sound Recorder
Fax
bSquare Fax
bSquare Fax
bSquare Fax
Backup
bSquare Backup
bSquare Backup
bSquare Backup
Remove Desktop
Terminal Server Client (RDP 4.0)
Remote Desktop Client 5.1
Remote Desktop Client 5.1
Games
Solitaire
Solitaire
Solitaire
Utilities
DeClock
GS Battery Monitor
iTaskManager
Microsoft Query Client
Microsoft Query Client
Microsoft Query Client
MyTools
QuickLaunch
ResInfo
ScreenSnap
Soft Reset (via Software)
Soundwidget
Executability Check
OKapp
Overclocker
Cursor keys remapper
Winwatch
GAPI (GX)
GSFinder
PHMRegedit
pNotepad
Tascal Guage
Thesaurus
Total Commander
ChangeLog – CMONEX Edition V2.0
changelog for custom rom by cmonex edition V2.0 as compared to edition V1.0. (see firmware version in control panel, NEC firmware info applet! 🙂 )


important note: please read the info section for further information on some special features.


WHAT'S NEW:


NEW/UPDATED Applications/Drivers/Runtimes

- HPC2000 office suite: pocket Word with spellchecker and word count, pocket excel, pocket access.
- HPC2000 inkwrite (instead of bsquare inkwriter)
- HPC2000 calculator (instead of bsquare calculator)
- HPC2000 worldclock (instead of bsquare clock)
- HPC2000 voice recorder (instead of bsquare recorder)
- EVB (visual basic runtime)
- declock (clock app)
- limpidCE (desktop icon background changer)
- mytools (battery and misc. stuff)
- NEC soft reset app, special!
- remapMP (option to remap arrow keys on keyboard)
- soundwidget
- tascal gauge (conversion app)
- taskswitcher (PC style task cycling)
- textmaker typing fix (usage: in info section below!)
- thesaurus CE
- xclcfg2 overclocker (CPU overclock)
- ftxbrowser updated with integrated speedup fix
- totalcommander 2.0 updated with new icons
- zsIRC updated

REMOVED

- bsquare inkwriter
- bsquare spreadsheet
- bsquare calculator
- bsquare clock
- bsquare recorder
- ce.net wordpad
- word viewer
- totalcommander registry plugin (use PHM or TRE instead)
- SIP (onscreen keyboard - still downloadable from my site)
- unnecessary file: gx.lib
- help files - installable package later if there is demand
- coredl2.dll (no longer necessary)
- richink dummy (no longer necessary)

FIXED (bugs from v1.0)

- hpcmonex.hu changed to hpcmonex.net in IE favourites 🙂
- executabilitycheck has a link in start menu now
- no more desktop.ini on the desktop (explorer will not show system files by default)
- mfcce301.dll/olece301.dll fixed (they were wrong versions in v1.0)
- mouse cursor is not displayed (mouse users look in info section below)
- display now doesn't dim
- gwes printing fix included

TWEAKS

- new shell theme again! special thanks to Geared2003! (v1.0 skin was made by TFGBD)
- background image updated to match updater splashscreen 🙂 (thanks to encore/jamie)
- rearranged start menu again and updated it with the new apps
- desktop icon background is set to transparent
- arrows in shortcuts are removed
- in startup: taskswitcher (alt+tab), limpidce
- redefined some hotkeys on keyboard to launch new apps
- taskbar back to no autohide
- wzc (wlan config app) edited to display all options properly (i.e. the WEP key option)
- extra regional support, better accented char support, new countries selectable in regional settings!

KERNEL/SYSTEM UPDATES/PATCHES

- coredll.dll: updated (to the best one in folder 10 on my site), and added WM5 stub exports!
- aygshell.dll: added stub exports!
- richink updated (added hpc2000 richink package)
- commctrl.dll is module again, allows for more current process memory
- OS version change is no longer required (will report CE version 6.20 to the WM5 apps!)
- MFC apps are autopatched on loading (no more problems with which version of mfcce.300/olece300.dll to use!)
- kerneliocontrol API fixed to allow opera 8.60 to load (IOCTL_HAL_GET_DEVICEID)
- system info now says ce.net 4.20 build 1088 (almost like a WM2003 pocketpc) 🙂
- system clock is initialized to October 28 2007 (IOCTL_HAL_RTC_INIT)
- program ram is initialized to a higher amount now (50MB)
- NEC serial number bug fixed, now it keeps original value on soft reset (more info below!)


IMPORTANT INFO
how to do/use / known issues:

- mouse cursor: if you want to use a mouse, download the mouse cursor file from: http://hpcmonex.net/nec900/files/releases/gwes_to_add_mousecursor.zip and copy it into \windows, do a soft reset to activate the file.
- usage for textmaker typing fix: will speed up typing in textmaker. launch textmaker, then run the fix app. do not run it again until next launch of textmaker. thanks to isotherm for original idea!
- NEC serial number fix: NEC left a bug in the system: after a hard reset you get the correct deviceID (serial), but soft reset erases it. fixed now.
if you need the original for some (rare!) registered apps (buggy number, it is the same on any 900c with the same bootloader version!), i'll release a kernel without this fix soon.
- if your wlan card asks for driver name, and it is prism based, PRISMNDS.dll is the driver name.
- aygshell: the default aygshell works better now, but for some pocketpc apps, aygsheld.dll or aygshelp.dll may work better (included in \windows), use execheck to rename aygshell in apps.
- taskswitcher: use alt+tab to switch between apps like on the desktop!
- limpidce: better desktop icon background changer than desappear.
- limpidce and taskswitcher are in startup, if you don't need them, you can remove them (from \windows\startup).
- if you want to run linux, you need to invalidate GAPI (name an empty txt as gx.dll and copy that into \windows)
- mfcce auto patch: it will attempt to auto patch MFC apps if they are pocketpc apps. if it doesn't work (in testing there was never a problem), use execheck to rename mfcce300 to mfcce301 (and/or olece300 to 301) in apps. does not breach EULA for the apps 🙂 because this does not patch the executable files (it only tricks the loader)
- please let me know if something doesn't work right.


PLANS FOR NEXT RELEASE

next release will be much sooner because of a great new tool for rom editing!

planned:

- optional package for internal disk with useful but too large apps that don't need installing after hard reset.
- alternative kernel with no NEC serial fix.
- alternative OS with all the patches but no extra apps/stuff
- improved msn messenger CE if i can do it.
- better remote desktop (connect disk drives)
- smb server
- basic bluetooth support
- latest system dll QFE's from platform builder (aygshell, coredll, commctrl, etc.)
- new kernel? (this is very tentative)
- awaiting your ideas!


******************************************************************************************************************************************************


OLD CHANGELOG:


changelog for custom rom by cmonex edition 1.0 as compared to stock OS 2.02. (as firmware version in control panel, NEC firmware info applet! 🙂 )


important note: this is first edition so a little bit experimental. but it is tested out fairly well.

some apps and tweaks are experimental such as the skin and the isotherm IE fix. let me know if you like them and they will be kept! also, the IE speedup fix will be developed further anyway.


WHAT'S NEW: ADDED / CHANGED / REMOVED


Applications (freeware only!)

- better file manager: totalcommander CE 2.0 or gsfinder+, your choice
- notepad: pnotepad
- msn messenger: windows messenger CE - resources fixed so it will fit on the display fairly well!
- irc client: zsirc
- ftxbrowser: extra shell on top of IE6
- bsquare backup app
- GAPI, set to 900c 640x240 already
- battery monitor: gsbatmon_tsy or resinfo, your choice (gsbatmon is already setup nicely)
- quicklaunch
- PHM registry editor
- itaskmanager+netmgr
- screenshot app (devone)

Drivers/Runtimes

- orinoco wlan drivers
- prism wlan drivers (driver name is PRISMNDS)
- macromedia flash 7.0
- updated original .net CF 1.0 to version 2.0 SP3. tested with wififofum
- jetcet printer drivers (CE3 ones, so doesn't break activesync)

Tweaks

- new shell skin ("xp silver" and new icons, i know they are vista but this is first version) and system color theme (new gwes and commctrl and mui files)
- rearranged start menu (subfolders, new apps)
- rearranged desktop (deleted links)
- fix900c: changes ftxbrowser priority: won't slow down system (by isotherm). experimental. another, downloadable version will work with IE6
- all the pocketpc dummy dll files (best versions of them), two aygshells (aygshelp: 22k version, "folder 14", and aygsheld: 16.5k version, "folder 4")
- hpc2000 compatibility dll and registry package added
- OKapp to OK ppc dialogs
- executabilitycheck
- SIP (software keyboard) or winwatch, your choice to make the dialogs fit
- smalltweak included
- IE6 starts with about:blank
- wireless activesync (only if your AS version is below 4.0 as 4.x doesn't know wireless sync anymore)
- hpc mfc 2.11 and 3.0 included for hpc apps
- backup battery warning dialogs deleted
- hpcfactor infrared "driver" included
- explorer will show all files by default
- taskbar autohide by default
- cabs will not be deleted on installation
- no card battery warning on insertion of a card
- no animation, makes GUI faster
- higher glypcache, should make it faster but i don't know
- dic aygshell registry fix
- DST (daylight saving) fix for USA people
- dimming display is disabled
- favourites in IE is hpcfactor and my site, also it remembers my site as an already entered page 🙂
- IE user agent is changed to show full PC IE, makes some sites render better
- sounds for screen taps and keyboard turned off (i think this is nicer)

Removed

- vibren disk utility (doesn't prompt anymore on a hard reset!)
- net .cf 1.0
- most of the desktop icons removed so it refreshes faster


PLANS TO UPDATE THIS WITH

- new skin, first one is half experimental, but i can keep it if you all want. new skin will be either a newer xp silver or for fun, a new one, xp royale or vista.
- some cool new apps and tweaks TFGBD sent me
- evb
- improved spreadsheet (same as default one but it will be able to edit xls files, hopefully)
- hpc2000 office if it does make its way to cenet
- improved msn messenger CE if i can do it.
- better remote desktop (connect disk drives), smb
- basic bluetooth support maybe
- new aygshell, new coredll etc...
- OS version will say 5.0 if it can be done - so it can run wm5 apps easier
- more ideas not detailed yet
- i await your suggestions

custom updater bootloader (no risk, it won't be flashed in) will have to be used with the next editions as they will have too much stuff for the standard one


NOTES:

1. to use the 900c IE fix (actually it only applies to the ftxbrowser version):
run ftxbrowser, then run the fix, then you can browse more comfortably (system slowdown will be gone).

2. there are two aygshells added, one named aygshelp.dll the other is named aygsheld.dll, so use execheck to edit aygshell for apps that aren't happy out of the box with the default (not renamed) aygshell.dll.
also, the included pocketpc mfcce300 and olece300 are named 301, so they don't clash with the hpc mfc.

3. please let me know if something doesn't work right.
i know of a thing that doesn't work: new GWES prevents the screen click sounds but that's turned off by default anyway.
one more thing, a little bit of ram is consumed by the new skin but it isnt too much.

4. flashing instructions: flash this only if you already have bootloader 4.10!! this is important!
you can flash it with the update exe but you should reformat your cf card and do not put SABOOT.NB0 on it, to prevent extra bootloader update (which would be pointless). or you can flash it using the C+F keys, this one doesn't require your AC adapter being plugged in.
if you do not have bootloader 4.10, check official rom updates page.
Kitchen v1.0 for NEC MobilePro 900C
***quick intro to the kitchen v1.0 for nec mobilepro 900c***


what you need
- kitchen package where this readme is included.
- romtools package:
***quick intro to the kitchen v1.0 for nec mobilepro 900c***


what you need
- kitchen package where this readme is included.
- romtools package: romtoolpack.zip
- if xipport doesn't run: http://www.microsoft.com/downloads/details.aspx?familyid=200b2fd9-ae1a-4a14-984d-389c36f85647&displaylang=en

how to use the kitchen
- please read the rom editing document in romtools package
- the essential stuff is (very) briefly listed below

1) explanation to folders
- base rom: includes base rom NB0 and the dumped files, and main tools to edit it
- registry: base registry and initobj files to work with and stock registry too
- packages: packaged up rom files, hopefully useful!
- addon updates: whatever addons or updates i released to cmonex v2.0
- convert BIN tools: tools to convert to flashable format and example bin

2) using the tools
1. dump rom with xipport to OUT folder (done for you for the base rom already)
2. add/remove/modify files using base rom, packages and base registry as guidelines, use dumpromx when needed
3. build the new rom with xipport
4. convert it to XIP.BIN using xipbin (there is an example BIN for the base rom already)
5. have fun

3) the steps:
more details in rom editing tutorial in romtools package.
please read at least dumpromx and xipport usage descriptions.

1.: run xipport for the NB0 named xip.bin (not the same as the XIP.BIN for flashing), use "dump xip.bin" option, will create OUT folder
2.: edit OUT folder and optionally romhdr.txt. to compress your new/modified files use dumpromx (see tutorial).
3.: run xipport for OUT folder, use "realloc P" then use "build xip_out.bin" and the resulting xip_out.bin is the new rom.
4.: this consists of more steps:
- run this command with xipbin.exe in cmd: xipbin xip_out.bin 0 XIP.BIN 84080000 (where "xip_out.bin" is the image built by xipport)
- cut last 12 bytes of the XIP.BIN in a hexeditor
- attach the kernel BIN from "kernel binary" folder to the end of the OS part in a hexeditor
- finally, edit the four bytes referring to the image size (12th-15th bytes at the start of the whole BIN) to say 28 05 1E 0C
5.: heh.

4) errors in first version of kitchen:
- the .nlp files in bsquare pim package are supposed to belong to .net cf according to TFGBD.
- the system files package will be packaged up better later.


***THE END***
- if xipport doesn't run: http://www.microsoft.com/downloads/details.aspx?familyid=200b2fd9-ae1a-4a14-984d-389c36f85647&displaylang=en

how to use the kitchen
- please read the rom editing document in romtools package
- the essential stuff is (very) briefly listed below

1) explanation to folders
- base rom: includes base rom NB0 and the dumped files, and main tools to edit it
- registry: base registry and initobj files to work with and stock registry too
- packages: packaged up rom files, hopefully useful!
- addon updates: whatever addons or updates i released to cmonex v2.0
- convert BIN tools: tools to convert to flashable format and example bin

2) using the tools
1. dump rom with xipport to OUT folder (done for you for the base rom already)
2. add/remove/modify files using base rom, packages and base registry as guidelines, use dumpromx when needed
3. build the new rom with xipport
4. convert it to XIP.BIN using xipbin (there is an example BIN for the base rom already)
5. have fun

3) the steps:
more details in rom editing tutorial in romtools package.
please read at least dumpromx and xipport usage descriptions.

1.: run xipport for the NB0 named xip.bin (not the same as the XIP.BIN for flashing), use "dump xip.bin" option, will create OUT folder
2.: edit OUT folder and optionally romhdr.txt. to compress your new/modified files use dumpromx (see tutorial).
3.: run xipport for OUT folder, use "realloc P" then use "build xip_out.bin" and the resulting xip_out.bin is the new rom.
4.: this consists of more steps:
- run this command with xipbin.exe in cmd: xipbin xip_out.bin 0 XIP.BIN 84080000 (where "xip_out.bin" is the image built by xipport)
- cut last 12 bytes of the XIP.BIN in a hexeditor
- attach the kernel BIN from "kernel binary" folder to the end of the OS part in a hexeditor
- finally, edit the four bytes referring to the image size (12th-15th bytes at the start of the whole BIN) to say 28 05 1E 0C
5.: heh.

4) errors in first version of kitchen:
- the .nlp files in bsquare pim package are supposed to belong to .net cf according to TFGBD.
- the system files package will be packaged up better later.
Repair and Maintenance
Backup Battery CRITICAL
I haven’t figured out a way to fix this yet, but when replacing backup battery, it instantly just says CRITICAL. When removing the main battery, it does not hold the data. Voltage is continuously dropping. Makes me think there’s a short that’s draining it. I’ve not figured out what to do to troubleshoot this yet. It will NOT retain any data when main battery is removed, so it’s kinda annoying.
MobilePro 900 JTag Instructions
This information is incomplete – if you can help finish it, please contact me
Some people have bricked their 900 series Mobilepros by doing the wrong thing…like trying to install a ROM with the wrong flash, or simply experimenting trying to install Linux or some other operating system. Sometimes JTagging the 900 can bring the unit back into life. This fix assumes you have a corrupt boot loader, but good hardware. It also assumes you are sending commands from a Windows desktop computer to the Mobilepro. The steps are sequential, and commands you issue are in blue. • Disassemble your 900/900C so that you have access to the motherboard under the keyboard. • Solder the JTag cable to the JTag pins on the 900c like this: HYPERLINK “https://sites.google.com/site/necmobpro/my-mobilepro/nec-mobilepros/mp900-900c/900-brick/brickpic1.jpg?attredirects=0” • Connect the other ends to the parallel port connector as shown in this schematic
HYPERLINK “https://sites.google.com/site/necmobpro/my-mobilepro/nec-mobilepros/mp900-900c/900-brick/brickpic2.jpg?attredirects=0” This schematic above emulates a Wiggler cable • Now install the software Cygwin from here: HYPERLINK “http://cygwin.com/” http://cygwin.com and the Ioperm package. The Ioperm is under Devel and will be sorted automatically. • You will also need to unzip the complied JTag tools from this zip file jtag900cfinal.zip and copy them to the Cygwin\home\yourusername\jtag folder. • Cmd into cygwin\bin and run this command: ioperm -i • Everything is all set…now fix it. Run cygwin from the Cygwin icon on desktop and from the cmd it opens, issue this command: cd jtag • Then issue this command: cd src • Finally issue this: ./jtag • Connect the 900c if you haven’t already, and power it up by simply inserting the battery and putting it on AC power as well! • Type this command: cable parallel 0x378 WIGGLER and it should say
Modem Update Procedure
Double click on the modem patch ICON. It will be expanded and create “C:\NEC\CE.NET Modem Update” sub-directory.
Backup all of your data on the MobilePro before attempting to update your system.
Connect the external power adaptor to the system.
Note: The following step can be accomplished using either Active-Sync or removable storage media.
Ensure that the following files are in the same folder on the MobilePro 900.
0-7ff.s37
nvmlpe3_01-16_ver8.s37
PATCH9B52NVM.S37
ComNET_40611.exe
Double tap the “ComNET_” ICON.
The program should open and start running automatically.
Note: Several screens will be displayed during the update process.
The following screen will be displayed when the update is complete.
Tap the ‘OK’ to close the window. Remove the external power adaptor. Momentary depress the “Pwr” to shut the system off. Momentary depress the “Pwr” to shut the system back on. The update process is complete and the modem is ready for use. If the files copied to the MobilePro in step 4 can be deleted, as they are not longer needed.
Opening the Modem Cover
Performing a Hard Reset
A hard reset restores your MobilePro™ 900 system to its original shipping configuration, erasing all information and settings you have entered. Use a hard reset only when your unit does not respond after doing all of the following procedures:
Install a charged battery.
Verify that the battery lock is in the locked position.
Connect the unit to an AC power source.
Use the soft reset button to reset the system (see “Resetting the MobilePro” in Chapter 4 of the NEC MobilePro 900 User’s Guide). Note A soft reset lets you restart the MobilePro operating system while preserving any saved data. Using the hard reset returns your MobilePro to its original shipping configuration. All data and applications are erased from RAM. All open/unsaved files are lost and all user specific data such as contacts and tasks are erased. You can only restore data that has been backed up to your host PC. If a hard reset is necessary, use the following procedures to perform the reset:
Save your data, turn off unit power, and close the display panel. Disconnect any cable attached to the unit, such as the AC adapter and PC connect cables.
Remove the installed main battery pack (see “Replacing the Main Battery” in Chapter 2 of the NEC MobilePro 900 User’s Guide).
Remove the backup battery (see “Replacing the Backup Battery” in Appendix A of the NEC MobilePro 900 User’s Guide).
Wait a full minute after removing the backup battery. Then reinstall the backup battery (see “Replacing the Backup Battery” in Appendix A of the NEC MobilePro 900 User’s Guide). The hard reset requires that you wait a full minute before you reinstall the backup battery.
Replace the main battery pack (see “Replacing the Main Battery” in Chapter 2 of the NEC MobilePro 900 User’s Guide).
Open the display panel and power on the MobilePro 900. Note If the system does not power on after reinstalling the batteries, wait five seconds and then press the power button again.
Linux / JLime
In attempting to salvage what exists in the HPC Factor repository
Installation
This is a simple guide for manually partitioning your Compact Flash card and installing JLime using a Linux desktop PC and a memory card reader. It is recommended that you use this method if you can, since it yields better performance than partitionless installs. This tutorial is rather long because it describes every step meticulously accurately. So let’s get started.
What will you need to install JLime?
NEC MobilePro 900/c
a Compact Flash card of at least 128MB
a Compact Flash reader (USB)
a PC or Mac with any Linux distribution (you can use a LiveCD which can be run without installing it) with the cfdisk application (most likely it will be included in your distribution, but otherwise you will need to install it)
about 45 minutes (hardcore Linux geeks about 10) of spare time and some patience.
What will be the final result?
Your CF card will be divided into three partitions: FAT, ext2 and swap. The FAT (Windows) partition will be visible from within the Windows CE side and will contain the kernel, the bootloader and its configuration file. The bootloader will load the kernel into the memory of your device and allow the execution of the booting procedure from ext2 (Linux) partition containing the JLiME filesystem. The swap partition will be used for memory-intensive operations to improve your system’s performance.
Partitioning your Compact Flash card
a) Boot Linux on your computer. You will need root or superuser (whichever you like to call it) privileges for some of the following instructions.NOTE: If in some step when you’re using the terminal in your desktop Linux and get a “Permission denied” warning, this tutorial has forgotten to tell you to execute the command as root so do that then. On Debian distributions (Ubuntu, Kubuntu, Xubuntu, Fluxbuntu, Edubuntu, Mythbuntu etc.) the root privileges are gained by adding the word sudo in front of the command, e.g. ‘mkdir /mount/cf_jlime’ becomes ‘sudo mkdir /mount/cf_jlime’. All commands are to be typed in a terminal emulator (console), and they are case-sensitive.
b) Plug in your CF card reader with the CF card attached.
c) Examine the name of your CF card. Open a terminal emulator and type
dmesg | tail
Look for a line saying “Attached SCSI removable disk” and note the name in brackets. It may depend on your computer hardware configuration and Linux distribution used, but most probably it will be similar to the one below
[[118640.111000]] sd 1:0:0:0: [[sda]] Attached SCSI removable disk
NOTE: In this case the name of the CF card is sda, but it may be a different one in your system. This tutorial refers to it as sdX further on, so remember to replace it with your value each time. I.e. sdX, sdX1 and sdX2 would be sda, sda1 and sda2 respectively in this case.
IMPORTANT: Some hard disks may use similar names. Ensure you are 100% certain that you have the correct device.
d) Make sure that your card is unmounted with the command
umount /dev/sdX*
(root privileges required)
e) Run the cfdisk partitioning tool with the command
cfdisk /dev/sdX
(root privileges required)
Check that the size display matches that of your CF card. If it doesnt, then you may have accidentally selected your hard disk – exit immediately if this is the case. Partition the card:
CFDisk instructions wrote:
Using the tab key move over to the Delete button at the bottom of the window. Press Enter. Repeat for all partitions on the disk.
Now, move over to the New button in the same way. Press Enter. Check that Primary is highlighted and press Enter.
Enter an appropriate size (this will be the Windows part, so it should be quite small), 10MB is a good size. Type the size and press Enter.
Ensure Beginning is highlighted and press Enter.
Now, navigate to the Type button and press Enter.
Type “04” (FAT). Press Enter.
Now, using the arrow keys move down to the free space section.
Repeat steps 2, 3, 4 and 5. The recommended size is about 32MB less than the amount it offers you. Type “83” (ext2) as the filesystem type.
Leaving the type as it is, move down to the free space again.
Repeat steps 2-5. Confirm the suggested size of partition (which should equal the amount of remaining space). Type “82” (Linux swap) as the filesystem type.
Move back to the FAT16 partition, move to Bootable and press Enter.
Move to Write, and press Enter (you may have to confirm). Navigate to Quit when it says it’s done.
f) Make filesystems on your freshly partitioned card with the commands
NOTE: If you want to partition your CF with other structure (i.e. the ”/” at the partition ”/dev/hda3”) so you must to set up the file ”/etc/fstab” of your JLiMe.
Downloading and installing Jlime
All the necessary files are located here.
a) Download three files – a userland archive (contains the user interface and the kernel) – a bootloader executable (haret) – a bootloader config file (startup.txt)NOTE: The Download section contains multiple userland archives. If the most recent one doesn’t work for you, try the earlier userlands. This tutorial refers to the userland archive as userland.tar.bz2
b) Mount your CF card Change your working directory to the directory where filesystems are mounted.NOTE: This varies among distributions. It may be for example /mnt or /media. If you’re in doubt, examine /etc/fstab file or consult the documentation of your distribution. This guide will refer to this directory as /mount, but replace it with your value each time if required.
Type the commands below
  mkdir /mount/cf_win
  mkdir /mount/cf_jlime
  mount /dev/sdX1 /mount/cf_win
  mount /dev/sdX2 /mount/cf_jlime
(root privileges required)
c) Change your working directory to cf_jlime:
cd /mount/cf_jlime
Extract the userland (it is assumed that you have downloaded the files to your home directory, but please alter the command if required – the filename also varies among the userlands)
tar jxvf ~/userland.tar.bz2
Change your working directory to /mount:
cd ..
d) Copy files to the FAT (cf_win) partition Copy the appropriate bootloader and configuration file to the FAT partition of your CF card. Change shlo.exe and shlo.txt to your architecture-specific files:
  cp ~/haret.exe cf_win/
  cp ~/startup.txt cf_win/
Copy your kernel file from the userland archive to the FAT partition:
cp cf_jlime/boot/zImage cf_win/zImage
Unmount both partitions:
umount cf*
(root privileges required)
Booting
Put the card into your Mobilepro. Let Windows CE boot. Tap Start, Run and Browse. Find the storage card and double tap your bootloader’s name. Confirm, then wait a short while, and JLiME should boot.
HINT: You can skip the Windows CE startup wizard by pressing the Windows key to bring up the start menu, and using the arrows and tab buttons to navigate through the run dialog.
Have fun 🙂
JLime Development
NEC MobilePro 900C
Leveraging the existing kernel + userspace to piece together some of the configuration used in the initial compilation.
uname -a Linux mobilepro9xx 2.6.24-jlime #3 Tue Feb 19 23:06:52 CET 2008 armv5tel unknown
ls -lsah /lib/libc.so* libc-2.5.so
cat /proc/version Linux version 2.6.24-jlime (kristoffer@Wolverine) (gcc version 3.4.5) #3 Tue Feb 18 23:06:52 CET 2008
grep -rn “gcc” libgcc_so.so.1 /opt/jlime/build/arm/work/arm-linux/gcc-4.2.2-r6/gcc-4.2.2/build.arm-linux.arm-linux/gcc (lots more here, might need it later)
Reading a userspace binary with readelf: ELF Header: Magic: 7f 45 4c 46 01 01 01 61 00 00 00 00 00 00 00 00 Class: ELF32 Data: 2's complement, little endian Version: 1 (current) OS/ABI: ARM ABI Version: 0 Type: EXEC (Executable file) Machine: ARM Version: 0x1 Entry point address: 0x1c02c Start of program headers: 52 (bytes into file) Start of section headers: 705496 (bytes into file) Flags: 0x202, GNU EABI, software FP, Size of this header: 52 (bytes) Size of program headers: 32 (bytes) Number of program headers: 6 Size of section headers: 40 (bytes) Number of section headers: 27 Section header string table index: 26
Extracted the kernel config from the running machine(!) via /proc/config.gz << LINK TO FILE RETRIEVED FROM MACHINE >>
Using an Ubuntu 20.04 system to work on this, for now.
Create QEMU Image
Unfinished – WIP
qemu-img create m900c.img 2G
fdisk create first partition as Linux, max size. Note, this won’t be compatible with the CF card for booting on the physical device, but that is OK right now.
Scan for partitions: losetup --partscan --show --find m900c.img /dev/loop11 on this system, so format this partition as ext3
Since we only created the first partition (ignoring the FAT16 requirement for the mp900c device, we can format the first partition: mkfs -t ext3 -L m900c.img /dev/loop11p1
Mount it: mount /dev/loop11p1 /mnt/m900c
Unpack the userspace archive into this image: cp icewm-image-Henchman-04.14.08.tar /mnt/m900c/ ; cd /mnt/m900c tar xvf icewm-image-Henchman-04.14.08.tar ; rm icewm*.tar
Make a backup of the m900c.img as an ‘original’
Booting Up in QEMU
So far this is a little bit of a bish bosh using an old kernel that works with machine type versatilepb. I have not been able to get an Intel PXA255 CPU based machine to boot with the kernel for the mp900c nor this one, so for now, just to get the userland area making progress, this is where I’m at.
Missing kernel modules, slightly incorrect kernel (but should be code compatible), and no X windows operation yet, but we have a partially operating emulated environment:
Once I get Linux running on the real device, I should be able to make a little more progress in comparing the environments.
QEMU – Jornada6xx SH3 Architecture
Identifying the state and usefulness of the artifacts that still exist may help in reconstructing the old dev environment. This looks to be heavily sh3 (MIPS?) focused and not the Intel XScale ARM MobilePro 900C.
Getting things running
Some good news, I’ve been able to boot the kernel and the small disk. Sure enough, it’s Jornada SH3 (SH4) based, but if I can get a working model here, with compilation, then maybe I can rebuild some of the missing components for the ARM version.
disk_small.img – not really sure what this is, so let’s try to mount it. It won’t mount straight up, so we need to figure out the structure:
disk_small.img: DOS/MBR boot sector; partition 1 : ID=0x83, active, start-CHS (0x0,1,1), end-CHS (0x130,3,32), startsector 32, 39008 sectors\012- DOS/MBR boot sector\012- (Lepton 2.x), scale 0-0, spot sensor temperature 0.000000, unit celsius, color scheme 0, calibration: offset 0.000000, slope 0.000000\012- data
fdisk -lu ./disk_small.img
Disk ./disk_small.img: 29.3 MiB, 30720000 bytes, 60000 sectors
Units: sectors of 1 * 512 = 512 bytes
Sector size (logical/physical): 512 bytes / 512 bytes
I/O size (minimum/optimal): 512 bytes / 512 bytes
Disklabel type: dos
Disk identifier: 0x000e7f66
Device Boot Start End Sectors Size Id Type
./disk_small.img1 * 32 39039 39008 19M 83 Linux
We can see the following:
block-size of 512 bytes and the start-block is 32.
The offset is 512 * 63 = 16384.
From here, we can mount starting at the offset of 16384 with the command:
mount -o loop,offset=16384 disk_small.img /mnt/disk_small/
Success! we now have the root filesystem for what is either the qemu environment, or a disk image used in the development of JLime. I’m unsure if this is actually deployed to the devices, but it’s progress. Unfortunately, it seems to be the development tree for the Jornada 6xx, as I can see the ipkg architecture is sh3, and jornada6xx, with the hostname as jornada6xx, and the available boot image/kernel being sh3. While this will not run directly on the mp900c, I’m sure this will be helpful to someone
WinCE is contained within a Flash ROM chip which means that you can remove WinCE by reflashing your device. However, so far nobody has created a flashable bootloader and/or linux kernel. There is an effort to port u-boot to the MobilePro 900 that supports booting from the CF card so the Linux kernel and userland can be stored there.
What WiFi PCMCIA cards are supported by the MobilePro 900?
Unfortunately, the MobilePro 900 only supports 16-bit PCMCIA devices so your choices are limited. There Linux kernel has support for Wifi cards based on the Atmel at76c50x chipset, like the the Belkin F5D6020. It is still not clear if the PCMCIA interface is fully supported and working with the latest jlime kernels, more testing needs to be done. Any PCMCIA card that meets the “PC Card Type II” interface spec is a 16-bit card. If it says that it is a “CardBus” card, then it is 32-bit and will never be supported on the MobilePro 900. When the USB host port support is finished, then we’ll be able to use more advanced USB based Wifi access devices like the Alfa AWUS036H which gives us 802.11 b/g support. There is still hope that netstumbler/kismet/aircrack-ng will work on the MobilePro 900 someday.
Where can I get a serial cable adapter for the MobilePro 900?
You can’t. I have contacted NEC and they do not have any stock left. The retailers online that have stock want $200+ for them. I haven’t seen one on eBay in over a year of checking. And to add insult to injury, the connector for the data port on the MobilePro 900 is a non-standard, unknown connector with no known part supplier so we can’t build our own.
Development
Windows CE / Embedded C++ 4 on XP
Windows CE 4.2 Emulator Error in a VM
When evc4.0 and SP4 are installed, the system prompts “Virtual PC/Windows CE emulator will cause Windows instability. Program Unable to load “. The reason for going to Microsoft’s website is: when hardware-based Dep (hardware-based Data Execution Protection) is enabled, the driver protection mechanism of Windows XP SP2 does not allow Loading virtual PC/Windows CE emulator Driver (vpc1_v. sys), the Microsoft official website also provides a solution, the original article is as follows: You install Microsoft Windows CE 4.x emulator on a computer that is running Microsoft Windows XP Service Pack 2 (SP2 ). the computer has Data Execution Prevention (DEP) hardware. you receive the following error message when you restart your computer:
Devices or applications disabled
‘Virtual PC/Windows CE emulator’ will cause Windows to become unstable. Windows has prevented these drivers from loading. You may also receive the following error message when you try to start Windows CE 4.x emulator:
Emulator for Windows CE
One or more files from the emulator for Windows CE installation is missing. please reinstall emulator for Windows CE and try again. to resolve this problem and to run window ce 4.x emulator, disable hardware-based Dep on your computer that is running Windows XP SP2. to do this, follow these steps: 1. click Start, click Run, type sysdm. CPL, and then click OK.
In the System Properties dialog box, click the Advanced tab.
Under START and recovery, click Settings.
In the startup and recovery dialog box, click Edit.
Disable PAE mode by removing the/PAE option if it exists.
Remove the/noexecute option if it exists.
Add the/execute option.
On the File menu, click Save.
To exit notepad, click exit on the File menu.
To close system properties, click OK two times.
Restart your computer. In fact, it is to modify the boot. ini file and remove the/noexecute and/PAE options. Add/execute, restart the computer, and then install EVC. My boot. ini file is modified as follows:
[Boot loader] Timeout = 5 Default = multi (0) disk (0) RDISK (0) Partition (1) \ WINDOWS [Operating systems] Multi (0) disk (0) RDISK (0) Partition (1) \ Windows = “Microsoft Windows XP Professional”/execute/fastdetect
Emulator will run fine. Still showing a networking issue, but I haven’t looked into it yet.
The MIST board was designed to implement classic 16 bit computers like the Amiga, Atari ST(E) or the Apple Macintosh (and even early 32 bit computers like the Acorn Archimedes) as a System-on-a-Chip using modern hardware. But it equally well supports 8 bit systems like the Atari 800/XL, ZX81, ZX Spectrum, C64, Atari VCS, Atari 5200, Colecovision, Apple II, Sega Master System, Nintendo Gameboy, Nintendo NES, Odyssey2 plus others and 16 bit consoles SNES, Genesis/Megadrive, PC Engine. It also supports over 100 Arcade games!
adding networking hardware for Amiga. Note, this won’t work with 1.4 of the device, as they removed the UART/SERIAL holes.
Atari ST
Setting up the SD Card
adding the core, and files, and rom images
Setting up and using Hardfiles on the SD Card
creating and adding hardfiles, then setting them up in the ST for software
Useful Downloads
HDDSETUP.st – Atari ST Floppy Image that contains the AHDI 6061 HDD setup files, to enable you to format/use an SD card as a HDD, or hardfiles as HDDs with the MiST. I cannot seem to find this anywhere else. Hard drive setup floppy disk image.
Empty Hardfiles here
Commodore Amiga
Setting up the SD card
adding the core, files, and rom images
Setting up and using Hardfiles on the SD Card
creating and adding hardfiles, then setting them up in the Amiga for software
Using the T5730 as a small retro gaming machine is possible, but not without caveats. It also performs best with early XP era games, but it requires a storage upgrade. It would benefit from a CPU and RAM upgrade too.
Introduction
What is it?
It’s an AMD Sempron (K8) 1GHz processor on an AMD 690G chipset, with 512MB RAM and 1GB IDE (44 pin) flash storage, in a small form factor. AKA a Thin Client.
The processor is removable/upgradable and is running without a fan.
The RAM is a DDR2 800MHz SO-DIMM but is under-clocked due to the RAM speed being a divisible of the CPU clock multiplier.
The storage is a 1GB 44 pin IDE flash/DOM module.
It’s well loaded with ports:
USB 2.0
2 front
2 ‘secure’ internal (need screwdriver to access, thus ‘secure’)
4 rear
PS/2 keyboard
PS/2 mouse
Video – dual monitor
VGA
DVI-I (analogue DVI, so you can use a VGA to DVI adapter)
DC input (19V ** double check this **)
Gigabit ethernet
It actually has an internal speaker, that the digital audio (not just PC speaker) defaults out from
Headphone jack on the back
9 pin serial port!!! Handy for you console cable users.
It comes factory baked with an XP Embedded install, with customizations from HP. This works pretty good, especially when you hit log-off holding the left SHIFT key, then logging in as Administrator (password Administrator).
Windows XP SP3
A ‘lite’ or netbook version installs into the 1GB flash no issue, but you’re only left with 75MB of storage after installing all drivers. Not really much use, except, well, as a thin client.
Windows 98 and DOS
It’s no good for Windows 98SE simply because the X1250 (possibly workable) and the AMD 690G chipset do not have 9x/ME drivers. Pity, as the hardware is not bad, and the default RAM and storage would fit a 98SE/DOS rig well.
Pure DOS isn’t really a viable option due to the lack of compatible drivers for the infamous AC97 sound-card issues.
Hardware Upgrade
upgrading the storage
upgrading the cpu & ram
OS Installation
Installing the HP Restore/Factory Image
If you go to install the HP XP Embedded image from the HP website (or below) and get the error – ***ERROR*** The system does not have license for the image OS! it is a simple fix.
If you feel nostalgic for a bit of Windows 9x action, or you just want to play some old games that are between DOS and Windows XP, you can either build a retro PC gaming rig, or you can test the water with VirtualBox.
Once it’s all done, you too can see how pointless it all is. 🙂
Update March 2019: Due to popularity of this post, I’ve run through this again on OSX with Virtualbox 6. I’ve also added some new content and will continue to do so.
Boot with your 98SE ISO mounted (you’ll have to find this yourself)
Boot with option 2 – Start computer with CD-ROM support
Run fdisk and accept all the defaults to create an 8GB partition on your virtual drive.
Restart the virtual machine
Boot with option 2 – Start computer with CD-ROM support
Format the virtual drive using format on the Windows CD
D:\win98\format c:
Run: D:\setup.exe /ie /im /is /nr
/ie Disables create a boot disk (causes crashing on VBox and 98SE installer)
/im Disables checking conventional RAM
/is Disables scandisk
/iv Don’t disable billboards
/nr Disable registry check
Run through the Windows installer with all the defaults
After reboot – Boot from Hard Disk
Enter your name and the CD key for Win98SE (DMWRC-T9XP4-GJ2P8-26G66-V9WBB); install will continue.
If everything went well, you should see Windows 98 desktop and hear some tragic music. 🙂
I recommend that you take a snapshot of the VM and call it “BASE INSTALL”
Install Video Driver
Shutdown Windows (and the VM)
Edit Settings of the VM -> Storage -> Add another device to the IDE controller (click the CD with the green plus) and mount the scitech-display-doctor-7.iso file you downloaded earlier.
You should see a CD drive with Sdd7 – double click that then run the scitech-display-doctor-win-7.0 installer – Express installation is fine.
Register the Sci-Tech Display driver with either the name/serial in the text file on the mounted ISO, or use:
Name: CSCKnight
Serial: 0B5E-12B4-A8A4-0B
OS will restart, when it returns, SciTech Display Doctor will load. Either register it or start the 21 day trial.
On the HOME page, underneath Current Configuration, there is a section called Active Features. Click ‘Disabled’ next to SciTech Display Driver then select SciTech Nucleus Driver and apply.
OS will reboot again (remember how annoying this used to be?)
SciTech reloads and you’ll see that VESA VBE 2.0 Oracle VM VirtualBox VBE Adapter is now selected.
Once the SciTech window returns; click the ‘Monitor not selected!’ link and choose SuperVGA 1600×1200, then reboot Windows.
Once back into Windows after the reboot; right click Desktop then Properties then Settings
Here you should see Default Monitor on SciTech Display Doctor 7.0
Click the monitor model, and select Super VGA 1600×1200. (Strangely, I wasn’t able to pick anything higher than 1024×768, so select that, it’ll make you reboot. Once you return, go back into the settings, and you’ll now see 1600×1200 32bit)I’ve had issues trying to change resolution at the same time.
I’ve also had issues when the restart didn’t work – if so, restart the VM yourself – no need to go into safe mode, it should boot the second time OK.
Right click Desktop -> Properties -> Settings; now you can select 1600×1200 32bit True Color no problem.
Reboot one more time to be sure.
Hello accelerated Windows desktop!
Take another VM snapshot and call it something like “Display Driver Installed”
Configure for basic Internet access (NAT)
This will allow you to access the Internet, albeit in a basic and broken way.
Start -> Settings -> Control Panel -> Internet Options -> Connections -> Setup
I want to set up my Internet connection manually … or local area network (LAN).
I connect through a local area network (LAN).
Accept everything except for setting up a mail account.
Right click the inf file then install; it will ask you for a disk. Just browse to the directory that it was decompressed in, and select the catalog file.
Install Internet Explorer 6
Not a strict necessity, but it’s better than having IE5.
In Explorer/Folder window -> View -> Folder Options -> View
Show all files
Display the full path in title bar
Don’t hide file extensions for known file types
Show window contents while dragging
Smooth edges of screen fonts
Click Apply then Like Current Folder
Install AC97 soundcard
The default VM setting is SoundBlaster 16 compatible. You can use the Windows Midi Synth, but I’ve seen some issues with games. In turn, we can use 9x drivers for AC97. Warning: lots of these drivers don’t work, so use mine.
Shutdown the VM and go into Settings -> Audio, and change the audio hardware to ICH AC97, then boot up the machine.
It will complain about no driver, select find driver and point it at the 0001-VXD_A406\Win95 directory. It will find and install the driver for you without crashing/or no audio, possibly after a reboot. You will also see it installing Realtek SB Emulation.
Should have audio and wavetable MIDI when it returns.
You can test this by running C:\windows\system\dxdiag.exe again.
Install Unofficial Windows 98SE Update Roll Up Pack (pseudo SP3)
Instructions aren’t very good, it will pop up a Windows Help file. You can close this, then it’ll show you the install menu.
Install DirectX 9.0c by itself, it will require a reboot after, then run installer again.
Install Main Updates/System Core Files by itself. When complete, it will return with “Installation is now complete” and reboot, then run installer again (remember close the help window each time).
At this point, I install (all at the same time) (with a reboot at the end):
Adaptec ASPI Layer
Animated Boot Up and Shutdown Logos
DMA for all hard disks
Microsoft Pain Graphic Filters
Microsoft Word 97 SR-2
Performance Tweaks
Remote Desktop Connection
Time Zone Update
TrueType Fonts
Universal Plug-n-PLay
WinTop
Snapshot! Call this “Windows 98SE Updated All Drivers and Clean”
Optional: Install 98SE2ME
98SE2ME will update over 700 of the system files with the newer versions from Windows ME. I don’t personally install it, at this time, but you can read more about it from the installer. http://www.mdgx.com/9s2m/read1st.php
You will need a Windows ME ISO to use this.
Optional: Install KernelEx
KernelEx adds an open source compatibility layer to Windows 98 that will let you run more modern software (like later versions of Opera, Firefox, etc).
I don’t personally have it installed, at this time, but you can read more about it here: http://kernelex.sourceforge.net/
Optional: Install Revolution Pack 9
Revolution Pack makes the 98SE installation look more like XP/Vista. I don’t personally install it, but you can read more about it here: http://rp9.win98.nl/
Info: Resizing Windows 98SE Partition
If you get into a situation where you don’t have enough disk space. You can solve it by extending the virtual disk within VirtualBox, then grow the fat32 partition with gparted live ISO. The only caveat is that you need to remove all snapshots first.
To resize the VDI:
/Applications/VirtualBox.app/Contents/Resources/VirtualBoxVM.app/Contents/MacOS/VboxManage modifyhd –resize <MEGABYTES> <PATH TO VDI>
Then, boot from the gparted ISO.. you should see the total disk size and utilized. Right click the partition and hit resize, then apply. Once it’s complete, Windows 98 should have the extra space available. I would run scandisk just to be sure everything is OK, too.
Software
Games
The biggest problem with VirtualBox and Windows 9x is the lack of Guest Additions. This prevents any hardware emulation for Direct3D.
N – Does not work
Y – Does work
P – Works, with issues.
N – C&C Gold 95
Y – Civilization 2 Ultimate Collection – works perfect (dx5 game)
N – Star Trek: Birth of the Federation 1.0.2 Software Emulation (video)
Applications
Y – Visual Studio 6 Enterprise
FAQ for Running Windows 98SE on VirtualBox
Q: How does Windows 98SE perform on VirtualBox compared to original hardware?A: On VirtualBox, Windows 98SE tends to offer stable performance and improved compatibility for legacy software and games, thanks to modern hardware resources and VirtualBox’s emulation.
Q: Can I access modern web content on Windows 98SE via VirtualBox?A: Accessing modern web content is challenging due to outdated browsers and security in Windows 98SE. Solutions involve using proxy services or specialized legacy browsers.
Q: Is it possible to adapt this setup for other legacy operating systems like Windows 95 or ME?A: Yes, but it requires specific adjustments related to installation, drivers, and compatibility settings to ensure functionality.
For more detailed guides and discussions, visiting forums like VirtualBox Forums and communities dedicated to retro computing can provide additional insights and technical support.


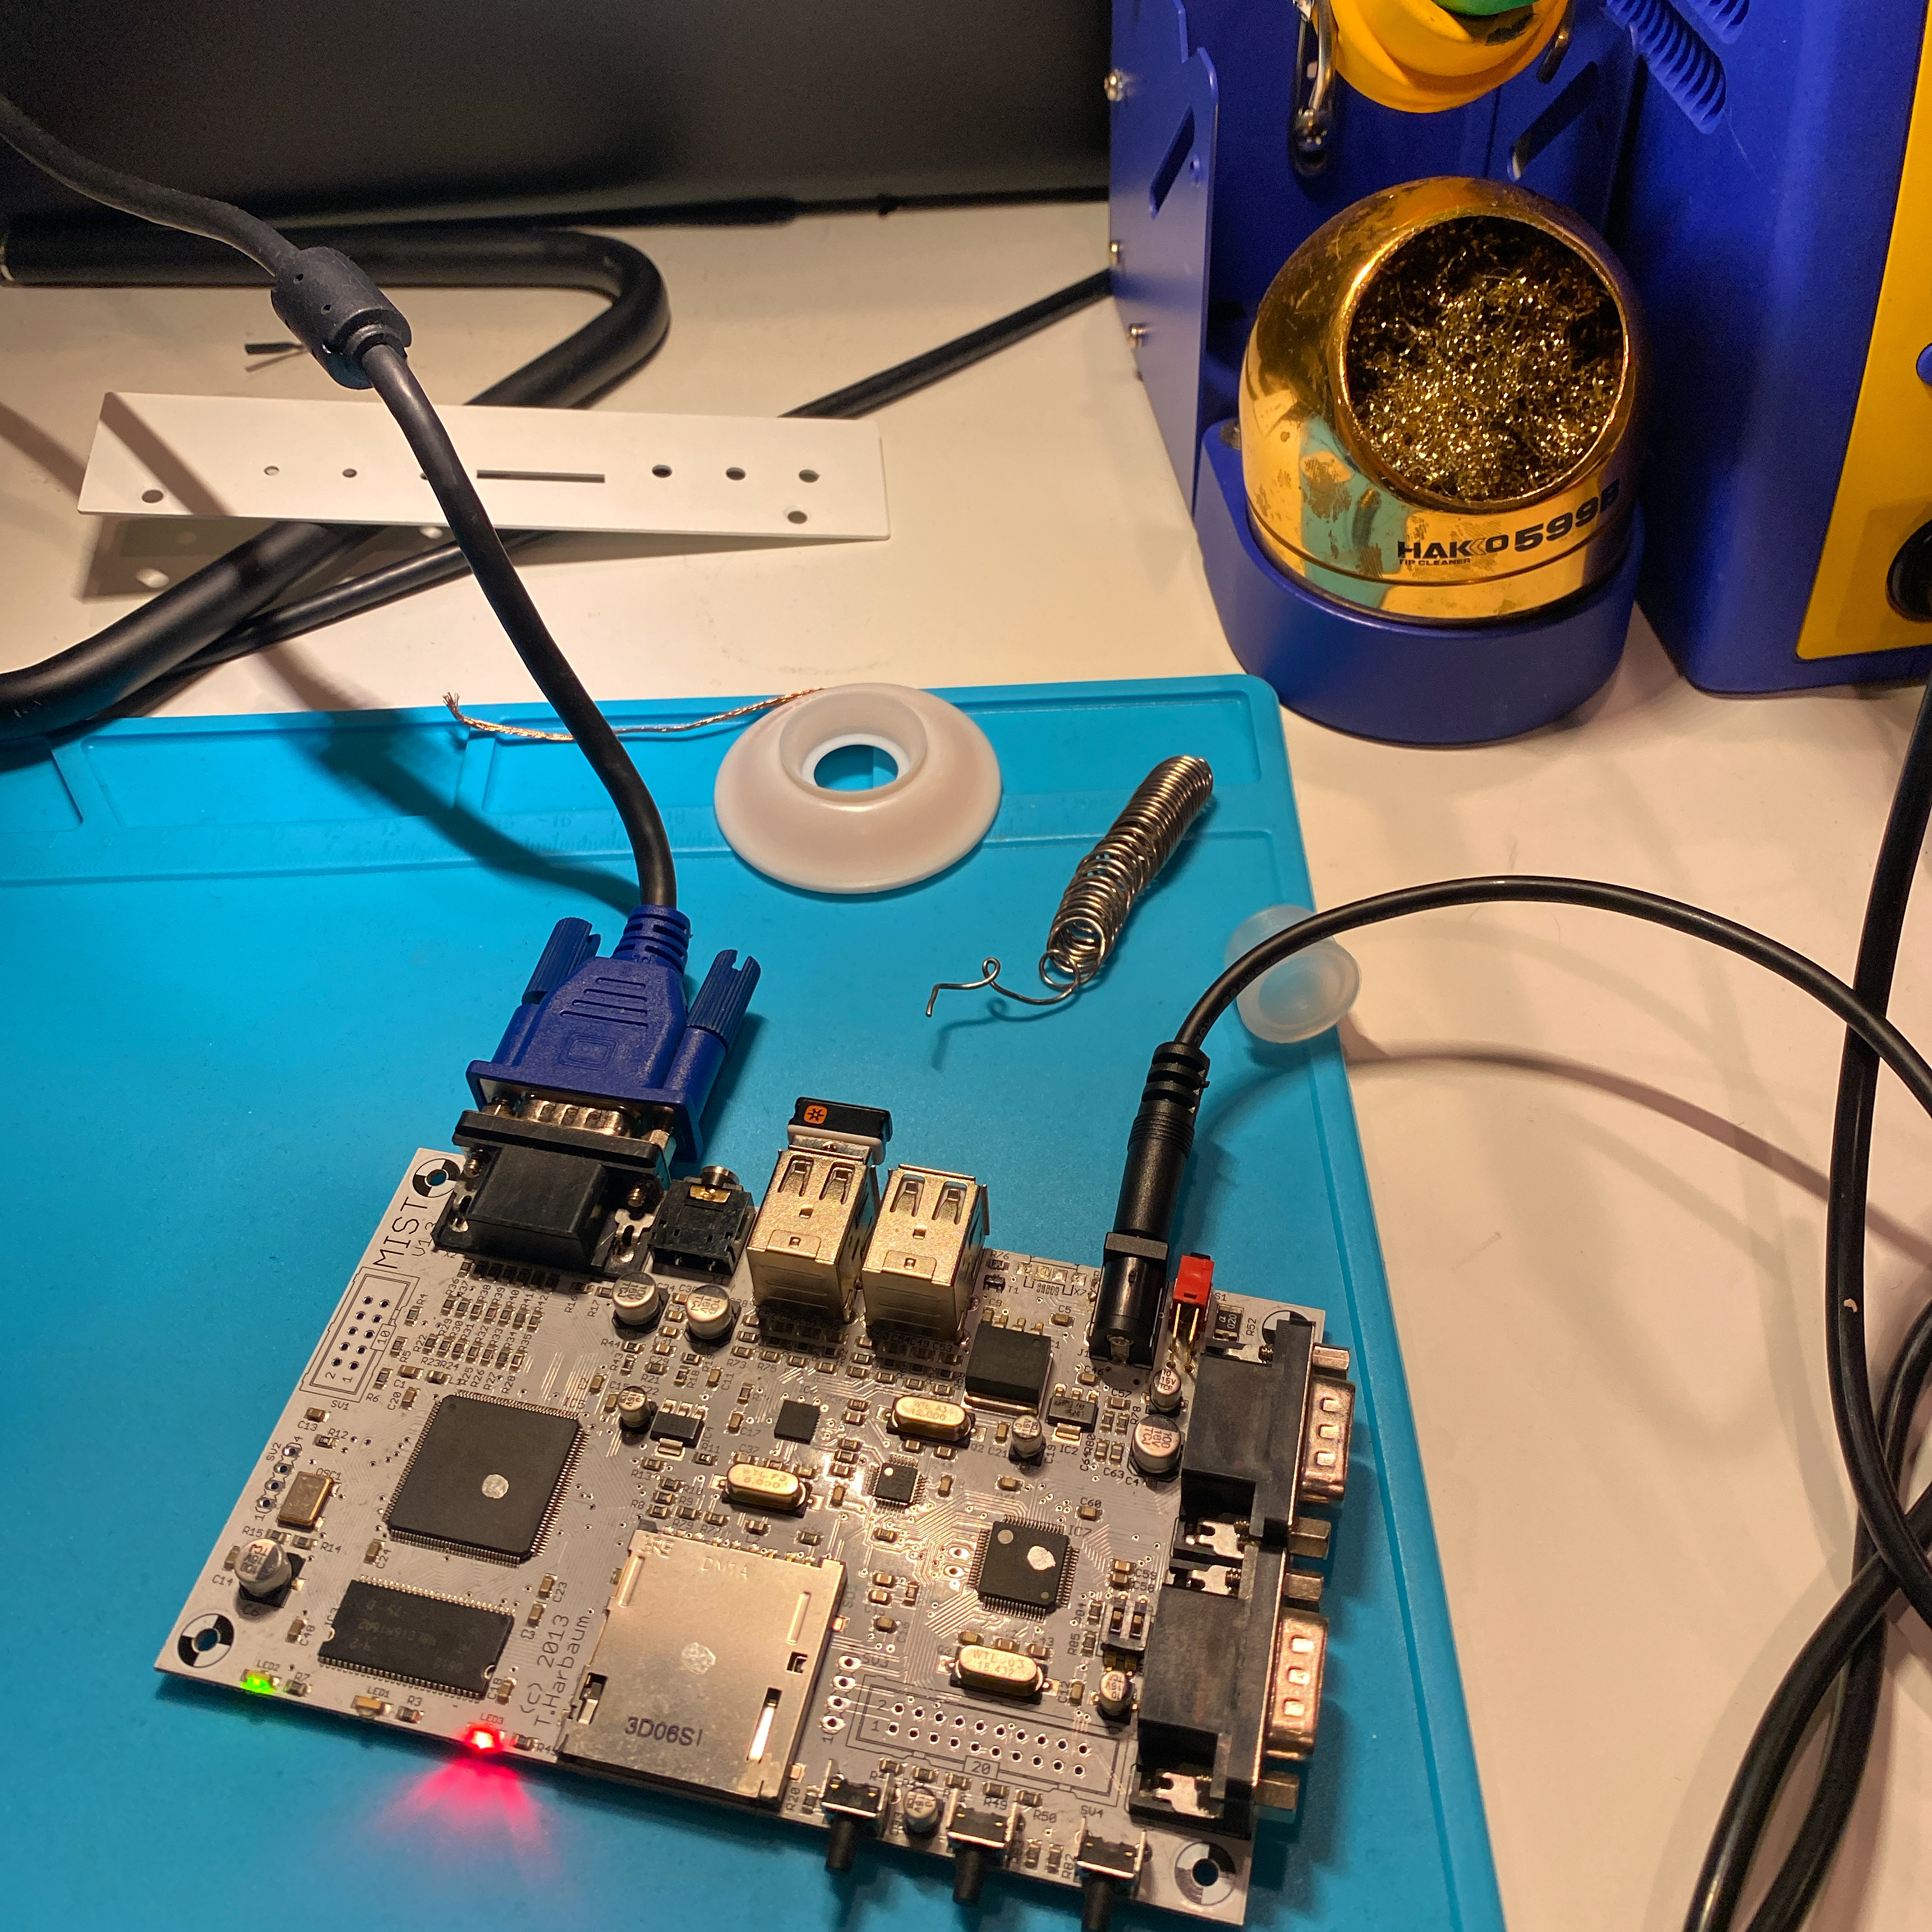
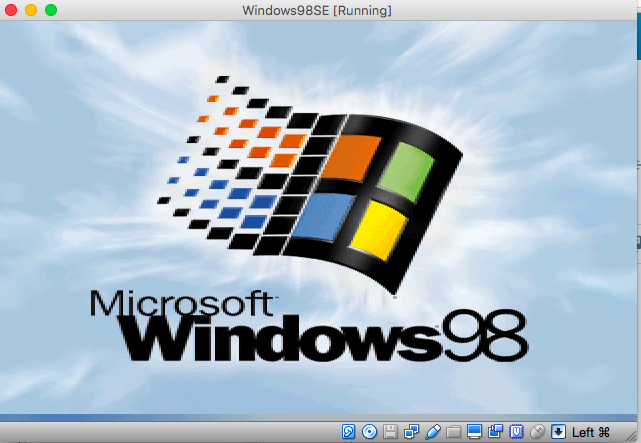
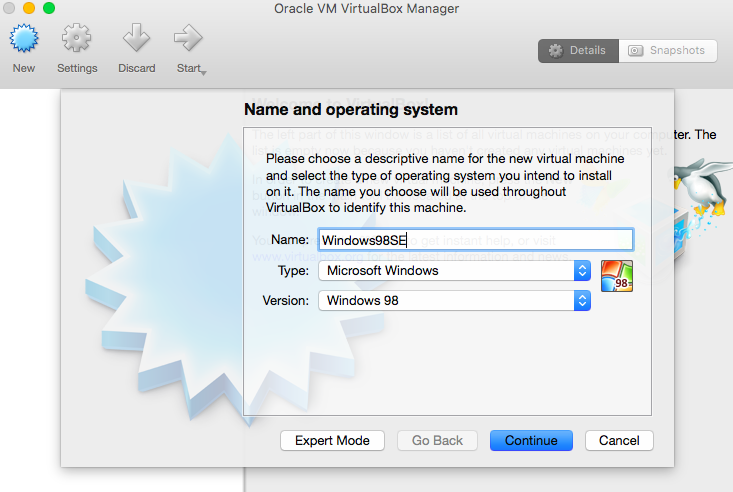
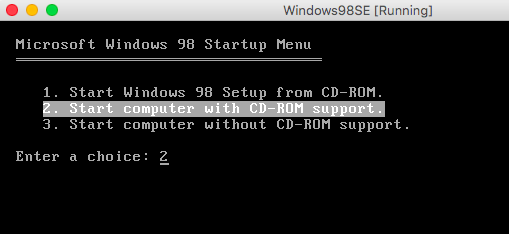


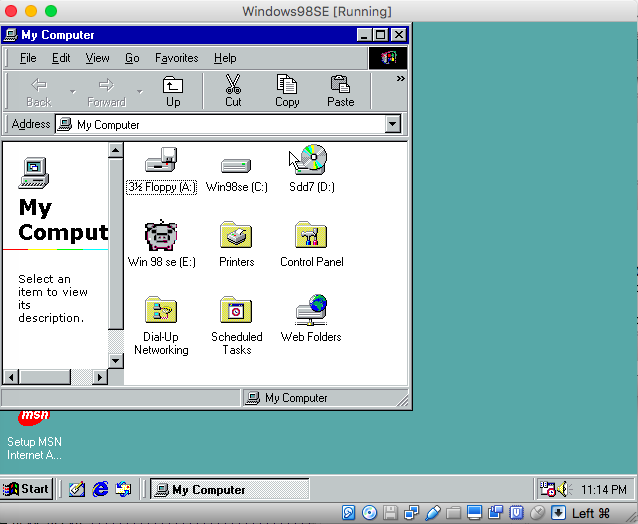
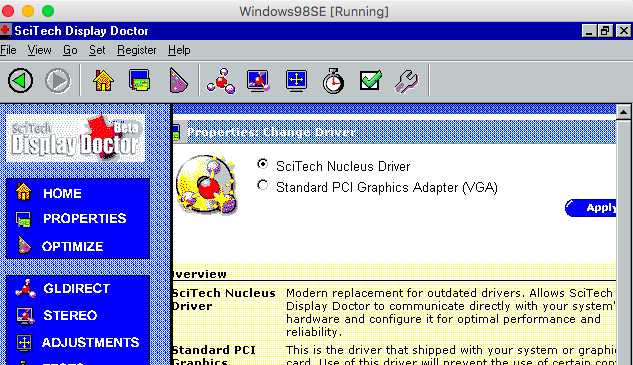


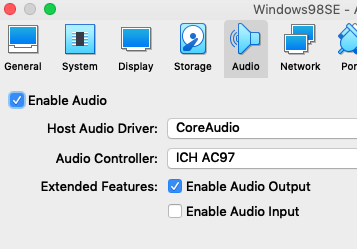


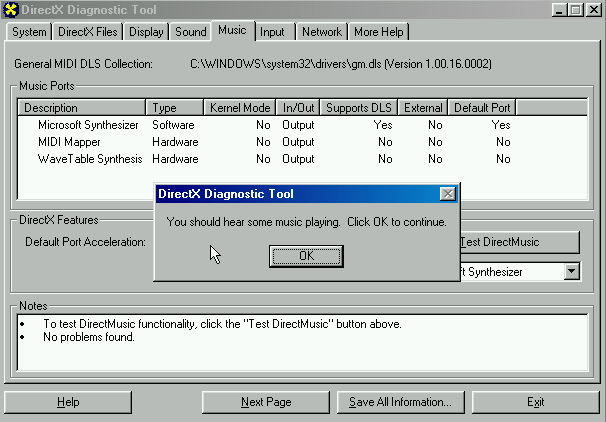

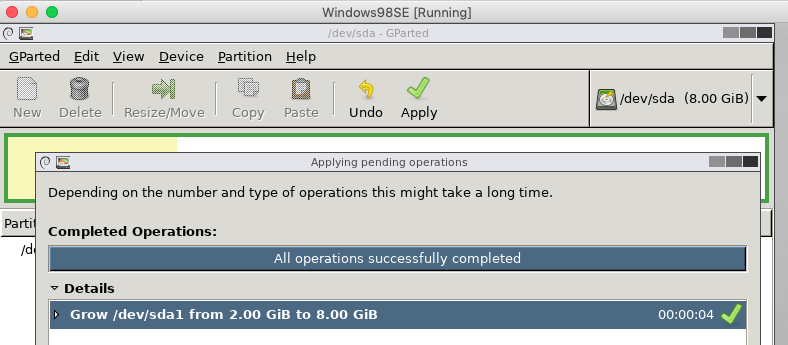
