
The Garden Shed
A Community Newsletter published by the Piedmont Master Gardeners
June 2017 - Vol. 3 No.6


For comments, questions or suggested topics for future Garden Shed articles contact us at: garden-shed@piedmontmastergardeners.org.
If you have specific gardening questions or need help to solve a gardening problem, our Horticultural Help Desk is a free community resource and can be contacted at 434-872-4583 or by email: albemarlevcehelpdesk@gmail.com.

Who We Are
We are members of the Piedmont Master Gardeners, which simply means we have all been trained to share the scientific expertise of Virginia Tech and the Virginia Cooperative Extension Service. More important, we are your friends and neighbors with a passion for gardening – and learning more about it. MORE
Table of Contents
Recipe of the Month
Colorful and nutritious, thinly shaved beets are a delicious and elegant alternative to chunky salads.
Tasks and Tips
Keep the June garden looking interesting as summer heat and humidity sets in.
In the Ornamental Garden
This native shrub offers an antidote to many landscaping problems.
Blackberries Part 2-Diseases
In the April 2017 issue we talked about starting a blackberry patch: environmental requirements, selecting varieties, planting and harvesting. This month we will continue our discussion on potential diseases that may invade your blackberry patch. There are a number of diseases that can attack blackberries. Knowing what to look for is the first step in controlling problems that may arise in the blackberry patch.
Blackberry Diseases:
Anthracnose is the result of a fungus that attacks the leaves and canes of the plant. You may first notice spots on leaves and/or canes. In late spring, the spots on the leaves are small with gray centers and purple margins. Leaf infection rarely causes defoliation, but the spots enlarge and become oval in shape and sunken. The infected tissue may eventually drop out and give the leaf a shot-hole appearance. On the canes, anthracnose symptoms first appear as small purplish spots on young canes (primocanes) and spurs. The spots enlarge and develop rather conspicuous borders (dark in color) with gray centers. In general, fruit on infected canes ripens abnormally. Infected canes may become girdled or cracked, causing either decline or death. If the planting is seriously infected, anthracnose is best controlled by removing and destroying all canes during the spring pruning.

Blackberry cane lesions caused by the fungal disease Anthracnose. Photo Credit: Phillip M. Brannen, Plant Pathology Department, University of Georgia.
Cane Blight – This disease is caused by the fungus, Leptosphaeria coniothyrium, which sporadically attacks canes of all Rubus species. Cane blight usually affects only canes that have been wounded in their vegetative year. All symptoms of cane blight occur in close association with wounds. Infection occurs in late spring or early summer through pruning — especially large pruning cuts — and insect wounds. In the spring, buds fail to break dormancy, lateral shoots wilt, or fruiting canes die when the fruit begins to ripen. Canes are usually brittle at the point of infection, and may break if bent. Symptoms appear late in the season on new shoots where plants have been pruned. Infected areas are brownish purple and develop from the cut ends. Branches originating in the infected areas wilt and die. Fruiting canes show a sudden wilting of branches when the fruit begins to ripen. Weakened canes are more susceptible to winter injury.
Symptoms of cane blight. Following infection, dead and dying floricanes are observed in the spring and summer. Dead canes may have a silvery to gray appearance.

Blackberry Cane blight. Photo Credit: Department of Horticulture Science, N.C. State University
Septoria Leafspot is caused by a fungus – Mycosphaerella rubi. The symptoms are similar to anthracnose leafspots. Spots tend to remain small with light brown or tan centers. Tiny black specks visible with a hand lens develop in the centers of leafspots. Chemical control is not usually necessary.

Septoria Leafspot on Blackberry Leaf. Photo Credit: Paul Bachi, University of Kentucky and Education Center, Bugworld.org
Rosette (fungus – Cercosporella rubi): This disease is also called double blossom or “witches’ broom.” Symptoms appear in the spring as bunches or clusters of foliage at terminals or along fruiting canes. Flower buds are larger and redder than normal. Petals may be purplish, and sepals are much elongated. Infected flowers do not set fruit. Control rosette by removing infected canes as soon as they become noticeable. Destroy all wild berry plants in the vicinity. Remove and burn all fruiting canes soon after harvest and keep plants adequately spaced for good air circulation. Where heavy infection has occurred, mowing all canes to the ground may be necessary.

Blackberry Rosette Disease. Photo Credit: Department of Horticulture Science, N.C. State University
Verticillium wilt causes the leaves to turn yellow, starting at the bottom of the canes and progressing upward. Infected canes are stunted and eventually wither and die.
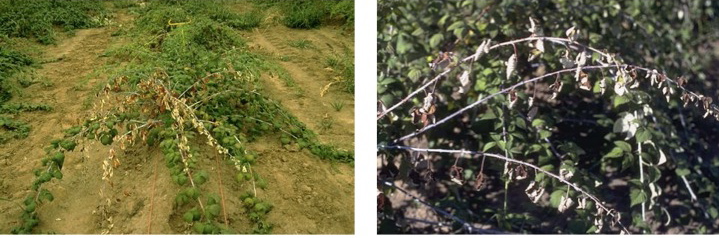
Verticillium wilt. Photo Credits: Bernadine C Strike, University of California & Natural Resources.
Phytophthora Root Rot The fungi that cause Phytophthora root rot live in the soil and occur under wet and poorly-drained soil conditions. Blackberry plants that have wet feet are often predisposed to Phytophthora root rot. Excess water not only promotes susceptibility of roots to this disease, but also aids the fungus in moving to new infection sites.
Symptoms
Disease symptoms may first become noticeable in the spring, initially occurring in areas of the planting that are low or poorly drained. Foliar symptoms can include marginal browning, red or purple coloration, and/or chlorosis. Off-color leaves may also be smaller than normal. Infected plants show low vigor, developing fewer canes than usual; the canes that are produced may be weak and stunted. Stressed plants become more susceptible to other diseases, as well as to winter injury. Severely infected plants collapse and die. None of these symptoms alone are definitive for Phytophthora root rot since other factors, such as prolonged flooding or canker diseases, can result in similar symptoms. Diagnosis requires a careful examination of the main roots and crown of dying (not yet dead) plants. The tissue beneath the root epidermis or bark is white on healthy roots, while a typical reddish-brown discoloration is evident with Phytophthora-infected roots. Often a clear line of demarcation can be observed between diseased and healthy portions of the root. A laboratory test is often required to confirm the presence of Phytophthora.
Did you know that the Extension Office can send a sample from your infected plant to the plant pathologists at Virginia Tech, who will then send you a report with their diagnosis? If you’re interested in this, contact the Help Desk first to find out how to prepare your sample. You can call (434) 872-4580 or email: albemarlevcehelpdesk@vt.edu. The Extension Office is located at the Albemarle County Office Building on 5th Street Extended, 2nd floor. Find out more at piedmontmastergardeners.org/contact.

Photo Credit:Phillip M. Brannen Plant Pathology Department University of Georgia
Orange rust is also a concern on blackberries. In the spring, the undersides of the leaves are covered with bright orange fungal growth. Unlike all other fungi that infect blackberries, the orange rust fungus grows “systemically” throughout the roots, crown and shoots of an infected plant, and is perennial inside the below-ground plant parts. Once a plant is infected by orange rust, it is infected for life. Orange rust does not normally kill plants, but causes them to be so stunted and weakened that they produce little or no fruit. Key control methods are cultural practices such as removing infected plants early in the spring and eradication of any wild blackberry plants growing near the planting.
Symptoms
Orange rust-infected plants can be easily identified shortly after new growth appears in the spring. Newly formed shoots are weak and spindly. The new leaves on such canes are stunted or misshapen and are pale green to yellowish. This is important to remember when one considers control, because infected plants can be easily identified and removed at this stage. Within a few weeks, the lower surface of infected leaves are covered with blister-like pustules that are waxy at first but soon turn powdery and bright orange. This bright orange, rusty appearance is what gives the disease its name. Rusted leaves wither and drop in late spring or early summer. Later in the season, the tips of infected young canes appear to have outgrown the fungus and may appear normal. But appearances can be deceptive! At this point, infected plants are often difficult to identify. In reality, since the plants are systemically infected, the infected canes will be bushy and spindly in future years, and will bear little or no fruit.

Orange rust on Blackberry leaf. Photo Source: N.C. State University
Crown Gall (Agrobacterium tumefaciens): Wartlike growths (galls) appear on the roots or crowns of infected plants. Galls may range in size from that of a pinhead to several inches in diameter. Plants are weakened and yield dry, poorly developed berries. Galls are caused by bacteria present either in the soil or on planting stock. The bacteria enter the plant only through wounds or growth cracks.

An example of crown gall. Photo Credit: N.C.State University
An on-line blackberry diagnostic tool developed by N.C. State University can be found at the following link: https://projects.ncsu.edu/project/berries/diagnostic_tool/roots_and_crown/crown_and_roots_have_galls.php.
The key to controlling diseases in your blackberry patch is sanitation. The following suggestions will improve your chances of a healthy blackberry patch and improve your chances of producing a more bountiful harvest.
- Avoid “wet feet” by selecting a well-drained location. Consider a raised bed to reduce the likelihood of root diseases.
- Select disease-resistant varieties.
- Only disease-free plants should be planted. Before planting, inspect all plants and cut off and burn any old or diseased stems.
- Remove as many wild blackberries growing nearby as possible. The folks at the Tennessee Agricultural Extension Service recommend a minimum distance of 300 feet.
- If cane diseases become a problem, cut all plants at the soil line and destroy. For varieties with a double blossom, cut canes back to 12 inches above the ground immediately after harvest.
- Remove all old canes soon after harvest.
- Keep the blackberry patch free of weeds. Weed removal allows good air circulation, which helps reduce conditions favorable for disease development.
Blackberries are a wonderful garden addition. With a little care, a properly established blackberry patch will provide you with years of fresh gourmet and healthy treats.
Thanks for joining us in The Garden Shed. We look forward to your visit next month.
SOURCES:
“Small Fruit in the Home Garden,” https://www.pubs.ext.vt.edu/426/426-840/426-840.html
“Field Identification and Management Strategies of Common Diseases in Blackberry Production,” https://extension.missouri.edu/greene/documents/Horticulture/Blackberry/BlackBerryDisease16.pdf
“Cane Blight of Blackberry,” http://extension.uga.edu/publications/detail.cfm?number=C894
“Blackberries,” https://galveston.agrilife.org/files/2012/03/Fruit-Nut-Production-Blackberries.pdf
“Management of Important Blackberry Diseases in Arkansas,” https://www.uaex.edu/publications/PDF/FSA-7563.pdf
“Rosette (Double Blossom) of Blackberry,” https://www.ars.usda.gov/ARSUserFiles/5276/BlackberryRosetteInformation.pdf
“Cane Diseases of Brambles,” http://plantclinic.cornell.edu/factsheets/canediseasesbrambles.pdf
“Diseases of Small Fruits,” https://ag.tennessee.edu/EPP/Redbook/Small fruit diseases.pdf
“Blackberries and Raspberries in Home Gardens,” https://extension.tennessee.edu/publications/Documents/SP284-C.pdf
Virginia Sweetspire
What characteristics define the “perfect” shrub for your landscape? Should it be native? Deer-resistant? Drought tolerant? A source of nectar for pollinators? Low-maintenance? Attractive in more than one season? If you answered yes to any or all of these, then Itea virginica or Virginia sweetspire may be just the plant for you.

Virginia Sweetspire in Late Spring
This tough, highly adaptable shrub is native to the United States in USDA zones 6 – 9 from New Jersey to Florida on the Atlantic coast, extending westward throughout the Mississippi River Valley to southern Illinois. In the wild, Virginia sweetspire can be found growing in wetlands, along stream beds and along the margins of lakes and ponds. In the urban landscape, this versatile shrub provides multiple seasons of interest, making it a particularly valuable addition to the ornamental garden.
DESCRIPTION
Virginia sweetspire is an upright or mounded, thickly branched, deciduous shrub with gracefully arching branches. It provides nesting and shelter for wildlife as well as food for bees, butterflies and moths. In the urban landscape, this mid-sized shrub grows 3 to 5 feet tall and has a spreading growth habit. In the wild, it may grow taller and leggier, particularly in moist or shaded sites.
This shrub has three seasons of interest. In late May and June, it is covered in a blanket of 5 to 6 inches long, white, sweetly scented, catkin-like “spires” (thus, the plant’s common name). Lasting for several weeks, the fragrant and graceful flowers are a magnet for bees and butterflies. Depending on the cultivar, the blossoms may either be held upright or cascade gracefully over the foliage. The flowers are produced on last year’s growth (old wood).

Closeup of Virginia Sweetspire Flowers
In summer, the floral display is replaced with rich, medium to dark green foliage, which makes the shrub an attractive choice for foundation plantings. The attractive, lustrous leaves are alternate, simple, toothed, elongate, and 1 to 4 inches long.
In autumn, the foliage changes from its rich green summer color to stunning, long-lasting shades of deep red, purple, orange, and yellow. While the floral display in late spring is attractive, it is the rich autumn color that makes this plant especially valued in the landscape. The fall colors vary, depending on sun exposure. Full sun exposure produces the most vibrant fall color.
While it would be nice to say that Virginia sweetspire is the “perfect” shrub for the landscape, it does have one downside — a tendency to sucker. The mother plant produces shoots from the root system that may develop into a colony of slender stems over time. The better the growing conditions, the more it suckers. If grown in drier sites with heavy clay soil, it suckers less vigorously than it does in rich, loamy soil with plenty of moisture. Depending on how you use it in the landscape, the suckering nature of this plant can be viewed as either a positive or a negative attribute.
CULTURAL REQUIREMENTS
Virginia sweetspire is a low-maintenance shrub recommended for medium acid soils with a pH of 5.0 to 6.5 and above. Alkaline soils can cause the foliage to be yellowish (chlorotic) due to a lack of available iron. It prefers moist, well drained to wet soil. Although it is categorized as a wetland species, it thrives just fine with average moisture conditions and can even tolerate droughty conditions. Just keep it well watered the first year to help it become well established. It will be drought tolerant once it is happily established.
It will develop a denser, more attractive habit when grown in a sunny site with at least 6 hours of sun per day, but it adapts well to shadier conditions. In shade, Virginia sweetspire may grow taller and leggier and will not flower as prolifically, nor will its fall foliage colors be as vivid.
Virginia sweetspire is easy to propagate. Stem cuttings, taken between May and September, root in about four weeks. Autumn is the best time to start a new plant by root division. Simply snip one of the suckered roots free of the mother plant.
Virginia sweetspire is deer resistant and does not have any serious pests or diseases although some selections may be more susceptible to flea beetles and leaf spot.
LANDSCAPE VALUE
Adaptable to both sun and shade, as well as to wet and dry areas, this versatile, long-lived shrub is an ideal choice for a variety of landscape situations including:
- Single specimens
- Borders
- Mass plantings
- Foundation plantings
- Mixed shrub and perennial borders
- Informal woodland settings
- Rain gardens
- Edgings along a wall or walkway (use the dwarf varieties)
- Moist areas, including pond or stream margins
- Dry soils, once established
- Tall ground covers. Its tendency to sucker makes it useful for erosion control, particularly near streams or moist sites or on large banks.
- Difficult sites, such as ravines, ditches or uneven terrain, where the soil may be slow to drain.
Bear in mind that it may be difficult to keep Virginia sweetspire within boundaries due to its suckering habit. Give it plenty of room to spread initially.
SELECTED CULTIVARS
While the species is good, several selected cultivars are improvements. Prior to 1982, there were no named clones, but, since then, approximately a dozen selections or cultivars have become available commercially, including ‘Henry’s Garnet’, ‘Little Henry’, ‘Sarah Eve’, ‘Saturnalia’, ‘Longspire’, ‘Beppu’, ‘Shirley’s Compact’, and ‘Merlot’. Not all of them have consistently good fall color, however. Of the group, the following have excellent fall color and are generally easy to find in garden centers.
- ‘Henry’s Garnet’ is considered to be the best selection in terms of habit, floral display and fall color. The leaves turn a consistent reddish purple fall color and persist until winter temperatures fall below 15 to 20°F. It grows 4 to 5 feet high and about 4 to 6 feet wide. One of the benefits of growing ‘Henry’s Garnet’ is that it has larger flowers and better fall color than the species. It is the recipient of several awards, including the Pennsylvania Horticultural Society’s Gold Medal Award in 1988 and the University of Kentucky’s Theodore Klein Plant Award in 2000.
- ‘Little Henry’ is a dwarf form of ‘Henry’s Garnet’ and a good choice for homeowners who have smaller gardens. It only grows 2 to 3 feet tall and wide and has smaller 3- to 4-inch long flower tassels. The foliage turns orange and red in autumn.
- ‘Merlot’ is also a dwarf form of Virginia sweetspire. Slightly larger than ‘Little Henry’, ‘Merlot’ grows 3 to 4 feet tall and wide and has wine red fall color on leaves that persist well into winter. This low, mounding selection is hardy to Zone 5 and looks particularly attractive in a mass planting.
SOURCES
Dirr’s Hardy Trees and Shrubs, An Illustrated Encyclopedia (Dirr, Michael A., 1997)
Flora of Virginia (Weakley, Alan S., Ludwig, J. Christopher, and Townsend, John F., 2012)
Manual of Woody Landscape Plants (Dirr, Michael A., 1975, rev. 2009)
Native Plants of the Southeast (Mellichamp, Larry, 2014)
“Problem-Free Shrubs for Virginia Landscapes,” Virginia Cooperative Extension (VCE) Publication 450-236
“Rain Garden Plants,” VCE Publication 426-043
“Selecting Plants for Virginia Landscapes: Showy Flowering Shrubs,” VCE Publication HORT-84
“Trees and Shrubs for Acid Soils,” VCE Publication 430-027
Pennsylvania Horticultural Society website (https://phsonline.org/)
The Ornamental Garden in June
Now that it’s June, the temperatures and humidity levels are cranking up and the ornamental garden is growing at a phenomenal rate. To keep your garden looking its best, monitor moisture levels and keep weeds, pests, and diseases under control.
The Ornamental Garden in June
PLANT ANNUALS AND PERENNIALS THAT OFFER COLOR ALL SEASON LONG
Timing is critical to keeping your ornamental garden looking interesting, particularly during the summer months. Plant annuals and perennials that offer color all season long. As one plant finishes blooming, time it so that another plant will take up the baton and keep the color display going. If that seems overwhelming or even expensive to you, then try plants with interesting foliage. Here are a few ideas:
- Glossy Foliage — Plants with glossy foliage, such as New Jersey Tea (Ceanothus americanus), Leucothoe, or glossy abelia always look fresh and inviting regardless of the heat and humidity.
- Contrasting colors —

Contrasting Purple and Chartreuse colors (‘Homestead Purple’ Verbena and ‘Firepower’ Nandina
Plants with silver, burgundy, purple, or chartreuse foliage liven up the landscape, adding a touch of drama and excitement. Coral bells (Heuchera), purple-leaved ninebark (Physocarpus), and purple smokebush (Cotinus coggygria) are just a few examples.
- Variegated Foliage – Incorporate plants that have variegated foliage, such as hostas, brunnera, dogwoods, and weigela.
- Tropical plants – For a real change of pace, try using plants with large or unusual foliage such as Musa (hardy banana), Canna, or Colocasia (elephant ear).
TEND TO ROUTINE GARDENING CHORES
- Add deadheading and pinching to your list of routine gardening chores this month. Pinch back annuals, such as petunias and coleus, to keep them bushy and prevent them from becoming leggy. Annuals with large flower heads, such as geraniums (pelargonium) or zinnias, should be deadheaded (pinched back to just above the first leaf below the flower) to keep them looking tidy. TIP: Many of the newer varieties of annuals are self-cleaning and don’t need to be deadheaded.
- Deadhead rhododendrons in June, about three weeks after the shrubs finish blooming. While deadheading really isn’t necessary, it improves the appearance of the shrub. It also helps to divert the plant’s energy into developing flower buds for next year’s blossoms. Just snap off the spent blooms, being careful not to damage the emerging buds for next year’s blooms. The idea is to divert the energy from the old flower heads to buds for next year. June is also the best time to prune rhododendrons (See Virginia Cooperative Extension Publication 430-462, Shrub Pruning Calendar). Don’t wait too long to do this. Rhododendrons bloom on new wood. If you wait too long to prune, the plant will not have time to develop buds for next year’s flowers.
- Clean up dead foliage from daffodils and other spring bulbs that have long since finished blooming. If any foliage resists when you tug it, leave it alone for the time being. It’s still absorbing sunlight for next year’s floral display. Plant some annuals to fill in the space if you now have holes in the landscape where the spring bubs grew.
MONITOR SPECIFIC NEEDS OF GARDEN FAVORITES
Now that Irises have finished blooming, don’t neglect them.
- Flower Stalks — Cut off the spent flower stalks at the base of the plant. That will divert the plant’s energy from forming seeds to storing energy in the rhizome for next year’s flowers.
- Weeds — Pull weeds and grass from around the rhizomes.
- Nutrients — Apply a light application of a low-nitrogen fertilizer, such as 6-10-10. Work it into the soil and water it in. Avoid piling fertilizer on top of the exposed rhizomes. That can burn them as well as encourage problems with rot.
- Water – Avoid overwatering irises. Too much water can lead to issues with rot. Established irises are drought tolerant and don’t require much water during the remainder of the growing season. Re-blooming irises are an exception to this rule. They should be watered periodically to encourage a healthy second round of blooms late in the summer.
- Foliar Diseases — Remove any leaves that turn brown, leaving healthy green leaves only.
Garden Phlox (Phlox paniculata) is one of the classic mainstays of the sunny perennial border. But powdery mildew can devastate the foliage of this plant and turn it into an ugly, unsightly mess. To combat this disease, plant garden phlox in full sun. Allow plenty of spacing between plants for good air circulation. In general, they should be spaced about 18 to 24 inches apart. Thin out clumps by snipping out the weakest stems, leaving only 5 or 6 sturdy stems. Give phlox plenty of water, particularly during dry weather. Water the clumps with a soaker hose at soil level and avoid wetting the foliage. A layer of mulch around the roots will help retain moisture in the soil.
For the best looking roses in the neighborhood, pay attention to their specific needs. To prolong the bloom time, remove the spent blossoms to just above a fresh set of five leaves. For repeat-blooming hybrid tea roses and floribundas, apply a general-purpose, balanced fertilizer after the first display of blooms has passed. In the absence of adequate rainfall, give your roses about an inch of water per week to keep them vigorous and happy. A deep watering periodically is more effective than a shallow watering. Always water at the soil level and avoid getting the foliage wet. Overly wet foliage can set the stage for fungal diseases such as black spot or powdery mildew. If you detect either of these problems, treat the foliage with a fungicide as necessary. Also, monitor for pests such as aphids, spider mites, and Japanese beetles.
Vines, climbing roses, and other twining or climbing plants normally go through a growth spurt in early summer. Monitor them as they grow and train them onto supports as needed before they become unmanageable. As you tie up the vines, spread them out to the extent possible to cover trellises better and to provide better air circulation.
KEEP TABS ON THE CREEPY CRAWLIES

Bagworm emerging from Cocoon
Inspect susceptible trees and shrubs, particularly junipers and arborvitae, for evidence of bagworm damage. Bagworms are perennial insects that get their name from the spindle-shaped silken bag they weave around themselves. According to Virginia Cooperative Extension Publication ENTO-83NP , these pests attack Juniper, arborvitae, other cedars, pine, hemlock, spruce, Chinese elm, honey locust, crabapple, maple, sycamore, box elder, willow, linden, and poplar trees, among others. Bagworms produce one generation per year. The overwintering eggs begin hatching in early June and the larvae are capable of doing serious defoliation. Whereas small larvae are more susceptible to insecticides, larger larvae and molting larvae are not so easily killed. Therefore, the optimum time to treat for bagworms is during mid-June. A non-chemical method of control is to pick off and burn the bags from fall until spring.
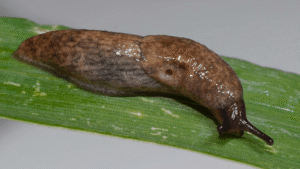
Common Garden Slug (Deroceras reticulatum)
Be alert to damage from slugs and snails. These ground dwellers are capable of climbing plants and damaging them well about the ground. Anyone who has grown hostas knows the heartbreak caused by these slimy mollusks. They eat large, unsightly, ragged holes in foliage from spring until frost. They can also eat entire seedlings of other plants. Slugs and snails drink from puddles of water or absorb moisture directly through their skin. To keep cool and prevent dehydration, they hide during the day under leaves, rocks, loose flagstones, porches, flower pots, wood chip mulches, etc. At night, they emerge from their hiding places to feed.
Frogs, toads, birds and some beetle species feed on slugs and snails. These natural predators may help minimize damage to your plants. If the damage is serious enough to require intervention, some non-chemical strategies to control these pests include the following:
- Eliminate their hiding places.
- Clear the soil of weeds, debris and decaying organic matter that might provide breeding and hiding places around your susceptible plants.
- Keep shaded areas free of weeds and litter.
- Pick the creatures off by hand, dropping them into soapy water. The best time to do this is about 2 hours after sunset when they are out and about feeding. They may also be detected on overcast days.
- Trap them under a board, inverted grapefruit half, or overturned flower pot and then physically remove them. For additional effectiveness, bait the trap with pieces of potato, apple, or lettuce.
- Place a shallow container of beer in the garden. Position the container so that the mollusk can crawl into it to get to the beer and drown. Beer is generally effective for about three days before you have to change it.
LET YOUR GARDEN COME ALIVE AFTER DARK
Extend the enjoyment of your ornamental garden by creating an evening or “moonlight” garden. As the sun goes down, brightly colored flowers tend to fade into the landscape. That’s when white flowers are at their best. White reflects light and white flowers look particularly beguiling in moonlight. Some white-flowering annuals and perennials include Angelonia, moonflower, clematis, impatiens, hydrangea, Nicotiana, petunias, verbena, snapdragons, bugbane, and alyssum. Many of these plants add extra value to the landscape by perfuming the evening air. To add a little extra zip, combine some silvery-leaved plants such as lamb’s ear, Artemisia, or dusty miller with the white flowers. But keep the composition simple. While a monochromatic palette may sound boring, it can actually be very serene and sophisticated, especially when the plants are grouped in a mass planting.
Variegated white and green foliage can have the same effect as an all-white planting. Something as simple as variegated hostas planted beneath River birches or grouped along a meandering woodland path can transform the ordinary to the extraordinary in the moonlight. The overall effect will dazzle the eye in the reflected light, bringing an otherworldly feel to the landscape.
CREATE A BUTTERFLY GARDEN
To entice more pollinators to your ornamental garden, try some of the easy-to-grow plants listed below. A wide range of plants blooming throughout the growing season will entice a variety of pollinators to your garden. Also, group plants of the same species together to form a mass of color or fragrance. A mass planting makes it easier for the pollinators to spot your garden and will entice them to swoop in for a closer inspection. If they like what they see, they’ll happily make your garden a regular stop on their daily food-foraging expeditions.
- Achillea millefolium (Yarrow)
- Agastache species (Anise hyssop)
- Asclepias (Butterfly weed)
- Aster species
- Buddleja davidii (Butterfly bush)
- Coreopsis species
- Cosmos bipinnatus (Cosmos)
- Echinacea (Purple Coneflower)
- Eupatorium purpureum (Joe Pye Weed)
- Helianthus annuus (Sunflower)
- Herbs, such as dill, mint, fennel, borage, and oregano
- Lantana
- Liatris spicata (Liatris)
- Lobelia cardinalis (Cardinal flower)
- Monarda didyma (Beebalm)
- Penstemon
- Perovskia (Russian Sage)
- Rudbeckia hirta (Black-Eyed Susan)
- Salvia greggii (Salvia)
- Sedum species (such as Autumn Joy)
- Solidago species (Goldenrod)
- Sweet Alyssum
- Zinnia
SUMMER HOUSEPLANT CARE
Check the saucers under houseplants for standing water and empty any you find. It only takes a tablespoon or so of water to provide a potential breeding place for mosquitos.
If you moved a tank-type Bromeliad outdoors for the summer, it is possible for mosquitos to lay their eggs in the plant’s reservoir. To avoid a potential problem, spray the plant with fresh water every 2 or 3 days to flush out the old water and renew the reservoir. Another strategy is to periodically add a few drops of cooking oil to the Bromeliad tank to smother mosquito larvae.
The move outdoors into brighter light and fresh air provides just the jump start that many houseplants need for a growth spurt. It may be necessary to take preemptive steps to keep some of your plants from sprawling or becoming unwieldy. Jade plant is one plant that tends to sprawl. To keep it under control, pinch off the side shoots to keep the plant growing upright and looking fuller. Don’t toss the side shoots that you pinched off. Pot them and start new plants.
Houseplants tend to grow rapidly once they have adjusted to being outdoors. To keep up with their summer growth spurt, give them sufficient water and feed them with a liquid fertilizer.
Beet Carpaccio
Beet Carpaccio with Goat Cheese and Watercress
Carpaccio (karˈpattʃo) has traditionally been associated with paper-thin slices of beef, a popular Italian appetizer since the 1950’s. Invented by Giuseppe Cipriani from Harry’s Bar in Venice, the beef is served with lemon, olive oil, capers, salt and pepper, and shaved Parmesan. In recent years, other thinly sliced raw meats, fish, and vegetables have acquired the term Carpaccio. Beets are no exception. Beet Carpaccio is found on the menus of many trendy restaurants across the country. I think it is one of the easiest and most satisfying ways to enjoy the plentiful beets in our farmers’ markets at this time of year. Any type of beet will do, from golden to ruby red to pink-and-white stripe.
Ingredients
Assorted beets of any variety
Favorite Vinaigrette (flavor affinities include citrus or wine vinegars, olive or walnut oil, shallots, honey)
Choice of cheese (goat, blue, ricotta salata), optional
Choice of nuts (walnuts, pistachios, hazelnuts), optional
Greens (endives and watercress work well)
Directions
- Preheat oven to 350º. Place beets on a baking sheet, lined with foil. Sprinkle beets lightly with water and cover them tightly with foil. Bake until tender when pierced, about 45 minutes. Cool slightly, then trim both ends of the beets and rub off the skins with your fingers. Note: If using both light- and dark-colored beets, bake them on different pans to prevent discoloration. The beets may be kept cool in the refrigerator for two days; bring to room temperature before serving.
- Slice the beets as thinly as possible. I like to use a mandoline, but a sharp knife will do. Arrange the beets on a platter or individual salad plates.
- This step is where you may go wild with creativity (see suggestions). Sprinkle the beets with cheese, herbs, salt and pepper, and drizzle with any light vinaigrette. Delicious served with toasted baguette.
- Pictured: Beets and Watercress (dressed with red wine vinegar, olive oil, and orange zest) topped with Baked Goat Cheese (rounds of goat cheese, coated in olive oil and thyme, rolled in breadcrumbs and baked for 10 minutes at 400 degrees) and sprinkled with toasted walnuts.
- Crumbled Goat Cheese and Mint Vinaigrette (2Tbl. minced shallot, 1/3 cup unseasoned rice vinegar, 1/3 cup chopped fresh mint, ¼ cup walnut oil, 1 ½ teaspoons sugar); add a sprinkling of fresh chives to finish it off.
- Marinate beets in red wine vinegar, shallots, olive oil, salt and pepper overnight, then top with Gorgonzola and hazelnuts.
The Vegetable Garden In June
WOW, what a spring we had in central Virginia. In April we had very little rain, and, well, May just made up for it with a deludge of rainfall. Naturally, a lot of planned planting got pushed out to June. And guess what, June is already a busy month in the vegetable garden — there’s planting, weeding, mulching, harvesting, looking for that little extra space to plunk in that one more pepper or tomato plant. Did I say weeding?
But let’s start with planting. June is a good month for planting beans and squash and plenty of other vegetables. Take a look at the handy-dandy chart below, which was developed using the Cooperative Extension Publication 426-331 , “Vegetable Planting Guide and Recommended Planting Dates.”
| June 1-6 | June 7-13 | |
| Bush Beans | Bush Beans | |
| Pole Beans | Pole Beans | |
| Lima beans | Lima beans | |
| Wax Beans | Wax Beans | |
| Cucumbers | Cucumbers | |
| Egg Plant* | Egg Plant* | |
| Muskmelons | Muskmelons | |
| Okra | Okra | |
| Peppers | Peppers | |
| Pumpkins | Pumpkins | |
| Southern Peas | Southern Peas | |
| Sweet Corn | Sweet Corn | |
| Summer Squash | Summer Squash | |
| Winter Squash | Winter Squash | |
| Sweet Potato | Sweet Potato | |
| Tomatoes* | Tomatoes* | |
| Watermellow | Watermellow | |
| June 14-20 | June 21-30 | |
| Bush Beans | Bush Beans | |
| Pole Beans | Pole Beans | |
| Lima beans | Lima beans | |
| Wax Beans | Wax Beans | |
| Cucumbers | Cucumbers | |
| Egg Plant* | Egg Plant* | |
| Muskmelons | Okra | |
| Okra | Peppers | |
| Peppers | Pumpkins | |
| Pumpkins | Southern Peas | |
| Southern Peas | Sweet Corn | |
| Sweet Corn | Summer Squash | |
| Summer Squash | Winter Squash | |
| Winter Squash | Tomatoes* | |
| Tomatoes* | ||
| Watermellow | ||
| * Denotes Transplants | ||
| The suggested dates may vary for different areas. | ||
June Tasks
Thin the seedlings of carrots and beets to proper spacing, about 4-5 inches to avoid crowding.
Apply organic mulches such as leaves, straw and clean grass to conserve water, suppress weed germination, and enrich soil as the mulch decays.
Repeat plantings of corn and beans to extend the harvest season.
Monitor soil moisture. As a general rule, vegetables require about an inch of water per week during the growing season. Soaker hoses or drip irrigation make the most efficient use of water during dry spells.
Asparagus –– stop harvesting when spears become thin.
Growing lettuce under a shade screening material will slow bolting and extend the harvest season. Also try planting bolt-resistant varieties such as Muir, Sierra and Nevada.
Sow new warm-season vegetable seeds after harvesting cool weather crops.
Continue to mound soil up around the potatoes to prevent them from being exposed to the sun and turning green. You can also add a layer of straw or leaf mulch to help control weeds.
Some soils in our area are magnesium deficient, especially those where high-calcium lime has been applied rather than lime containing magnesium (dolomite). “Green” your peppers by giving them a magnesium boost with Epsom salts. This will aid fruit production. Dilute one tablespoon of Epsom salts in a quart of water. Spray the solution on leaves using a clean household spray bottle. You will notice a difference in the color of the leaves in couple of days.
Tips:
Herbs planted in average soil need no fertilizer. Too much fertilizer may reduce flavor and pungency.
To control earworms on corn plants: apply several drops of mineral oil to the corn silk.
Thin overloaded fruit trees; this will result in larger and better fruit at harvest time.
You may have noticed that your strawberries have a milder favor than normal this year. The problem could be the result of the excessive rainfall we had in May; it could have diluted the flavor of the berries. That heavy rain increased the risk of fungal problems, too. I am experiencing higher than normal loss due to fungal diseases because of the wet weather.
Renovate the strawberry patch after harvest. Mow the rows, thin out excess plants and apply mulch for weed control.
The best time to harvest most herbs is just before flowering, when the leaves contain the maxium essential oils. Cut herbs early on a sunny day.
Sources:
Adapted from the Albemarle/Charlottesville VCE Office, “Monthy Horticulture Tip Sheets,” http://offices.ext.vt.edu/albemarle/
Meadow Gardening
Meadow gardens are a trendy thing in the garden world. You may have seen some beautiful meadows in garden books and magazines or even right here in central Virginia. Perhaps you’ve wandered the one that winds along the perimeter of IX Art Park or the large meadow at Preddy Creek Park.
Probably the most prominent meadow garden in town is the one at Martha Jefferson Hospital, and if you haven’t seen it yet, get thee to the MJH! It’s pretty and it’s inspiring. On top of that, meadows have been touted as a way to reduce the environmental and economic costs of turf grass lawns. Have you — like me — been inspired to make your own meadow garden? Before you start ripping out your turf, let’s take a closer look.

Meadow garden at Martha Jefferson Hospital with monarda, coneflowers and path rush. Photo: Catherine Caldwell
Plenty of folks have made the mistake of thinking that they can create a beautiful meadow in their yard by simply sowing some seeds from a “meadow in a can” or by letting a cleared area “go natural” – – and then putting the mower into permanent storage. I’m sorry to say that a meadow garden is NOT the way to get out of mowing. As I’ve observed in my own vicinity, the result is likely to be a tangled web of tree seedlings and invasives. If that’s not meadow gardening, then what is?
What is meadow gardening?
For starters, I really can’t emphasize this too much: meadow gardening is still GARDENING! As one thoughtful landscaper has wisely pointed out: “Tossing some wildflower seed onto the lawn and retiring the mower is not likely to produce something attractive or lasting.” Nick Novick, “Getting Real With Meadows,” www.ecolandscaping.org (July 16, 2010). And so now I’m going to follow Novick’s advice and get real about meadows here in central Virginia.

A “natural” meadow in the West.
Photo: Catherine Caldwell
When we think of the term “meadow” most of us think of a grassland with wild flowers. The native grasslands of the midwestern United States, now mostly gone, are composed of native, tall grasses, and are generally referred to as “prairies.” These meadows were a natural result of the climate, geology and soils of that region, as well as disturbances caused by large herds of animals.
But we gardeners in the eastern half of the country must recognize that a meadow is rarely a “natural” thing in our area. This fact was brought home to me recently when I began studying a book titled The American Meadow Garden: Creating a Natural Alternative to the Traditional Lawn by John Greenlee. This book is filled with photographs of gorgeous meadow gardens, but I couldn’t help noticing that most of them were located in California or other parts of the West or in the prairie states, where the gardeners do not have to fight nature to keep their meadows going. Fight nature? That’s right. Nature has other plans for the eastern half of our country.
Midwestern prairies are considered a “climax” plant community because the community of grassland plants which occur there is the last stage of succession in that region. Succession is an ecological term for the gradual “change in the composition and structure of a plant community over time.” Va. Dept. of Conservation and Recreation, Natural Heritage, www.dcr.virginia.gov/natural-heritage/natural-communities/, (“The Natural Communities of Virginia: Classification of Ecological Community Groups,” Version 3.0, April, 2017).
Basically this succession business means that your yard really wants to be a forest. Our open fields are in an early successional stage which will gradually revert to mostly woody plants and trees over time. But that doesn’t mean that if you really want to create a meadow garden, you can’t. It just means that you’ll have to mow at least once a year to cut down the tree seedlings. And you’ll have to do some weeding. Sorry!
If the maintenance element doesn’t discourage you, then read on, but keep in mind that, as with any gardening, you’ll have to invest a goodly amount of time in site preparation and in learning about the plants that will be suited to your meadow garden.
Grasses are essential to a meadow

Meadow Garden at MJH
Photo: Catherine Caldwell
Any meadow or prairie is composed of a high percentage of grasses. Yes, grasses. I know, I know — you were thinking along the lines of a field of black-eyed Susans and other colorful flowers. I was, too. But then I learned that those flowers need the companionship of grasses. And there are a number of reasons for this — not the least of which is that those tall flowers you and I are dreaming about may need the support of grasses nearby to keep them upright!
So the backbone of your meadow garden must be grasses, and to be more specific, grasses and sedges, which are small, grasslike plants of the genus carex. Sedges make good groundcovers in a meadow garden. Both grasses and sedges are part of the Graminoid family. In order to choose the right ones for your location, you’ll need to learn a little bit about our region’s native graminoids.
Consider Using LOCAL Native Plants
 You’ll be well-advised to consider using LOCAL native plants in your meadow. And there are indeed native plants that are adapted to meadows right here in our area. According to Devin Floyd, a plant community survey specialist, native landscape architect, and executive director of The Center for Urban Habitats (CUH), the State of Virginia at one time had a few native prairies in the Piedmont region. Yes, prairies. Indeed, Virginia had a significant number of open spaces, including great expanses of prairie, savanna, and woodland habitat. And these prairies were dominated by little bluestem (Schizachyrium scoparium, pictured at left), big bluestem (Andropogon gerardii), broomsedge (Adropogon virginicus), gray goldenrod (Solidago nemoralis), plus hoary mountainmint (Pycnanthemum incanum), small’s ragwort (Packera anonyma), common dewberry (Rubus flagellaris), upland ironweed (Vernonia glauca), and toothed white-topped aster (Sericocarpus asteroides). CUH employs these species, and about 150 others, in its ecosystem-modeled native meadows. Using these local natives appeals to me, and if it appeals to you, too, read on! One starting point is at the Center for Urban Habitats, based in Charlottesville. CenterforUrbanHabitats.com; www.facebook.com/CenterForUrbanHabitats.
Floyd has an ecological approach to choosing plants for a given site; he attempts to find a nearby native plant community and uses it as a model. How? He conducts surveys of native plants in our area, and then determines the “native trajectory” of a garden site through an analysis of its characteristics. You don’t really have to do your own survey to identify local natives for your meadow garden, though close observation of your property is bound to be helpful. You and I can take advantage of others’ surveys, which form the basis for several excellent sources for local natives.
I recommend that you start with the wonderful new handbook, Piedmont Native Plants: A Guide for Landscapes and Gardens (Piedmont Natives Team, Repp Glaettli, ed.). You can obtain your own copy of this book from the Thomas Jefferson Soil and Water Conservation District, www.tjswcd.org. This book has useful pictures, cultural recommendations, and other helpful information, including a map and descriptions of the multiple ecoregions in central Virginia. Each of these ecoregions has a particular geology, hydrology, soil, and, as a result, characteristic plant communities.
For more detailed, ecologically sound advice on native plant communities, you’ll want to go to the Department of Conservation and Recreation’s website I mentioned before, dcr.virginia.gov/natural-heritage/PLANT COMMUNITIES. This DCR website also has a nifty “native plant finder” you might want to try. You simply fill in a few drop-down menu items — such as our region (Piedmont), the type of plants you wish to find (grasses and sedges, for example) — and voila! — it produces a list of native plants in that category for our region. Then you can press on the name of the plant and up comes more information, plus photos (some good, some not so good) of that plant. You can try it out at www.dcr.virginia.gov/NativePlantFinder (on the main menu, click on Natural Heritage, then click on Native Plants, and then in the Native Plants menu, click on Native Plant Finder). Have fun!

Andropogon virginicus (broomsedge)
Photo: USDA Plant Database
A good primer for our native grasses and sedges is the Piedmont Native Plants handbook, which recommends the following grasses for our area:
- Schizachyrinum scoparium (little bluestem)
- Elymis hystrix (bottlebrush grass)
- Muhlenbergia capillaris (muhly grass)
- Andropogon virginicus (broomsedge)
- Avenella flexuosa (wavy hair grass)
- Danthonia spicata (poverty oatgrass)
The Center for Urban Habitats recommends the following graminoid ‘starter list’ for a dry meadow in the Central Virginia Piedmont:

Eragrostis spectabilis (purple lovegrass)
Photo: Katja Schulz
- Andropogon gyrans (Elliot’s bluestem)
- Eragrostis spectabilis (purple lovegrass)
- Schizachyrium scoparium (little bluestem)
- Andropogon ternarius (splitbeard bluestem)
- Elymus virginicus (Virginia wild rye)
- Dichanthelium linearifolium (slim-leaf panic grass)
- Panicum philadelphicum (Philadelphia panic grass)
- Sphenopholis obtusata (prairie wedgegrass)
- Aristida purpurascens (purple three-awned grass)
- Sporobolus vaginiflorus (poverty dropseed)
- Carex glaucodea (blue sedge)
- Carex albicans (white-tinged sedge)
- Juncus tenuis (path rush)

Packera anonyma (Small’s ragwort)
Photo: Pieter Pelser
And now for the flowers! The recommended natives that you will wish to consider include:
- Goldenrods — Solidago nemoralis (gray goldenrod), Solidago rugosa (wrinkle leaf goldenrod), Solidago speciosa (showy goldenrod) and Solidago juncea (early goldenrod)
- Rudbeckia hirta (black-eyed Susan)
- Asclepias tuberosa (butterfly weed)
- Milkweeds — Asclepias syriaca, Asclepias viridiflora, and Apocynum cannabinum
- Monarda fistulosa (wild bergamot)
- Mountain mints — including Pyncanthemum incanum (hoary mountain mint), and Pyncanthemum tenuifolium (narrow leaf mountain mint)
- Liatris pilosa (blazing star, grassleaf gayfeather)
- Eragrostis spectabilis (purple lovegrass)
- Heliopsis helianthoides (ox eye sunflower)

Pyncnanthemum incanum (hoary mountain mint) and swallowtail butterfly Photo: Tom Potterfield
- Achillea borealis (common yarrow)
- Chrysopsis mariana (Maryland golden aster)
- Penstemon canescens (eastern graybeardtongue)
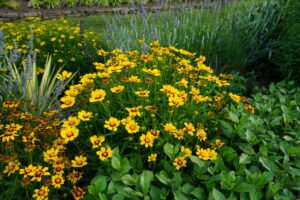
- Coreopsis verticillata (threadleaf coreopsis)
- Salvia lyrata (lyre-leaved sage)
- Cirsium pumilum (pasture thistle)
- Sabatia angularis (rose-pink)
- Packera anonyma (Small’s ragwort)
- Chamaecrista nictitans (wild sensitive plant)
Designing a Meadow Garden
Basic plant composition: Most meadow-makers recommend that meadow gardens consist of 60% grasses, and about 40% forbs — those flowering plants we love. The precise percentage is not critical, however. You’ll want perennial grasses, but when it comes to flowers, include some annuals, especially those that will likely self-seed for you, like Rudbeckia hirta (black-eyed Susan).
You’ll have to give some consideration to your neighbors, especially if you live in a city or suburb. A front yard meadow will be more acceptable if it is surrounded by a manicured section of turf grass or well-tended garden; a meadow that reaches all the way to the street is much more likely to provoke controversy. You’ll also want to determine if there are ordinances or rules of a homeowners association that apply to your property.

Meadow garden on an urban lot
Design and Photo: Wolf | Josey Landscape Architects
As with any garden, you’ll need to consider the specifics of your site — its orientation to the sun, slope, soil, moisture and the like. Before you embark on a meadow garden project, I recommend that you tour one or more of our local meadow gardens and take a good look at the plants and their arrangement. And even though a meadow garden seems ultra-casual, you’ll still need to heed that basic gardening principle — that drifts of the same plant are usually the most effective and eye-pleasing arrangement. That’s how nature does it, too.

Monarda fistulosa at MJH meadow garden
Photo: Catherine Caldwell
I learned a lot by studying the meadow garden at Martha Jefferson Hospital. And that’s where I saw for the first time the delicate lavender flowers of Monarda fistulosa, a plant that immediately became a centerpiece of my own dream meadow garden.
Many of us who are looking to install a meadow garden are dealing with a hot, dry site, and for that situation, you’ll find the following plants to be especially well-suited:
- Solidago nemoralis (gray goldenrod)
- Andropogon gyrans (Elliot’s bluestem)
- Coreopsis auriculata (larkspur coreopsis)
- Asclepias tuberosa (butterfly milkweed)
- Dichanthelium linearifolium (slim-leaf panic grass)
- Oenothera fruticosa (sundrops)
- Packera anonyma (Small’s ragwort)
- Eragrostis spectabilis (purple lovegrass)
–The Center for Urban Habitats, centerforurbanhabitats.com. This grouping is also ideal for a “hell strip” between street and sidewalk or a driveway margin. The boldness of the yellows is softened by the purple clouds hovering about the purple lovegrass.

Urban meadow garden on a narrow strip in Belmont, Charlottesville. Photo: Devin Floyd
Then there’s the matter of finding sources for the plants you’ve chosen and deciding whether you’ll use seeds, plugs (small thumb-size plants), regular nursery plants or some combination thereof. You’ll find a list of sources for native meadow plants at the end of this article.
Basic preparation for a meadow
You’ll have the most success if you start with soil that is weed-free, or as close to that as you can achieve. Some commercial landscapers use multiple herbicide treatments as the first step in site preparation. If that’s not appealing to you, you can use other methods — such as digging up turf or smothering or solarizing. The latter two — smothering and solarizing — involve placing large sheets of plastic over the site for several months starting in late spring and leaving them in place for the remainder of the growing season. As an alternative to black plastic, you can smother your turf grass with 6 inches of wood chips, 4-by-8 pieces of plywood, or a layer of newspapers 20 sheets thick with wood chips on top.
In my own yard, I used solarization after removing and cutting to the ground a patch of invasives. I followed directions from the University of California Cooperative Extension — using thick sheets of clear plastic, which allow the sun to “cook” those pesky weeds and weed seeds. One thing I learned from my experience is the importance of getting that plastic nice and tight over the soil surface; in areas where it was loose, some unwanted plants survived. “Soil Solarization for Gardens and Landscapes,” Univ. of California Cooperative Extension, ucanr.edu/sites/Solarization
Another method you can try is selective weeding — a method that is viable if you have a small site and especially if you have a patch with some natives already thriving.
What if you have a very large area you’d like to turn into a meadow? According to the Penn State Extension Service, the best way to prepare a large site is to till the soil and plant a cover crop, such as buckwheat, which will shade out the existing vegetation. After you cut down the mature cover crop, till again during hot, dry weather to dry out the roots of any remaining weeds and grasses.
Once you have your site cleared, you need to be ready to plant it; otherwise, you’re just inviting weeds and invasives. If you prepare your site in the fall, but you’re planning to install your plants in the spring, you need to be able to cover it — with mulch or plastic, for example — until spring.
Maintenance of a meadow garden
True confessions time: the first few years of maintenance involve some heavy lifting, as I discovered during my research. That’s because you’ve got to stop weeds before they take over. This means that you’ll have to mow frequently during the first year before plants have a chance to go to flower and set seed. That stops unwanted plants from dropping new seeds for the following year. Unfortunately, all that mowing will prevent your beloved wildflowers from blooming, too. But they’ll be growing and spreading and you’ll see the benefit — and the blooms — later. Penn.State Extension.psu.edu/natural-resources/wildlife/landscaping-for-wildlife/pa-wildlife-5
Over the long term, the most important maintenance is mowing everything down to stubble once a year at the end of winter (late February through early March). Some meadow-makers use burning instead of mowing. www.dgif.virginia.gov/grow-a-native-grass-meadow-1.pdf. For more specifics on maintenance, I refer you to the Center For Urban Habitat’s Keys to a Successful Meadow of Natives, below.
Have you created a meadow garden? If so, I’d love to hear from you — and we could all learn from your experiences. Also, if you decide to embark on this project, please let me know how it goes. And send photos, please!

Meadow Garden at Ix Art Park, 2014
Center for Urban Habitat’s Keys to a Successful Meadow of Natives
Planning
- Use a plant community approach (let go of focusing on individual species). Model the list of species that form that community after a natural community that is well-documented in the wild.
- Stay within your ecoregion, on the same geology, and at the same elevation when looking to a natural community to mimic.
- Keep the list of species local – that is, locally adapted natives.
- Site preparation is the next critical step. Remove all non-native exotic weeds. This takes time, and that’s okay. We encourage the use of natural methods like solarization, repeated tilling and spot weeding.
Installation and Year One
- Once the site is prepared, we recommend a 2-pronged approach to planting that involves colonies of plugs in a meadow of predominantly seeded ground.
- Plan for enormous overlapping colonies of plants, with outlying small patches of the same species; this generates a natural appearance and helps the community reach balance quickly.
- Seed and plant in early spring. Plant the plugs no more than 6 inches apart. Mow the meadow every 4-5 weeks to 4 inches to allow for light to reach seeds that have not germinated yet.
- Overseed heavily again in fall with other species and perhaps an additional colony or two of plugs. Stop the periodic mowing in September.
- Spot weed for targeted non-native species throughout the year (these should be identified at the onset as potential problem plants).
Year Two:
- Overseed and plant to fill gaps in early spring; spot weed; mow every 4-5 weeks (mow even the plugs!!). This second year will see significant infill as the meadow begins to take hold.
- Mow throughout the season and continue spot weeding and edge maintenance.
- Assess in September-October, and over-seed with additional species if needed. Remember that this is a plant community. This type of open meadow-like community can have more than 150 species. This richness is critical for success.
Year Three and Thereafter
- In Year 3, do final plug infilling in any gaps.
- Mow in late February.
- No mowing for the growing season in Year 3.
- Continue spot weeding and edge maintenance after meadow is fully established.
Plant and Seed Sources
- See the list of seed sources in “Grow a Native Grass Meadow,” www.dgif.virginia.gov/grow-a-native-grass-meadow-1.pdf.
- See the list of plant and seed sources in Piedmont Native Plants: A Guide for Landscapes and Gardens (Piedmont Natives Team, Repp Glaettli)
- The Virginia Native Plant Society maintains a downloadable list of native plant nurseries, vnps.org/conservation/plant-nurseries/
- PiedmontEnvironmentalCouncil.www.pecva.org/our-mission/wildlife-habitat/154-native-plants-pollinators/477-native-plant-lists
SOURCES: (books and website links)
The American Meadow Garden: Creating a Natural Alternative to the Traditional Lawn,” (Greenlee, 2009)
Urban and Suburban Meadows: Bringing Meadowscaping to Big and Small Spaces (Catherine Zimmerman, 2010)
Bringing Nature Home, (Doug Tallemy, 2009)
Piedmont Native Plants: A Guide for Landscapes and Gardens (Piedmont Natives Team, Repp Glaettli, ed.), available from Thomas Jefferson Soil and Water Conservation District, 706 Forest St # G, Charlottesville, VA. http://www.tjswcd.org
Center for Urban Habitats, centerforurbanhabitats.com; www.facebook.com/CenterForUrbanHabitats
“Grow a Native Grass Meadow,” virginia.gov/grow-a-native-grass-meadow-pdf
www.dcr.virginia.gov/natural-heritage/natural-communities, (“The Natural Communities of Virginia: Classification of Ecological Community Groups,” Va. Dept. of Conservation and Recreation, Natural Heritage, Version 3.0, April, 2017).
“Meadows and Prairies: Wildlife-Friendly Alternatives to Lawn,” Penn State Extension, extension.psu.edu/natural-resources/wildlife/landscaping-for-wildlife/pa-wildlife-5.
vaplantatlas.org (Digital Atlas of the Flora of Virginia)
“Ecosystem Modeling in Landscape Design,” (Devin Floyd, 2016)
www.albemarle.org/nativeplants.
“Soil Solarization for Gardens and Landscapes,” Univ. of California Cooperative Extension, ucanr.edu/sites/Solarization/files/114635.pdf