

When we first try sewing, our first idea is to learn from project and instructional videos or reading pattern and sewing instruction books. One of the top things you’ll need to know about is the type of stitches you can create and when it’s time to use them on your projects! Depending on what machine you’re working on, whether you’ll be able to complete every stitch we mention below, and how you’ll be able to create it.
Let’s Get to Stitching!
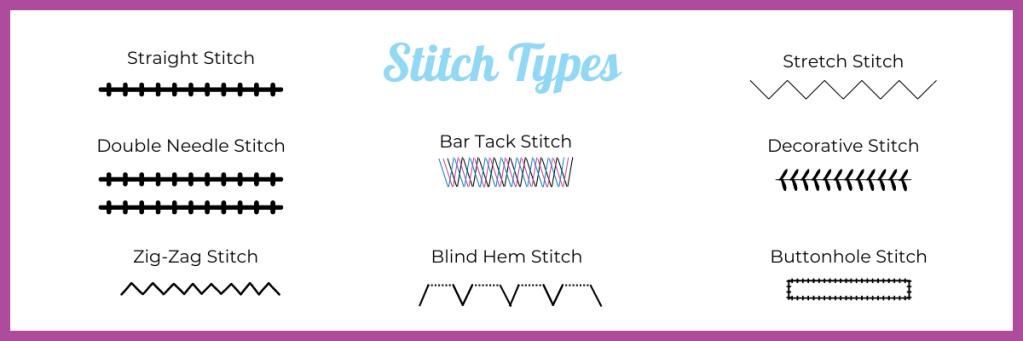
Straight Stitch: The straight stitch on all JUKI sewing machines is perfect for plain seams, darts, tucks, and topstitching! We recommend altering the stitch length to suit your project goals. The longer stitch lengths can be used for projects that require gathering or very long lengths for basting, making it easy to remove the stitches. Remember that your needle position should be set to the center of the presser foot for this to work.
Some machines will also offer a triple straight stitch. This is where the machines take 2 steps forward and one step back. This extra-strong stitch is excellent for crotches in pants where the seam is under extra stress.
Stitch Lengths to Know:
Seams and Majority Sewing: Length 2.0-3.0.
Gathering Fabric or Machine Basting Fabric: Length 4.0 is used for gathering fabric and machine basting fabric.
Double Needle Stitch: Add extra durability to your projects using this stitch! If you’re working on knits or stretch fabrics, this type of stitch creates parallel lines along the fabric and has the benefit of the fabric responding well to it.
If you’re working with woven fabrics, you won’t require this type of stitch, but it can be used to make a hem look more professional, giving your project that professionally finished look.
Keep in mind that twin needles come in a variety of sizes, and they have two number designations: one is the space between the needles, and the other is the needle size. So, for example, a 4/80 twin needle has 4 mm space between two sizes of 80 needles. Then for your extra needle, you’ll use your extra spool to place the second thread on your machine.
You can use this stitch to create decorative stitches, parallel rows of topstitching, and a coverstitch hem like those found on t-shirt hems or pintucks.
The Zig-Zag Stitch: Found on most of JUKI’s electrical and computerized machines, you won’t need to go over the fabric multiple times with this stitch! This stitch is solid and most commonly used to stop raw edges from fraying.
If you find yourself without a serger, this stitch is great for sewing knits as it has a built-in elasticity, meaning your stitches won’t break when pulled.
This stitch can also assist you in adding applique to your projects, like beautiful motifs for decoration.
Zig-Zag Width Setting Tips:
Sewing knits on the seams – We recommend a width of 1.0 and a length of 2.5. The stitch should be small and tight and look similar to a straight stitch.
Sewing knit hems – We recommend a width of 4.0 and a length of 3.0. The zig-zag should be much wider than the seams.
Finishing raw edges – We recommend a wide zigzag of width 4.0 and length 3.0 right on the edge of the fabric. This can stop your project from fraying and will increase the longevity of your creations.
Applique – We recommend a length of 0.5 and a width of 4.0. Again, you’ll want a very close zigzag stitch so that very little fabric shows between the stitches.
Blind Hem Stitch: This mix of straight and zig-zag stitches is perfect for hemming and mending your closet items! Nearly invisible, this stitch is used to either sew two pieces of fabric together or fold one fabric together.
A blind hem means you can’t see the stitching on the top of the outward-facing fabric. When done correctly, all you should see are little dots. These are the micro stitches, with all the visible stitching at the back. This stitch is perfect for skirts, dresses, and trousers with non-stretch fabrics.
You can also find presser feet accessories like the Blind Stitch Presser Foot to use in conjunction with this stitch option.
Bar Tack Stitch: This stitch was made for those areas that need extra durable stitches! Due to being in high-stress zones, you’ll want to use this stitch to reinforce project areas that are subject to stress and stretch, like your pant’s belt loops or pockets.
We also recommend this stitch for fabric bags because the stitch will provide strength to your stitches and the ability to withstand the stress of carrying multiple items.
This stitch does include the use of zig-zag and can be applied with a machine. If you want extra support, this stitch can be doubled up with a back stitch at the end of the seam.
The Buttonhole Stitch: This stitch can be used on a multitude of projects and depending on what machine you’re creating on you will either have one step to do, which measures and sews the buttonhole reinforcement for you, or take 4 steps and adjusts a few settings as it sews the 4 sides of the buttonhole.
You can use a zig-zag stitch for stitching buttonholes. Still, most sewing machines have the capability to create buttonholes with a special foot attachment or a pre-programmed buttonhole setting, like our DX-4000QVP.
You can also use the buttonhole stitch to make sewn eyelets, attach applique to ground fabric for personalization, and as couching stitches.
Stretch stitch: Use this narrow zig-zag stitch when working with knit fabrics! While a straight stitch would break under the stretch of these fabrics, a zig-zag stitch stretches according to the fabric stretch. You might also hear this stitch called the lightning stitch or elastic stitch. This stitch can also be used to join elastic and the fabric or for mending tears in cloth!
Decorative Stitch: While not commonly picked, many electrical and computerized machines offer many decorative stitches that you can work into your everyday projects. You can experiment with different color threads and stitch options to be as creative as you want in your project designs!
We recommend stabilizers when creating with decorative stitches so that your designs don’t pucker or stretch on your fabric bases. This will help create a smooth, consistent stitch in your designs.
Keep in mind when working with decorative stitches the difficulty of removing them. These stitches can be very dense, making them easier to fix if you don’t like your chosen design. We recommend using a sample fabric to test your decorative stitch on the fabric and confirming which designs you want to use before beginning our project.
The Right Machine
When choosing your machine, remember what stitch capabilities it has and what you’ll need to create the projects you’re dreaming of. A basic sewing machine will often only offer straight stitching sewing, so if you hope to work with other stitch options like we listed above, you’ll need to broaden your machine options. To use more stitch options, like decorative stitches, we recommend researching an electrical or computerized machine like our computerized sewing machines that commonly offer a variety of stitches for your project needs.
Want to test-drive a machine and check out our stitch options? Contact your nearest JUKI dealer today here!
