
![]()
What’s the greatest handheld of the 1980s and 1990s? Why, the 16-bit arcade juggernaut named Atari Lynx, of course! I was a kid when the original Lynx 1 came out for us here in the old country in 1990, and was blown away. The Game Boy was a monochrome moron in comparison, and the Game Gear was all about converting Mega Drive and Master System games to pocket version – the Lynx, with its hardware-driven zooming and distortion of sprites, was going for Arcade experiences. BOOYA!
Sadly, as with everything Atari, this too turned to dust. BUT, fast-forward to 2018 and look at the love for this lovable giant! So much so, that McWill, a name you must’ve heard of by now, released one of the most impressive upgrades for a system I’ve ever seen – LCD replacement for the waning washed-out Lynx screen, with VGA output.
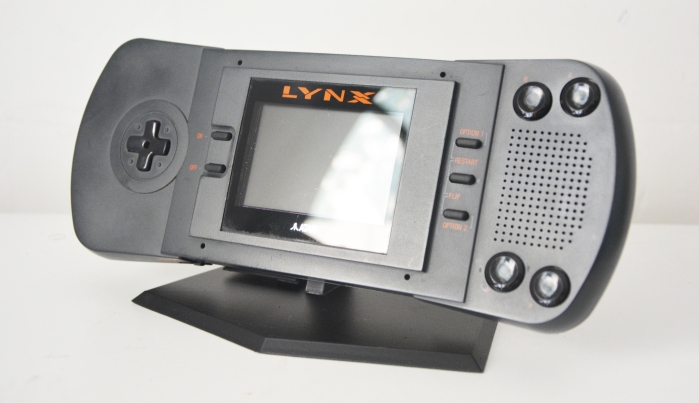
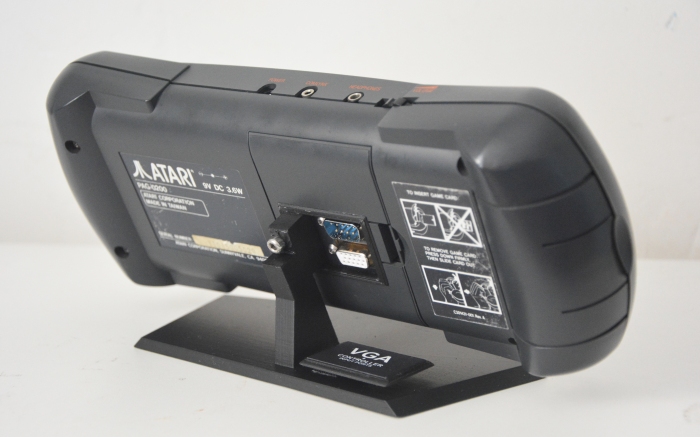
The VGA output was a great addition, but the way I’ve seen people utilize it online seemed rather silly to me; you would have to use the Lynx as the controller when playing on the VGA. No sir, I don’t like it. So I decided to use the spacious room behind the screen to build an interface to: 1) securely place the Lynx on a stand; 2) output VGA; 3) connect a standard DB9 compatible controller (Mega Drive, Master System, Atari).
")
")
")
")
")
")

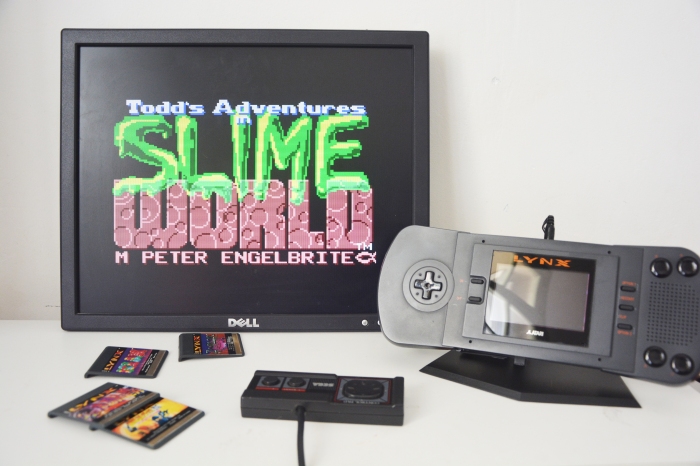
It’s a tight squeeze, but the VGA, Controller port and Stand all fit neatly in the small 3x4cm interface window. This was an absolute pleasure to build, everything went smooth and simple, all the measurements were direct hits, hell even the stand only took me 10 minutes to design (8 hours to print, but hey). So let’s see it in full VGA action:
")
")
")
")
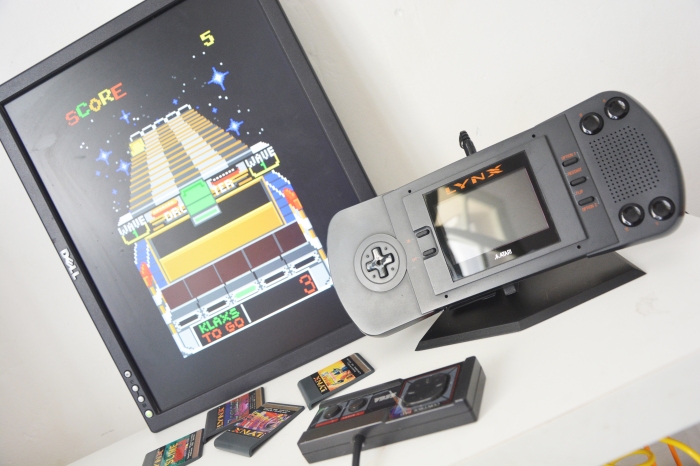
It’s perhaps the best handheld to consolize: the GameGear has most games on Master System or Mega Drive, the GameBoy looks rather silly and clunky on a monitor, and TurboExpress is pointless, because it’s a 1-to-1 conversion of the actual console. I am glad I did it, I hope you will too, and stop placing those ugly connectors on the top of your handheld.
Building the Lynx 1-UP
I bought a pristine looking junked Lynx 1 for 20 euros – seemed a good place to start, let’s see if we can bring it alive! I replaced all the capacitors, power input socket, MOSFET, but finally it was the two 3906 transistors that were the issue.


In order to do these replacements, you need a fine-point soldering iron and some tweezers, but everything on the board is quite spacious, so there’s no mistaking what’s what. This part is cheap: 7 dollars on console5.com. They have links and tutorials on that site, very complete. I also bought the McWill for 120 dollars, I was gonna do this mod regardless if this particular system was junked. So far everything together cost me ~150 dollars.


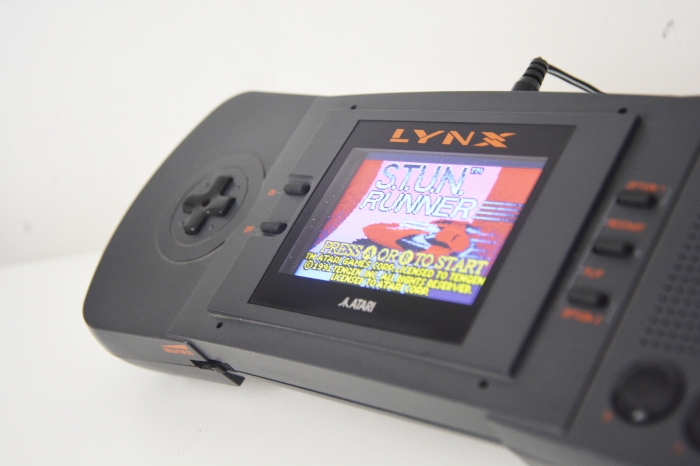
After bringing the console back to live, it was time for McWillification! I followed the 1 page diagram that came with it, but it’s a little information dense, so I followed the following video instead:
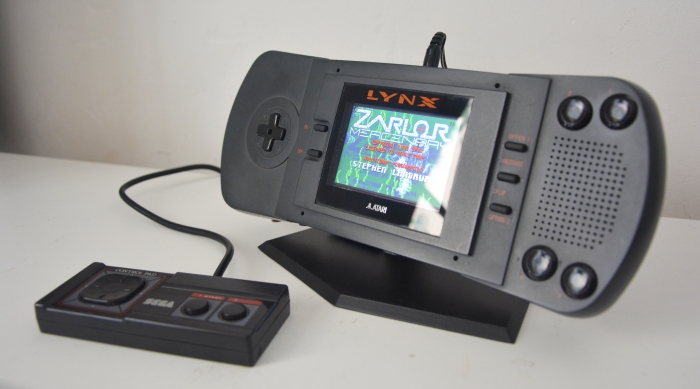
This worked better than I could have ever imagined, I know everyone says they’re gobsmacked when they see the difference, but it really is very true – I get why it’s such an expensive mod now.


I was gonna leave it with that, honestly that’s just everything one could ever want from an upgrade… but, of course, me being the way I am, things escalated. You see, the mod came with the VGA socket, and I saw how people were placing these at the top of their handhelds, and you know what – it looked ugly. I want the facade of the handheld to be untouched. While I was adding the McWill mod I noticed the enormous space left behind the screen, which is when I had the idea: make the Lynx into a hybrid, with the connector ports at the back with a stand for console gaming via VGA, and all the ports hidden behing a minimal cover during handheld gaming.
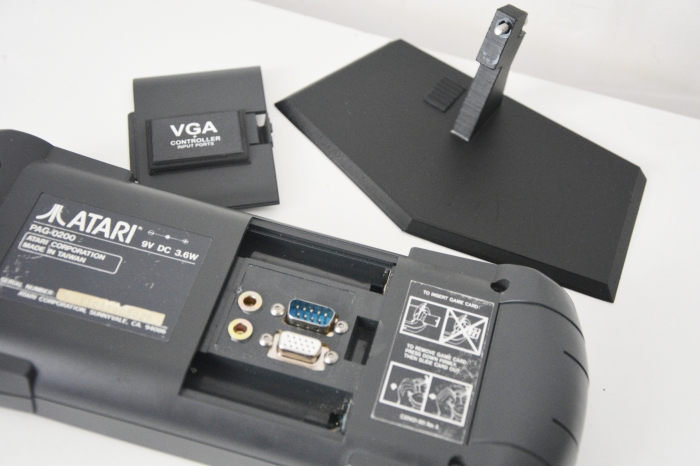
I first ordered DB9 sockets for a controller, and placed this together with the VGA socket on the inside of the battery cover. I made a little window in the battery cover, 3D printed a frame and cover for the ports, and there we have our interface.
")
")
For the controller ports I had to solder 6 wires on the button pads of the Lynx PCB. Luckily most of these have soldered extension traces, so you can avoid blocking the normal button-to-pad press, but for two I had to solder directly onto the pad: be mindfull to be as flat as possible.


Then we wire up the VGA socket to the pads on the McWill screen, this is shown in the accompanied diagram of the screen. We then place the DB9 and VGA socket in the space between the batteries, where the little light tube of the old screen sat (ignore the loose wires, they’re from the battery input, I cut them for ease of access).


In the left picture, top connector is the VGA socket you can see running to the McWill screen. The lower connector go to the front of the PCB to the button pads. When assembled the VGA socket is lower, and DB9 is upper. Next to these I added screw connectors, so that I may fix the system to a stand, as shown in the next pictures:
")
")
")
Unlike the Nintendo Snack Pack, this was a joy to make. I did it to unwind and relax, I didn’t want to build something from the ground up, but this just gave enough inspiration to just slightly 1-up it. The Lynx Stand and little VGA cover in particular really clean the mod up nicely, and makes this thing into a fully consolized system. I must admit though, I’ve been mostly playing it with the stand and controller via the McWill screen, not via VGA, but hey, it’s there. Finally, it all cost me a substantial 150 euro, but it was worth it.
The Atari Lynx is a very strange and powerful handheld, spanning 7 years with 72 games, it’s still enjoying new homebrew releases every year, with a small but dedicated following. I’m very happy to be one of them.
Upgrades:
- Full capacitor replacement
- MOSFET replacement
- 3906 Transistor replacement
- Power input socket replacement
- McWill Screen upgrade
- VGA output port
- DB9 input port
- Custom interface window & stand
Bonus: Rechargeable Battery!
SO, tonight I found out the battery spring was shot to hell, which meant I can’t use the Lynx via batteries. Bummer. BUT, on the plus side, Now I could do the final mod I wanted to do: rechargeable battery! I looked online and just saw overcomplicated solutions, so here’s what I installed: generic €10 li-ion battery (12v, 3000mAh) + generic €2 variable step-down converter, set to 9v. Dremel out the batteryholder, crammed’m in, works like a champ.
Check it out!


