The AudioCodes MediaPack (MP1288) gateway allows you to use a large number of analog devices with Zoom Phone. Visit the AudioCodes website for more information.
This article covers:
Required components
Note: Please read before starting the deployment of your Audiocodes MP1288.
Make sure that the following items (in addition to any separate-orderable items that you may have purchased) are included with your shipped device:
- 2 × front-mounting brackets for 19-inch rack mounting
- 1 × RJ-45-to-DB-9 serial cable adapter for serial communication (AC-powered models) 2 x AC power cords
- (DC-powered models) 2 × DC terminal blocks
- 1 × grounding lug
- Regulatory Information document
Main components
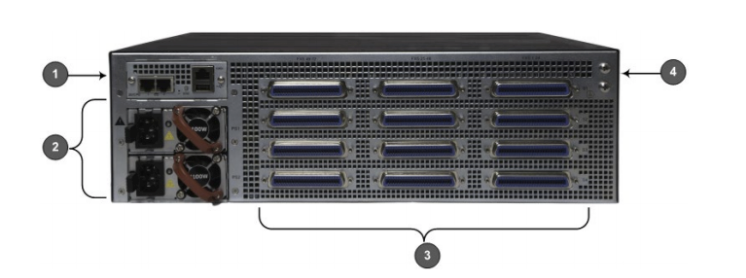
| Item number | Label | Description |
| 1 | CPU | CPU module providing the central processing unit and various network port interfaces. |
| 2 | PS1 / PS2 | Power supply modules. |
| 3 | Blades: S1 / S2 / S3 / S4 FXS ports: FXS 1-24 / FXS 25-48 / FXS 49-72 | FXS blades providing FXS port interfaces. |
| 4 | | Protective grounding for connecting a grounding lug for chassis ground connection for ESD-preventive equipment or a grounding wire. |
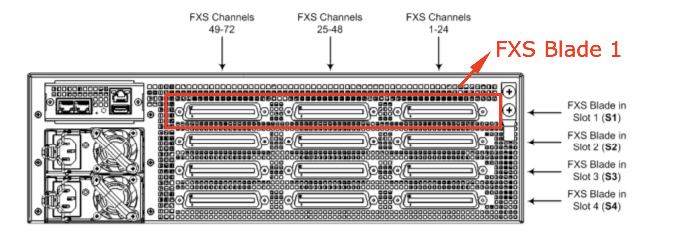
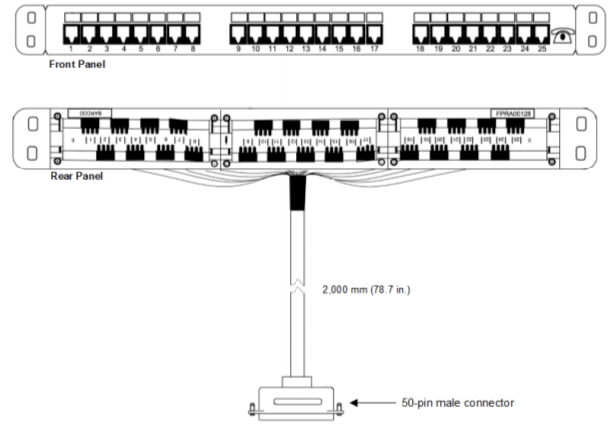
FXS blade
To provision the MP1288 and make it compatible with analog devices, make sure the patch-panel 50-pin Centronics Amphenol cable with a 24-port RJ11 breakout is included in your setup. Contact AudioCodes or another supplier if it's not included:
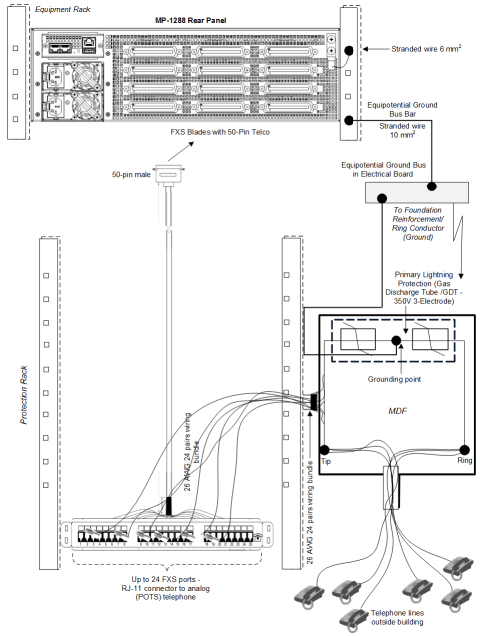
Setup diagram
The complete setup for the MP1288 should look like:
How to configure network settings
Important: We recommend using the static IP address to access the MP1288 web interface.
Obtain the IP address of the MP1288
Use the device‘s factory default IP address (192.168.0.2/24) and default gateway (0.0.0.0) to Initially access the device‘s web interface and change It to suit your network's addressing scheme for subsequent connectivity.
- Using a CAT-Se/6 shielded twisted pair (STP) straight-through RJ-45 Ethernet cable, connect any one of the Ethernet ports of the CPU module (rear panel) to the LAN port on your computer.
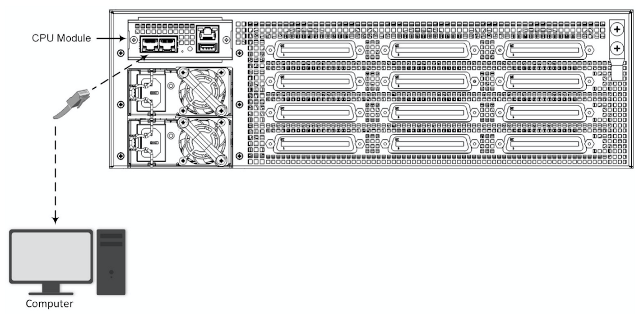
- Change the IP settings of your computer to correspond with the device's default IP address and subnet mask.
- On your computer, open a web browser (for example, Google Chrome).
- In the URL field, enter the device's default IP address.
The web login screen will appear. - Type in the default username (Admin) and password (Admin), then click Login.
- Open the IP Interfaces table (Setup menu > IP Network tab > Core Entities folder > IP Interfaces).
- Select the OAMP interface. In the Application Type drop-down menu, select OAMP + Media + Control. Click Edit, and then in the dialog box, modify the device's OAMP interface.
- Click Apply. Your connection with the device becomes unavailable at the default IP address. The device can be accessed using the new IP address.
- Change the IP settings of your computer to correspond with the new OAMP IP addresses and subnet of the device.
- Access the device's web interface using its new IP address.
- In the web interface's toolbar, click Save.
The new IP address will be saved to the device's flash memory. - Re-cable the device to the required network. You can remotely access the device's management interface using the new IP address.
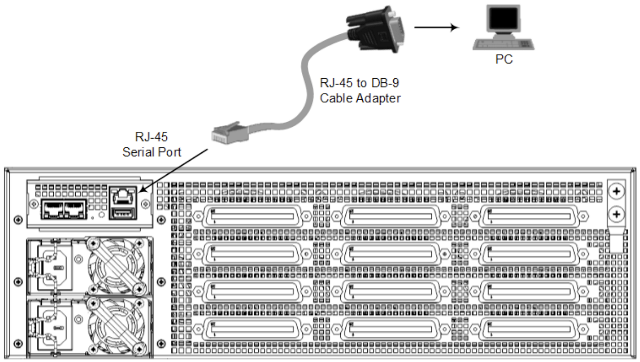
If the device ls using DHCP to obtain an IP address from a DHCP server, you can discover the device's IP address using its command-line interface (CLI). The device can be accessed through RS-232 by connecting a VT100 terminal to the device or using a terminal emulation program (for example, HyperTerminal) with a computer.
- Using the supplied RMS to 08-9 female cable adapter, connect the RJ-dS connector to the device's serial port (labeled |0|0|) located on the CPU module, and then connect the 08-9 connector to a COM RS-232 communication port on your computer.
- Establish serial communication with the device using a terminal emulator program such as HyperTerminal. with the following communication port settings:
- 115200 baud rate
- 8 data bits
- No parity
- 1 stop bit
- No flow control
- At the CLI prompt, type the userame (default is Admin):
Username: Admin
- At the prompt, type the password (default is Admin):
Password: Admin
- At the prompt, type the following command:
MP-1288 FX5> show system version
- The output of this command displays the device's DHCP-obtained IP address, as shown in the example below:
Version info:
---------------
;Time 8 Date: 08/07/2020 11:13:34
;Device Up Time: 0d:2h:33m:53s
;Board: MP-1288 FXS
;Board Type: 86
;Serial Number: 9164073
;Software Version: 7.20A.256.399
;DSP Software Version: 5033AE3_R => 723.04
;Board IP Address: 10.15.77.128
;Board Subnet Mask: 255.255.0.0
;Board Default Gateway: 10.15.0.1
Note: To configure your MP1288 with a static IP, follow the instructions above to change the IP network settings. The current MP1288’s portal (with default IP) will stop responding and the new IP network settings will take over. Make sure the settings are done correctly, otherwise, the portal will not be accessible. Performing a factory reset will restore the IP network settings.
Obtain the MAC address of the MP1288
After changing the network settings, access the MP1288’s web interface to obtain the MAC address:
- Enter the MP1288's IP address in a web browser to access its web interface:
http://your_IPv4
Note: The default username and password is Admin and Admin. - Under SUMMARY, click MONITOR then Device Information to obtain the MAC address.
- Add the MP1288 to the Zoom web portal.