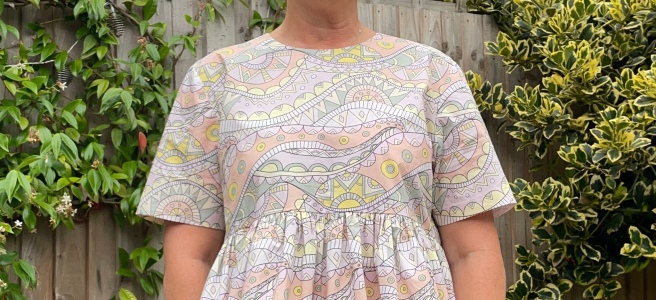
I bought 3 metres of this gorgeous viscose crepe fabric (originally bought from Fabric Godmother in July 2020 in probably long discontinued) but it sat in my stash for nearly 3 years before I could decide what to make with it! The problem was that I liked it so much that I didn’t want to waste it on something which didn’t show off the beautiful ‘ceramic tiles’ print, utilise its gorgeous drapey qualities, or which left too much wasted. I would regularly get the fabric out and pin it onto Doris in various ways to see if I could settle on anything in particular. I knew it had to have simple lines and I didn’t want complicated pattern matching to break up the design. In the last year I’ve made a number of LB Pullovers from Paper Theory and it occurred to me that the top was just the right shape to use for the bodice (minus the sleeves and collar) and then I could use what was left for a skirt.
Washed and ready for a three year wait….Four versions of the LB Pullover, so far
I used approximately 60cms for the bodice (I was able to place the front and back side by side across the width) and then everything that was left I cut into strips across the width following the ‘tile’ design. I had enough to make 3 tiers to the skirt and, ideally, each one would have been twice as long as the one above but there wasn’t really sufficient for that. I reckon the tiers were more like one and a half times as long so that would have to do.
I finished the neck edge with narrow binding which I managed to eke out of the remnants. I sewed a reasonable amount at the penultimate Herts Sewcial in early March and then finished the rest later at home. I was over-confident in the fit though because when I tried the finished dress on it was too big. I wanted slightly over-sized and my previous LBs were all a good fit but this crepe fabric had ‘grown’ a bit so I needed to bring the sides in to give it more shape. On the inside at the waist and running horizontally across the side seams I made a wide channel about 25cms long by 5cms through which I inserted elastic approximately 12cms long that pulled up enough for me to be happy with the effect. I finished the dress ready to take on holiday, our first cruise in more than 3 years.
Each tier is as deep as the tile print.
Happy Anniversary to us and cheers to 34 years married!In the fancy atrium of the shippratting about in the fancy atrium of the ship!It’s a bit hard to tell which is front or back so I sewed in this helpful Kylie and the Machine label
It might have taken nearly three years to get there but I’m really pleased with the final result and I know I’m going to enjoy wearing this dress in the coming months.
Do you dither as long as me about what to sew with fabric you love? I can’t be the only one who gets their various fabrics out periodically, strokes it, considers it, matches patterns to it and then folds it away again until next time!
It’s been a while since I wrote my first blog post for Backstitch way back in January but I’m happy to say that I have loved wearing the Ellsworth shirt I made then, it’s been a great addition to my wardrobe.
For my second post I’ve sewn a Homer and Howells Ingrid dress. Like many popular styles circulating this year it’s a loose-fitting dress but the USP of the Ingrid is its unusual asymmetric style lines.
The front and back are both quartered by differing horizontal and diagonal seams, plus the bust shaping is in the form of tucks in the centre front seam. It pops on over the head so no zips to insert, there are inseam pockets and a choice of two skirt lengths and two sleeve shapes.
I felt with all this unusual seaming going on that I didn’t want a busy printed fabric which disguised it (that said, you could have fun with stripes or even checks) My original plan was to use needlecord and deliberately cut the pieces in opposite directions to highlight the shading this would create.
However I wasn’t sure that any of the colours available in the shop at the time I was making it were really very ‘me’ so I plumped for the saffron yellow Broderie Anglaise double gauze instead! [I made this handbrake turn decision partly based on having recently seen a woman wearing a similar style RTW dress made in grey Broderie Anglaise and the fabric looked great, not too ‘girly’ or twee at all]
The stitching on Broderie Anglaise fabric usually has a right and a wrong side if you look closely at the embroidery but it isn’t always very obvious. My advice would be to choose the side you prefer and stick to it throughout! Because virtually every piece of the Ingrid is cut as a single I pinned paper labels onto each one so that I didn’t get them mixed up. Alternatively you could use small sticky dots to differentiate.
I gave the fabric a pre-wash before cutting, there was virtually no dye run and no obvious shrinkage either. Because of its asymmetric shape the Ingrid is almost all cut from a single layer of fabric so I would highly recommend keeping each pattern piece attached to the fabric until you’re ready to use them, or label them as I’ve suggested earlier. [Incidentally, if ever you’re short of fabric for a project, check if you can cut it out of a single layer rather than folded, it’s always more economical…just make sure you mirror everything as necessary] Helpfully Backstitch sell their fabrics in 25cm increments which can mean a lot less wastage, I bought 2m25 for this dress.
I pinned rough labels to the pieces so that I knew exactly which one was which.
I found the instructions and diagrams for construction nice and clear and very straightforward, do read them through a couple of times first though because I made assumptions about the order of making in a couple of places which would have led me up the garden path and some unpicking. The right and left dress parts are sewn tops to skirts before joining vertically at the centre front and back. Some of the seams which would normally match one another on more conventional styles don’t on the Ingrid because of the asymmetry but if you start pinning at the top of each seam down to the hem you should be fine.
The fabric sewed up nicely although be aware that the weave of double gauze causes it to have a little inherent stretch so try not to pull it about too much during construction, and pressing causes some of the natural crinkles of the cloth to flatten as well but they will bounce back after the next wash.
I made a couple of other small deviations from the pattern by using self-fabric bias binding instead of the neck facing. I cut a bias strip 4cms wide, folded and pressed it lengthwise before sewing the two cut edges to the neckline on the dress. Next, I understitched the seam to the inside then finally topstitched it down to finish. I also chose to sew my own thread loop for the button at the back neck rather than try to make a rouleau loop with such ‘bobbly’ fabric, I was delighted to find a button in the shop which is a great match to the fabric colour.
marking the centre front point on my folded bindingPinning the bias binding in positionClose up of the centre front seam details
I wasn’t convinced that either skirt length would be quite right on me so I went somewhere in between, finishing a little below knee length (I’m 5’5”) I wanted longer sleeves too so I used a bell-shaped pattern with a cuff which I had drafted myself for a different dress earlier in the year.
My sleeve has a fixed cuff with gentle gathers (incidentally, the colour here is paler than in reality, the outdoor photos of the finished dress are much more accurate)
Finally, I turned up the hem by 2.5cms and then used one of the huge range of embroidery stitches on my Pfaff machine to sew it up, it took a while to go all the way around the hem but I love the little detail it gives.
The hem is finished with a machine embroidery stitch
The only fitting change I will probably make if/when I sew another Ingrid is to slightly reduce the width of the shoulders, the sleeves cause them to droop off my shoulders a little but it’s not a major issue. I sewed the UK14 with no fitting adjustments other than the length and it’s very comfortable.
The back seams are asymmetric tooThe button and hand-sewn loop
Thank you to Backstitch for providing me with the fabric and supplies to sew with by means of gift vouchers, the Ingrid is not currently stocked in the shop though. Broderie Anglaise might not be typical winter fabric but I love the sunny colour on a miserable English day.
I hope you’ve found my review helpful, until next time,
First a bit of preamble, because the origins of the fabric I used for this top were important. In June 2022 me and Mr Y were finally able to return to mainland Europe again for a four day stay in Florence, one of my favourite cities. We knew it would probably be very busy with visitors during the summer but frankly I didn’t care about this, I was just so happy to be able to see all those magnificent buildings and beautiful art again.
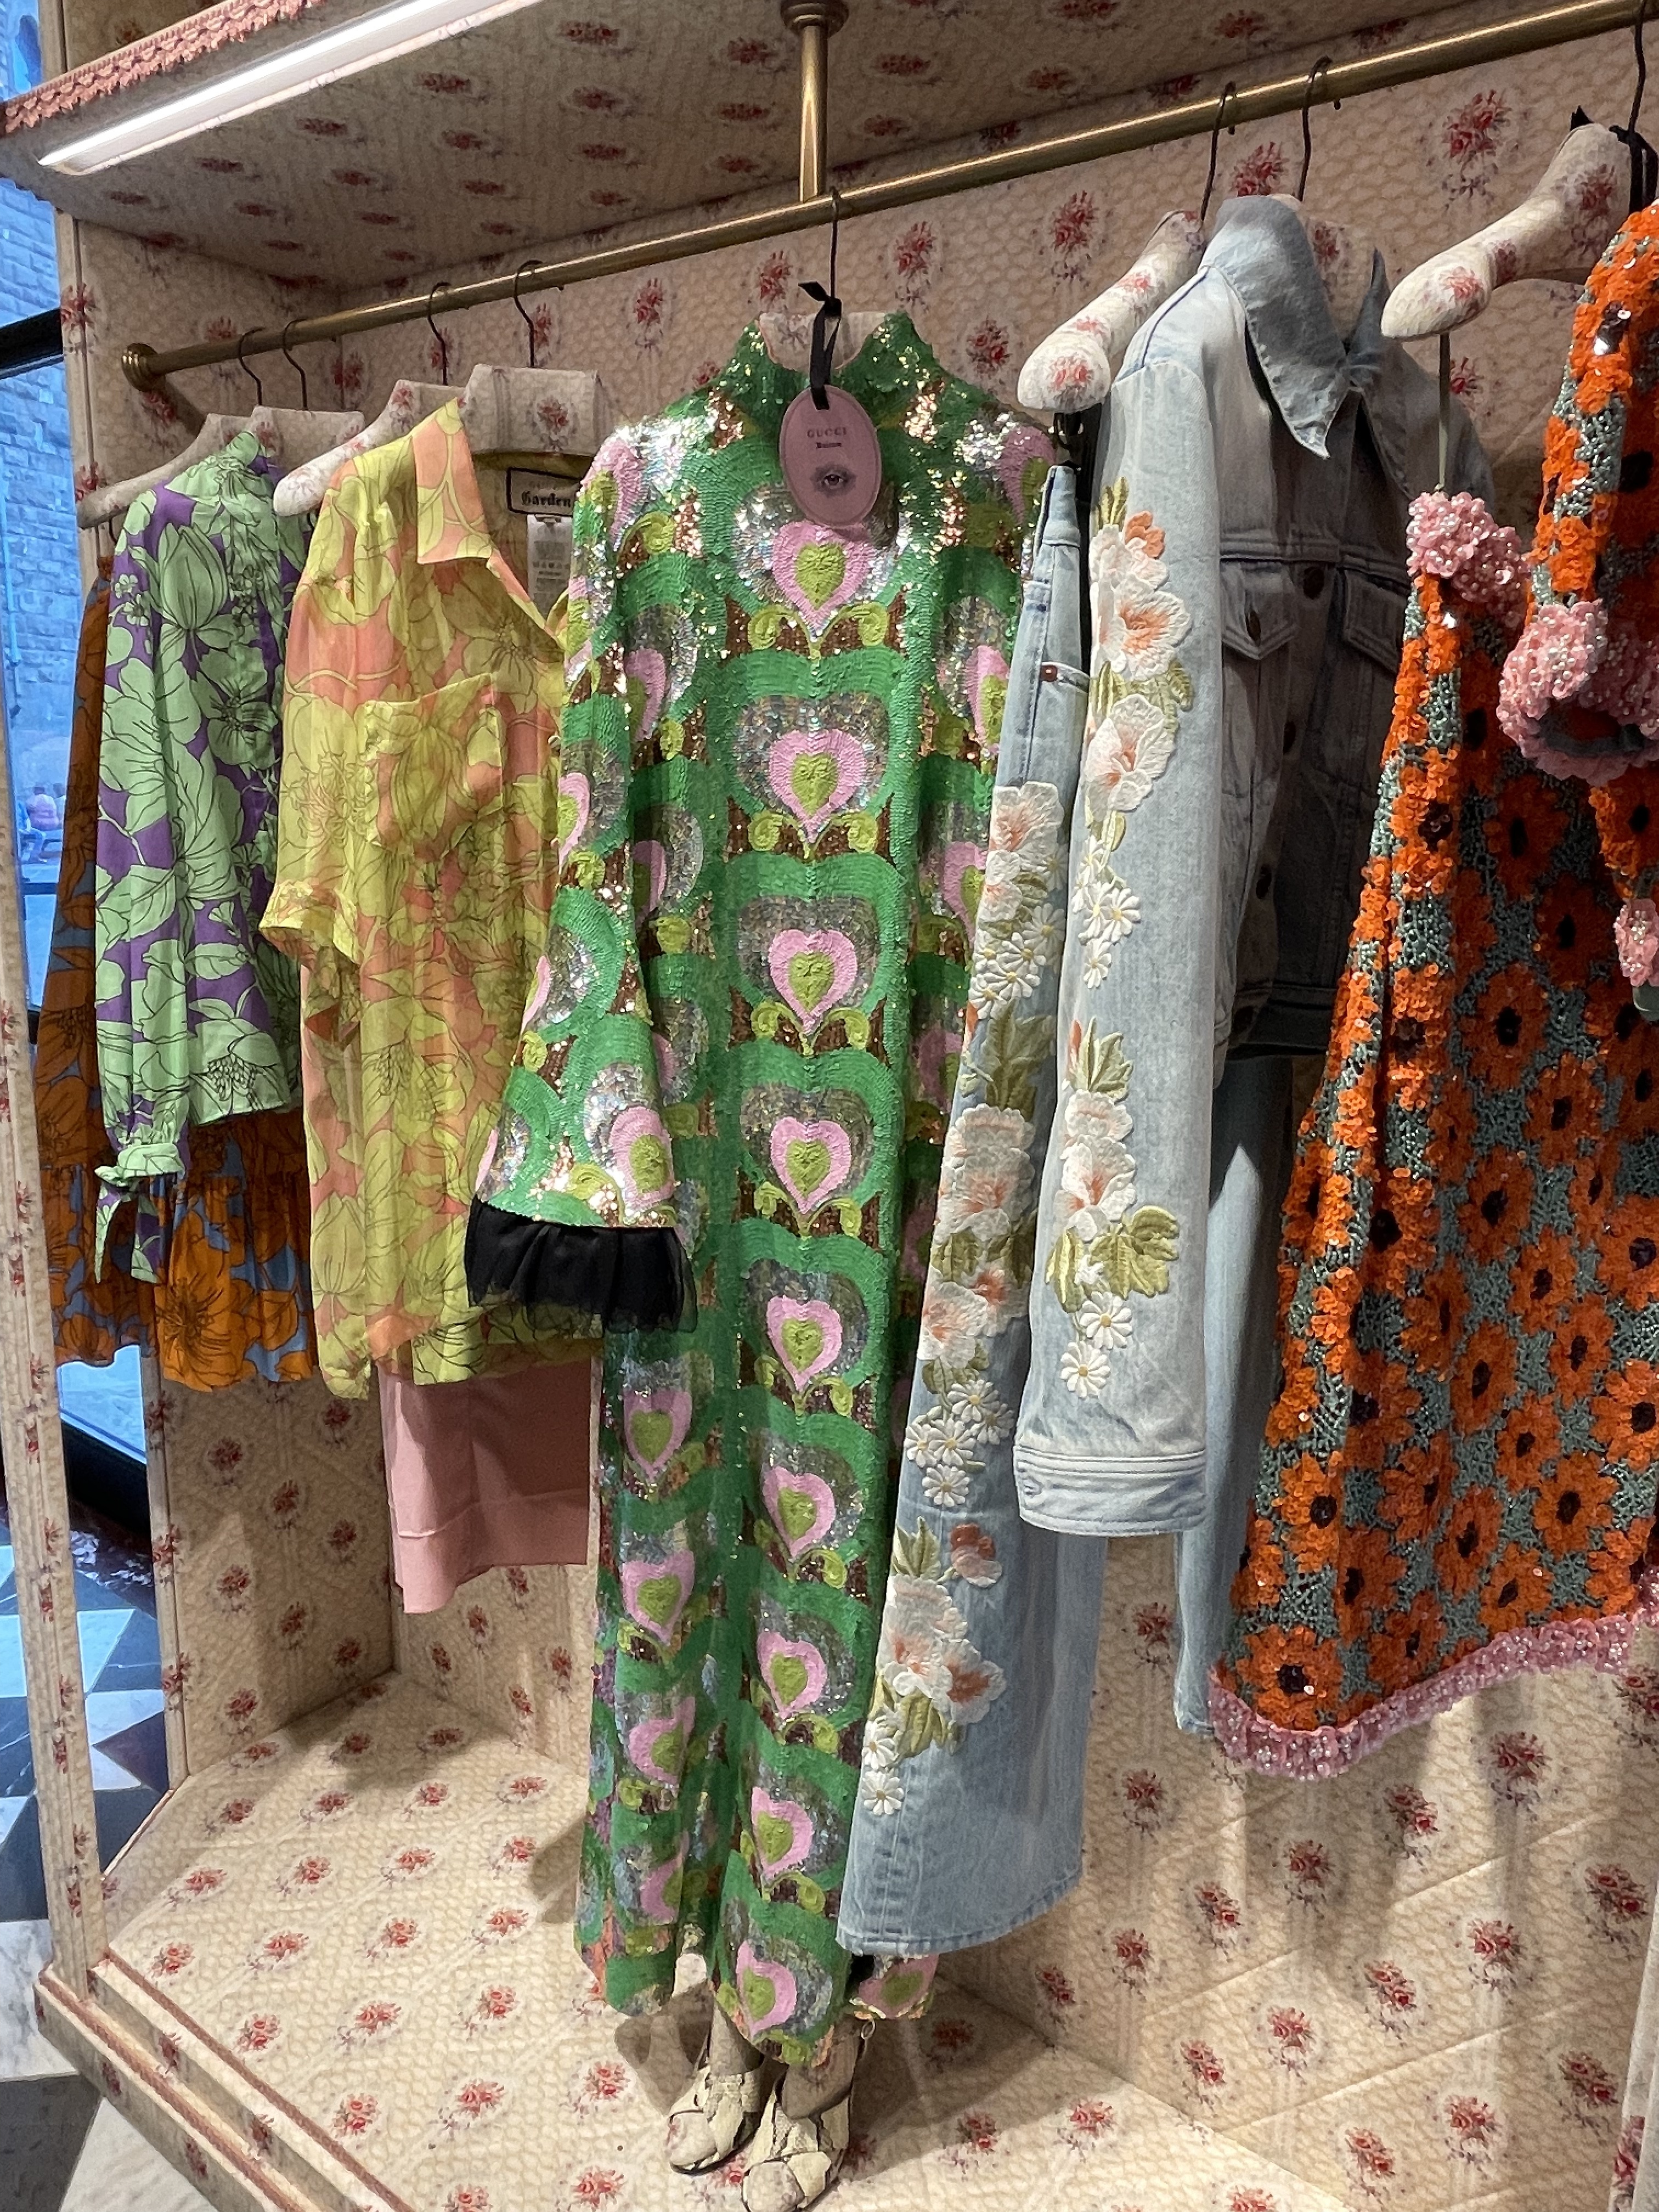
In between looking at the art and strolling the ancient streets I indulged in a little window shopping at the stores where I can afford literally nothing, including Alexander McQueen, Missoni and Gucci.
I could get a closer look at the details in the Gucci store that is based in the Gucci exhibition (worth a visit)Missoni….obviously, look at that extraordinary panelled dressAlexander McQueen…be still my beating heart
Amongst all these shops though I *may* have come across a fabric emporium….In truth, there are quite a number of fabric shops in Florence, what with this being Italy and home of fabulous quality textiles.
I failed to make a note of the name of this particular shop but it was very close to the Duomo and the Baptistry. I didn’t go in (thankfully it was shut at the time!) but they clearly specialised in very high-end alta moda fabrics which were nowhere near my budget!Stunning beaded silk cloth
I had, however, been given the name of another more accessible shop by a kind Instagram follower so we set off to find it with only the vaguest idea where it was. Bacci Tessuti is quite close to the Medici Chapel and San Lorenzo and, with a little help from Google Maps, we found it eventually.
The air-conditioned shop was a very welcome haven from the extreme heat Florence was experiencing during our visit and I was not disappointed by what I found, there is a wonderful selection of lovely cloth to browse.
The choices in a beautiful store like this can be quite overwhelming so I had a sort-of plan to buy something which felt ‘Italian’ to me. I set out looking at their fine linen, personally I would call it handkerchief linen and it’s much lighter and softer than most of the heavier and more durable linens I’ve seen on sale in the UK. I homed in on one with a large design in blue, red and pink flowers (I love a floral fabric but I don’t often wear it) but this one ’spoke’ to me. So that was great but then the helpful shop manager, who spoke excellent English, pointed out the Liberty Tana lawn he had at a very good price! I would have resisted but my husband wanted to buy some for me so who am I to turn him down!
These were going to be my total purchases but when I went over to the counter the manager told me that the linen cloth was by the textile designer for well-known Italian brand, Pucci. At this point he produced from under the counter several short length pieces of some beautiful Italian designer fabrics including Dolce and Gabbana! They were all very lovely (and still expensive) but I wouldn’t have a use for them. The one I did fall for though was a small piece of silk/cotton cloth from Pucci with their trademark psychedelic design in delicate ice cream shades. It still wasn’t cheap but it was just a bit different and there was enough to make a top of some kind. So of course it came home with me…
it’s a bit crumpled from the wash after I got it homeThe linen is on the left, plus the two pieces of Tana lawn bought by my husband, and that was my view from the hotel in the background, straight over the Arno with the Ponte Vecchio just to the left.
With my purchases safely stowed away we got on with enjoying the rest of our holiday (although I spent a fair bit of time planning in my head what I was going to make when we got home!)
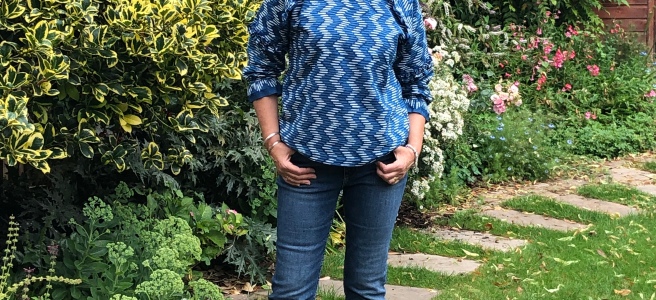
Initially I was going to use this ‘vintage’ Style pattern as is (I bought it new in 1988 so it’s a little upsetting to think of it as vintage!) I used it several times back in the day, and I’ve sewn it again a couple of times in the last few years. The back buttons are the feature I like, the rest is basically a woven T-shirt.
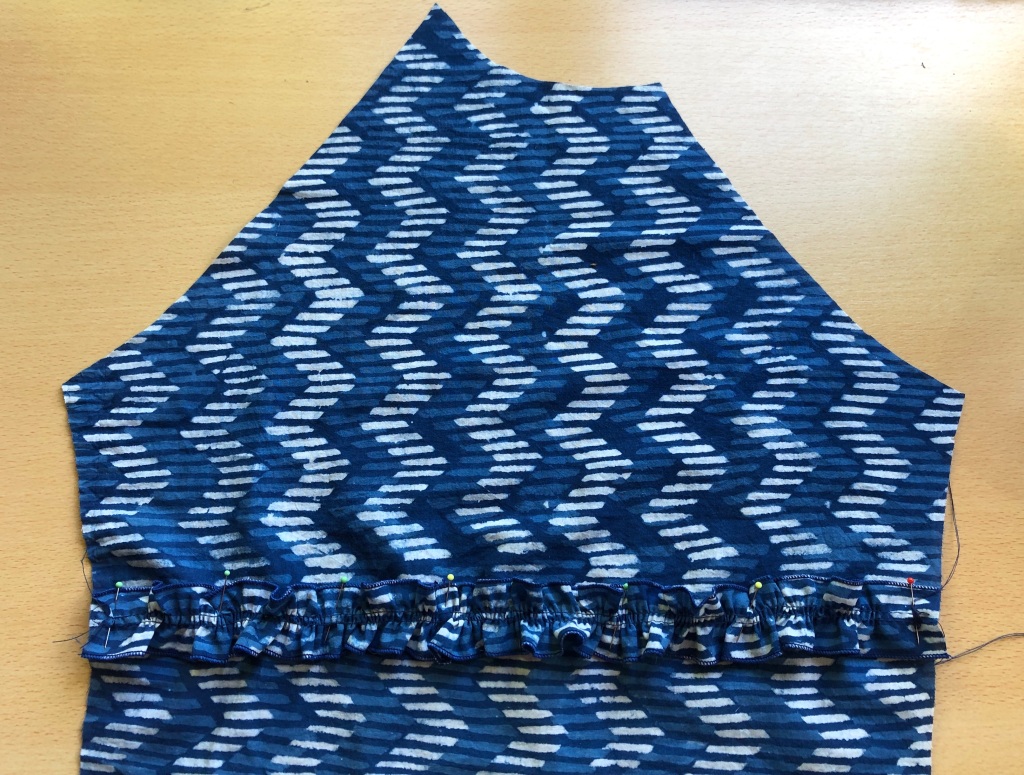
As I said earlier, I had no more than 1m30 of fabric to play with and I still wanted to do a decent job of matching the print as best I could. The basic pattern fitted on the fabric, it’s only a front, back, sleeves and facings, but I thought it might look a bit meh, and there would still be some wastage. After a bit of a rethink, by shortening the body and making two deep ruffles across the width of the fabric I knew I would get a much more interesting design and have very little wastage in the end.
Basically it was a case of working out how long I could afford to make the top section and still get ruffles that were a balanced length [I had the Merchant and Mills Florence top in my head as inspiration] I took a line horizontally straight across to the centre front/back from the side seam approximately 15cms down from the bottom of the arm scye of both the front and back. What I should have done if I had stopped to think about it was make the centre front longer, I didn’t though and as a result the front hem lifts up because of my bust. The back is fine though.
The first dashed line is roughly where I folded out the pattern to make the horizontal seam, the curved dashed line on the front is how I should have shaped it.
I was able to cut the front and back pieces side by side on the folded cloth which meant the design ran smoothly around the garment. From the remaining fabric I calculated how deep two full widths of the fabric could be (approximately 28cms each strip) and still have enough to get two sleeves and the neck facings out too.
Once I had all the pieces it was just a case of assembling. First I did my usual scavenge through my button boxes to find enough suitable colours in matching sizes. After joining the shoulder seams and attaching the neck and back facings I sewed all the buttonholes at this stage, by doing this first it meant I wasn’t fighting the bulky seam of the gathered ‘skirt’ later.
My usual mash-up of various buttons down the backBy sewing the buttonholes at an early stage meant I didn’t have to struggle getting the bottom one under the buttonhole foot with the gathering in the way.All finished. I know I’m just being fussy but you can probably see what I mean about the top rising up at the front slightly. There is no bust dart on the pattern which would have made a difference.I’m pleased with how the top uses almost all the fabric and shows off the print to good effect, I didn’t want to chop it up unnecessarily and there weren’t many options with the small quantity I had anyway. I had to use a very narrow pin hem on the ruffle to maximise the length, the sleeves had their normal hem allowance on them. If you want a few more ideas for finishing hems I wrote this blog a couple of years ago which you might find useful. I opted to have the ruffle run straight across the back rather than have an opening (this was because I was being lazy and didn’t want to make a facing and sew more buttonholes!!)The top is shorter than I’ve worn in the recent past but I like the look, especially with the flat-fronted Eve pants by Merchant and MillsOut in the wild at Africa Fashion which is on at the Victoria and Albert Museum in London until 16/4/23
As for the other Italian fabrics, I have plans to make a shirt dress with the beautiful linen, I have a design I’ve drafted and sewn a couple of versions of but there’s probably still a few tweaks I want to make to it before making it in the ‘real thing’. The Liberty lawn is waiting for the right project to present itself too, no need to rush these things. I’m all for sewing the good stuff but it’s really upsetting if you sew a dud with it!
Essentially it’s a raglan cropped-sleeve sweatshirt or dress with ribbing cuffs, hem and neckline. The sleeves have darts at the shoulder to give them some shaping and the neckline is quite scooped out. Most of the sweatshirts I’ve made in recent years have been quite baggy and over-sized so I thought I would try the closer fit of the Fielder for a change. Based on my own body measurements and the finished measurements given on the packet I opted for a UK size 12, and I lengthened the sleeve to be wrist length.
I bought the unusual ‘quilted’ fabric from the M&M stand at the recently-revived Knitting and Stitching Show at Alexandra Palace in London. It was so good to be able to browse a whole selection of stands once again, it had been over 18 months since any of us were last able to do that. The colour reminds me of old-fashioned sticking plasters, the triple-layer fabric is a clever weave but the loose threads through the middle layer do come adrift quite easily. Because of this I overlocked every piece around its edges to prevent further disintegration. I also stay-stitched the neck edge before it had a chance to stretch.
I couldn’t get any ribbing in a colour I was happy with but I found this brilliant wide elastic in MacCullogh and Wallis with it’s pink/beige stripe blending into black.( Can’t find this exact product on their website, I bought it in-store, they do have similar items online though) The next challenge was how to attach it without losing any of the colours. I tried out laying the elastic over the top of the overlocked edges like this and that seemed satisfactory. I lined up the pink stripe with the O/L stitching underneath which created a suitable overlap.I tried out a few stitch options and settled on this closed overlock on my Pfaff It calls for the blindhem foot to be used which meant I could follow the red guide along the stripe.The finished stitch is nice and stable and looks good too.The next challenge was neatening the neck but, as you can see from the photo above, the width of the elastic meant it stood away from the neck and was all wavy.I pinned it on though and had a ponder on how to solve the issue while I went out for a run….I came up with the idea that if I could get rid of the fullness on the outer edge (like I’ve pinned it out here) then that might work. I sewed the elastic on in the same way I had on the cuffs and hem and pinned evenly and in alignment with each line on the check design. Next I folded and pinned each pleat evenly, the chalk line and pencil marks where I would start and finish the line.I used the width of the presser foot as a starting point to sew down to the bottom of the triangle.a completed triangle.This is how it looked after I’d sewn all the triangles and I was pleased with the result. The idea worked but now the triangles weren’t flat inside against my neck.I tried topstitching each one from the outside to see if it would flatten the triangle sufficiently.It worked! I pushed them all the same way instead of having some going in one direction and some the other.The end of the elastic was folded over and stitched with two lines at the CB, it ain’t perfect but I’m pretty pleased with end result! I thought I was going to have to settle for an alternative ribbing/binding of some kind on the neck which wouldn’t have linked so well with the hem and cuffs so I’m delighted with how well this has worked out.I added this gorgeous little label given to me by my friend Alana (and available from Rosy Little Cheeks) on the back, I think it’s perfect, and true!
I haven’t mentioned the rest of the garment construction because it’s a very straightforward sew, I just made it a bit harder for myself…but in a good way.
As I said in an Instagram post, whilst I’m really pleased with he finished result as a garment, I’m not 100% convinced about the fit yet. The fabric is an unusual alternative to traditional sweatshirt fabric, although it creases more and there’s no stretch either but I think it will come to like it. I’ve got plans to make a plain white button-up shirt to go under things this winter (most of mine are over-sized like the sweatshirts!) so I’ll probably layer it up under this, or a roll-neck perhaps?
Anyhoo, that’s one way to elevate a plain top into a slightly more interesting one (IMO!)
There’s been quite a lull in my sewing and blogging of late due to a distinct lack of motivation and generally feeling meh about everything. I don’t know about you but I’m utterly cheesed off with the persistence of the ‘Rona and, whilst I really try to find the positives as much as I can, there comes a time when I’m all out of good thoughts.
Anyhoo, I’ve finally managed to get my act together and to cut out and sew something which is worth blogging about!
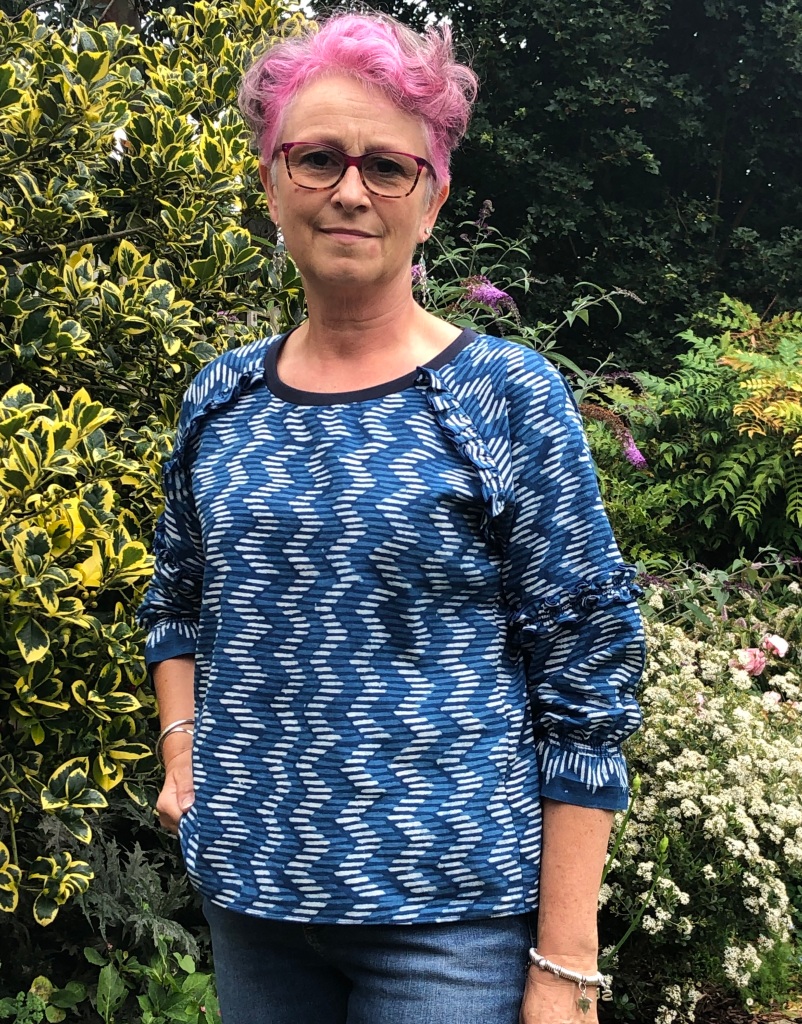
You’ll know I use The Sewing Revival patterns a lot, and especially because they are SewOver50-friendly in their representation. Janine kindly offered me a copy of the new and improved Kingfisher top recently so here are my thoughts on it. The original version was one of the first in the Sewing Revival collection and it now features extra variations including 3 sleeve lengths and additional ruffles and frills to gussy it up.
Initially I’d settled on using a length of fabric I bought recently but in the end, whilst searching-sorry-shopping, my stash I came across a length of batik-printed lightweight cotton which had originally been a dress. I bought it as a remnant which was in two different-sized pieces pieces so I joined them right across the weft to make it useable. From that I turned it into a simple ‘pillowcase’ dress with a gathered drawstring top and hemmed at the bottom. Needless to say, this being England, I didn’t get a massive amount of wear from it because our climate is so unreliable. Sadly I don’t seem to have a photo of it now so you’ll just have to believe me.
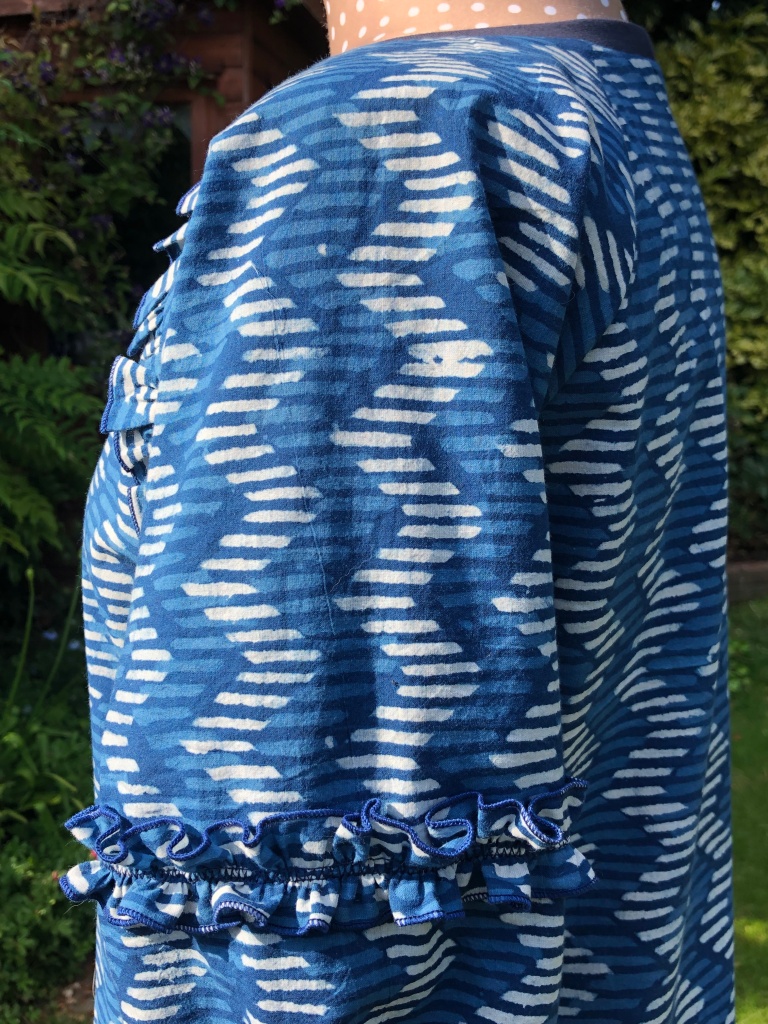
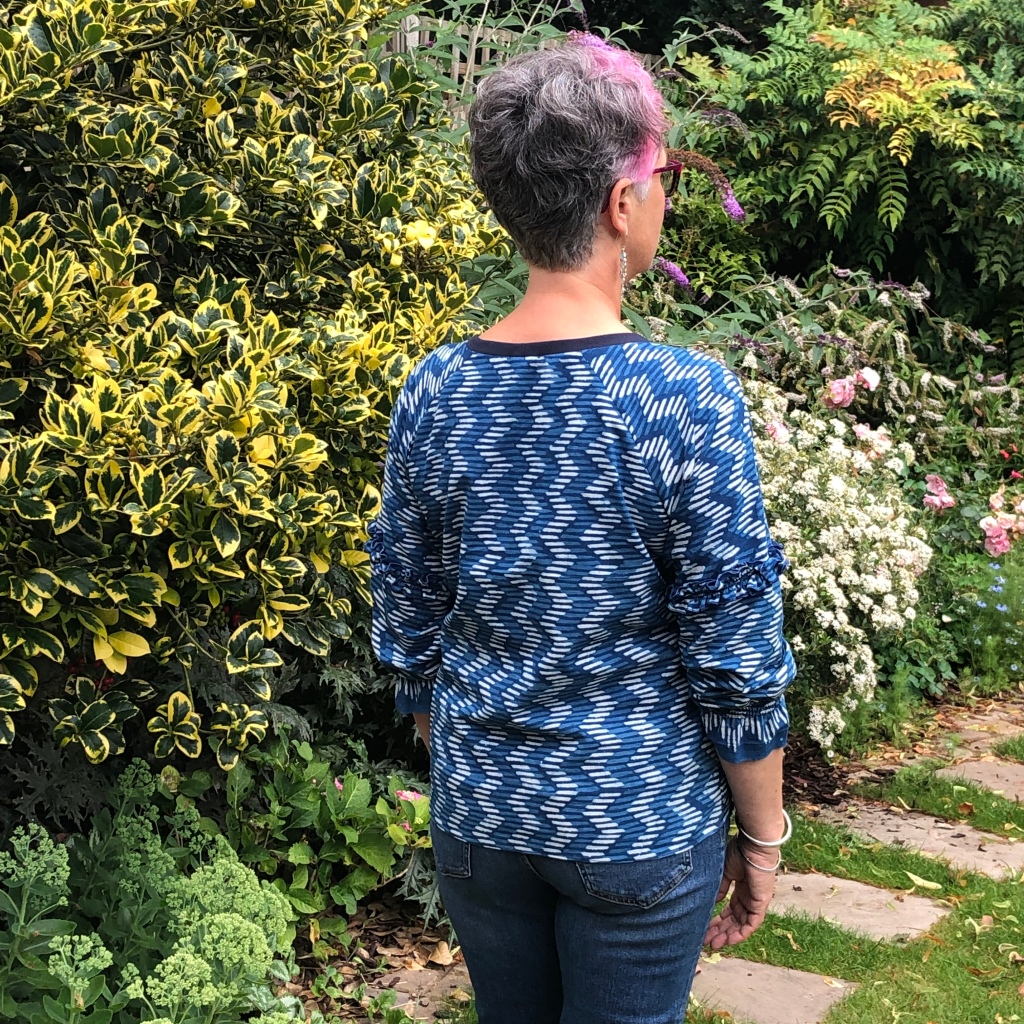
The Kingfisher has raglan sleeves which are always so nice to make because they are simple and quick to construct. One of The Sewing Revival’s trademarks is to mix a stretch neck band, cuffs or hem with a woven fabric and this top features a ribbed, rounded neck band. But first I had to get all the pieces out of a length of fabric with a join across it at about 50cms in, plus a tear at right angles to the selvedge in another place AND a small hole just near that! I calculated that I could get a pair of 3/4 length sleeves but one would have to have the seam running horizontally across it. Another new feature of the Kingfisher is additional small ruffles to add so, instead of placing them vertically on the sleeves, I opted to cover the seam with horizontal ruffles, that way way both sleeves would look the same. After a bit of pattern Tetris I got everything I needed out including the ruffles. I started by making the sleeves.
Inside the sleeve with the exisiting join running horizontally
Because of the limitations of the fabric the ruffles were only 5cms wide so, in order to lose as little of their width as possible, I finished each edge with a rolled-hem finish on the overlocker. Check your instruction booklet because I’m sure many models will offer this feature, it will involve a few simple adjustments to the settings to achieve. A rolled hem is a quick and attractive way of neatening fine or lightweight fabrics when you can’t afford to lose too much off the edges.
Each ruffle was cut twice as long as the width of the sleeve because the fabric is quite fine and will gather up well. If you are limited for fabric (mine were cut on the straight grain) or if your fabric is quite stiff or thick, then 1.5x the width will be fine. I sewed a rolled hem on both edges of the sleeve ruffles and then ran two rows of a long gathering stitch along the centre line. Make sure the gathers are evenly distributed before sewing the ruffle down, I used a zigzag stitch to sew the ruffle in place.
I created a cuff to finish the sleeve ends by cutting two pieces of fabric from along the selvedge and sewing them on. My original plan was to create an elasticated cuff using a casing but then inspiration struck(!) and I sewed three rows of shirring instead.
Shirring works best on lighter-weight fabrics such as soft cotton-types [lawn, batiste, voile, Swiss Dot, pique, poplin if it isn’t too stiff] also most viscose/rayons, many silks, and fine woollens such as challis. This isn’t a definitive list by any means, basically nothing too thick, or stiff or overly ‘bouncy’. As with anything you’re unsure about I’d strongly suggest sewing a few samples first to see how it goes.
To begin (and these are very much my own thoughts on shirring, you will find many others which might vary to these-trial and error before you startis the best plan of action) you ideally need a bare minimum of 1.5x the eventual finished measurement but as a rule of thumb I would say at least 2 or 2.5x your finished measurement, especially if the fabric is very fine. I also wrote advice on shirring the back of a sundress in a previous blog post which you can still read here.
Gently windshirring elastic onto your bobbin by hand, do not stretch it as you wind, you will use regular sewing thread on the top as normal. Set your stitch length as long as possible and, sewing on the right side of the work, make sure you backstitch at the start to secure your threads then sew your first row of stitching. Do not backstitch at the end of the row, carefully remove the sewing by gently pulling the elastic out so that there’s enough to tie off the ends eventually. Repeat by sewing parallel to the first row of stitch as many times as you require, I’ve just done three for the cuff. You could draw on the lines using a marker pen or chalk if it will help, I just keep the edge of the foot in line with the previous row of stitching. The work will gradually start to pucker up as you increase the rows. The photo above shows you what it looks like on the reverse. This is the right side of the cuff, wherever possible work with the fabric flat and then joint it in a seam or to the next piece it’s connected with. It won’t be gathered up enough to start with so hover your hot iron with plenty of steam over the area and it will pucker up a lot more. When it’s gathered as much as it’s going to tie off or backstitch the threads/elastic to secure.In the photo above, the top cuff is before the steam was applied and the lower cuff is afterwards, you should be able to see that the stitching is a fair bit tighter-looking. Next I added small ruffles to the front raglan seams, also neatened with the rolled hem finish just on one edge. The rest of the Kingfisher was very straightforward, the ribbing band went on neatly and gives the neckline a nice finish. You could also use bias binding or make facings if you don’t want to deal with stretch but I like it like this. Close-up of the finished neckline, I think I bought the navy ribbing from Lamazi Fabrics a little while ago. Sleeve ruffle
I cut this top in a UK10 so it’s a closer fit than some tops I’ve generally made but I’m really happy with the fit, there’s still ample room for comfort and movement. From a fabric that was languishing in a box I’ve concocted a casual top I can wear in warmer or cooler weather.
Thank you to Janine for providing me with the pattern, I hope my review will be helpful, for a such a simple shape there are so many possibilities with it. If you haven’t tried any Sewing Revival patterns I’d definitely suggest you pop over there and take a look, and if you choose to follow any link I’ve created in this post or previous TSR ones, and you then make a purchase, I will receive a modest fee from it. You can also read my previous reviews for the Sidewinder pants, the Heron dress plus a hack, the Bellbird top and the Fantail top and it’s follow-up. If you want any more inspiration use the hashtag #KingfisherTop on Instagram or Facebook. I’ve got plans for a deep-cuff version later in the year, just so long as I don’t have another creative slump…!
Welcome back and thanks for reading this far, I’ll try not to leave it so long next time!
Two years ago I wrote a review of the Sewing Revival Heron dress which you can still read here. I liked the pattern so much that since then I’ve made another knee-length version in a viscose/linen mix fabric from Ditto in Brighton and a blouse variation too in a beautiful soft Italian cotton voile, also from Ditto. I wore it often although not so much lately…
my very first version of the Heron dress…it has pockets!
While I was at Sew Brum in October 2019 I bought some lovely soft brushed printed viscose twill from Barry’s Fabrics with the express intention of making another Heron but this time making it longer and more cold weather-friendly. There had been a lot of Wilder Gowns by the Friday Pattern Company popping up everywhere at the time, I liked the tiered style a lot but I knew I could create my own take on it by using a pattern I already had. A multiple-layered skirt like this isn’t difficult, it’s really a case of working out the number and sizes of rectangles you want to use. If you take a look at this post I wrote about recreating a sun dress for a client in 2019 you’ll get the gist. Because I like the top section of the Heron so much I decided this was a good pattern to use and it wouldn’t be difficult to adapt it to what I wanted.
All the quantities and proportions I have used for this dress were completely arbitrary and had to be based primarily on the quantity of fabric I’d purchased [which I can’t actually remember as it’s well over a year ago, probably 3m of 150cm wide fabric I’d guess] and my own height of 5’5” so bear this in mind if you decide to have a go yourself. I wanted the dress to be nice and long so eventually I settled on approximately hip length for the bodice, the finished length of the side seam is now 40cms. I folded the front and back dress pattern sections up out of the way when I pinned them to the fabric (obviously you could trace or print off a new copy of the PDF if you wish) Once both bodices, sleeve and pocket pieces are on the fabric [pockets could be cut from something else if you’re a bit short of fabric] I could see exactly how much I had left to create the skirt from. I kept it very simple and divided the remaining fabric into two equal rectangles across the full width, each one measured approximately 56cms long but that had to include the seam allowance at the top and a hem at the bottom.
Initially the construction of the dress followed the normal method up as far as putting the pockets into the side seams of the bodice as per the pattern.
Making the skirt was very straightforward, I joined the short selvedges to one another [if it’s a one-way design make sure the print is running the same way on both pieces] to form a large cylinder of fabric with two side seams. Press the side seams open, if you’ve been able to use the original selvedges they might not need finishing. I made the hem at this point too, it seemed easier than wrestling with a complete dress at the end, although this could have backfired on me if I hadn’t been happy with the length but I was pretty certain it would be OK.
I ran two rows of gathering stitches within the seam allowance of the top edge, I pinned them in position matching the side seams, centre front and centre back, plus the quarter seam positions too. Gather up carefully so as not to break the threads, small pleats would also work here especially if the fabric would be bulky otherwise, it depends a bit on the weight of the fabric to some extent. Once I was happy with the gathering distribution I sewed the skirt on and overlocked the seam.
And that was it. Now, I have to say that because I was taking a risk with proportions and limited by the quantity of fabric I’d bought that if I were to repeat this I would definitely make the bodice quite a lot shorter and make the skirt from more than one gathered tier instead. I’m happy with the overall finished length but I think the seam at the hip isn’t quite right. But, by wearing it with a narrow leather belt (there wasn’t any fabric left for a self-belt anyway) and bringing it in at the waist I’ve saved it, the belt gives it a lot more definition.
It got an outing without the belt before lockdown started last spring, it looked a bit too sack-like though
By the time it was ‘seasonally appropriate’ again last autumn I tried it with belt and much prefer it.
I added a tie at the neck this time using a bit of grosgrain ribbon which I had knocking about.
I grabbed a cheeky selfie in John Lewis with my sewing friend Ruth in the autumn, we can only dream of when we can meet up again at the moment though sadly. that’s my upcycled jeans jacket I’m wearing
The dress was finished around a year ago and these photos were shot in the autumn but it’s taken until now to write up. I just wanted to demonstrate how easy it can be to make your own version of popular patterns using one you already have-there’s a certain risk involved because it might not be completely successful but that’s always the risk anyway when making our own clothes-a style might turn out not to suit us after all, or we make a wrong fabric choice, or it could be a triumph so why not revisit what you already own before buying another pattern?
It’s been such a tough time for so many and being a part of the wider sewing community has been a very real lifeline for many people. Those of us that enjoy making our own clothes already realise the obvious benefits this can give us; total freedom to choose types, colours and patterns of fabrics as we wish, the ability to emulate high-end or high street fashion at the price-point we can afford and the skill to make clothes fit our own particular body type, to name but a few. It shouldn’t then come as a surprise that the wider world, whilst searching for activities to entertain and occupy them during the long weeks and months of lockdown, discovered (or rediscovered) that home sewing can be creative, absorbing and rewarding which is a VERY GOOD THING! Who knew there was a link between doing a creative activity and a more balanced sense of well-being??
To be honest it doesn’t matter what that activity is, or whether you’re really any good at it, the fact that it can take your mind away to other less stressful places for a time is what matters.
But at the start of the year none of that was of much interest to most. I was extremely fortunate in January to go on a cruise to the Caribbean so I made a couple of new things to fills ‘gaps’ but mostly I took old favourites…cue multiple photos of 3 versions of The Maker’s Atelier Holiday shirt on heavy rotation! One new item was the Trend Square dress I made in fabric given to me by Dibs from Selvedges and Bolts the previous year, I got a lot more wear later on in the summer.
Within a couple of weeks of getting back, Judith Staley and I hosted the very first Sew Over 50 meet-up in London. We very much hoped, and expected, that it would be the start of many more such meet-ups between followers of the @SewOver50 account all over the world but it wasn’t to be…not yet anyway.
If you’ve been reading my blogs for a while you’ll know that as well as meeting up for sewcials with fellow sewers I really enjoy my visits to exhibitions and galleries. At the end of February I caught up with Janet Poole who is a fellow Lamazi blogger at the Stitch Festival in London, I had such a lovely day shopping and chatting with her, and her friend Great British Sewing Bee winner Juliet too. We didn’t realise it then but we were very fortunate to be able to attend the event at all and I wouldn’t be surprised if others who went didn’t catch the-virus-that-shall-not-be-named because it was so crowded.
About a week after this I was able to go to the stunning new Kimono show at the V&A and, although we didn’t know it at the time, that was to be the final outing for several months…
So then we entered the first long lockdown and that’s when sewing (and some baking) became my primary occupation. During this time I had some blogging commitments for Simple Sew Patterns and Lamazi fabrics to complete. For my first Lamazi post I made a Trend patterns Bias T-shirt dress which was a tough make, not because the pattern was difficult but because I was making the dress for a wedding that never took place. And worse than that, I was making the Bride’s gown too so I still have an almost-finished dress waiting for the day that the wedding can happen.
In all honesty I hated how I looked in this dress because I had piled on weight and felt very self-conscious in a fitted dress. It was a lovely pattern made in beautiful fabric but I felt I was doing both a disservice. Eventually I did wear it in September by which time I had lost weight and it was a delight to wear! I’m sure I’m not the only one whose state of mind has fluctuated wildly this year and my self-confidence was rockbottom when this picture was taken.
I know I’m very blessed in that I have little to actually complain about in my life but that does not mean that these months of lockdown didn’t take their toll mentally so, when the call to help make scrubs came, it was something I could actually do! Eventually I made 10 sets, I believe they were headed to a maternity department in a London hospital.
I continued to keep busy by doing a few refashioning projects because the desire to make new things that weren’t going to be worn outside the house was just too depressing. I love the act of making clothes, the planning, the cutting out, the sewing, because that was taking my mind off what was happening in the real world but how could I justify making new clothes that I had little use for? Even dressmaking was starting to become a negative because I felt guilty about it. By doing some refashioning projects using things I already had, other than new fabric, I made a few items including pyjamas for my final Simple Sew post and another pair using the PJ pattern in the Great British Sewing Bee book written by Alex and Caroline of Selkie patterns and for which I had made a couple of samples. I used 4 old work shirts of my husband’s which were very well worn! I also made (eventually) two pouffes as well which took care of loads of scraps and off-cut furnishing fabrics and were extremely satisfying! I also refashioned a very old and redundant heavyweight cotton curtain into a Dawson coatigan by Thrifty Stitcher.
Early on in lockdown I had the pleasure of talking to Maria Theoharous for her Sew Organised Style podcast on a couple of occasions. I’ve set up a separate page so you can access this to be able to listen to her inspiring SewOver50 guests every week. One of our chats revolved around how we each arrive at our fabric choicesfor specific purposes or projects, I wrote this topic up as a post which you can read here, and I also wrote a further post which came from when I was guest editor on the @SewOver50 account and we talked about our cutting out processes-did we cut and make one thing at a time, or cut several things and have multiple projects on the go? Scissors or rotary cutter? Pins or weights? It was wide ranging and fascinating with so many excellent ideas and practices. I hosted another discussion about a variety of hem finishes later in the year and you can read that one here. Incidentally, by the end of this year @SewOver50 has reached an incredible 25,600 followers!!
hem finishesbatch cutting, or not?
One of my stranger tasks this year was to carry out a socially-distanced dress fitting on a doorstep! Before lockdown started I had been commissioned to make a dress for a work colleague of my daughter Katie. Thankfully I’d opted to make a toile of the bodice which I’d fitted just before lockdown kicked off so I managed to get the dress to a good stage of completion. However, I got to a point where I definitely needed her to try it on because even if she couldn’t wear it for the event she had hoped to, it would be nice for her to take delivery and wear it around the house!! So I went to their place of work and handed the dress over at arms length to Tracey to put on in the staff toilet, then she came out onto the porch where Katie, under my direction, pinned the dress for me. I took a few photos for reference too. From that I was able to finish and deliver the dress and my client was delighted with it…phew
One of the regular sewing highlights of the last 4 years for me has been the Sewing Weekender which generally takes place in Cambridge, UK in August. The organisers took the bold decision to put the whole event online instead which meant that many more people could ‘attend’ from all over the world. Myself and Judith Staley were delighted to be asked to contribute a video message each which was very nerve-racking but it turned out alright in the end. I published a transcript of mine here, along with the original video (you’ll notice that I had abandoned my signature pink hair by this time because, quite frankly, what was the point of bothering!) The Online Weekender also raised a significant amount of money which was divided between 4 charities.
As lockdown started to ease in the summer I was able to get out and about a couple of times. I joined an al fresco rag-rugging workshop in Hertfordshire run by Elspeth Jackson of Ragged Life which was so enjoyable, and I visited a couple of exhibitions in London including the Kimono show again, plus Andy Warhol at Tate Modern and Tricia Guild at the Fashion and Textiles museum both on the same day. Since then though things have been shut down then reopened, then shut down again. My heart goes out to everyone who is trying to run a business or an organisation that relies on visitors through their doors to make them viable, their future is very uncertain.
I’ve made a few other garments during the autumn which I’ve been really pleased with including the Prada-inspired shirt dress and a pair of Utility pants by Trend Patterns (not blogged yet) but I feel I’ve run out of steam with my sewing right now and I never thought I’d say that. My own teaching classes restarted for a total of 5 weeks in October but they’ve stopped again. I know some have adapted by using Zoom or other platforms but it just wouldn’t work for me, I feel dressmaking is too hands-on and needs real assistance for tricky bits, holding things up to the camera isn’t good enough sometimes. And being part of a group and all that shared enjoyment is a huge part of it too. I’ve had fairly regular online catch-ups with some of my lovely sewing friends and that has been a joy, albeit not as good as seeing them in the flesh.
Mr Y was the lucky recipient of a few handmade garments too during 2020 when I made him another two Kwik Sew 3422 shirts, and not one but two Thread Theory Finlayson sweatshirts! I’m happy to say he’s delighted with all of them and I’ve got plans for another sweatshirt for him in the new year.
I’m working on my own pattern which I’ve self-drafted so hopefully that will be something positive for the new year but I need occasional assistance from more expert friends and that’s making it a drawn-out process which would have been so much more fun person-to-person.
One final project I was commissioned by a friend to make was a Christmas chasuble for her to wear as she presides over her Christmas services in church. A chasuble is essentially a fancy poncho which the priest wears over their other vestments and Wendy wanted me to create one with a Nativity scene on it. She sourced the base fabric with my advice, and a printed quilting cotton Nativity which was sent from the US. This was square so I carefully cut it into approximate thirds with the central third featuring the stable scene and the star for the front, another third with Bethlehem for the back and the remaining third I cut into two parts to use on the stole, which is the long scarf priests wear around their necks. All of these I attached by appliquéing around the black outlines (I was literally making it up as I went along!) Wendy is delighted with the finished result (thankfully) and I’m sure she will enjoy using them during the Christmas season.
As I finish writing this (2 days before Christmas) we have no idea what lies ahead…some countries seem to be slowly recovering whilst the UK as a whole seems to be sliding further and further into disaster, or maybe not? I should try to think more positively as scientists have worked tirelessly to make a vaccine which will gradually be rolled out. Personally I’m a long way down the list for it but that’s absolutely fine, we must protect the most vulnerable first.
I’m making an effort to look cheerful in this most recent Lamazi blog make, but the wine was slightly off watered down Rosé from my daughter’s fridge and it was 10.30 in the morning! I’m genuinely pleased with the dress though and in spite of everything I’ll wear it on Christmas Day because there’s plenty of room for expansion!!
This has probably ended up not being a-not-entirely-coherent post but that’s kind-of appropriate I reckon! Wherever you are and whatever the new year brings for all of us I’d like to thank so many of you for reading my posts, sending me lovely or encouraging messages. Being a part of the online sewing community and Sew Over 50 in particular has been an absolute joy and a lifeline at times. We need to lift each other up more often, call out injustices when we see them but not to the extent that it becomes bullying of individuals, that isn’t right either. 2020 has been a year of huge upheaval, I plan to restart 2021 with fresh sewing plans to help me to feel more positive about it…it’s going to be a bumpy ride!
The Festive season is often a reason to make, or buy, a special new outfit to wear for office parties or Christmas Day but this year’s Festive season things will be very different for most of us. I don’t want to be entirely negative though so, as part of the Lamazi blogger team, I thought I’d make something which is a little bit Christmassy but will double up as a ‘regular’ winter dress too.
I’ve chosen the cord velvetfrom Danish Design in a gorgeous shade of aubergine-I’m always a sucker for purple-but it comes in several other beautiful rich shades including a sumptuous gold and a stunning teal too. I picked this fabric because it’s a medium weight stretch jersey and has soft pile which makes it lovely to the touch. I’ve made a dress but you could easily make tops or wide-legged pants in it, or babies and children’s clothes too because it’s washable and crease resistant.
Whilst I love a complex make to really get my teeth into I felt this wasn’t a garment which warranted lots of time. Making a special Christmas once-worn garment wasn’t appropriate any longer so I wanted something quite simple but adaptable and for that reason I’ve picked the Somerset T-shirt by Maven Patterns. I’ve made a few of these now, the bones of it are beautifully simple, it has a self-neatened bateau neckline, a slightly fitted silhouette and four sleeve options. I’ve chosen the Bishop sleeve with a long cuff but I’ve hacked the sleeve to make it even fuller, and I’ll lengthen the body to create a dress finishing below the knee.
Another idea was to add a flared skirt which looks nice but didn’t think I would use it as much as the straight version.
The Somerset has excellent very full instructions with lots of tips and advice to get a good finish. There’s a useful sheet to write all your information including body measurements and fit alterations, and a fabric stretch gauge to check you have enough stretch for the pattern to fit properly. You can also list the needle type and size you’ve used, stitch type and length and anything else you might want to remember for another time.
To increase the size of the sleeves I took the bishop sleeve pattern and drew 5 vertical lines from each of the notches from shoulder to hem. Each segment will become slightly wider as it gets nearer the bottom edge so make sure they are even in size.
Cut a piece of spot and cross or tracing paper bigger than the pattern as it is, mark a grainline running right down the paper and then lay the pattern piece on top of it, matching the grain on the pattern to the grain line you’ve just drawn. Next, I carefully cut up to the top of the marked lines taking care not to snip right through at the top, keep it attached by a tiny amount to act as a pivot point. [If you don’t want to cut your original pattern piece I suggest you trace off a new one to use instead] Then you splay the hem edge apart by a few centimetres each, I added 2.5cms between the each of the ‘side’ segments and 5cms to the central one. By doing this you’re adding fullness at the hem but not altering the sleeve head. You could put additional fullness to the sleeve head by opening the top edge too if you wanted. I lengthened the sleeve by 5cms too so that it would have plenty of blousy fullness into the cuff.
Trace around the new shape using a tracing wheel or pencil and cut out the new piece transferring all markings. One final change I made was to add a bias grainline because I knew I wanted to play with the stripe direction of the rib on the fabric.
I had pre-washed my fabric and partly tumble dried it on ‘low’ before letting it dry completely on the clothes airer, it seemed to survive the experience just fine.
I made an arbitrary choice of how long to make the dress by simply holding the tape measure at my shoulder and seeing where it came to at about mid-shin! I attached another piece of spot and cross to the bottom of the front and back pattern pieces and drew on the skirt length I wanted, plus a generous hem. I knew I would have to make some adjustments to the hip and thigh during the fitting stage, just make sure that the hip and thigh measurements are plenty big enough because you can always remove some, it’s much harder to add later!
The ‘cord’ runs across the width of the fabric and I wanted the rib to run down the length of my dress which meant I had to fold the fabric across the width. Try not to twist the fabric if you have to fold this way, I marked a single rib by following it across the width with pins so that I can see it clearly. Fabrics like corduroy, velvet or velour have a pile or ‘nap’ which will shade so if you cut some pieces facing one way on the grain and some pieces running the other way then you will end up with a garment that looks like it’s been made with two different colour fabrics, even though you know that isn’t the case. If you’re unsure what quantity of this type of fabric to buy go with the ‘with nap’ amount on the pattern information and follow the one-way layplan to cut out.
I marked the rib across the fabric with pins so that I could be sure it was folded correctly and would not be twisted.
Once I’d cut all my pieces I followed the making instructions which are very comprehensive. If you have a walking foot for your machine I strongly recommend you use it because velour like this has a ‘pile’ and has a tendency to ‘creep’ as you sew so you might find that it starts off with all the edges matching but by the time you get to the other end the two fabrics are no longer matching. I also strongly recommend you tack any seams you are unsure about. You could use a million pins but by the time you’ve done all that you could have basted it in place which does the same job and usually more effectively. I was able to coverstitch the neck and the skirt hem on the Pfaff Coverlock 3.0 I have on loan as a brand ambassador but it works just as well by overlocking the raw edges and twin-needle stitching them down, or zigzag and twin-needle, or two rows sewn singly if you don’t have a twin needle. When it comes to pressing a fabric like this, if you don’t have a special needle board (and few of us do) then you should press on the reverse at all times. You could place a towel on your pressing surface and lay the fabric on top so that the pile of the cloth is against the pile of the towel which will help protect it. Use a pressing cloth as well. These tips will also apply to regular corduroy or any non-stretch fabrics with a pile too.
The bell of the sleeve is gathered using shirring elastic which helps to retain some of the stretch required for the cuff.
Once the sleeves were in I sewed up one side seam directly on the overlocker and then pinned the other side seam to fit myself. This was because I didn’t know if I’d need a split at the hem to be able to walk in the dress and I didn’t want to end up with loads of unpicking!
First I tried it right side out to get an idea of how it was fitting initially, then I turned it inside out to pin.
I looked at the fit in the mirror first of all and the sewn side seam was quite wavy, this could be cured by either adjusting the differential feed on the overlocker so that it doesn’t happen, or you could stitch the seam on the sewing machine and then overlock the edges [This is what I opted to do because I could see I had to take a fair bit off the side seams anyway to achieve a fit I was happy with] Then I put the dress on inside out in front of the mirror and pinned out the excess. I turned it right side out and tried it on again to check the fit, then finally sewed both side seams on the sewing machine, I used a ‘stretch’ needle, a ballpoint or jersey needle performs the same task. Either use a short straight stitch or a straightened out zigzag, make some samples to see which works best for your particular fabric.
Now I tried it on the dress inside out to adjust the seamsI pinned out a fair bit of the side seams to give more shape through the waist and hips.still Inside outFinally I put the pinned dress back on the right way around to check I was happy with the fit before making the adjustments.
Lastly, the cuffs go on and the skirt is hemmed.
And that’s pretty much it, it pops straight over the head so no tricky closures, because of the stretch it didn’t need a split, and that means there’s room for Christmas lunch and it won’t look like a dish rag after spending the afternoon curled up on the sofa watching Christmas telly!
cheers!
I’ve dressed it down with an ancient knitted gilet plus a wide belt, long boots and my much loved Alexander McQueen scarfI love a scarf to keep my neck warm!It could be the strangest of Christmases but let’s raise a glass to a much better 2021
I have to say that I’m really happy with this dress because it ticks all the boxes I wanted it to. It’s comfortable but it looks Christmassy, it looks great with opaque tights, heels and jewellery, but also with boots, a chunky belt, a roll neck top underneath for extra warmth or a cosy scarf…and did I mention it’s comfortable! #secretpyjamas It also has the advantage of rolling up and going in the corner of a bag or suitcase and coming back out again not needing a press. Bonus!!
At 160cms the fabric is very wide so a little will go a long way, and because it’s so soft it would be lovely for children’s wear too. It needs a little bit of careful handling but a lot of that is in the ground work. Make sure you lay it up and cut it accurately to minimise unnecessary stretching or distortion (try to keep it flat on the table or lay it up on the floor) pin or tack the seams so they don’t move about and press carefully as you go and you should be fine.
It’s been an incredibly tough year for so many and I wouldn’t blame you for not feeling like making anything new to wear. However, if crafting and creating bring you joy and respite then you could view it as a gift to yourself, and when you choose to buy from small companies like Lamazi and Maven then you are helping them too.
Thank you to Lamazi for providing me with the fabric for me to write my review, and I hope you find it helpful.
I had made two Simple Sew Cocoon dresses without alteration when the pattern was first released a couple of years back, and you probably know that I love a bit of a pattern hack so I decided that the style would be good for an adaptation. I’d drawn a few sketches of ideas and had a rummage in the stash for some suitable fabric when a funny thing happened…
I found I had already cut out a hacked Cocoon in the past!! I realised I must have done it easily two summers ago but then abandoned it because I decided it would be too short. I remember it was a limited amount of fabric, probably 2 metres, but I put it to one side and forgot about it.
Fast forward to now, I wanted to make it up but I needed to lengthen it in a way I was happy with. I had truncated the bodice at Empire line just below the bust and then the skirt was two widths of the fabric, a simple dirndl. I’d cut the facings too but there was literally nothing else left except small scraps.
There’s a centre front seam in the bodice, I cut the dress horizontally under the bust at about Empire line
I went through various options including adding extra frill layers but to do that you gradually increase the amount of fullness needed for each layer, in other words, layer 1 would be 1.5x the waist measurement, layer 2 could be 2x the length of layer 1, and layer 3 could be 3x the length of layer 2. In simple terms this means longer and longer strips of fabric are needed to form each frill to be sewn to the previous one, and the longer the length of the dress the more layers you might need. Basically I couldn’t make the skirt any longer with what I had because it was already cut, and because of the lockdown I couldn’t go out to look for a suitable plain cotton. I returned to the stash and eventually found 50cms of cotton poplin which I know I bought at the same time as the original, I must have intended it as a contrast but never used it.
By cutting the 50cms piece across the width into two 25cms pieces I could join them at the side seams to form a loop and then fold them in half to create a 12.5cms deep band which I would sew to the hem of the dress! Simple!
Once I’d worked all this out I sewed up the bodice, rather than hemming the cap sleeves I used some binding from my stash so that I could maximise their length. I planned to twin needle some top stitching in various places and I used two different coordinating threads for this.
Bias binding sewn onto the sleeve then understitchedbias binding turned backThe completed sleeve with twin needle topstitching
I did the same around the V neck once the facing was sewn on, in order to get a pristine join at the point I carefully unpicked a couple of stitches and secured them on the reverse.
I wanted side seam pockets (of course) so I had to cut them out of some plain cotton scraps,each piece was added to the side seam and then the side seams sewn up.
The new band was initially slightly wider than the lower edge of the skirt so I restitched it until the two were the same width and matched exactly at both side seams. I used the overlocker with four threads to join and neaten the band in one step, I pressed the seam upwards and then twin-needle topstitched it to decorate.
the band folded and pinned to the lower edge of the skirt
The final step was to run two rows of gathering stitches at the top of the skirt then sew it onto the bottom of the bodice, matching at the side seams. I pressed this upwards too and topstitched it as well.
For a dress which had languished with not much hope for two years I’m really happy with it!! I loved the fabric (which was from John Lewis originally I think about 4-5 years ago!) and I was so cross I’d cut something which I couldn’t imagine I’d wear if I sewed it up. By adding the deep band the skirt now has weight as well as length. It’s been so comfortable in the hot weather, why did I wait so long?!
we were heading out for our exercise hence the unsexy shoes!we have a Henry Moore sculpture on loan for the duration of the centenary year of our town, maybe we can keep it for an extra year now that all the summer celebrations are cancelled?Coronation Fountainyes I have got water coming out of the top of my head!
Lockdown is easing in the UK since I originally finished this dress but I hope, as always, this hack has given you an idea of how simple it can be to take a section of a pattern you already have and give it a twist to become a different garment. I had very limited fabric with a print which still needed to match everywhere, by adding the hem band I’ve given it the look I was after…it just took a couple of years to think of it!
Firstly, I probably need to give you a quick explanation of why I’m making a fancy frock during the lockdown because it must seem rather incongruous.
This is my first post as a Lamazi Fabrics blogger and before the Covid-19 pandemic reared it’s ugly head I had offered to make an outfit using a slightly ‘tricky’ fabric in order to share a few hints and tips for sewing with it. I selected the beautiful Tencel/Cupro ‘Bark’ fabric in Lavender because we were going to a wedding in late May which would be the perfect chance to make a something using this special fabric. Very sadly that wedding is now postponed indefinitely but I’m making the dress because I’ll still need something to wear when it’s rescheduled.
The fabric has a lovely weight and handle which makes it drape really well. It’s has a bark-like finish and is different on each side, you could use this to your advantage if you want to create an interesting visual effect by having some pieces with one side out and some using the reverse side.
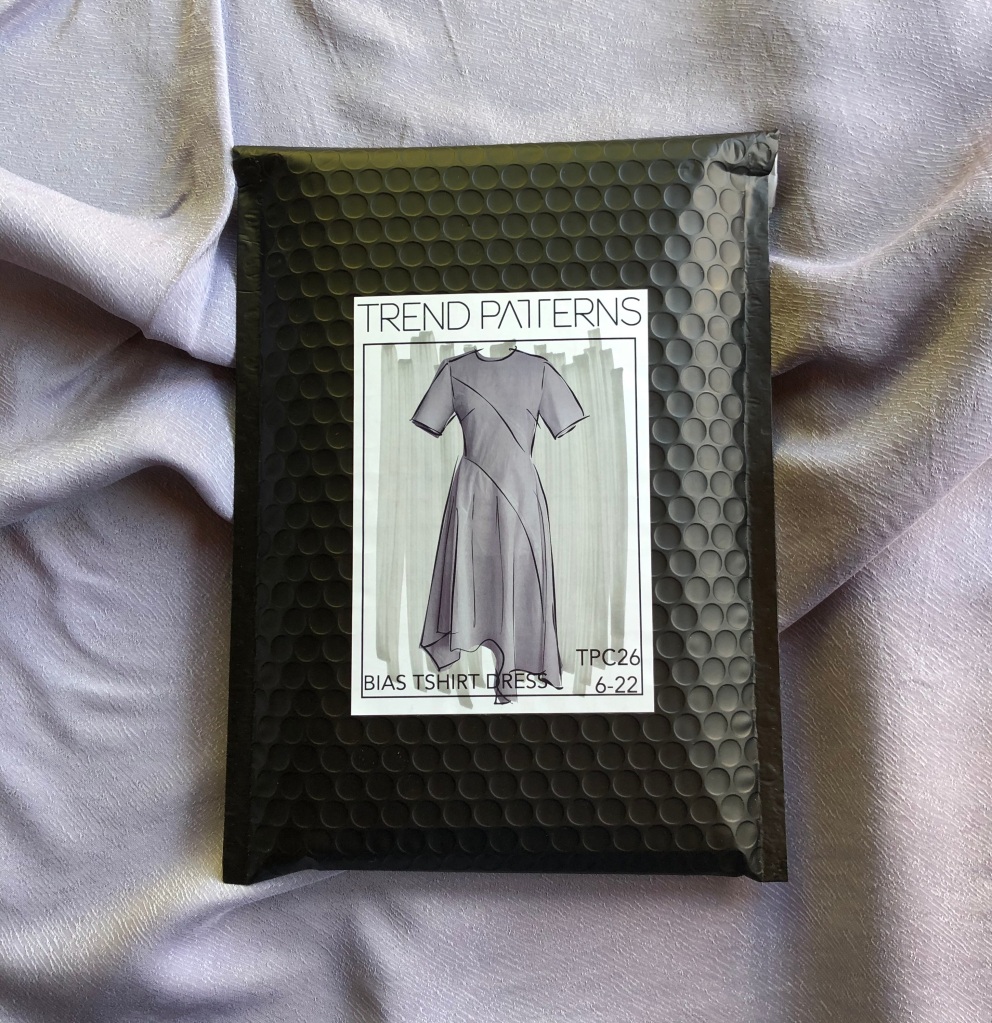
I made life harder for myself by choosing the new Bias T-shirt Dress by Trend patterns (generously gifted to me by them) in which EVERY piece except the sleeves are singles and strange shapes which means you cut everything out on a single layer of fabric right side up (RSU). Unlike most patterns, when you are cutting pairs of parts you can usually flip a piece without too much difficulty, however if you do that for a piece which must be cut RSU you would have completely reversed the print/design to the wrong side when you try to sew it up. This Tencel/Cupro has a nice look whichever side you use but my advice is to be really careful on printed fabrics before reversing any piece labelled RSU.
Next, when cutting slippery or fluid fabrics (unless you have a lovely big cutting table) you’ll need to handle them as little as possible (by which I mean pulling them about to get them into position) which might be easier said than done. I know that cutting out is most people’s least favourite part of sewing but it’s so important to take time and care at this stage. If you’re cutting out on a table with straight sides use the edges as a visual marker to get the end of your cloth at a right angle to start with, ensure the weft (across the fabric) is nice and straight as well as the warp, pull a few threads to find the grain if necessary. If you have more cloth than will fit on the table in one go you could try having the excess rolled on a cardboard tube if you have one to keep it under control rather than sliding off the table all the time.
Because my pattern has large awkward-shaped pieces cut from a single layer I had no option but to cut out on the floor! This can be physically quite tiring so you might want to get help if you need to. This is slippy slidey fabric so an extra pair of hands could help you lay it up nice and straight, again, rolling the fabric onto a long cardboard tube would also help keep the fabric taut and straight as you lay it out on the floor. This is not a fabric to use weights and a rotary cutter on unless the whole lot fits onto a cutting board without disturbing the fabric, if you’re spending time laying up the fabric carefully so that the grain lines are straight in both (warp and weft) directions you can’t then mess it about shifting a cutting mat underneath it and the pattern pieces need to be secured in place with pins. Cut out carefully moving the pieces as little as possible and try to keep them flat after cutting until you’re ready to sew. All of this will help minimise the pieces stretching out of shape, especially as a lot of this pattern has seams running on a diagonal.
I felt that the length of the dress would probably be too long for me so I took some of the length out of the skirt pieces before I cut them out in fabric.I calculated that approximately 5 cms would be sufficient to take out of the length so first I drew a line at a right angle to the grainline, then a second line 5cms from the first.I pinned each piece to it’s ‘partner’ so that I could see if it would still align correctly after I folded out the 5cms.It was really just educated guesswork but, eventually, by folding out the 5cms horizontally from each panel I was reasonably confident it would be pretty close. Why didn’t I just take it off the hem at the end? You could easily do that but because I had just 2.5m of fabric, which may not have been quite sufficient, I could not take that risk so I did it this way instead. It took longer but removed the element of uncertainty.This is almost everything laid up on the floor, I cut a linen version at the same time which is what you can see on the top. Whilst a single layer is often a very economic way of cutting fabric it’s usually more time-consuming to cut out so I did the two at the same time which was slightly risky but it worked out.
Once I’ve finished cutting out it’s vital to transfer all notches and mark darts and a couple of pivot points so I use old-fashioned tailor’s tacks (obviously you can use a textile marker pen if you prefer, I often do but it’s a pale fabric and I didn’t want to risk any marks being left) It’s a habit of mine to keep all the pattern pieces attached by just a couple of pins to the fabric until I need it, so that I don’t them get muddled. These are curious-shaped pieces so the chance of having them the wrong way round could be quite high! Next I stay-stitched all the neck edges on the machine 5mm in, if you have a very loose weave fabric it would probably be sensible to stay-stitch the bottom edge of the front bodice piece to prevent stretching. If you’re using a particularly fine fabric like chiffon you should stabilise the neck, and any other seams which could stretch, by hand-stitching very narrow cotton tape or ribbon over the seam line on the wrong side of the fabric. When I worked for bridal designer David Fielden many years ago we would cut the selvedges off the silk habutai linings for the seamstresses to use on necklines.
There is just a little fraying on the cut edges which I overlocked singly as I went along, as per the pattern instructions. Whether you’re sewing or overlocking the fabric I strongly suggest you have the whole piece supported on the table in front of the machine rather than feeding up from your lap. This is to prevent the piece becoming stretched as you’re sewing and possibly causing it to become misshapen.
If you find, as I did, that there’s a slight discrepancy between two seams (assuming that it isn’t an error in cutting or adjustment of the pattern) then pin it with the excess on the underside so that when you sew the feed dogs will take up the ease.
You can see the lower layer is a little longer than the top one and by sewing it with this on the underside means the feed dogs should take up the excess.After sewing but before pressing it looked like this.
My photos should make it clearer, a good press will help steam out some of the excess too. Also, to minimise the risk of making a shiny patch on the fabric make sure you use a pressing cloth, you can often buy silk organza ones although I have a piece of plain fine pure cotton lawn which I’ve overlocked around the edge. I use this when I’m pressing darts or turning points or corners out too.
To sew an invisible zip into the diagonal seam across the back I machined the seam closed but I used a long basting stitch just for the section where the zip will go. This stitching will be removed later.
Line up the teeth with the basted part of the seam, this has been lightly pressed open already.Pin the zip tape to the seam allowance with the seam and teeth matching.I prefer to tack the tape to the seam allowance at this point but you could use Wonder Tape if you have it. Now I removed the basting stitches and sewed the zip in using an invisible zipper foot. The zip I was using was longer than I needed.Make a new stopper for the zip by carefully sewing backwards and forwards a few times over the teeth, cut off the excess then secure each side of the tape to the seam allowance using a regular zip foot.
Once the zip was in and side seams sewn up I checked the fit on myself. I cut a UK 16 and overall I’m happy with the fit and apart from the length I made no alterations to the bodice. Because I made the linen version first I already knew that the shoulders were a bit too broad for me and the sleeves dangled too much off the crown of my arm. I calculated that I needed to remove approximately 3cms to lift them up to a slightly better position. I found I didn’t need to alter the sleeve head though, fortunately it still fitted into the armhole. Another thing I did decide at this point was that the sleeve needed ’something’ else so I mocked up some small pleats and pinned the sleeve into the armhole to try out the effect.
I mocked up some small pleats with the sleeve pinned into the armhole.I drew some markings so that I could then transfer the pleats equally to both sleeves.More old-fashioned tailor tacks to mark the pleats.The pleats are equally divided across the centre line of the sleeve.
After making the pleats in the sleeves and sewing up the underarm seam I used a ‘pin hem’ to finish the edge. This is similar to a simple rolled hem but even narrower. Begin by stitching a turning of approx 1cm very close to the edge, trim this carefully
Sewing a pin hem, this is useful technique well worth mastering because if you haven’t got a rolled hem foot which could do the job, this gives a beautiful hem finish to fine or delicate fabrics. Finished pin hem on the sleeveBecause I’d made the pattern alterations to the skirt length I wasn’t surprised to find there was a slight discrepancy in levels at the hem. Using a long ruler I averaged out a new straight line and then pin-hemmed it.
I love the 1930s/40s vibe of this dress, the drapey qualities of the fabric enhance the bias lines of the skirt in particular. I really enjoyed the challenge of putting the dress together, there are no particularly difficult techniques as such but it’s an interesting puzzle which you’ll need to spend a little time concentrating on, you’ll be rewarded with a striking but really wearable dress.
Thank you to Trend Patterns for gifting me the pattern, there was no expectation to write a review. You can read my previous review of the Square Dress pattern here. The fabric was provided by Lamazi Fabrics in return for a review which is also published on their own website.
I hope you find some tips and advice in here that might be of use to you if you’re thinking of using a fabric that needs a bit more forward planning than you’re used to. Trend have created another beautiful pattern with stunning and unusual details but the pieces cleverly work with the grain of the fabric so that working with the bias cut is a lot easier than it usually is. They have been gradually increasing their size range too so the TPC26 comes in UK sizes 6-22.
Quite a long blog this time so thank you for reading this far and, until next time,