1. THE TAMARIND TREE - Crops for the Future
1. THE TAMARIND TREE - Crops for the Future
1. THE TAMARIND TREE - Crops for the Future

Create successful ePaper yourself
Turn your PDF publications into a flip-book with our unique Google optimized e-Paper software.
<strong>1.</strong> <strong>THE</strong> <strong>TAMARIND</strong> <strong>TREE</strong><br />
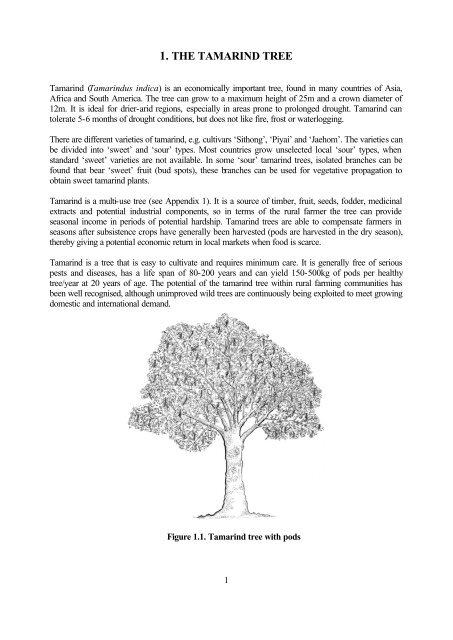
Tamarind (Tamarindus indica) is an economically important tree, found in many countries of Asia,<br />
Africa and South America. The tree can grow to a maximum height of 25m and a crown diameter of<br />
12m. It is ideal <strong>for</strong> drier-arid regions, especially in areas prone to prolonged drought. Tamarind can<br />
tolerate 5-6 months of drought conditions, but does not like fire, frost or waterlogging.<br />
There are different varieties of tamarind, e.g. cultivars ‘Sithong’, ‘Piyai’ and ‘Jaehom’. The varieties can<br />
be divided into ‘sweet’ and ‘sour’ types. Most countries grow unselected local ‘sour’ types, when<br />
standard ‘sweet’ varieties are not available. In some ‘sour’ tamarind trees, isolated branches can be<br />
found that bear ‘sweet’ fruit (bud spots), <strong>the</strong>se branches can be used <strong>for</strong> vegetative propagation to<br />
obtain sweet tamarind plants.<br />
Tamarind is a multi-use tree (see Appendix 1). It is a source of timber, fruit, seeds, fodder, medicinal<br />
extracts and potential industrial components, so in terms of <strong>the</strong> rural farmer <strong>the</strong> tree can provide<br />
seasonal income in periods of potential hardship. Tamarind trees are able to compensate farmers in<br />
seasons after subsistence crops have generally been harvested (pods are harvested in <strong>the</strong> dry season),<br />
<strong>the</strong>reby giving a potential economic return in local markets when food is scarce.<br />
Tamarind is a tree that is easy to cultivate and requires minimum care. It is generally free of serious<br />
pests and diseases, has a life span of 80-200 years and can yield 150-500kg of pods per healthy<br />
tree/year at 20 years of age. The potential of <strong>the</strong> tamarind tree within rural farming communities has<br />
been well recognised, although unimproved wild trees are continuously being exploited to meet growing<br />
domestic and international demand.<br />
Figure <strong>1.</strong><strong>1.</strong> Tamarind tree with pods<br />
1
2. WHY GROW <strong>TAMARIND</strong><br />
2.0.<strong>1.</strong> Nutrition<br />
Tamarind produces a nutritious fruit, high in vitamins B1 (Thiamin), B2 (Riboflavin) and B3 (Niacin).<br />
These vitamins work toge<strong>the</strong>r to help <strong>the</strong> body convert food into energy. They also help to provide a<br />
healthy immune system to fight off disease and help <strong>the</strong> body to be strong. Tamarind is a fair source of<br />
vitamin C, which, like <strong>the</strong> B vitamins, helps to provide a healthy immune system. Vitamin C also helps<br />
to provide strong bones, teeth and skin. Tamarind is rich in <strong>the</strong> minerals, potassium, phosphorus,<br />
calcium and magnesium, which help to keep <strong>the</strong> body in balance. Calcium, magnesium and potassium<br />
help to protect <strong>the</strong> bones and teeth, and all have a role in providing strong muscles and general health.<br />
Tamarind can also provide smaller amounts of iron and vitamin A. Iron is present in <strong>the</strong> blood, and<br />
helps <strong>the</strong> movement of oxygen through <strong>the</strong> body, to <strong>the</strong> organs which require it. Vitamin A is necessary<br />
<strong>for</strong> good eye sight. Some cases of blindness have been attributed to lack of vitamin A in <strong>the</strong> diet,<br />
predominantly in developing countries. Tamarind also contains a high level of protein, with many<br />
essential amino acids, which help to build strong and efficient muscles. Tamarind is also high in<br />
carbohydrate, which provides energy.<br />
2.0.2. Income generation<br />
Farmers can use <strong>the</strong> tamarind tree by incorporating it within <strong>the</strong>ir agricultural system to enhance<br />
household incomes. Tamarind products are popular in many countries, but <strong>the</strong>re is little organised<br />
marketing of pods or pulp, so market returns can vary considerably. In full production, a tree yields on<br />
average 80-100kg of pulp per year and <strong>the</strong> tree should remain productive <strong>for</strong> at least 60 years. If unused<br />
land is available, tamarind trees can be considered <strong>for</strong> additional income. However, <strong>the</strong> local<br />
market and market price <strong>for</strong> tamarind must first be established to ensure production would be<br />
profitable.<br />
2.0.3. Fodder<br />
Both <strong>the</strong> seeds and leaves of <strong>the</strong> tamarind tree can be used to feed domestic animals. Leaves are more<br />
popular as <strong>the</strong>y require less preparation. The leaves are very high in crude protein and are relished by<br />
wild animals. Leaves, however, are rarely used <strong>for</strong> this purpose on homesteads, as harvesting <strong>the</strong><br />
leaves can reduce fruit production.<br />
Seeds can also be used as animal feed, however, <strong>the</strong> seed coat is very hard and must first be removed,<br />
which can be eased by boiling. The seeds must <strong>the</strong>n be ground. The seeds are also very high in protein.<br />
2.0.4. Timber<br />
Tamarind wood is made up of heartwood and sapwood. The heartwood is dark reddish in colour and<br />
is very hard, durable and resistant. It is often used <strong>for</strong> making furniture, as it gives a good polish, but it<br />
can be difficult to work. The sapwood is yellow in colour and is far less durable than <strong>the</strong> heartwood; it<br />
is also liable to insect attack. Although tamarind wood is used widely, it is of little commercial<br />
importance.<br />
2.0.5. Medicines<br />
Tamarind is used in traditional medicine throughout Africa and Asia. Modern medical science has also<br />
confirmed <strong>the</strong> laxative and diuretic properties of <strong>the</strong> tree. All parts of <strong>the</strong> plant are used, from <strong>the</strong> fruit<br />
pulp and seed to <strong>the</strong> leaves, bark and flowers. Ailments such as diarrhoea, jaundice, ulcers, eye<br />
2
infections and digestive problems can be treated with infusions, pastes and powders. Herbal practices<br />
are still widely used.<br />
2.0.6. Industrial<br />
In addition to <strong>the</strong> industrial processing of tamarind fruit into a range of products such as pulp, juice,<br />
paste and candy, tamarind seed can also be processed to produce oil, jellose (a jelling agent) and<br />
tamarind kernel powder (TKP).<br />
2.0.7. Environmental Impact<br />
Tamarind trees have positive environmental benefits as <strong>the</strong>y provide perennial cover protecting <strong>the</strong> soil.<br />
Grown especially in arid climates, tamarind can provide, store and recycle plant nutrients, and give<br />
stability to <strong>the</strong> soil. Tamarind trees also act as effective windbreaks.<br />
3. WHERE TO GROW <strong>TAMARIND</strong><br />
Tamarind can be grown on a homestead, plantation, wasteland or as a <strong>for</strong>est tree. The tree is suitable<br />
<strong>for</strong> marginal lands, where rainfall and poor soil may limit o<strong>the</strong>r crop production. An average yearly<br />
rainfall of 500-1500mm is required <strong>for</strong> healthy tree growth. Where rainfall exceeds 4000mm, <strong>the</strong> trees<br />
may grow but flowers will not develop and <strong>the</strong> tree will not yield a crop. Regardless of total annual<br />
rainfall, tamarind produces more fruit when subjected to a fairly long annual dry period. The tree can be<br />
grown in warm regions, but temperatures should not exceed 33-37 o C (maximum) or go below 9.5 o C<br />
(minimum). The trees cannot withstand frost and should <strong>the</strong>re<strong>for</strong>e not be planted where frosts occur.<br />
Tamarind is able to flourish in a wide range of soils e.g. rocky, sandy, or rich soils, but all soils need to<br />
be free draining. The tree grows well in open areas and does not thrive when shaded. The branches are<br />
wind resistant, and <strong>the</strong> deep tap root and extensive root system aid stability, which means it can<br />
withstand violent typhoons and cyclones. Tamarind can grow up to 2000m above sea level.<br />
Once established in <strong>the</strong> field, tamarind trees do not usually require irrigation and can be inter-cropped<br />
with a number of food crops, such as cowpeas and beans, until 4 years old. Homestead trees can<br />
provide shade and act as a windbreak in areas of strong prevailing winds.<br />
3
4. GROWING <strong>TAMARIND</strong> <strong>TREE</strong>S<br />
There are two methods of propagating tamarind trees:- seed propagation and vegetative propagation.<br />
• Seed propagation involves <strong>the</strong> collection, preparation and direct planting of <strong>the</strong> seed into<br />
soil/compost. This method is very simple, however <strong>the</strong> quality of <strong>the</strong> new offspring cannot be<br />
guaranteed (not true-to-type) and <strong>the</strong> time taken <strong>for</strong> <strong>the</strong> tree to reach bearing age is usually longer<br />
than <strong>for</strong> trees propagated using vegetative methods.<br />
• Vegetative propagation may be carried out using a number of different methods, <strong>the</strong>se are<br />
described in section 4.3 of <strong>the</strong> manual. Vegetative propagation involves <strong>the</strong> growth of <strong>the</strong> new tree<br />
from a shoot, bud or cutting of a mature, 'good quality' or 'plus' tree. This guarantees <strong>the</strong> quality of<br />
<strong>the</strong> new tree. Selection of planting material <strong>for</strong> both seed and vegetative propagation is described<br />
below.<br />
The best time to begin propagation depends on <strong>the</strong> local climate, water availability and method of<br />
propagation. Seed propagation is limited by <strong>the</strong> fruiting time of <strong>the</strong> mature, healthy trees from which<br />
seed is to be collected. Vegetative propagation, on <strong>the</strong> o<strong>the</strong>r hand, does not have <strong>the</strong> same limitation.<br />
Scions (shoot/buds) can be obtained throughout <strong>the</strong> year, however collection is dependent on <strong>the</strong> stage<br />
of tree growth of <strong>the</strong> mo<strong>the</strong>r plant. Regardless of which propagation method is used, it is essential to<br />
select a tree with good qualities, referred to above as 'plus' tree, from which to collect ei<strong>the</strong>r seeds or<br />
vegetative material.<br />
4.0.1 Selection of planting materials<br />
When selecting a good 'plus' tree <strong>the</strong> following points should be considered:<br />
• <strong>the</strong> tree should have a good crown and strong trunk;<br />
• <strong>the</strong> tree should be disease-free, undamaged and have no signs of pest attack;<br />
• pods and scions should be selected from a tree that is older than 15 years and is known to produce<br />
a good harvest of fruit;<br />
• <strong>for</strong> consistent pods and pulp yields, it is essential that <strong>the</strong> tree produces pods every year. Some<br />
trees produce pods every two years.<br />
Once <strong>the</strong> 'plus' tree has been selected, it is necessary to prepare an area <strong>for</strong> propagation. A nursery will<br />
provide protection to <strong>the</strong> plants when very small, and a greater chance of full establishment later on.<br />
The following pages provide details of nursery establishment.<br />
4
4.<strong>1.</strong> NURSERY ESTABLISHMENT<br />
The size of a nursery is dependent on <strong>the</strong> number of trees required. Seeds may not have 100 % viability<br />
(in tamarind most seed lots give 72 - 82 % germination from healthy seed), so 20-30 % extra seed will<br />
need to be sown than required in terms of number of trees. Not all grafted or stem propagated trees<br />
will root, so it is better to prepare a slightly larger area than <strong>for</strong> <strong>the</strong> exact number of trees required.<br />
Land suitable <strong>for</strong> a small tree nursery could be on a homestead, in a fenced enclosure, and if possible,<br />
situated close to a water source. Young trees do require more water than mature trees and <strong>the</strong>y are<br />
more prone to damage by animals, such as goats and cattle, so an enclosure around <strong>the</strong> chosen nursery<br />
area may be required.<br />
a. Seed bed on <strong>the</strong> ground.<br />
b. Pots or bags on benches.<br />
c. Pots or bags on <strong>the</strong> ground.<br />
Figure 4.<strong>1.</strong> Tamarind tree nurseries<br />
The above diagrams show three types of tree nurseries with overhead shade. The benches (Fig. 4.1b)<br />
can be made from locally available materials such as bamboo canes, and palm fronds or grass can be<br />
used <strong>for</strong> <strong>the</strong> roof. A tree nursery does not always require benches, as pots can be placed directly on<br />
<strong>the</strong> ground (Fig. 4.1c), or a seedbed/rooting bed can be used <strong>for</strong> bare-rooted transplants (Fig. 4.1a).<br />
All seedlings or cuttings require a roof structure to shade <strong>the</strong> plants and prevent leaf scorch. Care must<br />
be taken in <strong>the</strong> design of <strong>the</strong> nursery in terms of <strong>the</strong> height of <strong>the</strong> shade attachment and also <strong>the</strong> quality<br />
of <strong>the</strong> palm leaves or grasses used. Older palm leaves should be avoided <strong>for</strong> such structures as <strong>the</strong>y<br />
can harbour fungi, such as mildew, which can be transmitted to <strong>the</strong> young plants below. There<strong>for</strong>e, only<br />
new fronds or grasses should be used and, if possible, a fence to prevent <strong>for</strong>aging animals should be<br />
built. The nursery shade should allow some sunlight through <strong>the</strong> roof and sides; <strong>the</strong> aim is to allow about<br />
30 % sunlight to reach <strong>the</strong> top of <strong>the</strong> young plants and 60 % to reach <strong>the</strong> sides.<br />
The nursery should not be situated on waterlogged land or land prone to waterlogging. It should be<br />
sufficiently far from paths to prevent human and animal damage, and far enough from shade trees if a<br />
roof is being used. Prior to building <strong>the</strong> nursery structure, <strong>the</strong> ground must be cleared of all weeds and<br />
pests. A plastic ground cover can be used to prevent weed re-growth. O<strong>the</strong>rwise, <strong>the</strong> ground should<br />
be lightly hoed and top dressed with clean sand and gravel or small stones.<br />
5
4.<strong>1.</strong><strong>1.</strong> Pots and potting mixture<br />
Pots can be made from any available material, such as plastic bags, clay, tin cans (punctured) or natural<br />
vegetation, e.g. banana leaves or woven baskets (Fig. 4.2).<br />
NOTE: Natural pots may last <strong>for</strong> less time and be more sensitive to uplift or storm damage.<br />
Tamarind usually produces a long tap root, which, in <strong>the</strong> case of plastic bags and natural pots, may<br />
grow into <strong>the</strong> soil. Moving <strong>the</strong> pots with <strong>the</strong> plants is <strong>the</strong>re<strong>for</strong>e a delicate operation. Placing <strong>the</strong> pots on<br />
a raised bench (per<strong>for</strong>ated or latticed) reduces this problem, as <strong>the</strong> roots will be air pruned with no<br />
damage to <strong>the</strong>ir growing points.<br />
Tin pot Plastic bag pot Banana leaf pot Clay pot Basket pot<br />
Figure 4.2. Pot sources<br />
The best media <strong>for</strong> seed germination is soil, mixed with sand and cow or chicken dung. Normal potting<br />
mixtures usually contain 3 parts topsoil, 1 part sand and 1 part compost.<br />
NOTE: Sand should not be used directly from beach sources, as it may contain too much salt<br />
<strong>for</strong> <strong>the</strong> young trees. Sand from high up <strong>the</strong> beach or inland is better <strong>for</strong> potting mixtures.<br />
6
4.2. SEED PROPAGATION<br />
4.2.<strong>1.</strong> Seed extraction from <strong>the</strong> pulp<br />
Fully <strong>for</strong>med, ripe pods, showing no damage or disease, should be selected. The ripe pods are dried in<br />
<strong>the</strong> sun <strong>for</strong> 5 to 7 days, turning occasionally. When <strong>the</strong> fruit is dry, <strong>the</strong> pods should be cracked to<br />
separate <strong>the</strong> pulp from <strong>the</strong> pod shell and <strong>the</strong> seed extracted by hand kneading or washing in water. The<br />
seeds should be washed to remove any pulp and dried in <strong>the</strong> shade <strong>for</strong> 2 days. The seed can be stored<br />
in a cool, shady place in sealed, clay jars, away from rats, mice or insects. Storage time can depend on<br />
<strong>the</strong> condition of <strong>the</strong> seed, and how well it was cleaned and dried.<br />
IMPORTANT: Fresh pods bought in <strong>the</strong> market can be used as a source of tamarind seed,<br />
though seed may originate from poor or diseased trees. Such seeds may have a delayed<br />
germination time, lack of viability or produce inferior trees.<br />
4.2.2. Seed pre-treatments<br />
Healthy seeds of tamarind have approximately 72 % germination. The percentage of germination can<br />
be increased by treating <strong>the</strong> seed be<strong>for</strong>e planting, which also reduces <strong>the</strong> germination time.<br />
Tamarind seed can be treated as follows:<br />
• Soaking in clean water <strong>for</strong> 24 hours (can improve germination to 80 %) (Fig. 4.3a)<br />
• Cutting (scarifying) <strong>the</strong> seed coat (can improve germination to 85 %) (Fig. 4.3b)<br />
• Both scarifying and soaking in water <strong>for</strong> 24 hours (can improve germination to 92 %)<br />
Cut through <strong>the</strong><br />
seed coat<br />
Cut edge, encourages<br />
germination<br />
a. Seeds soaking in clean water. b. Cutting (scarifying) seeds.<br />
Figure 4.3. Seed preparation<br />
7
4.2.3. Planting and germination<br />
Tamarind seeds should be sown in well-prepared seed beds, boxes or pots, at 2-3cm distances apart.<br />
One seed should be placed in each hole at a depth of 1-2cm, covered with compost (sandy loam) and<br />
watered. If <strong>the</strong> seed is planted too deep in <strong>the</strong> soil, germination might not occur and <strong>the</strong> seeds will rot<br />
(Fig. 4.4).<br />
The compost should be kept moist. Seed germination should begin after approximately 5-10 days with<br />
viable seed, but may take up to one month be<strong>for</strong>e shoots can be seen above <strong>the</strong> soil. Tamarind has a<br />
hard seed coat, so delayed or poor germination may occur.<br />
Soil level<br />
1-2 cm<br />
The seed is placed at <strong>the</strong> bottom of a small<br />
hole, 1-2cm deep.<br />
The seed is <strong>the</strong>n be covered with soil and watered.<br />
Figure 4.4. Planting of Tamarind seeds<br />
Once <strong>the</strong> seedling tree has emerged, it should remain in <strong>the</strong> nursery and be watered regularly until it is at<br />
least 30-40cm tall. After this time, <strong>the</strong> seedling can be established in <strong>the</strong> field.<br />
8
4.3. VEGETATIVE PROPAGATION<br />
Vegetative propagation can be practiced throughout <strong>the</strong> year, but it is less successful in <strong>the</strong> hot season.<br />
This method requires shade and water resources, and higher losses may be experienced than with seed<br />
planting. Chemical rooting hormones will improve <strong>the</strong> efficiency of this method.<br />
Tamarind can be propagated vegetatively by stem cuttings (softwood, semi-hardwood and hardwood),<br />
grafting and ground or air layering. With all methods, it is important to choose shoots and branches that<br />
are free from disease, pests and damage. Stems or branches displaying leaf colours o<strong>the</strong>r than green<br />
should also be avoided.<br />
4.3.<strong>1.</strong> Stem cuttings<br />
The easiest and cheapest method of propagating tamarind vegetatively is by stem cutting. There are<br />
three types of stem cuttings: softwood (new shoots, flexible and green), semi-hardwood (young shoots<br />
under a year old with wood evident) and hardwood (older shoots, all wood). Hardwood cuttings,<br />
however, will not root <strong>for</strong> tamarind and should not be attempted.<br />
All cuttings should be collected early in <strong>the</strong> morning. Softwood cuttings should be approximately 15cm<br />
in length, whereas semi-hardwood cuttings should be 18-20cm in length with 3 nodes (leaf<br />
attachments). Leaves are removed from <strong>the</strong> bottom nodes in all cuttings and a clean cut should be<br />
applied to <strong>the</strong> base of this node, at a 45 degree-angle (Fig. 4.5).<br />
Softwood cuttings have better rooting success than semi-hardwood cuttings, especially when <strong>the</strong>y are<br />
from terminal shoots with new flushes of leaves. Terminal cuttings have an advantage over mid stem<br />
cuttings because <strong>the</strong>re is only one cut end, which reduces <strong>the</strong> possibility of infection.<br />
18-20cm<br />
15cm<br />
Semi-hardwood<br />
Figure 4.5. Tamarind cuttings<br />
Softwood<br />
Soft or semi-soft mid stem cuttings must be wrapped in moist cloth after removal from <strong>the</strong> tree to<br />
prevent loss of moisture. Rooting hormone is essential when using this method. The cuttings should be<br />
dipped in rooting hormone (IBA at 1000ppm) and <strong>the</strong>n placed on a sand bed in a mist propagator (75-<br />
80 % humidity).<br />
NOTE: If <strong>the</strong> cuttings have to be transported <strong>for</strong> a long time <strong>the</strong>y should be wrapped in moist<br />
cloth or paper to prevent loss of moisture.<br />
4.3.2. Propagation areas and shoot treatments<br />
9
Be<strong>for</strong>e <strong>the</strong> cuttings are collected, it is necessary to have a soil bed prepared within which rooting will<br />
take place. The soil bed provides shade and protection to <strong>the</strong> young cuttings. Wooden poles can be<br />
used <strong>for</strong> <strong>the</strong> uprights and grasses or palm fronds can be used <strong>for</strong> <strong>the</strong> roof (see nursery construction,<br />
section 4.1). A soil bed can be constructed on or near <strong>the</strong> homestead, but care must be taken to keep<br />
animals away from <strong>the</strong> rooting area.<br />
Figure 4.6. Rooting bed and shade <strong>for</strong> propagation<br />
Softwood cuttings should be pushed straight into <strong>the</strong> soil to a depth of 2.5cm, <strong>the</strong> top of <strong>the</strong> shoot<br />
should be no more than 20cm from <strong>the</strong> soil surface. The shoot top can be removed, this may encourage<br />
root growth ra<strong>the</strong>r than fur<strong>the</strong>r shoot growth, however, this method is not recommended <strong>for</strong> semihardwood<br />
cuttings.<br />
If available, rooting hormone should be applied to <strong>the</strong> cuttings, this can improve rooting success and<br />
reduce <strong>the</strong> time taken <strong>for</strong> root development (10-15 days instead of 40-50 days). The cut end of <strong>the</strong><br />
cutting should be moistened and dipped <strong>for</strong> 10 seconds in <strong>the</strong> powder, be<strong>for</strong>e inserting into normal<br />
nursery soil mixture. The cuttings should be watered regularly but not excessively and once well<br />
established can be transplanted into <strong>the</strong> field.<br />
NOTE: The local extension officer should have in<strong>for</strong>mation about <strong>the</strong> availability, cost and<br />
use of rooting hormone.<br />
10
4.3.3. Grafting<br />
Grafting involves removal of a shoot or bud from a tree and joining it to a rootstock. Once <strong>the</strong> union<br />
has healed and fresh growth occurs on <strong>the</strong> newly attached portion, it is said to be successfully grafted.<br />
It is mostly done by removing a shoot or bud from a 'superior' or 'plus' tree to a compatible seedling<br />
rootstock. Grafting of tamarind trees can enhance pod production, reduce length of time to bearing and<br />
may increase resistance to disease.<br />
Equipment required <strong>for</strong> grafting includes a clean and sharp budding knife, polyethylene tape, <strong>1.</strong>5-2cm<br />
wide, approx. 30-40cm long, which can be cut from ordinary clear plastic bags if budding tape is not<br />
available.<br />
There are two main types of grafting, bud grafting (also known as patch budding) and shoot grafting.<br />
4.3.3.<strong>1.</strong> Bud grafting<br />
A small piece of budded bark (scion) is taken from a good quality 'plus' tree and fixed onto a rootstock<br />
in place of an equal sized piece of bark that has been removed. The bud is tied firmly with polyethylene<br />
or specially prepared budding tape to keep it in position. Budding should be carried out when <strong>the</strong><br />
seedling rootstocks are 6-9 months old. A good indicator that <strong>the</strong> budding is likely to take, is when <strong>the</strong><br />
budwood is in active growth and <strong>the</strong> bark is easy to peel off.<br />
Bud grafting results in a stronger bud union than shoot grafting and can be used <strong>for</strong> large-scale<br />
multiplication of tamarind.<br />
2<br />
1<br />
3 4<br />
Figure 4.7. Patch budding in Tamarind<br />
<strong>1.</strong> Patch of bark removed from 'plus' tree, 2. Patch of bark with a bud from a desirable scion, 3. Bud<br />
inserted into <strong>the</strong> rootstock plant, 4. Bud is wrapped firmly with tape.<br />
11
4.3.3.2. Shoot grafting<br />
There are two methods of shoot grafting, 'approach' grafting and 'cleft' grafting. The most reliable<br />
method (95 % success) <strong>for</strong> tamarind is <strong>the</strong> approach method.<br />
Approach grafting<br />
This method requires two self sustaining plants, one is <strong>the</strong> rootstock plant, which must be vigorous and<br />
sturdy to provide excellent anchorage <strong>for</strong> <strong>the</strong> new plant and <strong>the</strong> o<strong>the</strong>r is <strong>the</strong> 'superior' or 'plus' plant,<br />
which has <strong>the</strong> desirable characteristics required by <strong>the</strong> grower. A small section of bark (approx. 5-6cm<br />
in length and 1-2cm in width, depending on <strong>the</strong> size of <strong>the</strong> stem) should be removed from both <strong>the</strong><br />
rootstock plant and <strong>the</strong> superior tree, at <strong>the</strong> same level, using <strong>the</strong> budding knife. The area of bark<br />
removed should be just deep enough to expose <strong>the</strong> inner tissue of <strong>the</strong> stem and allow close contact of<br />
this tissue between <strong>the</strong> two plants. The union of <strong>the</strong> two plants should <strong>the</strong>n be bound firmly using<br />
grafting tape and waxed. The wax will prevent water entering <strong>the</strong> wound, as this may cause rotting. The<br />
wax will also increase <strong>the</strong> temperature and humidity around <strong>the</strong> union which will help in <strong>the</strong> healing<br />
process of <strong>the</strong> graft. The healing process in shoot grafting is usually longer than in bud grafting, and may<br />
take up to one month. Once <strong>the</strong> union is complete, <strong>the</strong> rootstock plant should be severed above <strong>the</strong><br />
graft and <strong>the</strong> base of <strong>the</strong> 'superior' plant is removed below <strong>the</strong> graft. The grafted tree will now obtain<br />
nutrients from <strong>the</strong> soil using <strong>the</strong> root system of <strong>the</strong> rootstock plant.<br />
CUT<br />
a<br />
<strong>1.</strong> Slice of bark and wood removed from<br />
both plants, a rootstock, b scion.<br />
Cleft Grafting<br />
b<br />
CUT<br />
a b a b<br />
2. Cut surfaces are bound<br />
toge<strong>the</strong>r with tape and waxed.<br />
Figure 4.8. Approach grafting of Tamarind<br />
Tamarind can be propagated using cleft grafting. This method also requires two self-sustaining plants,<br />
<strong>the</strong> rootstock and <strong>the</strong> 'superior' plant. The vegetative (top) section of <strong>the</strong> rootstock plant should be<br />
removed with <strong>the</strong> budding knife, using a horizontal cut at 20-30cm above <strong>the</strong> level of <strong>the</strong> soil. A 4-5cm<br />
vertical cut should <strong>the</strong>n be made into <strong>the</strong> cross section of <strong>the</strong> stem. A scion should be removed from a<br />
'superior' plant. A young branch should be used, with a similar diameter to that of <strong>the</strong> rootstock plant<br />
(approx. 1-2cm). The base of <strong>the</strong> scion should be cut into a wedge-shaped point at approx. 45<br />
degrees, to a depth of 4-5cm, similar to <strong>the</strong> vertical cut in <strong>the</strong> rootstock plant. The wedge-shaped<br />
scion should be inserted into <strong>the</strong> vertical cut of <strong>the</strong> stem of <strong>the</strong> rootstock plant. The aim is to provide a<br />
good point of contact <strong>for</strong> <strong>the</strong> rootstock plant and 'superior' scion to encourage grafting. The graft<br />
12<br />
3. a. The rootstock plant is cut above <strong>the</strong><br />
union and b. <strong>the</strong> scion is cut below <strong>the</strong><br />
union to separate <strong>the</strong> new plant.
should be firmly bound with grafting tape and waxed as with <strong>the</strong> approach grafting method. If <strong>the</strong><br />
grafting process is successful, <strong>the</strong> scion will <strong>for</strong>m new shoots in about 3-4 weeks.<br />
Figure 4.9. Cleft grafting of Tamarind<br />
1-2cm<br />
4-5cm<br />
<strong>1.</strong> Preparation of scion - base of scion is<br />
cut into a wedge shape.<br />
45 o<br />
4-5cm<br />
3. Base of scion inserted into vertical cut on<br />
rootstock plant, <strong>the</strong>n taped and waxed.<br />
2. Preparation of rootstock plant - top of<br />
rootstock plant removed and vertical cut<br />
applied to remaining stem.<br />
Softwood grafting is most successful in tamarind<br />
4.3.4. Layering<br />
Layering involves <strong>the</strong> growth of roots on a stem, while <strong>the</strong> stem is still attached to <strong>the</strong> mo<strong>the</strong>r plant.<br />
There are 2 methods of layering used <strong>for</strong> tamarind, air (marcotting) and ground layering.<br />
4.3.4.<strong>1.</strong> Air layering<br />
Air layering is <strong>the</strong> most commonly used method of layering <strong>for</strong> tamarind propagation. A young branch<br />
should be selected and <strong>the</strong> bark removed from an area of about 2-3cm or a small cut can be made, this<br />
reduces sap circulation and encourages rooting. The area or cut should be covered with soil mixture or<br />
root promoting material, such as coir fibre dust, watered and kept in position by wrapping with clear<br />
poly<strong>the</strong>ne film (plastic bag). The plastic should be tied firmly at both ends to retain moisture and<br />
encourage rooting. The rooting area must be kept moist. After about 2-3 months <strong>the</strong> growing roots<br />
should be observed through <strong>the</strong> poly<strong>the</strong>ne film. At this stage <strong>the</strong> branch can be severed about 5cm<br />
below <strong>the</strong> rooting area and potted <strong>for</strong> later field establishment. It is best to leave <strong>the</strong> new plant in a pot<br />
<strong>for</strong> 6-12 months to allow <strong>the</strong> roots to become well established be<strong>for</strong>e replanting in <strong>the</strong> field.<br />
Rooting hormone (IBA at 1000ppm) can be applied to <strong>the</strong> initial cut to encourage shoot rooting, this<br />
13
can reduce <strong>the</strong> time required <strong>for</strong> rooting from 12 to 6-8 weeks.<br />
2. The cut area is covered with soil mixture,<br />
wrapped in plastic and tied firmly with tape.<br />
3. The branch is severed when root development<br />
can be observed through <strong>the</strong> plastic.<br />
4.3.4.2. Ground layering<br />
Figure 4.10. Air layering of Tamarind<br />
This method is very similar to air layering, <strong>the</strong> only difference is that rooting is encouraged below<br />
ground and not in <strong>the</strong> air. A flexible branch from a 'superior' tree should be bent to <strong>the</strong> ground and<br />
14
pegged. A small cut is made onto <strong>the</strong> lower side of <strong>the</strong> stem where it touches <strong>the</strong> ground. This section<br />
of branch is <strong>the</strong>n covered with soil. The top of <strong>the</strong> stem can be supported by a stick to encourage<br />
upright growth. After 10-12 weeks, roots begin to develop at <strong>the</strong> point of <strong>the</strong> cut. Once <strong>the</strong> roots are<br />
established <strong>the</strong> new plant can be obtained by severing <strong>the</strong> branch from <strong>the</strong> mo<strong>the</strong>r tree, above ground<br />
level. This method is less common that air layering as it can be difficult to select a flexible enough<br />
branch unless <strong>the</strong> tree is very young.<br />
<strong>1.</strong> The branch is cut to encourage rooting. 2. The cut can be held open using a small piece of<br />
wood.<br />
3. The branch is bent to <strong>the</strong> ground and <strong>the</strong> cut<br />
portion covered with soil.<br />
4. The cutting is pegged at ground level and staked<br />
to keep it erect.<br />
Figure 4.1<strong>1.</strong> Ground layering of Tamarind<br />
15
4.4. FIELD ESTABLISHMENT<br />
Tamarind trees prefer full sun and open areas are most suitable <strong>for</strong> planting out. They should not be<br />
planted under heavy shade, in boggy patches, within <strong>the</strong> leaf litter of o<strong>the</strong>r trees, near refuse areas,<br />
animal enclosures or in areas where <strong>the</strong> trees are likely to be damaged. The tree should not be planted<br />
in highly saline soil or in areas of contamination with heavy metals, e.g. petrol spills. The land should be<br />
free draining and not subject to flooding.<br />
Tamarind can be planted on roadside corridors, homesteads, agricultural land or as a tree in open<br />
grasslands. Tree protection may be required, in <strong>the</strong> <strong>for</strong>m of a stick/cane as a tree support and a thorn<br />
or wire enclosure, to prevent damage by children or animals.<br />
4.4.<strong>1.</strong> Land preparation<br />
Weeding is required on all tamarind planting sites, up to 1m in diameter around <strong>the</strong> planting hole. A<br />
larger area of 3-4m squared must be cleared when local vegetation such as ‘creeper’ weeds and vines<br />
are invasive, as <strong>the</strong>se can choke <strong>the</strong> young trees. If planted on grassland, <strong>the</strong> grass also needs to be<br />
removed to 1 m in diameter around <strong>the</strong> planting site.<br />
If a site is over-run with woody growth and shrubs, some clearance will be necessary. The cutting of a<br />
small area <strong>for</strong> each tree is not sufficient, as cutting stimulates growth and <strong>the</strong> cleared shrubs will<br />
continue to grow through <strong>the</strong>ir root stumps, unless removed.<br />
When preparing <strong>the</strong> soil <strong>for</strong> seed planting, it should be lightly turned to allow aeration.<br />
Weeds, including grass are removed<br />
from <strong>the</strong> tree planting area.<br />
The soil is lightly turned to allow<br />
aeration.<br />
Figure 4.12. Land preparation<br />
If a number of trees are to be planted in an area of grassland grazed by animals, it might be necessary<br />
to consider fencing structures. Alternatively, tree guards can be made and placed around <strong>the</strong> base of<br />
each tree to a height of 120cm. These guards can be made from local branches or thorny scrub to<br />
prevent animal damage.<br />
16
Lattice-work structure Fence Thorn branches<br />
4.4.2. Direct seeding<br />
Figure 4.13. Tree guards<br />
Seeds can be sown directly in <strong>the</strong> field. This method can be used on homestead farms and in areas<br />
where all surface vegetation has been removed. Small holes should be dibbed in <strong>the</strong> soil and seeds 2-3<br />
placed at a depth of about 1-2cm (<strong>the</strong> strongest can be selected later on). The seeds should be planted<br />
at a spacing of 5x5m and thinned to a spacing of about 13x13m, or line sown, with seeds dibbed 5cm<br />
apart in lines and 4-5m apart, and <strong>the</strong>n thinned later to <strong>the</strong> recommended spacing of 13x13m (seed<br />
requirement is in general 20kg per hectare).<br />
In home gardens, tamarind seeds should be sown in cleared patches, spaced at 4-5m apart.<br />
When creating a tamarind firebreak, <strong>the</strong> spacing adopted should be 2.5x2.5m or 3x3m.<br />
4.4.3. Transplanting<br />
Tamarind seedlings (from seed and vegetative propagation) should be field planted at 12-14 months of<br />
age or when <strong>the</strong>y are greater than 30cm in height. All field planted seedlings need to be planted with<br />
sticks <strong>for</strong> support, but within a year <strong>the</strong>y can support <strong>the</strong>mselves.<br />
If <strong>the</strong> growth is poor, <strong>the</strong> seedlings should be retained in <strong>the</strong> nursery <strong>for</strong> ano<strong>the</strong>r year. The taproot of<br />
<strong>the</strong>se seedlings may grow into <strong>the</strong> soil and root pruning should be practiced, when required. Overgrown<br />
seedlings can be more effectively transplanted when <strong>the</strong> stem and tap root are pruned to lengths<br />
of about 5cm and 20-25cm, respectively.<br />
4.4.4. Planting techniques <strong>for</strong> transplants<br />
4.4.4.<strong>1.</strong> Pit planting<br />
Pit planting is one of <strong>the</strong> commonest methods <strong>for</strong> planting tamarind trees and is essential <strong>for</strong> trees over<br />
90cm tall. It is a time consuming method, especially in rocky soils, and may require a lot of ef<strong>for</strong>t to<br />
make a decent sized pit, but tree establishment has a greater rate of success with this method. The pit<br />
should be about 30cm deep and 20cm wide. The soil should be loosened on <strong>the</strong> sides of <strong>the</strong> pit walls<br />
and base as this will help <strong>the</strong> roots to grow and develop later. The tree should be held in <strong>the</strong> centre of<br />
<strong>the</strong> hole, checking that <strong>the</strong> soil mark at <strong>the</strong> root collar of <strong>the</strong> transplanted tree is at ground level and that<br />
<strong>the</strong> tree is straight. The pit and roots should be covered to ground level with <strong>the</strong> soil that was removed<br />
(all stones should be removed be<strong>for</strong>e replacing around <strong>the</strong> tree); if <strong>the</strong>re is insufficient soil after digging<br />
17
<strong>the</strong> pit, topsoil should be used to fill <strong>the</strong> pit. It is important to flatten <strong>the</strong> soil around <strong>the</strong> base of <strong>the</strong> tree<br />
up to ground level. The tree should be watered daily if <strong>the</strong> rains have not occurred.<br />
20cm<br />
30cm<br />
<strong>1.</strong> Planting hole is prepared 30cm<br />
deep and 20cm in diameter.<br />
2. The tree is placed in <strong>the</strong> hole. 3. The roots of <strong>the</strong> tree are covered<br />
with soil and flattened.<br />
Figure 4.14. Pit planting of Tamarind<br />
4.4.4.2. Notch planting<br />
Notch planting is practised with bare rooted tamarind trees. This method is not possible in rocky soils<br />
and should not be used in heavy clay soils as <strong>the</strong> soil notch may reopen in dry wea<strong>the</strong>r.<br />
An ‘L’ or ‘T’ shaped notch should be cut into <strong>the</strong> ground to a depth of at least 20cm (depending on <strong>the</strong><br />
size of <strong>the</strong> roots) using a spade or similar tool. The soil should be lifted to create a hole. The tree should<br />
be inserted bringing <strong>the</strong> root collar level with <strong>the</strong> soil surface. The spade should <strong>the</strong>n be removed to<br />
allow <strong>the</strong> surface of <strong>the</strong> soil to fall back in place. The soil should be flattened around <strong>the</strong> stem to firm<br />
<strong>the</strong> roots.<br />
<strong>1.</strong> A notch is cut<br />
into <strong>the</strong> ground.<br />
2. The soil is lifted and <strong>the</strong><br />
tree placed in <strong>the</strong> hole.<br />
3. The soil is replaced<br />
around <strong>the</strong> tree.<br />
4. The soil is<br />
<strong>the</strong>n flattened.<br />
Figure 4.15. Notch planting of Tamarind<br />
4.4.5. Time of planting<br />
The best time <strong>for</strong> field planting is at <strong>the</strong> beginning of <strong>the</strong> rainy season, particularly in seasonally dry<br />
regions. If water is constantly available planting may be done throughout <strong>the</strong> year. The best time of day<br />
is late afternoon to early evening.<br />
18
5. MANAGING <strong>TAMARIND</strong> <strong>TREE</strong>S<br />
5.0.1 Training and pruning<br />
Tamarind requires minimal care except in <strong>the</strong> early stages of growth. Initial growth is slow and after <strong>the</strong><br />
main stem and some branches have developed, young trees should be pruned to allow 3 to 5 well<br />
spaced branches to develop into <strong>the</strong> main structure of <strong>the</strong> tree.<br />
The lower branches should be pruned to allow easier access <strong>for</strong> management, such as fertiliser<br />
application and inter-cropping. Pruning dwarfs <strong>the</strong> tree, which facilitates harvesting. Bearing trees<br />
require very little pruning, except <strong>for</strong> removal of weak, dead and diseased branches, this can prevent<br />
<strong>the</strong> spread of disease and infection.<br />
5.0.2. Fertilisers<br />
Figure 5.<strong>1.</strong> Pruning to remove dead branches<br />
Tamarind trees grow and produce good crops with or without fertiliser, due to <strong>the</strong>ir deep and extensive<br />
root system. Farmyard manure can be applied at <strong>the</strong> time of planting or yearly as a top dressing and<br />
will improve yield.<br />
Inorganic fertilisers are often applied in sweet tamarind orchards to increase <strong>the</strong> yield. Ammonium<br />
sulphate can be applied at <strong>the</strong> rate of 100-200g per tree, a month after planting and twice a year at <strong>the</strong><br />
end of <strong>the</strong> rains. When <strong>the</strong> tree begins to bear fruit, 500g of complete fertiliser (NPK) can be applied<br />
twice a year, at <strong>the</strong> end of <strong>the</strong> rains. A mature, bearing tree can be given 2-3kg of complete fertiliser a<br />
year.<br />
5.0.3. Water supply<br />
Mature tamarind trees require no irrigation. Young trees do require water in <strong>the</strong> nursery and during<br />
establishment. The amount of water required varies (depending on local climate), but in general, about<br />
1-2 litres of water every 2 weeks should be applied to each young tree, preferably in late afternoon or<br />
early evening.<br />
5.0.4. Weeding<br />
19
Removal of weeds from around <strong>the</strong> plant is necessary during <strong>the</strong> early stages (first 4 years) of growth.<br />
In commercial orchards, weeding may not be required if cover crops (inter-crops) are grown inbetween<br />
<strong>the</strong> trees to control weeds and conserve moisture.<br />
5.0.5. Intercropping<br />
Inter-cropping can be practised during <strong>the</strong> first 4 years of growth. It is a good practice and can provide<br />
an income in <strong>the</strong> early stages of tree establishment, be<strong>for</strong>e <strong>the</strong> trees bear fruit. The best inter-crops <strong>for</strong><br />
tamarind are groundnuts, vegetables, field beans, mung beans, cowpeas and short season cereals.<br />
NOTE: Climbing varieties of inter-crops are not recommended in tamarind orchards because<br />
<strong>the</strong>y creep up <strong>the</strong> trees and reduce available light.<br />
5.0.6. Pests and diseases<br />
Tamarind trees do not suffer badly from insect pests or diseases. There are however a number of pests<br />
(categorised as major and minor), along with possible methods of control (natural and chemical), which<br />
are mentioned in Appendices 2 and 3.<br />
In serious outbreaks, chemical methods may be <strong>the</strong> only feasible means of control. Chemical sprays<br />
should not be used if <strong>the</strong> tree is bearing fruits (it is better to spray after harvesting), if <strong>the</strong> tree is near a<br />
water source or if <strong>the</strong>re is a strong prevailing wind.<br />
Serious pest or disease problems should be reported to <strong>the</strong> local Extension or Agricultural Officer, who<br />
will give advice <strong>for</strong> control methods and / or chemical application rates and availability. Appendices 2<br />
and 3 can be used as a guide.<br />
Pests - The most common pests are <strong>the</strong> leaf feeding caterpillars, bag worms, mealy bugs and scale<br />
insects. Sap suckers, such as white flies, thrips and coccid aphids, affect tender shoots and fresh<br />
foliage, and defoliators, such as caterpillars and chafer beetles, can also cause considerable damage.<br />
They can all be controlled with chemical sprays or physical removal of <strong>the</strong> infected parts. Some pests<br />
are also known to attack flower buds, developing fruit and also fruits during storage (See Appendix 2<br />
<strong>for</strong> pest classification lists and control methods).<br />
Diseases - There are no major diseases of tamarind. The most common minor disease affects nursery<br />
seedlings and is a downy mildew caused by <strong>the</strong> fungus Oidium spp. O<strong>the</strong>r diseases, such as powdery<br />
mildew, collar rot, stem rot, stem canker, trunk rot and root rot, are also caused by fungi. Spraying<br />
fungicides at <strong>the</strong> recommended rates can effectively control <strong>the</strong> occurrence of fungal diseases (See<br />
Appendix 3 <strong>for</strong> a disease classification list and recommended chemical application rates).<br />
20
5.<strong>1.</strong> HARVESTING<br />
5.<strong>1.</strong><strong>1.</strong> Time to first harvest<br />
The time <strong>for</strong> a tamarind tree to reach its first harvest will vary, depending on <strong>the</strong> method of propagation.<br />
A tree propagated by bud-grafting will come into bearing in 3 to 4 years, whereas trees propagated by<br />
seed may take up to 12 years. Practical management and local conditions will also affect <strong>the</strong> time <strong>for</strong><br />
trees to bear. A well tended tree, grown from seed, in an open area will come into bearing in about 7<br />
years. Regardless of <strong>the</strong> method of propagation, pod yield should stabilise after 15 years. The tree has<br />
a pod bearing capacity of 50-60 years, but may yield fruit <strong>for</strong> over 200 years.<br />
5.<strong>1.</strong>2. Fruit ripeness and yield<br />
Pod skin colour does not change rapidly with maturity and individual fruits mature at different times, so<br />
harvesting should be carried out selectively. Mature fruits should have a brown shell, while immature<br />
pods have a green skin. At maturity, <strong>the</strong> fruits are filled with a sticky brown to reddish-brown pulp and<br />
<strong>the</strong> seeds become hard and glossy. The pod skin becomes brittle as <strong>the</strong> pulp shrinks and <strong>the</strong> shell can<br />
be broken easily by hand. The ripe pod produces a hollow sound when tapped with <strong>the</strong> finger.<br />
The yield of a tamarind tree varies considerably from country to country, and is dependent on genetic<br />
and environmental factors. Pod yield can also be cyclic, with bumper yields in every third year. A<br />
young tree may yield 20-30kg of fruit per tree in a year and a full-grown adult tree can yield about<br />
150-200kg of fruit per tree in a year. An average tamarind tree may yield 100kg of fruit per tree in a<br />
year. Pod yield can decline after 50 years. Once <strong>the</strong> pod yield is no longer profitable, <strong>the</strong> tree may be<br />
harvested <strong>for</strong> charcoal or fuelwood.<br />
5.<strong>1.</strong>3. Harvesting techniques<br />
Tamarind fruit can be harvested by hand picking, clipping with a hook mounted on a stick or by<br />
shaking <strong>the</strong> branches. Hand picking is used <strong>for</strong> sweet tamarind to avoid pod damage, as <strong>the</strong> fruit is sold<br />
whole, this however, requires climbing <strong>the</strong> trees and can be very time consuming. When <strong>the</strong> trees are<br />
shaken or clipped using a stick, a sheet is usually placed beneath <strong>the</strong> tree to collect <strong>the</strong> fallen fruits, this<br />
provides some protection against <strong>the</strong> hard earth and may prevent damage of <strong>the</strong> shell. The sheet also<br />
allows easy collection of <strong>the</strong> fruits. Fruit left on <strong>the</strong> tree will eventually fall off naturally.<br />
Using a ladder. Using a sheet. Using a long stick with a<br />
hook, and a basket.<br />
Figure 5.2. Harvesting of Tamarind pods<br />
21
6. PROCESSING AND STORAGE<br />
6.0.<strong>1.</strong> Processing<br />
In most rural households <strong>the</strong> pods are dried in <strong>the</strong> sun <strong>for</strong> 5-7 days. Small-scale dehydrators can also<br />
be used to dry <strong>the</strong> fresh fruit, if available. Once dried, <strong>the</strong> shells are hand-cracked and separated from<br />
<strong>the</strong> pulp. The fibres, seeds and shell pieces are removed from <strong>the</strong> pulp by hand. The pulp is <strong>the</strong>n dried<br />
<strong>for</strong> 3-4 days be<strong>for</strong>e being compressed, ready <strong>for</strong> storage. The pulp can be mixed with salt or sugar<br />
according to preference, prior to storage. Seeds can be used in industrial processing and should be<br />
dried <strong>for</strong> about 2 days.<br />
Juice<br />
Tamarind balls<br />
(pulp mixed with sugar and<br />
rolled into balls)<br />
Paste<br />
Pulp<br />
(mixed with salt or sugar and<br />
stored, or used in cooking)<br />
Figure 6.<strong>1.</strong> Processed products of Tamarind<br />
6.0.2. Storage<br />
In rural areas <strong>the</strong> compressed pulp can be stored in plastic bags, jute bags or closed clay pots. The<br />
pulp is usually stored with <strong>the</strong> seeds, however, when produced commercially, <strong>the</strong> seeds are removed.<br />
The freshly prepared, dried pulp is light brown in colour, but darkens with time in storage. Under cool,<br />
dry conditions <strong>the</strong> pulp remains good <strong>for</strong> about one year when stored with salt in a clay jar or in<br />
poly<strong>the</strong>ne, after which it becomes almost black, soft and sticky in texture.<br />
Various methods can be used to prolong <strong>the</strong> storage life of <strong>the</strong> whole fruit and <strong>the</strong> pulp:<br />
• Drying is <strong>the</strong> best and easiest way to store small amounts of tamarind pulp.<br />
• Freshly harvested fruits can be stored <strong>for</strong> 2-5 days in a cool, dark area, or a refrigerator.<br />
• Freshly harvested pulp can be stored <strong>for</strong> 4-6 months by packing in high density polyethylene and<br />
storing below 10 degrees in a dry place.<br />
6.0.3. Marketing<br />
Tamarind is marketed locally, regionally and internationally. Market value varies depending on location,<br />
variety, quality, processing and demand. Products sold in local markets are usually in <strong>the</strong> <strong>for</strong>m of fresh<br />
fruits, pulp, juice, sauce and paste. Products in international markets include pulp, juice, paste and TKP<br />
(Tamarind Kernel Powder). India is <strong>the</strong> world's largest exporter of Tamarind and in 1993, exported<br />
11,145 tonnes. Thailand exported 7,006 tonnes in 1999 and Sri Lanka exported 6903 tonnes in 1997.<br />
O<strong>the</strong>r countries also export tamarind, including Indonesia, <strong>the</strong> Philippines, Nicaragua, Venezuela and<br />
o<strong>the</strong>r Asian and South/Central American countries.<br />
22
APPENDIX <strong>1.</strong> MULTI-PURPOSE USES OF <strong>TAMARIND</strong><br />
Wood • Purplish brown hardwood used <strong>for</strong> furniture, well construction, tent pegs, canoes,<br />
side planks, boats, cart shafts and axles, naves <strong>for</strong> wheels, toys, hubs, oil, sugar presses<br />
and tool handles.<br />
• Fuel with high calorific value (4850 k cal/kg) used <strong>for</strong> brick making; excellent<br />
charcoal.<br />
Fruit and pulp • Product of economic value, sold in local markets in fresh or processed <strong>for</strong>m with<br />
high export value.<br />
• Fruits of sweet varieties are eaten fresh and sour fruits are used to prepare juice,<br />
jams, jellies and candy.<br />
• The juice is sold commercially in polypacks and can also be used as a vinegar to<br />
preserve food.<br />
• Acidic pulp used in curries, chutneys, sauces, ice cream, sherbets and toffees.<br />
• The pulp can also be mixed with common salt to clean brass, copper and silver.<br />
• Fruit pulp improves appetite and is a gentle laxative (medicinal).<br />
Seed • Eaten roasted or boiled and used in jams, jellies, confectionery and condiments. In<br />
some countries seeds are eaten alone or mixed with cereal powders, made into flour <strong>for</strong><br />
bread and cake making.<br />
• Seeds are a good substitute <strong>for</strong> fruit proteins.<br />
• Used to manufacture tamarind kernel powder (TKP), an adhesive used in textile<br />
and paper sizing, and in <strong>the</strong> food industry to thicken and stabilise.<br />
• TKP is also used as a filler <strong>for</strong> adhesives in <strong>the</strong> plywood industry, where seeds,<br />
when ground, boiled and mixed with gum, produce a strong wood cement.<br />
• Oil extracted from <strong>the</strong> seed can be used <strong>for</strong> making varnishes, paints and lighting<br />
oil.<br />
• Seed is also a source of pectin which can be used in <strong>the</strong> food industry.<br />
• Seed meal is a good livestock feed.<br />
• Powdered seed is used to treat chronic diarrhoea, jaundice and dysentery<br />
(medicinal).<br />
Leaf • Edible, used to make curries, soups, salads and stews. Young leaves are used as a<br />
seasoning vegetable. Fodder relished by cattle and goats, also preferred by wild<br />
animals.<br />
• Leaves contain tannin and can be used as an ink and in fixing dyes.<br />
• Used in cardiac and blood sugar reducing medicines (medicinal).<br />
• Ground with salt to prevent throat infections, coughs, fever, intestinal worms and<br />
liver ailments (medicinal).<br />
• Applied to boils/abscesses to reduce inflammation (medicinal).<br />
Flowers and immature<br />
pods<br />
• Edible and can be used in salads and stews.<br />
• Used internally as a remedy to cure jaundice and externally to cure eye diseases<br />
and skin ulcers (medicinal).<br />
Twigs and bark • Used in <strong>the</strong> tanning industry <strong>for</strong> tanning hides.<br />
• The bark can be burnt to make ink.<br />
• Twigs and bark can be used to make dyes.<br />
• Twigs are used as chewsticks.<br />
• Bark is used as an astringent <strong>for</strong> <strong>the</strong> treatment of diarrhoea, as a cure <strong>for</strong> asthma<br />
and acts as a digestive aid (medicinal).<br />
Root • Component in medicines <strong>for</strong> leprosy and dysentery (medicinal).<br />
23
APPENDIX 2a. MAJOR PESTS OF <strong>TAMARIND</strong><br />
COMMON<br />
NAME<br />
Scale insect<br />
Mealy bugs<br />
Thrips<br />
Coccids<br />
Soft scale<br />
insects<br />
Aphids<br />
Semilooper<br />
caterpillar<br />
SCIENTIFIC NAME<br />
Aonidiella orientalis,<br />
Aspidiotus destructor,<br />
Saissetia oleae<br />
Planococcus lilacinus,<br />
Nipaecoccu viridis<br />
Scirtothrips dorsalis,<br />
Halothrips ceylonicus,<br />
Eublemma ungulifera<br />
Aspidiotus tamarindi,<br />
Cardiococu castilleac,<br />
Hemiberlesia lataniae,<br />
Howasdia biclavis,<br />
Pinnaspia temporaria,<br />
Unaspis articolor,<br />
Saissetia oleae<br />
Toxoptera aurantii,<br />
Acaudaleyrodes<br />
rachipora<br />
Achaea janata<br />
NATURE OF<br />
ATTACK<br />
Sucks <strong>the</strong> sap of<br />
tender shoots.<br />
Sucks <strong>the</strong> sap of<br />
leaflets, mature and<br />
tender shoots and leaf<br />
petiole bases.<br />
Leaves become<br />
chlorotic and defoliate.<br />
Immature fruit fall.<br />
Attacks flowers, bores<br />
into flower buds<br />
causing bud death and<br />
can web flowers<br />
toge<strong>the</strong>r.<br />
Sucks <strong>the</strong> sap of semihard<br />
and tender shoots.<br />
Sucks cell sap of<br />
tender leaves and<br />
stems. Leaflets are<br />
distorted and covered<br />
with moulds.<br />
Infests flowers and<br />
causes a lot of<br />
damage.<br />
BIO-<br />
CONTROL<br />
Remove affected<br />
parts in initial<br />
stages.<br />
Remove affected<br />
parts.<br />
No known biocontrol.<br />
Remove affected<br />
twigs.<br />
Remove affected<br />
twigs and leaves.<br />
Remove<br />
caterpillars by<br />
hand and crush.<br />
* CHEMICAL<br />
CONTROL<br />
For serious<br />
infestations, spray with<br />
diazinon or carbosulfan<br />
at 0.1% solution.<br />
Spray with diazinon or<br />
carbosulfan at 0.1%<br />
solution.<br />
Spray with dimethioate<br />
at 20-40 ml/10 litres of<br />
water or Fenthion at<br />
10-15 ml/10 litres of<br />
water.<br />
Spray carbonsulphan at<br />
0.1% solution or<br />
dimethioate at 3%<br />
solution (20-40 ml/ 10<br />
liters of water).<br />
Spray endosulphan at<br />
10 ml/10 litres of water<br />
or spray dimethioate at<br />
20-40 ml per 10 litres<br />
of water.<br />
Repeat every 2 weeks<br />
until pest disappears.<br />
Spray permethrin at<br />
0.5% solution (5 ml per<br />
10 liters of water).<br />
* Chemical control regulations may change after publication of this manual. Please check with local<br />
Extension or Agricultural Office be<strong>for</strong>e application.<br />
24
APPENDIX 2b. MINOR PESTS OF <strong>TAMARIND</strong><br />
COMMON<br />
NAME<br />
SCIENTIFIC NAME NATURE OF<br />
ATTACK<br />
BIO-<br />
CONTROL<br />
- Thalassodes quadraria Feeds on plant foliage. No known biocontrols.<br />
Bag worms<br />
Lobster crab<br />
caterpillar<br />
Beetles<br />
Butterfly<br />
larvae<br />
Chaloides vitrea,<br />
Perteroma plagiophles<br />
Feeds on plant foliage.<br />
No known biocontrols.<br />
Stauropus alternus Feeds on plant foliage. Remove pest by<br />
hand and crush.<br />
- Cryptocrameri spp.,<br />
Euproctis scintillans<br />
Myllocerus blandus,<br />
Myllocerus spp.<br />
Charaxes fabius,<br />
Taragama siva<br />
Defoliates plant.<br />
Feeds on plant foliage.<br />
Feeds on plant foliage.<br />
Beetle larvae Lockmaecles spp., Damages branches.<br />
Attacks ripe pods.<br />
Caterpillar<br />
Grubs<br />
Beetles<br />
Aphomia gularis,<br />
Paralipsa gularis,<br />
Corcyra caphalonia,<br />
Assara albicostalis<br />
Alphitobius laevigatus,<br />
Echocerus maxillosus,<br />
Uloma spp.<br />
Lasioderma serricorne,<br />
Calandra linearis,<br />
Tribolium castaneum,<br />
Dichocrosis<br />
punctiferalis,<br />
Phycita orthoclina,<br />
Cryptophalebia illepida<br />
Attacks ripe pods and<br />
stored fruits. Bores<br />
inside <strong>the</strong> fruits and<br />
eats <strong>the</strong> pulp and<br />
sometimes bores into<br />
seeds.<br />
Attacks <strong>the</strong> fruit.<br />
Bores into <strong>the</strong> fruit.<br />
No known biocontrols.<br />
No known biocontrols.<br />
Remove by hand<br />
and crush.<br />
No known biocontrols.<br />
Remove by hand<br />
and crush.<br />
No known biocontols.<br />
No known biocontrols.<br />
* CHEMICAL<br />
CONTROL<br />
Spray permethrin at 0.5%<br />
solution (5 ml / 10 litres of<br />
water).<br />
Spray permethrin at 0.5%<br />
solution (5 ml / 10 litres of<br />
water).<br />
Spray permethrin at 0.5%<br />
solution (5 ml / 10 litres of<br />
water).<br />
Spray permethrin at 0.5%<br />
solution (5 ml / 10 litres of<br />
water).<br />
Spray permethrin at 0.5%<br />
solution (5 ml / 10 litres of<br />
water).<br />
Spray permethrin at 0.5%<br />
solution (5 ml / 10 litres of<br />
water).<br />
Spray permethrin at 0.5%<br />
solution (5 ml / 10 litres of<br />
water).<br />
Pirimiphos-methyl dust at<br />
2%. Fumigation with<br />
ethylene bromide, carbon<br />
tetrachloride, acrynitrile or<br />
phospine. Mix with neem<br />
oil at 5-10 ml per 1 kg<br />
seed in seed infestations in<br />
storage.<br />
Pirimiphos-methyl at 2%<br />
dust. Fumigation with<br />
ethylene bromide, carbon<br />
tetrachloride, acrynitrile or<br />
phospine. Mix with neem<br />
oil at 5-10 ml per 1 kg<br />
seed in seed infestations in<br />
storage.<br />
Pirimiphos-methyl at 2%<br />
dust. Fumigation with<br />
ethylene bromide carbon<br />
tetrachloride, acrynitrile or<br />
phospine. Mix with neem<br />
oil at 5-10 ml per 1 kg<br />
seed in seed infestations in<br />
storage.<br />
* Chemical control regulations may change after publication of this manual. Please check with local<br />
Extension or Agricultural Office be<strong>for</strong>e application.<br />
25
APPENDIX 3. DISEASES OF <strong>TAMARIND</strong><br />
COMMON NAME CAUSAL AGENT BIO-CONTROL<br />
Leaf spot<br />
Bartalinia robillardoides,<br />
Exosporium tamarindi,<br />
Hendersonia tamarindi,<br />
Pestalotia poonensis,<br />
Phyllosticta tamarindicola,<br />
Prathigada tamarindi,<br />
Sphaceloma spp., Stigmina<br />
tamarindi<br />
* CHEMICAL CONTROL<br />
No known bio-controls. Spray maneb 80 wp at 200/100<br />
litres of water.<br />
Powdery mildew Erysiphe polygoni,<br />
Oidium spp.<br />
No known bio-controls. Spray benomyl 50 wp at 10<br />
g/20 litres of water.<br />
Collar rot Phytophthora spp. No known bio-controls. Spray benomyl 50 wp at 10<br />
g/20 litres of water<br />
Stem rot<br />
Stem canker<br />
Pholiota gollani,<br />
Hypoxlon nectriodes<br />
No known bio-controls. Spray captan 80% wp at 200<br />
g/100 litres of water.<br />
Trunk and root Rot Stereum nitidulum No known bio-controls. Spray captan 80% wp at 200<br />
g/ 100 litres of water.<br />
Root and wood Rot Ganoderma lucidum No known bio-controls. Spray captan 80% wp at 200<br />
g/100 litres of water.<br />
Stony fruit Pestalotia macrotricha No known bio-controls. Spray captan 80%wp at 200<br />
g/100 litres of water.<br />
* Chemical control regulations may change after publication of this manual. Please check with local<br />
Extension or Agricultural Office be<strong>for</strong>e application.<br />
26
GLOSSARY<br />
Abscise -<br />
Air layering -<br />
Bole -<br />
Frond -<br />
Grafting -<br />
Ground layering -<br />
Hormone -<br />
Loam -<br />
Node -<br />
Nursery -<br />
Pinched -<br />
Plus tree -<br />
Propagation -<br />
Rootstock -<br />
Scarify -<br />
Scion -<br />
Seed propagation -<br />
Soil bed -<br />
Unpinched -<br />
Vegetative propagation -<br />
when a leaf, flower or fruit falls off <strong>the</strong> plant naturally.<br />
a method of propagation where a cut is made in a woody stem and<br />
surrounded by damp soil or peat moss and held in place with a wrap<br />
(plastic). When roots from <strong>the</strong> plant can be seen <strong>the</strong> stem can be cut<br />
and <strong>the</strong> plant transplanted.<br />
<strong>the</strong> trunk of a tree below <strong>the</strong> first major branch.<br />
leaf of a plant with many divisions, in this case referring to a<br />
palm leaf.<br />
method of propagation, by inserting a section of one plant, usually a<br />
shoot into ano<strong>the</strong>r so that <strong>the</strong>y grow toge<strong>the</strong>r into a single plant.<br />
similar to air layering except a flexible branch is bent to <strong>the</strong> ground and<br />
buried in <strong>the</strong> moist soil and pegged. When roots <strong>for</strong>m, <strong>the</strong> stem can be<br />
cut <strong>for</strong>m <strong>the</strong> mo<strong>the</strong>r plant.<br />
a biochemical product of a cell or tissue that can cause a change of<br />
activity in a cell or tissue elsewhere in <strong>the</strong> plant (organism). Rooting<br />
hormone is an artificial chemical which causes rooting in <strong>the</strong> tissue it is<br />
applied to.<br />
a generally fertile and well-drained soil, containing clay, sand and a<br />
significant amount of decomposed organic matter.<br />
point on a stem where one or more leaves are attached.<br />
an area or structure set aside <strong>for</strong> growth and protection of young<br />
plants.<br />
<strong>the</strong> terminal leaves may be removed using a finger nail or sharp knife,<br />
this may encourage growth in <strong>the</strong> roots.<br />
Superior or high quality tree from which cuttings and seeds can be<br />
collected.<br />
to produce a new plant, ei<strong>the</strong>r by vegetative means involving <strong>the</strong><br />
rooting or grafting of pieces of plant or by sowing seeds.<br />
<strong>the</strong> root system and lower portion of a woody plant to which a graft of<br />
a more desirable plant is attached.<br />
to scar, nick or cut <strong>the</strong> seed coat, to enhance germination.<br />
a cutting from <strong>the</strong> upper portion of a plant, which is <strong>the</strong>n grafted onto<br />
<strong>the</strong> rootstock of ano<strong>the</strong>r plant.<br />
to produce a new plant from sowing seeds.<br />
an area where soil is laid down <strong>for</strong> seeding.<br />
opposite to pinched, terminal leaves are not removed.<br />
to produce a new plant by vegetative means involving <strong>the</strong> rooting or<br />
grafting of pieces of plant.<br />
27
FIELD NOTES<br />
29
FIELD NOTES<br />
30