EQ5 Operations Manual - TECO-Westinghouse Motor Company
EQ5 Operations Manual - TECO-Westinghouse Motor Company
EQ5 Operations Manual - TECO-Westinghouse Motor Company

Create successful ePaper yourself
Turn your PDF publications into a flip-book with our unique Google optimized e-Paper software.
Document: TWMC-<strong>EQ5</strong>OMRevision: 001P0<strong>EQ5</strong> AC Drive <strong>Operations</strong> <strong>Manual</strong>
<strong>EQ5</strong> AC Drive <strong>Operations</strong> <strong>Manual</strong>PrefaceThank you for purchasing our <strong>EQ5</strong> series inverter. This product is used to drive a 3-phase electric motor atvariable speed. As incorrect use of this product may result in personal injury and/or property damage,please read all safety and operating instructions before using.Safety InstructionsPlease read this manual carefully before installing, connecting (wiring), operating, servicing, or inspecting theinverter. Also please familiarize yourself with all safety features before using the inverter.In this manual, safety messages are classified as follows:DangerImproper operation may result in serious personal injury or death.Improper operation may result in slight to medium personal injury or propertyCaution damage.Situations more serious than those covered by CAUTION will depend on prevailing circumstances.Always follow instructions.Instructions on use:Danger• This inverter is designed to drive a 3-phase induction motor and is not suitable for a single-phase motor orany other types, as fire may result.• This inverter may not be used (as is) as a component of a life-support system or other medical devicedirectly affecting the personal welfare of the user.• This inverter is manufactured under strict quality control standards. However, safety equipment must beinstalled if the failure of this device may result in personal injury and/or property damage.• There is a risk of accident.Instructions on installation:Danger• Mount this inverter on an incombustible material such as metal. There is a risk of fire.• Do not place combustible or flammable material near this inverter, as fire may result.Caution• Do not hold or carry this inverter by the surface cover. Inverter may be dropped causing injury.• Ensure that the inverter and heat sink surfaces are kept free of foreign matter (lint, paper dust, small chipsof wood or metal, and dust), as fire or accident may result.• Do not install or operate a damaged inverter or an inverter with missing parts, as injury may result._______________________________________________________________________<strong>TECO</strong> – <strong>Westinghouse</strong> <strong>Motor</strong> <strong>Company</strong>Compliance with UL
<strong>EQ5</strong> AC Drive <strong>Operations</strong> <strong>Manual</strong>Instructions on wiring:Danger• Connect the inverter to power via a line-protection molded-case circuit breaker or fuse, otherwise fire mayresult.• Always connect a ground wire, otherwise electric shock or fire may result.• A licensed specialist must perform the wiring, otherwise electric shock may result.• Turn off the power before starting the wiring, otherwise electric shock may result.• Wire the inverter after installation is complete, otherwise electric shock or injury may occur.Caution• Confirm that the phases and rated voltage of this product match those of the AC power supply, otherwiseinjury may result.• Do not connect the AC power supply to the output terminals (U,V,and W), otherwise injury may result.• Do not connect a braking resistor directly to the DC terminals (P(+)and N(-)),otherwise fire may result.• Ensure that the noise generated by the inverter, motor, or wiring does not adversely affect peripheralsensors and equipment, otherwise accident may result.Instructions on operation:Danger• Be sure to install the surface cover before turning on power (closed). Do not remove the cover whilepower to the inverter is on. Otherwise electric shock may occur.• Do not operate switches with wet hands, otherwise electric shock may result.• When the retry function is selected, the inverter may restart automatically after tripping. Design the machineto ensure personal safety in the event of restart. Accident may result.• When the torque limiting function is selected, operating conditions may differ from preset conditions(acceleration/deceleration time or speed). In this case, personal safety must be assured. Otherwiseaccident may result.• As the STOP key is effective only when a function setting has been established, install an emergencyswitch independently, and when an operation via the external signal terminal is selected, the STOP key onthe keypad panel will be disabled. Otherwise accident may result.• As operations start suddenly if an alarm is reset with a running signal input, confirm that no running signalis input before resetting alarm. Otherwise accident may result.• Do not touch inverter terminals when energized even if inverter has stopped. Otherwise electric shockmay result.Caution• Do not start or stop the inverter using the main circuit power. Failure may result.• Do not touch the heat sink or braking resistor because they can be extremely hot. Burns may result.• Carefully check the performance of motor or machine before operating at high speed. Injury may result.• Do not use the inverter braking function for mechanical holding. Otherwise injury may result._______________________________________________________________________<strong>TECO</strong> – <strong>Westinghouse</strong> <strong>Motor</strong> <strong>Company</strong>Compliance with UL
<strong>EQ5</strong> AC Drive <strong>Operations</strong> <strong>Manual</strong>Instructions on maintenance, inspection, and replacement:Danger• Wait a minimum of five minutes (30HP/CT, 40HP/VT or less) or ten minutes (40HP/CT, 50HP/VT or more)after power has been turned off (open) before starting an inspection. (Also confirm that the charge lamp isoff and that DC voltage between terminals P (+) and N (-) does not exceed 25V.) Otherwise electricalshock may result.• Only authorized personnel should perform maintenance, inspection, and replacement operations.(Take offmetal jewelry such as watches and rings and use insulated tools.) Otherwise electric shock or injurymay result.Instructions on disposal:Caution• Treat as industrial waste when disposing it. Otherwise injury may result.Other instructions:Danger• Never modify the product. Otherwise electric shock or injury may result._______________________________________________________________________<strong>TECO</strong> – <strong>Westinghouse</strong> <strong>Motor</strong> <strong>Company</strong>Compliance with UL
<strong>EQ5</strong> AC Drive <strong>Operations</strong> <strong>Manual</strong>Compliance with UL/cUL standards [Applicable to products with UL/cUL mark]CautionTightening torque and wire range: Refer to Table 2-3-5 in Section 2Apply the following power supply specifications to the inverter:Inverter Model Maximum input voltage Input source current<strong>EQ5</strong> - 20P2 - N1 to <strong>EQ5</strong> - 2032 - N1AC240V<strong>EQ5</strong> - 2040 - C to <strong>EQ5</strong> - 2150 - CNot more than 100,000A<strong>EQ5</strong> - 40P5 - N1 to <strong>EQ5</strong> - 4032 - N1AC480V<strong>EQ5</strong> - 4040 - C to <strong>EQ5</strong> - 4800 - CCaution* [CAUTION] Hazard of electrical shock. Disconnect incoming power before working on this control.* [CAUTION] Dangerous voltage exists until charge light is off.* [WARNING]* More than one live parts inside the inverter.* Type1 “INDOOR USE ONLY”The inverter is approved as a part used inside a panel. Install it inside a panel.* Suitable for use on a circuit capable of delivering not more than 100,000rms symmetrical amperes.* Use 60/75C copper wire only.* A Class2 circuit wired with class1 wire.* Field wiring connections must be made by a UL Listed and CSA Certified closed-loop terminal connectorsized for the wire gauge involved. Connector must be fixed using the crimp tool specified by theconnector manufacturer.* Connect the power supply to main power supply terminals via the Molded-case circuit breaker (MCCB) ora ground fault circuit interrupter (GFCI) to conform to the UL Listing Mark.(See Instruction <strong>Manual</strong> basic connection diagram Fig.2-3-1).* When using auxiliary control-power input (R0, T0), connect as per Basic connection diagram Fig.2-3-1.* Solid state motor overload protection is provided in each model._______________________________________________________________________<strong>TECO</strong> – <strong>Westinghouse</strong> <strong>Motor</strong> <strong>Company</strong>Compliance with UL
<strong>EQ5</strong> AC Drive <strong>Operations</strong> <strong>Manual</strong>ContentsPg.Before Using This Product ···························· 11-1 Receiving Instructions ·························· 11-2 Appearance ······································· 11-3 Handling the Product ························· 2-31-4 Carrying and Moving the Product ··········· 31-5 Storage ·········································· 3-42. Installation and Electrical Connections ·········· 52-1 Operating Environment ························ 52-2 Installation Method ···························· 5-72-3 Electrical Connections ························· 82-3-1 Basic Power Electrical Connections ·· 8Fig. 2-3-1 Basic Wiring Diagram.................92-3-2 Connecting Input power, <strong>Motor</strong> andGround Terminals ··················· 10-162-3-3 Connecting the Control Terminals 17-212-3-4 Input Protection Device Ratings ······· 222-3-5 Terminal Tightening Torque andCable Size ································· 232-3-6 DC Link Choke Wattage Loss…….....243. Initial Operation ······································ 253-1 Inspection and Preparation BeforeOperation ·········································· 253-2 Operation Method ······························ 253-3 Trial Run ······································ 25-264. Digital Operator ······································ 274-1 Appearance of Digital Operator ········· 27-284-2 Digital Operator LCD screen,Level Structure ··································· 284-2-1 Normal Operation ························ 284-2-2 Alarm Modes ·························· 28-294-3 Digital Operator Keypad Navigation ······· 304-3-1 Operation Mode ·························· 304-3-2 Setting the Output Frequency ········· 304-3-3 Switching to the LED Monitor ········· 314-3-4 Program Menu Screen ·················· 314-3-5 Setting the Parameter Values ····· 32-334-3-6 Checking Parameter Data ············· 334-3-7 Monitoring Operating Status ··········· 334-3-8 I/O Check ·································· 344-3-9 Maintenance Information ··············· 354-3-10 Load Rate Measurement ············· 364-3-11 Alarm Information ······················· 374-3-12 Alarm History and PossibleReasons ··································· 384-3-13 Data Copy, Verify and ErrorProcessing ··························· 39-404-3-14 Alarm Mode ······························ 41Pg.5. Parameters F,E,C,P,H, A and U ·················· 425-1 Parameter Summary List ················· 42-455-2 Parameter Explanation ··················· 46-866. Alarms Codes, Causes and Troubleshooting · 876-1 List of Alarm Codes and Causes ······· 87-886-2 Alarm Reset ····································· 896-3 Troubleshooting Alarm Codes andCauses (Flowcharts)………….….……...90-967. Maintenance and Inspection ······················ 977-1 Daily Inspection ································· 977-2 Periodic Inspection ························ 97-99Inspection Notes and Records..................1007-3 Main Circuit Voltage, Current and PowerMeasurements…………………………......1017-4 Insulation Test ································· 1027-5 Parts Replacement ··························· 1027-6 Inquiries about Damaged Products ······· 1037-7 Warranty…………………………………….8. Specifications ········································ 1048-1 Standard Specifications ··············· 104-1068-2 Common Specifications ····················· 1078-3 Outline Dimensions and Weights ··· 108-1118-4 RS-485 Modbus RTU SerialCommunications ······························· 1128-4-1 Transmission Specification ············ 1128-4-2 Connection ································ 1128-4-3 Serial Interface Configuration ········· 1128-4-4 Modbus RTU Functions ················ 1128-4-5 Inverter Function Code Access ······ 1138-4-6 Command and MonitorData Registers······················ 113-1158-4-7 Data Format Specification ······· 115-1198-4-8 Communication Errors ·················· 1199. Options ················································ 12010. Electromagnetic Compatibility (EMC) ········ 12110-1 General ········································ 12110-2 Recommended InstallationInstructions ···························· 121-124_______________________________________________________________________<strong>TECO</strong> – <strong>Westinghouse</strong> <strong>Motor</strong> <strong>Company</strong>Index
<strong>EQ5</strong> AC Drive <strong>Operations</strong> <strong>Manual</strong>1. Before Using This Product1-1 Receiving InstructionsUnpack and check the product as explained below.If you have any questions about the product,contact the nearest TWMC sales office or yourlocal distributor where you purchased the unit.1. Check the ratings on the nameplate to confirmthat the delivered product is the one that wasordered.TYPE : Inverter typeSOURCE : Power ratingOUTPUT : Output ratingMASS : Mass (not indicated for products with 30HP/CT, 40HP/VT or less)SER.No. : Serial number8 5 XXXXXXXXXXXXXProduction lot serial numberProduction month:1 to 9: January to September,X: October, Y: November, Z: DecemberProduction year: Last digit of year (7 --> 2007)2. Check for damaged and/or missing parts.3. In addition to the drive unit and this manual, the package contains rubber bushings (for products of30HP/CT, 40HP/VT or less) and a terminating resistor (1/2 W, 120Ω) which is packed separately. Theterminating resistor for products rated 40HP/CT, 50HP/VT or more, is installed internally. Theterminating resistor is required for RS485 communication and can remain installed regardless of RS-485 communication status.1-2 AppearanceMounting screws of surface coverMounting screws ofsurface cover(6 screws total)Digital OperatorDigital OperatorIntermediate coverSurface coverSurface coverRatings nameplate30HP/CT, 40HP/VT or Less40HP/CT, 50HP/VT or More_________________________________________________________________________<strong>TECO</strong> – <strong>Westinghouse</strong> <strong>Motor</strong> <strong>Company</strong> Receiving and Handling 1
<strong>EQ5</strong> AC Drive <strong>Operations</strong> <strong>Manual</strong>For drives 40HP/CT, 50HP/VT or more, loosen the mounting screws of the digital operator and removeusing the finger holds on the digital operator case (see Fig. 1-3-4).Fig. 1-3-4 Removing the Digital Operator (40HP/CT, 50HP/VT or more)1-4 Carrying and Moving the Product1. Carry the product by the main body.Do not carry the product while holding the cover or parts other than the main body.2. Use a crane or hoist to carry a product equipped with handling hooks.1-5 StorageTemporary StorageTemporary storage of this product must meet those conditions listed in Table 1-5-1.ItemAmbienttemperatureStoragetemperatureRelativehumidityAtmosphereTable 1-5-1 Storage EnvironmentSpecifications-10 (14°F) to +50 (122°F)-25 (-13°F) to +65 (149°F) Note15 to 95% Note2Condensation or freezing must not occur asa result of sudden temperature changes.The product must not be exposed to dust, direct sunlight, corrosive gas, oilmist, vapor, or water. There must be a minimum salt content in theatmosphere. Do not store where condensation may occur as a result ofsudden changes in temperature.Note1: The storage temperature applies only to short periods of time such as when transportingthe equipment .Note2: As a large change in temperature within this humidity range may result in condensation or freezing,do not store where such temperature changes may occur.1. Do not place this product directly on a floor.2. To store the product in an extreme environment, pack in vinyl sheeting, etc.3. If the product is stored in a high-humidity environment, insert a drying agent (e.g., silica gel)and pack the product in vinyl sheeting._________________________________________________________________________<strong>TECO</strong> – <strong>Westinghouse</strong> <strong>Motor</strong> <strong>Company</strong> Receiving, Handling, and Storage 3
<strong>EQ5</strong> AC Drive <strong>Operations</strong> <strong>Manual</strong>Long-term StorageIf the product is to be stored for an extended period of time after purchase, the method of storage dependsprimarily on storage location.The general long-term storage method is as follows:1. The above conditions for temporary storage must be satisfied.When the storage period exceeds three months, the upper limit of ambient temperature mustbe reduced to 30º (86ºF) to prevent the deterioration of the electrolytic capacitors.2. Pack the product thoroughly to eliminate exposure to moisture and include a drying agent toensure a relative humidity of about 70% or less.3. If the product is mounted on equipment or a control panel and is not being unused and is exposed tothe elements such as like moisture or dust (particularly on a construction site), remove the product andstore in a suitable environment.4. Electrolytic capacitors not provided with voltage for extended periods of time will deteriorate. Do notstore electrolytic capacitors longer than one year without providing voltage to them.NOTES_________________________________________________________________________<strong>TECO</strong> – <strong>Westinghouse</strong> <strong>Motor</strong> <strong>Company</strong> Receiving, Handling, and Storage 4
<strong>EQ5</strong> AC Drive <strong>Operations</strong> <strong>Manual</strong>2. Installation and Electrical Connections2-1 Operating EnvironmentInstall this product in a location that meets the conditions listed in Table 2-1-1Table 2-1-1 Operating EnvironmentTable 2-1-2 Output Current ReductionItemSpecificationsRate Based on AltitudeLocation IndoorsOutput currentAltitude-10Cº to +50ºC (14ºF to 122ºF) -reduction rateFor products of 30HP/CT,3300ft or lower (1000m) 1.00Ambient 40HP/VT or less, the ventilating3300-4950fttemperature covers must be removed if the(1000 to 1500m)0.97ambient temperature exceeds4950-6600ft+40ºC (104ºF)(1500 to 2000m)0.956600-8250ft0.91Relative(2000 to 2500m)5 to 95% non-condensinghumidity8250-9900ft0.88(2500 to 3000m)The product must not be exposedto dust, direct sunlight, corrosivegas, oil mist, vapor, or water.AtmosphereThere must be a minimum saltcontent in the atmosphere. Do notstore where condensation mayoccur as a result of suddenchanges in temperature.1000 m (3300 feet) or lower - ForAltitude altitudes above 1000 m (3300feet), see Table 2-1-2.3mm peak from 2 to 9Hz, 9.8m/s 2Vibrationfrom 9 to 20Hz,2m/s 2 from 20-55Hz, 1m/s 2 from55 to 200Hz.Fig. 2-2-130HP/CT, 40HP/VT or less:Gap X can be 0.(side-by- side installation)40HP/CT, 50HP/VT or more:Gap X >= 2.0” (50mm)2-2 Installation Method1. Mounting, dimensional and weight information for all of the inverter models, is covered in Sec. 8-3 ofthis manual. Select the model being used and prepare the installation.2. Securely fasten the product in a vertical upright position on a solid structure with the productlogo facing the front. Do not mount the product upside down or install in a horizontal positionas proper ventilation will be inhibited.3. As heat is generated during inverter operation, the spaces shown in Fig. 2-2-1 are required toensure sufficient cooling. Since heat radiates upward, do not install the product beneathheat sensitive equipment.4. During operation, the heat sink may reach a temperature of 90ºC (194ºF), therefore ensure thatthe material surrounding the product can withstand this temperature.DANGERInstall this product on nonflammable material such as metal.________________________________________________________________________<strong>TECO</strong> – <strong>Westinghouse</strong> <strong>Motor</strong> <strong>Company</strong> Installation Environment & Method 5
<strong>EQ5</strong> AC Drive <strong>Operations</strong> <strong>Manual</strong>5. When installing this product in a control panel,ensure that the ventilation is sufficient to prevent theambient temperature of the inverter from exceedingthe specified value. Do not install the product in anarea where there is inadequate ventilation,6. If two or more inverters must be installed in thesame equipment or control panel, arrange the unitshorizontally (side by side) to minimize the effect ofheat. If two or more inverters must be installedvertically (one on top of the other), place aninsulated plate between the inverters to minimize theeffect of heat.7. When shipped from the factory, inverters provideinternal cooling inside panel. An inverter of30HP/CT, 40HP/VT or less can be converted to anexternal cooling simply by adding an optionalmounting adapter.Fig.2-2-2In an external cooling system, the heat sink radiates about 70% of total inverter heat (totalloss) and can be placed outside the control panel (see Fig. 2-2-2). When doing this, ensurethat heat sink surfaces are kept free of foreign matter.DANGER・In the case of external cooling system, cover the back of the inverterin order to prevent the exposure of the power capacitor and brakingresistor as electric shock may result.・Ensure that the inverter and heat sink surfaces are kept free offoreign matter such as lint, paper dust, small chips of wood or metal,and dust, as fire may result.An inverter of 40HP/CT, 50HP/VT or more can be converted to an external cooling type simply bymovingupper and lower mounting brackets as shown in Fig. 2-2-3. Remove the M6 bracket screws,move the brackets, then secure the brackets using the M5 case mounting screws. (Thebracket screws are no longer required after changing the bracket mounting position.)VoltageSeries230V460VQuantity of Mounting ScrewsCaseInverter TypeBracket Screws MountingScrews<strong>EQ5</strong> - 2040 - C to <strong>EQ5</strong> - 2100 - C 5 (M6x20) 5 (M5x16)<strong>EQ5</strong> - 2125 - C 7 (M6x20) 5 (M5x16)<strong>EQ5</strong> - 2150 - C 6 (M6x20) 6 (M5x16)<strong>EQ5</strong> - 4040 - C to <strong>EQ5</strong> - 4125 - C 5 (M6x20) 5 (M5x16)<strong>EQ5</strong> - 4150 - C to <strong>EQ5</strong> - 4200 - C 7 (M6x20) *1 5 (M5x16)<strong>EQ5</strong> - 4250 - C to <strong>EQ5</strong> - 4300 - C 7 (M6x20) 7 (M5x16)<strong>EQ5</strong> - 4350 - C to <strong>EQ5</strong> - 4400 - C 6 (M6x20) *1 6 (M5x16)*3 <strong>EQ5</strong> - 4450 - C to <strong>EQ5</strong> - 4600 - C 6 (M8x20) *2*3 <strong>EQ5</strong> - 4150 - C to <strong>EQ5</strong> - 4200 - C 8 (M8x20) *2*1 Secure the brackets changing the screws, size:M5, length:20mm.*2 Secure the brackets using the brackets screws.______________________________________________________________________<strong>TECO</strong> – <strong>Westinghouse</strong> <strong>Motor</strong> <strong>Company</strong> Installation Method 6
<strong>EQ5</strong> AC Drive <strong>Operations</strong> <strong>Manual</strong>*3 Do not use the bottom brackets in the bottom surface mount Installation.Fig. 2-2-3 40HP/CT, 50HP/VT or more Removing Upper and Lower Brackets8. For inverters of 30HP/CT, 40HP/VT or less, remove the ventilating covers if ambient temperatureexceeds +40°C (104°F)(1) Removing the ventilating covers:One ventilating cover is mounted on top of the inverter and the other two or three are mounted atthe bottom.Fig. 2-2-4 30HP/CT, 40HP/VT or Less Removing Ventilating Covers______________________________________________________________________<strong>TECO</strong> – <strong>Westinghouse</strong> <strong>Motor</strong> <strong>Company</strong> Installation Method 7
<strong>EQ5</strong> AC Drive <strong>Operations</strong> <strong>Manual</strong>2-3 Electrical ConnectionsTo access the terminal blocks remove the cover in accordance with the instructions in this manual.2-3-1 Basic Power Electrical Connections1. Always connect input power to the main circuit power terminals L1/R, L2/S, and L3/Tof the inverter. Check that the input voltage to be applied is within the maximum allowablevoltage marked on the nameplate.2. Always connect the power output terminals U, V, and W to the motor. Check that outputvoltage rating is correct for the motor being used.DANGER- Do not connect the input voltage to the motor terminals U, V, and W asextreme damage and / or injury may result.3. Using the proper wire size and type, always bond the ground terminal to a reliable groundconnection to prevent dangerous situations such as the possibility of fire or electrical shockand to minimize electrical noise.4. Use a secure reliable cable crimp connection between the terminal and a cable.5. After terminating the wiring connection, ensure the following:a. The connection is correct.b. All necessary connections have been made.c. There is no short-circuit or ground fault between terminals and cables.6. If a wiring change needs to be made after power-up, wait at least 5 minutes before makingany wiring changes. Also ensure that the charge indicating LED is off. This is necessarybecause the DC power section capacitor(s) does not discharge immediately after power-downand maintains lethal voltages. The actual DC voltage may also be checked with a multimeterand should be 25VDC or less. If short circuiting the DC voltage after power-down, sparksmay occur.DANGER• Always properly ground the inverter otherwise electric shock or firemay result.• Ensure that a licensed specialist performs all wiring and that all codesare met.• Confirm that the power is turned off and that the charge indicator is off(Wait 5 minutes for 30HP/CT, 40HP/VT and less, 10 minutes for40HP/CT, 50HP/VT or above) before removing any protective covers aslethal voltages are present and electrical shock may result.NOTES______________________________________________________________________<strong>TECO</strong> – <strong>Westinghouse</strong> <strong>Motor</strong> <strong>Company</strong> Electrical Connections 8
<strong>EQ5</strong> AC Drive <strong>Operations</strong> <strong>Manual</strong>______________________________________________________________________<strong>TECO</strong> – <strong>Westinghouse</strong> <strong>Motor</strong> <strong>Company</strong> Basic Wiring Diagram 9
<strong>EQ5</strong> AC Drive <strong>Operations</strong> <strong>Manual</strong>2-3-2 Connecting the Input Power, <strong>Motor</strong> Output Power, and Ground TerminalsThe following shows the terminal arrangements for the various HP ranges of the <strong>EQ5</strong>.The terminal screw sizes are also shown for reference.______________________________________________________________________<strong>TECO</strong> – <strong>Westinghouse</strong> <strong>Motor</strong> <strong>Company</strong> Power Terminal Designations & Wiring 10
<strong>EQ5</strong> AC Drive <strong>Operations</strong> <strong>Manual</strong>R0T0Screw size: M4L1/R L2/S L3/TP1U V WL1/R L2/S L3/TPOWER INPUTP1U V WMOTORGGP(+)P(+)Screw size: G M10 –Other Terminals M12N(-) N(-)500 – 600 HP 460 VACR0T0Screw size: M4L1/R L2/S L3/TP1P(+)N(-)U V WL1/R L2/S L3/TPOWER INPUTScrew size: G M10 –Other Terminals M12P1P(+)N(-)U V WMOTORGG700 – 800 HP 460 VACTable 2-3-1 Functions of Main Circuit Terminals and Ground TerminalsSymbol Terminal Name DescriptionL1/R, L2/S, L3/TMain circuit input powerterminals.Connects to a 3-phase power supply.U, V, W Inverter output terminals Connects to a 3-phase motor.R0, T0Connects a backup AC power supply to theAuxiliary control-powercontrol circuit. (Not applicable to invertersinput terminals.of 1HP or less)P1, P (+)DC link reactor terminal Connects a power-factor correcting DC linkconnection.reactor. (optional)P (+), DBExternal braking resistor Connects an external braking resistor forterminal connections. inverters 10HP/CT, 15HP/VT or less.P (+), N (-) DC link circuit terminalsSupplies DC link voltage to the externalbraking or power regeneration unit(optional).G Inverter ground terminal Inverter chassis (case) ground.1. Main circuit input power terminals (L1/R, L2/S, L3/T)a. For circuit (wiring) protection, connect these terminals to the input power supply using amolded-case circuit breaker or a ground-fault circuit interrupter. Phase-sequencematching is unnecessary.b. To ensure safety, a magnetic contactor should be connected to disconnect the inverterfrom the input power supply when the inverter protective function activates.c. The main circuit input power should be used to start or stop the inverter only if absolutelynecessary and then should not be used more than once every hour.d. If you need to connect these terminals to a single-phase power supply, please consultthe factory.______________________________________________________________________<strong>TECO</strong> – <strong>Westinghouse</strong> <strong>Motor</strong> <strong>Company</strong> Power Terminal Designations & Wiring 11
<strong>EQ5</strong> AC Drive <strong>Operations</strong> <strong>Manual</strong>2. Inverter output terminals (U, V, W)a. Connect these terminals to a 3-phase motor in the correct phase sequence. If thedirection of motor rotation is incorrect, swap any two of the U, V, and W phases.b. Do not connect a power factor correction capacitor or surge suppressor to the inverteroutput.c. If the cable from the inverter to the motor is excessively long, a high-frequency currentcan be generated by stray capacitance between the cables and result in an overcurrenttrip of the inverter, an increase in leakage current, or a reduction in current indicationprecision.d. When a motor is driven by a PWM-type inverter, the motor terminals may be subject tosurge voltage generated by PWM switching. If the motor cables are excessively long,particularly the 460V series units, the surge voltage will deteriorate motor insulationover time. To prevent this, use the following guidelines:Inverters 7.5HP/CT, 10HP/VT and Higher<strong>Motor</strong> Insulation Rating 1000V 1300V 1600V460 VAC Input Voltage 66 ft (20 m) 328 ft (100 m) 1312 ft (400 m) *230 VAC Input Voltage 1312 ft (400 m) * 1312 ft (400 m) * 1312 ft (400 m) *Inverters 5HP/CT/VT and Smaller<strong>Motor</strong> Insulation Rating 1000V 1300V 1600V460 VAC Input Voltage 66 ft (20 m) 165 ft (50 m) * 165 ft (50 m) *230 VAC Input Voltage 328 ft (100 m) * 328 ft (100 m) * 328 ft (100 m) ** In this case the cable length is determined by secondary effects and not voltagespiking.Note: When a motor protective thermal O/L relay is inserted between the inverter and the motor, thethermal O/L relay may malfunction (particularly in the 460V series units), even when the cable lengthis 165 feet (50m) or less. To correct this, insert a filter or reduce the PWM carrier frequency. (Usefunction code “F26 <strong>Motor</strong> sound”.)3. Auxiliary control-power input terminals (R0 and T0)The inverter will operate even if poweris not provided to these terminals. If aprotective circuit is activated and themagnetic contactor on the inverterpower input side is opened (off), theinverter control circuit power, the alarmoutput (30A, B, and C), and the keypaddisplay will lose power. To prevent this,the same AC power as supplied to themain input circuit must be supplied (asauxiliary control power) to the auxiliarycontrol - power input terminals (R0 andT0). (see Fig. 2-3-2)a. To ensure effective noise reductionwhen using an input noise filter, theoutput from the filter must go tothe auxiliary control-power inputterminals. If these terminals areFig. 2-3-2 Connecting the Auxiliary Control-PowerInput Terminalsconnected to the input side of the filter, the noise reduction is much less effective.______________________________________________________________________<strong>TECO</strong> – <strong>Westinghouse</strong> <strong>Motor</strong> <strong>Company</strong> Power Terminal Designations & Wiring 12
<strong>EQ5</strong> AC Drive <strong>Operations</strong> <strong>Manual</strong>b. When the RCD (Residual-current Protective Device) is installed (30HP/CT, 40HP/VT or less), theterminal R0and T0 should be connected to the output side of the RCD. If they are connected to the input side,the RCD will malfunction because the power supply of the inverter is three phase and theR0 and T0 input is single phase. If it is required to connect terminals R0 and T0 are to the input sideof the RCD, an isolation transformer is required as shown on the Fig. 2-3-2.4. Connecting a DC link choke to terminals (P1 and P (+))a. Before connecting a DC link choke to these terminals, remove thefactory-installed jumper. (Fig. 2-3-3)b. If a DC link choke is not used, do not remove the jumper.Note: For inverters of 100HP or more, the DC link choke is providedas separate standard component and should always beconnected. For inverters less than 100 HP, the DC link chokeis not provided and is optional.P1DC Link ChokeXInverterP(+)Fig. 2-3-3 Remove Jumper4. Connecting an external braking-resistor to terminals (P (+) and DB) (10HP/CT, 15HP/VT or less)(Fig. 2-3-4). For inverters 10HP/CT, 15HP/VT or less, a built-in braking resistor is connected toterminals P (+) and DB. If this braking resistor does not provide sufficient thermal capacity (e.g.high operating duty cycle or high inertia loads), an optional external braking resistor must beinstalled to improve braking performance.a. Remove the internal braking resistor fromterminals P(+) and DB and Insulate theterminals with adhesive insulation tape, etc.b. Connect terminals P(+) and DB of the externalbraking resistor to terminals P(+) and DB of theinverter.c. The wiring (cables twisted or otherwise) shouldnot exceed 16ft (5m).6. DC link circuit terminals (P (+) and N (-)) (Fig.2-3-5).The <strong>EQ5</strong> inverter of 15HP/CT, 20HP/VT or moredoes not contain a drive circuit for the brakingresistor. To improve braking performance, an optionalexternal braking unit and external braking resistormust be installed.Fig. 2-3-4 Connection (10HP/CT,15HP/VT or less)a. Connect terminals P and N of the braking unit to terminals P(+) and N(-) of the inverter.The wiring (cables twisted or otherwise) should not exceed 16ft(5m).b. Connect terminals P and DB of the braking resistor to terminals P and DB of the brakingunit. The wiring (cables twisted or otherwise) should not exceed 33ft (10m).c. Connect terminals P and DB of the brakingresistor to terminals P and DB of thebraking unit. The wiring (cables twisted orotherwise) should not exceed 33ft (10m).______________________________________________________________________<strong>TECO</strong> – <strong>Westinghouse</strong> <strong>Motor</strong> <strong>Company</strong> Power Terminal Designations & Wiring 13
<strong>EQ5</strong> AC Drive <strong>Operations</strong> <strong>Manual</strong>DANGER- When terminals P (+) and N (-) ofthe inverter are not used, leave terminalsopen. If P(+) is connected to N (-) the busvoltage will be shorted, or if braking resistor isconnected directly, the resistor can causefire.d. Auxiliary contacts 1 and 2 of the brakingunit are polarity sensitive. To connect thebraking unit, refer to the "<strong>TECO</strong> InverterSpeecon Braking Unit <strong>Manual</strong>”.Fig. 2-3-5 Connection (15HP or more)7. Inverter ground terminalTo ensure safety and noise reduction, always bond the inverter ground terminal. Also,metal frames of electrical equipment must be grounded as specified in applicable codesThe connection procedure is as follows:a. Ground all metal frames and chassis to a ground terminal (Ground resistance: ≤10Ω).b. In accordance with applicable codes, use a suitable ground cable to connect the invertersystem to ground.8. Placement of connector (CN UX) for inverters 40HP/CT, 50HP/VT and higher.When an inverter of 40HP or higher is connected to an input voltage listed in Table 2-3-2,disconnect the auxiliary power connector CN UX from U1 and connect to U2.(Refer to Fig. 2-3-7)Table 2-3-2 Main Input Voltage Requiring Auxiliary Power Connector ChangeFrequency [Hz] Input voltage range [VAC]50 380 - 39860 380 - 4309. Placement of fan power connector (CN RXTX) for inverters 40HP/CT, 50HP/VT or higher.An inverter of 40HP/CT, 50HP/VT or greater uses an AC cooling fan. When the inverter is beingoperated with DC Input power, the fan must still be energized from an AC powersource. To do this, position the fan connector (CN RTXT) as shown in Fig. 2-3-9and provide AC voltage to auxiliary input terminals R0 and T0. For the (CN RTXT)connector placement method, see Fig. 2-3-7.Note: When shipped, the fan connector (CN RXTX) is connected to L1/R-L3/T. Do not change theconnector position unless DC power is being used.______________________________________________________________________<strong>TECO</strong> – <strong>Westinghouse</strong> <strong>Motor</strong> <strong>Company</strong> Power Terminal Designations & Wiring 14
<strong>EQ5</strong> AC Drive <strong>Operations</strong> <strong>Manual</strong>NOTES______________________________________________________________________<strong>TECO</strong> – <strong>Westinghouse</strong> <strong>Motor</strong> <strong>Company</strong> Power Terminal Designations & Wiring 15
<strong>EQ5</strong> AC Drive <strong>Operations</strong> <strong>Manual</strong>The connectors are mounted on the powerPCB above the control PCB as shown on theright.Note:To remove a connector, squeeze the lockingmechanism and pull. To mount a connector,push the connector down until it locks (clicks).<strong>EQ5</strong>-4040-C to <strong>EQ5</strong>-4200-C<strong>EQ5</strong>-2040-C to <strong>EQ5</strong>-14150-C<strong>EQ5</strong>-4250-C to <strong>EQ5</strong>-4900-CWhen shipped from the factory, CN UX is connected to U1 and CN RXTX is connected toL1/R-L3/T.Fig. 2-3-7 (CN UX) and (CN RXTX) Connector Locations and Orientation______________________________________________________________________<strong>TECO</strong> – <strong>Westinghouse</strong> <strong>Motor</strong> <strong>Company</strong> Power Terminal Designations & Wiring 16
<strong>EQ5</strong> AC Drive <strong>Operations</strong> <strong>Manual</strong>2-3-3 Connecting the Control TerminalsTable 2-3-3 lists the functions of the control circuit terminals. The connections to the controlterminals will be in accordance with its function setting.Table 2-3-3 Control Terminal FunctionsClassificationTerminalSymbolTerminal Name13Potentiometerpower supplyAnalog input12 Voltage input 1V2 Voltage input 2FunctionSupplies +10V DC to an externally connected frequencycontrol potentiometer (1 to 5kΩ).1- Sets the output frequency in accordance with an analoginput voltage applied from an external circuit.- 0 to +10V DC / 0 to 100%- Reversible operation using positive and negativesignals: 0 to +/-10V DC / 0 to +/-100%- Reverse operation: +10 to 0V DC / 0 to 100%2- Feedback signal for PID control.3- Output torque control.* Terminal Input resistance: 22kΩSets the output frequency in accordance with an analoginput voltage applied from an external circuit.- 0 to +10V DC / 0 to 100%- Reverse operation:+10 to 0V DC / 0 to 100%* Terminals "V2" and "C1" cannot be used at the same time.* Terminal Input resistance: 22kΩ1- Sets the output frequency in accordance with an analoginput current applied from an external circuit.- 4 to 20mA DC / 0 to 100%- Reverse operation: 20 to 4mA DC / 0 to 100%2- Feedback signal for PID control.3- PTC thermistor input.13PTCON OFF1kΩC1Current inputC1_V211kΩ+250Ω11kΩ1111Analog inputcommon* Terminals "V2" and "C1" cannot be used at the same time.* Terminal Input resistance: 250Ω* PTC switch is off when function not used.Common terminal for analog input and output signals_____________________________________________________________________<strong>TECO</strong> – <strong>Westinghouse</strong> <strong>Motor</strong> <strong>Company</strong> Control Terminal Designations & Wiring 17
<strong>EQ5</strong> AC Drive <strong>Operations</strong> <strong>Manual</strong>Digital inputFWDForward operation / Forward operation (when FWD-CM is on) or decelerationstop command and stop (when FWD-CM is open).REVReverse operation / Reverse operation (when REV-CM is on) or decelerationstop command and stop (when REV-CM is open).X1X2Digital input 1Digital input 2The coast-to-stop command, external alarm, alarm reset,multi-step frequency selection, and other functions (from anX3 Digital input 3 external circuit) can be assigned to terminals X1 to X9. ForX4 Digital input 4 details, see "Setting the Terminal Functions E01 to E09" inX5 Digital input 5Section 5.3 Function Explanation. *X7 Digital input 7Item min. typ. max.X8 Digital input 8Operating voltage ON 2V - 2VX9 Digital input 9OFF 22V 24V 27VOperating currentlevelON - 3.2mA 4.5mALeakage current OFF - - 0.5mA+24VPLCFWD, REVX1 – X96.8kΩCM0VAnalog outputCM Common terminal Common terminal for digital inputs ,FMP and P24.P24Control Unit power +24VDC power supply for control input. Maximum outputSupplycurrent 100mAPLC PLC signal powerUsed to connect to a PLC power supply output 22 to 27VDC, input signals set to sink logic operation.Analog output DC voltage 0 to +10V DC.The signal is selected to indicate one of the following:-Output frequency (before slip compensation)-Power consumption-Output frequency (after slip compensation)-PID feedback valueFMAAnalog monitor -Output current(11 Com)-PG feedback value-Output voltage-DC link circuit voltage-Output torque-Load factor*Minimum load resistance: 5kΩ______________________________________________________________________<strong>TECO</strong> – <strong>Westinghouse</strong> <strong>Motor</strong> <strong>Company</strong> Control Terminal Designations & Wiring 18
<strong>EQ5</strong> AC Drive <strong>Operations</strong> <strong>Manual</strong>Pulse outputTransistoroutputFMP(CM Com)Frequency monitor(pulse output)Outputs a pulse frequency indicating the same as that of theanalog FMA signal.Y1 Transistor output1 A running signal, frequency equivalence signal, overloadY2Transistor output2 early warning signal, and other signals from the inverter areY3Transistor output3 output (as a transistor output) to terminals Y1-Y4. ForY4Transistor output4 details, see "Setting the Terminal Functions E20 to E23" inSection 5.3 Function ExplanationTransistor output circuit specificationsItem min. typ. max.OperatingON - 2V 3VvoltageOFF - 24V 27VMaximum load current ON - - 50mALeakage current OFF - - 0.1mARelay outputsCommunicationCME30A,30B,30CY5A,Y5CDX+, DX-SDTransistor outputcommonAlarm output forany faultMultipurpose-signalrelay outputRS485Modbus RTUcommunicationCommunicationcableshieldconnection terminalCommon terminal for transistor output signalsThis terminal is insolated from terminals [CM] and [11].If the inverter is stopped by an alarm (protective function),the relay (SPDT) will activate.Contact rating: 250 VAC, .03A - 48V DC, 0.5AThe activation mode can be selected for normal or alarmoperation.The activation signals can be the same as the Y1 -Y4outputs above.The contact ratings are the same as that of the alarm outputabove.Terminals for RS485 communication (Modbus RTU). UP to31 inverters can be connected using the daisy chain method.Terminal for connecting the shield of the communicationcable. The terminal is electrically floating.(1) Analog input terminals (13,12,V2,C1,and 11)a. These terminals receive analog signals that may be affected by external noise. The cables should be as shortas possible (66ft /20m or less), be shielded twisted cable, and must be properly grounded. If the cables areaffected by externally induced noise, the shielding effect may be improved by connecting the shield to terminal[11]. (see Fig. 2-3-8)b. If contacts are used to connect to these circuits, twin (bifurcated type) contacts for handling low levelsignals must be used. A contact must not be connected to terminal [11].c. If an external analog signal output device is connected to these terminals, it may malfunction as aresult of inverter noise. To prevent malfunction, connect a ferrite core or capacitor to the external analogsignal output device as shown in Fig. 2-3-9.______________________________________________________________________<strong>TECO</strong> – <strong>Westinghouse</strong> <strong>Motor</strong> <strong>Company</strong> Control Terminal Designations & Wiring 19
<strong>EQ5</strong> AC Drive <strong>Operations</strong> <strong>Manual</strong>(2) Digital input terminals (FWD, REV, X1 to X9, and CM)a. Digital input terminals FWD, REV and X1 toX9 are generally turned on or off by switchingthe input to (P24) +24V (source logic) or to(CM) 0V (sink logic). If the digital inputterminals are turned on or off by a PLC withopen collector using an external power supply,a resulting bypass circuit may cause theinverter to malfunction. To prevent this, connectthe PLC terminal as shown in Fig. 2-3-10.b. When using a dry contact input such as arelay, highly reliable contacts capable ofhandling low level signals must be used.(3) Transistor output terminals (Y1 to Y4, CME)a. Refer to the circuit configuration in Table 2-3-3 Transistor Output and confirm the polarity of theexternal power supply.b. When connecting a control relay to the transistor output, connect a transient absorbing diodeto both ends of the relays’ exciting coil.(4) Sink or Source Logic selectiona. The slide switch SW1 located on the control board, sets the digital inputs for sink or sourceinput logic. The factory default is the sink position and is most commonly used in the US whilesource logic is common in Europe.b. For proper input digital connections, refer to the EQ 5 wiring diagram as well as other sectionscovering this subject. Ensure that the correct position is selected for a particular application.(5) Othersa. To prevent faulty operation as a result of noise, the control terminal cables should be placed asfar as possible from the main power cables.b. The control cables inside the inverter must be secured to prevent direct contact with the mainpower section, such as the power terminal block.(6) Wiring of the control circuit (40HP/CT, 50HP/VT or greater)a. Pull out the control circuit wiring along the left panel as shown in Fig. 2-3-11.b. Secure the cable binding hole A on the left wall of the power terminal block using a cable tie.Note: The cable tie should not exceed 0.14 ”(3.5mm) in width and 0.06” (1.5mm) in thickness.c. When an optional PC card is mounted, the signal cables must be secured to cable bindinghole B.______________________________________________________________________<strong>TECO</strong> – <strong>Westinghouse</strong> <strong>Motor</strong> <strong>Company</strong> Control Terminal Designations & Wiring 20
<strong>EQ5</strong> AC Drive <strong>Operations</strong> <strong>Manual</strong>Fig. 2-3-11 Control Cable Routing and Securing for 40HP/CT, 50HP/VT and GreaterNOTES______________________________________________________________________<strong>TECO</strong> – <strong>Westinghouse</strong> <strong>Motor</strong> <strong>Company</strong> Control Terminal Designations & Wiring 21
<strong>EQ5</strong> AC Drive <strong>Operations</strong> <strong>Manual</strong>2-3-4 Input Protective Device Ratings.InputVoltage230 VAC460VACHP Rating(VT / CT)L1/R, L2/S &L3/T(Nominal)Input Fuse (AMPS)L1/R, L2/S &L3/T(Maximum)AuxiliaryInputR0 & T0InputCircuitBreaker(AMPS)(Note 1)(Note 1)0.25 / 0.25 3 3 3 150.5 / 0.5 5 6 3 151 / 1 10 15 3 202 / 2 15 20 3 303 / 3 20 30 3 405 / 5 35 50 3 607.5 / 5 60 80 3 10010 / 7.5 70 125 3 12515 / 10 100 150 3 17520 / 15 125 200 3 22525 / 20 150 225 3 25030 / 25 175 250 3 30030 / 30 175 250 3 30040 / 30 200 * 5 20050 / 40 225 * 5 22560 / 50 300 * 5 30075 / 60 350 * 5 350100 / 75 300 * 5 300125 / 100 400 * 5 400150 / 125 450 * 5 4500.5 / 0.5 3 3 3 151 / 1 5 6 3 152 / 2 10 10 3 153 / 3 15 15 3 205 / 5 20 25 3 357.5 / 5 30 45 3 5010 / 7.5 40 60 3 7015 / 10 50 90 3 9020 / 15 70 110 3 11025 / 20 80 125 3 15030 / 25 100 125 3 17530 / 30 100 125 3 17540 / 30 100 * 10 10050 / 40 125 * 10 12560 / 50 175 * 10 17575 / 60 150 * 10 150100 / 75 175 * 10 175125 / 100 200 * 10 200150 / 125 225 * 10 225200 /150 300 * 10 300250 / 200 450 * 10 400300 / 250 500 * 10 450350 / 300 500 * 10 500400 / 350 600 * 10 600450 / 350 700 * 10 700500 / 400 700 * 10 700600 / 450 1000 * 10 1000700 / 500 1000 * 10 1000800 / 600 1200 * 10 1200Note 1 - Class J fuse or circuit breaker rated 600V with the maximum current rating as shown in theabove table to be connected to a drive 30HP/CT, 40HP/VT and less.______________________________________________________________________<strong>TECO</strong> – <strong>Westinghouse</strong> <strong>Motor</strong> <strong>Company</strong> Input Protection Device Ratings 22
<strong>EQ5</strong> AC Drive <strong>Operations</strong> <strong>Manual</strong>Input Voltage230VAC460VAC2-3-5 <strong>EQ5</strong> Terminal Tightening Torque and Cable SizeTerminal Tightening TorqueIb – in (Nm) (Note 4)HPRating(CT / VT)L1/R,L2/S,L3/T, U,V, W, P1& P(+)E (G)DBCircuitP(+), N(-)& DB(Note 1)R0&T0L1/R,L2/S &L3/TCable Size AWG (Note 3)U, V & WDCReactor,P1 &P(+)DB Cir.P(+), N(-)& DB(Note 1)0.25 / 0.250.5 / 0.510.6 (1.2) 10.6 (1.2) -1 / 116 162 / 23 / 3 20.8 (2.36) 20.8 (2.36)145 / 5 105 / 7.5831.0 (3.5)7.5 / 10 610 / 15415 / 20 31420 / 25 51.3 ( 5.8)31.0 (3.5)210.625 / 30(1.2)130 / 3030 / 404/0 1/0 2/0119 (13.5)40 / 5050 / 60Qty 2-1 3/0 4/01011960 / 75 239 (27)Qty 2-2/0 4/0 Qty 2-1(13.5)75 / 100 119 (13.5)Qty 2-3/0 Qty 2-1/0 Qty 2-2/0 8100 / 120Qty 2-2/0 Qty 2-3/0 Qty 2-4/0 6425 (48) 239 (27)125 / 150 Qty 2-4/0 Qty 2-4/0 Qty 2-250 40.5 / 0.510.6 (1.2) 10.6 (1.2) -1 / 116 162 / 23 / 320.8 (2.36) 20.8 (2.36)5 / 5 145 / 7.51231.0 (3.5)7.5 / 101010 / 1515 / 20 820 / 25 51.3 ( 5.8)31.0 (3.5)625 / 3030 / 3041430 / 402 3 340 / 50 1 2 2119 (13.5)50 / 602/0 2 160 / 75 10.6 3/0 2/0 2/075 / 100119 51.3 ( 5.8) (1.2)(13.5)2/0 4/0 4/0100 / 125 239 (27)3/0 4/0 Qty 2-1 10125 / 150Qty 2-1/0 Qty 2-1/0 Qty 2-1/0119 (13.5)150 / 200 Qty 2-1/0 Qty 2-2/0 Qty 2-3/08200 / 250Qty 2-3/0 Qty 2-3/0 Qty 2-4/0 6250 / 300 239 (27)Qty 2-4/0 Qt y2-250 Qty 2-3004300 / 350 Qty 2-250 Qty 2-300 Qty 2-350239 (27)350 / 400Qty 2-350 Qty 2-400 Qt y2-500350 / 450 425 (48)Qty 2-500 Qty 2-500 Qt y2-700400 / 500 Qty 2-350 Qty 2-400 Qty 2-500(Note 2)450 / 600 Qty 2-500 Qty 2-500 Qty 2-700(Note 2)500 / 700 Qty 2-600 Qty 2-600 Qty 2-800600 / 800 Qty 2-700 Qty 2-750 Qty 2-1000Notes 1 - Based on TWMC standard DB unit and DB resistor designs.2 - Consult Factory.3 - Wire size from NEC tables 310-16. Copper wire rated 60°C for 100 Amps or less, 75°C for over 100 Amps in 30°CAmbient, and 1.25 x drive rated Amps.4 - Control terminals tightening torque, 6.2 (0.7)R0&T0-1410-14-10______________________________________________________________________<strong>TECO</strong> – <strong>Westinghouse</strong> <strong>Motor</strong> <strong>Company</strong> Terminal Tightening Torques & Wire Size 23
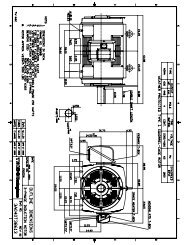
<strong>EQ5</strong> AC Drive <strong>Operations</strong> <strong>Manual</strong>2-3-6 DC Link Choke Wattage LossFig. 2-3-12 DC Link ChokeNote: Please refer to Sec. 8- 3- 4 for dimensions and weights.InputVoltage230V460VHp Model No.Loss(Watts)100/75 DCR2-75B 55125/100 DCR2-90B 57150/125 DCR2-110B 67100/75 DCR4-75B 58125/100 DCR4-90B 64150/125 DCR4-110B 73200/150 DCR4-132B 84250/200 DCR4-160B 90300/250 DCR4-200B 126350/300 DCR4-220B 131400/350 DCR4-280B 133450/350 DCR4-280B 150500/400 DCR4-355B 205600/450 DCR4-400B 215700/500 DCR4-450B 272800/600 DCR4-500B 292Notes:• <strong>EQ5</strong> Drives rated 100 Hp and above are furnished with a DC link choke. This chokemust be installed between terminals P1 and P+ prior to applying power to the Drive.• The weight of the DC Link Reactor is not included as part of weight referenced for the Drive.• The DC Link choke is provided as open type and is separately mounted. Any enclosures areto be provided by the user.______________________________________________________________________<strong>TECO</strong> – <strong>Westinghouse</strong> <strong>Motor</strong> <strong>Company</strong> DC Link Chokes 24
<strong>EQ5</strong> AC Drive <strong>Operations</strong> <strong>Manual</strong>3. Initial Operation3-1 Inspection and Preparation Before OperationCheck the following before operation:1. Check that all the electrical connections aresecure and correct. (Fig. 3-1-1)In particular, check that the input power supplyis not connected to any of the U, V, and Woutput terminals to the motor and that theground terminal is securely grounded.2. Check for short-circuits and ground faultsbetween the terminals and powered–upsections.3. Check for loose terminals, connectors, orscrews.4. Check that the motor is disconnected frommechanical equipment.5. Turn off all control switches before turning onpower to ensure that the inverter will not startor operate abnormally at power-up.6. Check the following after power-up:a. No alarm message is displayed on thedigital operator (see Figure 3-1-2).b. The fan inside the inverter is rotating. (Fordrives 2HP or more)InputPowerInput to InverterInverterOutput to <strong>Motor</strong>3Ø Induction<strong>Motor</strong>Fig. 3-1-1 Inverter ConnectionsDANGERBe sure that all protectivecovers are in place beforeturning on the power. Neverremove the protective coverswhile the power is applied tothe inverter. To ensure safety,do not operate switches withwet hands. Electric shockmay resultJOG / NORMALRUNREMOTE / LOCALFig. 3-1-2Display on Digital Operator at Power-up3-2 Operation MethodThere are various methods of operation. Select a method of operation according to theapplication requirements and specifications; referring to Section 4-2, Digital Operator LCDScreen Operating Structure, and Chapter 5, Explanation of Functions. Table 3-2-1 lists generalmethods of operation.3-3 Trial RunUpon confirming that the initial start-up is normal (see Section 3-1), proceed with a trial run. The initialoperating mode (set at factory) is using the keypad panel with the motor disconnected from themechanical load.______________________________________________________________________<strong>TECO</strong> – <strong>Westinghouse</strong> <strong>Motor</strong> <strong>Company</strong> Initial Operation 25
<strong>EQ5</strong> AC Drive <strong>Operations</strong> <strong>Manual</strong>4. Power down the inverter and following safetyprecautions, connect the motor. Power-up thedrive and repeat steps 1-3 and check thefollowing.a. Is the direction of rotation correct?b. Is the motor rotating smoothly with nobuzzing or abnormal vibration ?Table 3-2-1 General Methods of OperationOperationmodeFrequencysettingOperationcommandOperationusingkeypadOperationusingexternalsignalterminalsKeys on digitaloperatorFreq. settingPot (VR),analogvoltage,analog current.c. Is the acceleration and deceleration smooth?5. If no abnormalities are detected, increase the frequency and check the above items again.If the results of the trial run are normal, proceed to start a formal run.Switchcontact inputTerminals:FWD-CMandREV-CMNote - If an error is detected in the above procedure immediately stop the operation and attempt todetermine the cause by referring to Chapter 7, Troubleshooting.DANGERSince voltage is still applied to the main circuit terminals (L1/R, L2/S, L3/T), and auxiliarycontrol power terminals (R0, T0) even when the output from the inverter is terminated, do nottouch the terminals. The large capacitor(s) in the inverter are still charged after the power isturned off and do not discharge immediately. Before touching any electric circuit, confirm thatthe charge lamp is off or a multimeter verifies that the voltage at the P-N terminals is below 25VDC.NOTES______________________________________________________________________<strong>TECO</strong> – <strong>Westinghouse</strong> <strong>Motor</strong> <strong>Company</strong> Initial Operation 26
<strong>EQ5</strong> AC Drive <strong>Operations</strong> <strong>Manual</strong>4. Digital OperatorThe Digital Operator has various functions for inputting, controlling, and displaying operations suchas frequency setting, run/stop command, confirming and changing function data, confirming status,and copying.Please review and become familiar with each function before attempting to operate the drive.The Digital Operator can be removed or inserted during inverter operation, however, if it is removedduring a keypad operation (e.g., run/stop, frequency setting), the inverter will stop and initiate analarm.4-1 Appearance of Digital OperatorControl Keys(valid during digital operator operation):Used for inverter run and stopLED Monitor:4-digit 7-segment display used to display data suchas setting frequency, output frequency and alarmcode.Auxiliary Information Indication for LED Monitor:Indicates selected units or multiple of themonitored data shown on the LED monitor and isdisplayed on the top line of the LCD monitor. The• symbol indicates selected units or multiplenumber. The symbol ▲ indicates there is an upperscreen not currently displayed.LCD Monitor:Used to display various items of information asoperation status and function data. An operationguide message, which can be scrolled, isdisplayed at the bottom of the LCD monitor. ThisLCD monitor has a backlight feature which turnson when the control power is applied or anykeypad key is pressed. It stays on approximately 5minutes after the last key stroke.Indication on LCD Monitor:Displays one of the following operation status:FWD: Forward operationREV: Reverse operationSTOP: StopDisplays the selected operation mode:REM: Terminal blockLOC: Keypad panelCOMM: Communication terminalJOG: Jogging modeThe symbol ▼ indicates there is a lower screen notcurrently displayed.Run LED :Operation Keys:Used for switching screens, data change,frequency setting, etc. (Table 4-4-1)______________________________________________________________________<strong>TECO</strong> – <strong>Westinghouse</strong> <strong>Motor</strong> <strong>Company</strong> Digital Operator Appearance & Key Functions 27
<strong>EQ5</strong> AC Drive <strong>Operations</strong> <strong>Manual</strong>Table 4-1-1 Functions of Operation KeysOperation KeyMain FunctionUsed to switch the current screen display to the menu screen or switch to the initialdisplay screen in the operation/trip mode.Used to switch the LED monitor or to determine the entered frequency, function code,or data.Used to change data, move the cursor up or down, or scroll the display screen.Used to move the cursor horizontally when changing data. When this key is pressedwith the up or down key, the cursor moves to the next parameter function block.Used to cancel the current input data and switch the display screen. If an alarm occurs,this key is used to reset the trip status (valid only when the alarm mode initial screen isdisplayed).Used to switch normal operation mode to jogging operation mode or vice versa. TheSTOPselected mode is displayed on the LCD screen.Switches the operating mode from digital operator to terminal block operation (Local /Remote), and vice versa. When these keys are operated, function F01 data isSTOP+ RESET automatically set to 3 if set at 0, or automatically set to 0 if set from 1 thru 4. Theselected mode is displayed on the LCD screen.4-2 Digital Operator LCD Screen Operating Structure4.2.1 Normal OperationThe Digital operator LCD operating structure.Operating ModePRGProgram MenuFUNCDATAFUNCDATASupplementaryScreenRESETRESETScreen for eachfunctionFUNCDATARESETPRG4.2.2 Alarm modesIf an alarm is activated, operation is changed from normal digital operator function to alarm modeoperation. The alarm mode screen appears and alarm information is displayed.The program menu, function screens, and supplementary screens remain unchanged as duringnormal operation, though the switching method from program menu to alarm mode is limited to.______________________________________________________________________<strong>TECO</strong> – <strong>Westinghouse</strong> <strong>Motor</strong> <strong>Company</strong> Key Functions, LCD Screen Structure & Alarm Modes 28
<strong>EQ5</strong> AC Drive <strong>Operations</strong> <strong>Manual</strong>LevelNo.NameOperating1mode2 ProgrammenuTable 4-2-1 Overview of Contents Displayed for Each LevelContentThis screen is for normal operation. Frequency setting by keypad panel and the LED displayswitching are possible only when this screen is displayed.No Menu name Outline1 DATA SETThe code and name of the functions are displayed. Selecting afunction displays a data setting screen for checking or modifyingdata.2 DATA CHECKThe code and name of the function is displayed. Select a functionto be displayed for checking data. Modifying data is possible byselecting the DATA SET screen above.3 OPR MNTR Can check the operating status of various data .4 I/O CHECKCan check the status of analog and digital inputs and outputs ofthe inverter and option cards.5 MAINTENANCECan check inverter status, life expectancy, communication errorstatus, and ROM version as maintenance information.6 LOAD FCTRCan measure maximum and average current and averagebreaking force in load rate measurement.7 ALM INFCan check the operating and input/output status for the last alarmoccurrence.8ALM CAUSE9 DATA COPYPlaces the function of one inverter in memory for copying toanother inverter.34Screen foreach functionSupplementscreenThe function screen selected on the program menu appears, hence completing the function.Functions not completed (e.g., modifying function data, displaying alarm factors) on individualfunction screens are displayed on the supplementary screen.______________________________________________________________________<strong>TECO</strong> – <strong>Westinghouse</strong> <strong>Motor</strong> <strong>Company</strong> Alarm Mode Screen & Screen Level Displays 29
<strong>EQ5</strong> AC Drive <strong>Operations</strong> <strong>Manual</strong>4-3 Digital Operator Keypad Navigation4-3-1 Operation ModeThe LCD screen for normal inverter operation displays the inverter operating status and anoperation guide. A second screen is available which graphically displays the operating statusin the form of a bar graph. Switching between screens is possible by setting the value of parameterE45 (=1 operation guide), (=2 bar graph).1) Operation status (E45=0)RUNFWDPRG PRG MENUF / D LED SHIFT2) Bar graph (E45=1)STOP FWDPRG PRG MENUF / D LED SHIFTA%Fout/Iout/TRQHzOutput frequency (maximum frequency at full scale)Output current (200% of inverter rating at full-scale)Torque calculation (200% of inverter rating at full-scale)1) Output frequency control set by Digital operator (F01=0 or C30=0)RUNFWDPRG PRG MENUF / D LED SHIFT< DIG. SET Hz >LOCAL0.00 ~ 60.00F / D STORE< DIG. SET Hz >LOCAL0.00 ~ 60.00F / D STORE2) Output frequency set by external source (F01≠0)RUNFWDPRG PRG MENUF / D LED SHIFT< REMOTE REF >12+V1______________________________________________________________________<strong>TECO</strong> – <strong>Westinghouse</strong> <strong>Motor</strong> <strong>Company</strong> LED Monitor Display & Program Menu Screen 30
<strong>EQ5</strong> AC Drive <strong>Operations</strong> <strong>Manual</strong>When stoppedWhile runningE43 (E44 = 0) (E44 = 1)(E44 =0,1)Units0SettingOutput frequency 1 (before slipfrequency compensation)1SettingfrequencyOutput frequency 2 (after slip compensation) Hz2SettingfrequencySetting frequency3 Output current Output current A4Output voltage(specified value)Output voltage (specified value)VSynchronous5 speed settingvalue67Line speedsetting valueLoad rotationspeed settingvalueRemarksSynchronous speed r/min. For 4 digits ormore, the lastLine speedLoad rotation speedm/min.r/min.digits are cut,with x10, x100marked on theindicator.8Torquecalculation valueTorque calculation value % ± indication9PowerconsumptionPower consumptionkW10 PID setting value PID setting value − Displayed only11PID remotewhen the PIDPID remote setting value−setting valuefunction isselected.12PID feedbackvaluePID feedback value−______________________________________________________________________<strong>TECO</strong> – <strong>Westinghouse</strong> <strong>Motor</strong> <strong>Company</strong> LED Monitor Display & Program Menu Screen 31
<strong>EQ5</strong> AC Drive <strong>Operations</strong> <strong>Manual</strong>4-3-5 Setting the Parameter (function code) ValueOn the program menu screen, select 1. DATA SET as in para. 4-3-3. The parameter select screenappears. Select the desired parameter and set value as follows.RUNFWDPRG PRG MENUF / D LED SHIFTThe parameter designations (function codes) consist of alphanumeric characters with uniquealphabetical letters assigned to each parameter group as in table 4-3-1 below.Table 4-3-1 Parameter Designations and Corresponding GroupsParameter Group name RemarksF00 - F42 Fundamental FunctionsE01 - E47 Extension Terminal FunctionsC01 - C33 Control Functions of FrequencyP01 - P09 <strong>Motor</strong> ParametersH03 - H39 High Performance FunctionsA01 - A18 Alternative <strong>Motor</strong> ParametersU01 - U61 User Functionso01 - o55 Optional FunctionsCan be selected only with anoption connected.______________________________________________________________________<strong>TECO</strong> – <strong>Westinghouse</strong> <strong>Motor</strong> <strong>Company</strong> Setting Parameter Values 32
<strong>EQ5</strong> AC Drive <strong>Operations</strong> <strong>Manual</strong>Table 4-3-2Display Reason for No Modification To Enable Data ChangeLINK ACTIVECurrently writing from RS-485/RTUoption to function is being made.Send a cancel command to functionwriting from RS-485/RTU. Stops aNO SIGNAL(WE)DATA PRTCTDINV RUNNINGFWD/REV ONThe edit enabling commandfunction is selected using ageneral-purpose input terminal.Data protection is selected byparameter F00.An attempt is made to change afunction that cannot be changedduring inverter operation.An attempt is made to change afunction that cannot be changedwith the FWD / REV command on.“write” operation from the link.For functions E01 to E09, turn dataterminal 19 (edit enablingcommand selection) ON.Change F00 to 0.Stop inverter operation.Turn FWD / REV command off.4.3.6 Checking Parameter ValuesSelect 2. DATA CHECK on the program menu screen. The parameter select screen then appearswith the parameters and current values. (Note that an * will appear before the current value if it waschanged from the original value.)RUNFWDPRG PRG MENUF / D LED SHIFT4.3.7 Monitoring Operating StatusSelect 3. OPR MNTR on the program menu screen to display the current inverter operating status.RUNFWDPRG PRG MENUF / D LED SHIFT______________________________________________________________________<strong>TECO</strong> – <strong>Westinghouse</strong> <strong>Motor</strong> <strong>Company</strong> Checking Parameter Values & Operating Status 33
<strong>EQ5</strong> AC Drive <strong>Operations</strong> <strong>Manual</strong>Input Status via TerminalsRUNFWDPRG PRG MENUF / D LED SHIFTPRG1.DATA SET2.DATA CHECK3.OPR MNTR4.I/O CHECKFUNCDATAREMFWDREVX1X2X3X4X5X6X7X8X9Output Terminal StatusInput Status via CommunicationY1Y2Y3Y4Y5COMMFWDREVX1X2X3X4X5X6X7X8X9Analog Input Voltage ValueAnalog Input Current Value12 = + XX.XV22 = + XX.XV32 = + XX.XVV2 = + XX.XVTerminal 12 InputTerminal 22 Input (AIO Option)Terminal 32 Input (AIO Option)Terminal V2 InputC1 =C2 =XX.XmAXX.XmATerminal C1 InputTerminal C2 Input (AIO Option)DIO Option I/O StatusAnalog OutputAO =CS =DI =DO =XX.XVXX.XmAXXXXHXXHAnalog Output (V) (AIO Option)Analog Output (I) (AIO Option)Digital Input Terminal (HEX)Digital Output Terminal (HEX)FMA =FMP =FMP =XX.XVXX.XVXXXX0p/sFMA Output VoltageFMP Output VoltageFMP Output Frequency_______________________________________________________________________<strong>TECO</strong> – <strong>Westinghouse</strong> <strong>Motor</strong> <strong>Company</strong> Checking I / O Status 34
<strong>EQ5</strong> AC Drive <strong>Operations</strong> <strong>Manual</strong>RUNFWDPRG PRG MENUF / D LED SHIFTNOTES_______________________________________________________________________<strong>TECO</strong> – <strong>Westinghouse</strong> <strong>Motor</strong> <strong>Company</strong> Checking Maintenance Information 35
<strong>EQ5</strong> AC Drive <strong>Operations</strong> <strong>Manual</strong>RUNFWDPRG PRG MENUF / D LED SHIFTT= 3600sImax = 0.00AIave = 0.00ABPave = 0.0%Measuring TimeSet Measuring Time(0 – 3600 sec.)Start MeasuringUse these keys toset measuring timeEx.- Set for 600 sec.T= 150sImax = 0.00AIave = 0.00ABPave = 0.0%Displays remainingmeasurement time.When = 0 measurementends.T= 600sImax = 0.00AIave = 0.00ABPave = 0.0%T= 3600sImax = 56.4AIave = 23.5ABPave = 10.4%Time Returns to Initial ValueMaximum CurrentAverage CurrentAverage Braking Power(<strong>Motor</strong> rated output /100%)Measurements DisplayedNOTES_______________________________________________________________________<strong>TECO</strong> – <strong>Westinghouse</strong> <strong>Motor</strong> <strong>Company</strong> Load Rate Measurement 36
<strong>EQ5</strong> AC Drive <strong>Operations</strong> <strong>Manual</strong>RUNFWDPRG PRG MENUF / D LED SHIFT_______________________________________________________________________<strong>TECO</strong> – <strong>Westinghouse</strong> <strong>Motor</strong> <strong>Company</strong> Alarm Information 37
<strong>EQ5</strong> AC Drive <strong>Operations</strong> <strong>Manual</strong>RUNFWDPRG PRG MENUF / D LED SHIFTPRG5.MAINTENANCE6.LOAD FCTR7.ALM INF8.ALM CAUSEFUNCDATA0 / 1= LU 1-1= ----- 0-2= ----- 0-3= ----- 0Latest AlarmAlarm HistoryAlarm Code ofthe selectedalarmFUNCDATADisplayExample: Latest alarm LUis selected.Select an alarmTo be displayedLOW SUP VPWR FAILUREEXCESS LOADPHASE LOSSPossible cause foralarm occurrencefor the selectedalarm5= -----4= -----3= -----2= -----SimultaneouslyoccurringalarmsNOTES_______________________________________________________________________<strong>TECO</strong> – <strong>Westinghouse</strong> <strong>Motor</strong> <strong>Company</strong> Alarm History & Possible Causes 38
<strong>EQ5</strong> AC Drive <strong>Operations</strong> <strong>Manual</strong>Select Data Copy (DATA COPY) on the main menu screen. Press to access theData Copy (READ) screen. Press to read data from inverter 1. When complete,remove the Digital Operator and attach to inverter 2. Power up and again select 9. Press. On the Data Copy screen press to select (WRITE). Press . Whencomplete the data transfer done.The (VERIFY) feature which is covered on the next page also mkes it possible tocompare and check differences in the data stored in the Digital Operator and the datastored in the inverter.RUNFWDPRG PRG MENUF / D LED SHIFTRUNFWDPRG PRG MENUF / D LED SHIFT_______________________________________________________________________<strong>TECO</strong> – <strong>Westinghouse</strong> <strong>Motor</strong> <strong>Company</strong> Data Copy & Verify Function 39
<strong>EQ5</strong> AC Drive <strong>Operations</strong> <strong>Manual</strong>Verify DataRUNFWDPRG PRG MENUF / D LED SHIFTError Processing1. Data Change Disabled During OperationIf a write operation is attempted during a driveoperation, or vice versa, the error messagebelow will appear. After stopping the driveand pressing RESET retry the operation.PRG6.LOAD FCTR7.ALM INF8.ALM CAUSE9.DATA COPYFUNCDATA30 HP-2READ2. Memory Error30 HP-2WRITEINV RUNNINGIf a write operation is attempted while data hasnot been saved (i.e. no data) in the DigitalOperator memory during the read mode orwhen the drive types do not match, thefollowing error message will appear.30 HP-2WRITEMEMORY ERROR3. Verify Error30 HP-2VERIFYFUNCDATA30 HP-2VERIFYCOMPLETEDuring a data check (Verify) operation, if thedata stored in the Digital Operator differs fromthat stored in the drive, the following errormessage is displayed to indicate the functionnumber. The data check stops at the firstmismatch. To continue the data check pressFUNCDATAuntil another mismatch is displayed or iscomplete. To stop the data check and switchto another operation, press RESET .30 HP-2WRITEERR-F25_______________________________________________________________________<strong>TECO</strong> – <strong>Westinghouse</strong> <strong>Motor</strong> <strong>Company</strong> Verify Data & Error Processing 40
<strong>EQ5</strong> AC Drive <strong>Operations</strong> <strong>Manual</strong>5. 5 No. 5 alarm4. 4 No. 4 alarm3. 3 No. 3 alarm2. 2 No. 2 alarm1. 1 No. 1 alarm (more than two alarms have occurred.)Blank 0 Latest alarm (only one alarm has occurred / alarm release)Blank -1 Previous alarm historyBlank -2 Alarm history before previous alarmBlank -3 Alarm history two times before previous alarmNOTES_______________________________________________________________________<strong>TECO</strong> – <strong>Westinghouse</strong> <strong>Motor</strong> <strong>Company</strong> Alarm Mode 41
<strong>EQ5</strong> AC Drive <strong>Operations</strong> <strong>Manual</strong>5. Parameters F,E,C,P,H, A and UThis section covers parameters F,E,C,P,H, A and U which can be set via the digital operator(see Sect. 4) to achieve a specific performance for a particular application. For most general purposeapplications, the factory settings are sufficient and will not need to be changed. If the parametervalues are to be changed, it is recommended that resulting overall drive performance be evaluated toavoid any unwanted performance issues.5-1 Parameters Summary ListThe following tables show the setting range, LCD readout, factory setting, and whether the value canbe changed while the drive is operational.Para.No.F ParametersNAME LCD Display Setting range UnitMin.UnitFactory setting30HP/CT40HP/VT40HP/CT50HP/VTF00 Data protection F00 DATA PRTC 0, 1 - - 0 NF01 Frequency command 1 F01 FREQ CMD 1 0 to 11 - - 0 NF02 Operation method F02 OPR METHOD 0 to 4 - - 0 NF03 Maximum frequency 1 F03 MAX Hz-1 50 to 120Hz Hz 1 60 NF04 Base frequency 1 F04 BASE Hz-1 25 to 120Hz Hz 1 60 N0V: (Output voltage proportional toF05 Rated voltage 1 (at Base frequency 1) F05 RATED V-1230:(230V class)source voltage)V 1 460:(460V class)80 to 240V: (230V class)N320 to 480V: (460V class)F06 Maximum voltage 1 (at Maximum frequency 1) F06 MAX V-180 to 240V: (230V class)230:(230V class)V 1320 to 480V: (460V class) 460:(460V class)NF07 Acceleration time 1 F07 ACC TIME1F08 Deceleration time 1 F08 DEC TIME10.01 to 3600s s 0.01 6.0 20.0 YF09 Torque boost 1 F09 TRQ BOOST1 0.0, 0.1 to 20.0 - 0.1 0.1 YF10 Electronic (Select) F10 ELCTRN OL1 0, 1, 2 - - 1 YF11 thermal 1( Level) F11 OL LEVEL1 INV rated current 20 to 135% A 0.01 <strong>Motor</strong> rated current YF12 (Thermal time constant) F12 TIME CNST1 0.5 to 75.0 min min 0.1 5.0 10.0 N[Up to 10HP/CT, 15HP/VT]0Electronic thermal overload relay0, 2F13F13 DBR OL- -(for braking resistor)[15HP/CT, 20HP/VT and above ]00YF14 Restart mode after momentary power failure F14 RESTART 0 to 5 - - 0 NF15 Frequency limiter (High) F15 H LIMITERY0-120Hz Hz 1 70F16 (Low) F16 L LIMITER NF17 Gain (for freq. set signal) F17 FREQ GAIN 0.0 to 200.0% % 0.1 100.0 YF18 Bias frequency F18 FREQ BIAS -120.0 to +120.0Hz Hz 0.1 0.0 YF20 DC brake (Starting freq.) F20 DC BRK Hz 0.0 to 60.0Hz Hz 0.1 0.0F21 (Braking level) F21 DC BRK LVL 0 to 100% % 1 0YF22 (Braking time) F22 DC BRK t 0.0s (Inactive) s 0.1 0.0F23 Starting frequency (Freq.) F23 START Hz 0.1 to 60.0Hz Hz 0.1 0.5F24 (Holding time) F24 HOLDING t 0.0 to 10.0s s 0.1 0.0NF25 Stop frequency F25 STOP Hz 0.1 to 60.0Hz Hz 0.1 0.2 NF26 <strong>Motor</strong> sound (Carrier freq.) F26 MTR SOUND 0.75 to 15kHz (Vary by HP) kHz 1 2F27 (Sound tone) F27 SOUND TONE 0 to 3 - - 0YF30 FMA (Voltage adjust) F30 FMA V-ADJ 0 to 200% % 1 100F31 (Function) F31 FMA FUNC 0 to 11 - - 0YF33 FMP (Pulse rate) F33 FMP PULSES 300 to 6000p/s (full scale) p/s 1 1440F34 (Voltage adjust) F34 FMP V-ADJ 0%, 1 to 200% % 1 0YF35 (Function) F35 FMP FUNC 0 to 10 - - 0F36 30RY operation mode F36 30RY MODE 0, 1 - - 0 YF40 Torque limiter 1 (Driving) F40 DRV TRQ 1 20 to 150%, 999 % 1 999F41 (Braking) F41 BRK TRQ 1 0%, 20 to 150%, 999 999YF42 Torque vector control 1 F42 TRQVECTOR1 0, 1 - - 0 NChangeDuringOper.UserSet valueRemark_______________________________________________________________________<strong>TECO</strong> – <strong>Westinghouse</strong> <strong>Motor</strong> <strong>Company</strong> Parameter List F00 – F42 42
Para.No.E ParametersNAME LCD Display Setting range Unit<strong>EQ5</strong> AC Drive <strong>Operations</strong> <strong>Manual</strong>Min.UnitFactory setting30HP/CT40HP/VT40HP/CT50HP/VTE01 X1 terminal function E01 X1 FUNC0 NE02 X2 terminal function E02 X2 FUNC 1 NE03 X3 terminal function E03 X3 FUNC 2 NE04 X4 terminal function E04 X4 FUNC 3 NE05 X5 terminal function E05 X5 FUNC0 to 35 - -4 NE06 X6 terminal function E06 X6 FUNC 5 NE07 X7 terminal function E07 X7 FUNC 6 NE08 X8 terminal function E08 X8 FUNC 7 NE09 X9 terminal function E09 X9 FUNC 8 NE10 Acceleration time 2 E10 ACC TIME26.00 20.00 YE11 Deceleration time 2 E11 DEC TIME2 6.00 20.00 YE12 Acceleration time 3 E12 ACC TIME3 6.00 20.00 Y0.01 to 3600s s 0.01E13 Deceleration time 3 E13 DEC TIME3 6.00 20.00 YE14 Acceleration time 4 E14 ACC TIME4 6.00 20.00 YE15 Deceleration time 4 E15 DEC TIME4 6.00 20.00 YE16 Torque limiter 2 (Driving) E16 DRV TRQ 2 20 to 150%, 999 % 1 999 YE17 (Braking) E17 BRK TRQ 2 0%, 20 to 150%, 999 % 1 999 YE20 Y1 terminal function E20 Y1 FUNC0 NE21 Y2 terminal function E21 Y2 FUNC 1 NE22 Y3 terminal function E22 Y3 FUNC0 to 37- -2 NE23 Y4 terminal function E23 Y4 FUNC 7 NE24 Y5A, Y5C terminal func. E24 Y5 FUNC 10 NE25 Y5 RY operation mode E25 Y5RY MODE 0,1 - 1 0 NE30 FAR function (Hysteresis) E30 FAR HYSTR 0.0 to 10.0Hz Hz 0.1 2.5 YE31 FDT function (Level) E31 FDT1 LEVEL 0 to 120Hz Hz 1 60 YE32 Signal (Hysteresis) E32 FDT1 HYSTR 0.0 to 30.0Hz Hz 0.1 1.0 YE33 OL1 function(Mode select) E33 OL1 WARNING0: Thermal calculation1: Output current- - 0 YE34 Signal (Level) E34 OL1 LEVEL 5 to 200% A 0.01 <strong>Motor</strong> rated currentE35 (Timer) E35 OL1 TIMER 0.0 to 60.0s s 0.1 10.0YE36 FDT2 function (Level) E36 FDT2 LEVEL 0 to120Hz Hz 1 60 YE37 OL2 function (Level) E37 OL2 LEVEL 5 to 200% A 0.01 <strong>Motor</strong> rated current YE40 Display coefficient A E40 COEF A -999.00 to 999.00 - 0.01 0.01 YE41 Display coefficient B E41 COEF B -999.00 to 999.00 - 0.01 0.00 YE42 LED Display filter E42 DISPLAY FL 0.0 to 5.0s s 0.1 0.5 YE43 LED Monitor (Function) E43 LED MNTR 0 to 12 - - 0 YE44 (Display at STOP mode) E44 LED MNTR2 0, 1 - - 0 YE45 LCD Monitor (Function) E45 LCD MNTR 0, 1 - - 0 YE46 (Language) E46 LANGUAGE 0 to 5 - - 1 YE47 (Contrast) E47 CONTRAST 0 (soft) to 10 (hard) - - 5 YChangeDuringOper.UserSet valueRemarkPara.No.C ParametersNAME LCD Display Setting range UnitMin.UnitFactory setting30HP/CT40HP/VT0C01(Jump freq. 1) C01 JUMP Hz 1C02 (Jump freq. 2) C02 JUMP Hz 2 0 to 120Hz Hz 10Jump frequencyC03 (Jump freq. 3) C03 JUMP Hz 3 0C04 (Hysteresis) C04 JUMP HYSTR 0 to 30Hz Hz 1 3C05(Freq. 1) C05 MULTI Hz-10.00C06 (Freq. 2) C06 MULTI Hz-2 0.00C07 (Freq. 3) C07 MULTI Hz-3 0.00C08 (Freq. 4) C08 MULTI Hz-4 0.00C09 (Freq. 5) C09 MULTI Hz-5 0.00C10 Multistep frequency (Freq. 6) C10 MULTI Hz-6 0.00settingC11 (Freq. 7) C11 MULTI Hz-7 0.00C12 (Freq. 8) C12 MULTI Hz-80.00 to 120.00Hz Hz 0.010.00C13 (Freq. 9) C13 MULTI Hz-9 0.00C14 (Freq. 10) C14 MULTI Hz-10 0.00C15 (Freq. 11) C15 MULTI Hz-11 0.00C16 (Freq. 12) C16 MULTI Hz-12 0.00C17 (Freq. 13) C17 MULTI Hz-13 0.00C18 (Freq. 14) C18 MULTI Hz-14 0.00C19 (Freq. 15) C19 MULTI Hz-15 0.0040HP/CT50HP/VTChangeDuringOper.YUserSet valueRemarkCont._______________________________________________________________________<strong>TECO</strong> – <strong>Westinghouse</strong> <strong>Motor</strong> <strong>Company</strong> Parameter List E01 – E47 & C01 – C19 43
<strong>EQ5</strong> AC Drive <strong>Operations</strong> <strong>Manual</strong>Para.No.NAME LCD Display Setting range UnitMin.UnitFactory setting30HP/CT40HP/VT40HP/CT50HP/VTC20 JOG frequency C20 JOG Hz 0.00 to 120.00Hz Hz 0.01 5.00 NC21 PATTERN (Mode select) C21 PATTERN 0,1,2 - - 0 NC22 (Stage 1) C22 STAGE 10.00 F1C23 (Stage 2) C23 STAGE 2 0.00 F1C24 (Stage 3) C24 STAGE 3Operation time:0.00 to 6000s0.00 F1C25 (Stage 4) C25 STAGE 4F1 to F4 and R1 to R4 s 0.010.00 F1YC26 (Stage 5) C26 STAGE 5 0.00 F1C27 (Stage 6) C27 STAGE 6 0.00 F1C28 (Stage 7) C28 STAGE 7 0.00 F1C30 Frequency command 2 C30 FREQ CMD 2 0 to 11 - - 2 NC31 Offset adjust (terminal [12]) C31 BIAS 12 -100.0 to +100.0% % 0.1 0.0 YC32 C32 GAIN 12 0.0 to +200.0% % 0.1 100.0 YC33 Analog setting signal filter C33 REF FILTER 0.00 to 5.00s s 0.01 0.05 YChangeDuringOper.UserSet valueRemarkP ParametersP01 Number of motor 1 poles P01 M1 POLES 2 to 14 - 2 4 NP02Up to 30[HP]: 0.01 to 60HP<strong>Motor</strong> 1 (Capacity) P02 M1-CAP40[HP] and above: 0.01 to 800HPHP 0.01 <strong>Motor</strong> Capacity NP03 (Rated current) P03 M1-Ir 0.00 to 2000A A 0.01 <strong>Motor</strong> rated current NP04 (Tuning) P04 M1 TUN1 0, 1, 2 - - 0 NP05 (On-line Tuning) P05 M1 TUN2 0, 1 - - 0 NP06 (No-load current) P06 M1-Io 0.00 to 2000A A 0.01 Standard Rated Value NP07 (%R1 setting) P07 M1-%R1 0.00 to 50.00% % 0.01 Standard Rated Value YP08 (%X setting) P08 M1-%X 0.00 to 50.00% % 0.01 Standard Rated Value YP09 Slip compensation control 1 P09 SLIP COMP1 0.00 to 15.00Hz Hz 0.01 0.00 YH ParametersH03 Data initializing H03 DATA INIT 0, 1 - - 0 NH04 Auto-reset (Times) H04 AUTO-RESET 0, 1 to 10 times - 1 0 YH05 (Reset interval) H05 RESET INT 2 to 20s s 1 5 YH06 Fan stop operation H06 FAN STOP 0, 1 - - 0 YH07 ACC/DEC pattern (Mode select) H07 ACC PTN 0,1,2,3 - - 0 NH08 Rev. phase sequence lock H08 REV LOCK 0, 1 - - 0 NH09 Start mode H09 START MODE 0, 1, 2 - - 0 NH10 Energy-saving operation H10 ENERGY SAV 0, 1 - - 1 YH11 DEC mode H11 DEC MODE 0, 1 - - 0 YH12 Instantaneous OC limiting H12 INST CL 0, 1 - - 1 NH13 Auto-restart (Restart time) H13 RESTART t 0.1 to 10.0s s 0.1 0.1 NH14 (Freq. fall rate) H14 FALL RATE 0.00 to 100.00Hz/s Hz/s 0.01 10.00 YH15 (Holding DC voltage) H15 HOLD V3ph 230V class: 200 to 300V230V class:235VV 13ph 460V class: 400 to 600V460V class:470VYH16 (OPR command selfhold time) H16 SELFHOLD t 0.0 to 30.0s, 999 s 0.1 999 NH19 Active drive H19 AUT RED 0, 1 - - 0 YH20(Mode select) H20 PID MODE 0, 1, 2 - - 0 NH21 (Feedback signal) H21 FB SIGNAL 0, 1, 2, 3 - - 1 NH22 (P-gain) H22 P-GAIN 0.01 to 10.00 times - 0.01 0.1 YPID controlH23 (I-gain) H23 I-GAIN 0.0 , 0.1 to 3600s s 0.1 0.0 YH24 (D-gain) H24 D-GAIN 0.00s , 0.01 to 10.0s s 0.01 0.00 YH25 (Feedback filter) H25 FB FILTER 0.0 to 60.0s s 0.1 0.5 YH26(Mode select) H26 PTC MODE 0, 10 YPTC thermistorV 0.01H27 (Level) H27 PTC LEVEL 0.00 to 5.00V 1.60 YH30 Serial link (Function select) H30 LINK FUNC 0, 1, 2, 3 - - 0 YH31 (Address) H31 ADDRESS 0 (broadcast), 1 to 247 - 1 1 NH32 (Mode select on no response error) H32 MODE ON ER 0, 1, 2, 3 - - 0 YH33 (Timer) H33 TIMER 0.0 to 60.0s s 0.1 2.0 YH34 Modbus-RTU (Baud rate) H34 BAUD RATE 0, 1, 2, 3 - - 1 YH35 (Data length) H35 LENGTH 0 (8-bit fixed) - - 0 YH36 (Parity check) H36 PARITY 0, 1, 2 - - 0 YH37 (Stop bits) H37 STOP BITS 0(2bit), 1(1bit) - - 0 YH38 (No response error detection time) H38 NO RES t 0 (No detection), 1 to 60s s 1 0 YH39 (Response interval) H39 INTERVAL 0.00 to 1.00s s 0.01 0.01 Y_______________________________________________________________________<strong>TECO</strong> – <strong>Westinghouse</strong> <strong>Motor</strong> <strong>Company</strong> Parameters C20 – C33, P01 – P09 & H03 – H39 44
<strong>EQ5</strong> AC Drive <strong>Operations</strong> <strong>Manual</strong>A ParametersPara.No.NAME LCD Display Setting range UnitMin.Unit30HP/CT40HP/VTFactory setting40HP/CT50HP/VTA01 Maximum frequency 2 A01 MAX Hz-2 50 to 120Hz Hz 1 60 NA02 Base frequency 2 A02 BASE Hz-2 25 to 120Hz Hz 1 60 NA03 Rated voltage 2 (at Base frequency 2 ) A03 RATED V-20:80 to 240V: (230V class) V 1220: (230V class)380: (460V class)N320 to 480V: (460V class)A04 Maximum voltage 2 (at Base frequency 2) A04 MAX V-280 to 240V: (230V class)220:(230V class)V 1320 to 480V: (460V class) 380:(460V class)NA05 Torque boost2 A05 TRQ BOOST2 0.0, 0.1 to 20.0 - - 0.1 YA06 Electronic thermal overload relay for motor 2 A06 ELCTRN OL2 0, 1, 2 - - 1 YA07 (Level) A07 OL LEVEL2 INV rated current 20%to135% A 0.01 <strong>Motor</strong> rated current YA08 (Thermal time constant) A08 TIME CNST2 0.5 to 75.0 min min 0.1 5.0 10.0 YA09 Torque vector control 2 A09 TRQVECTOR2 0, 1 - - 0 NA10 Number of motor-2 poles A10 M2 POLES 2 to 14 poles poles 2 4 NA11(Capacity) A11 M2-CAPUp to 30HP:0.01 to 60HP40HP and above:0.01to800HPHP 0.01 <strong>Motor</strong> capacity NA12 (Rated current) A12 M2-Ir 0.00 to 2000A A 0.01 <strong>Motor</strong> rated current NA13 <strong>Motor</strong> 2(Tuning) A13 M2 TUN1 0, 1, 2 - - 0 NA14 (On-line Tuning) A14 M2 TUN2 0, 1 - - 0 NA15 (No-load current) A15 M2-Io 0.00 to 2000A A 0.01 TWMC standard rated value NA16 (%R1 setting) A16 M2-%R1 0.00 to 50.00% % 0.01 TWMC standard rated value YA17 (%X setting) A17 M2-%X 0.00 to 50.00% % 0.01 TWMC standard rated value YA18 (Slip compensation control 2) A18 SLIP COMP2 0.00 to 15.00Hz Hz 0.01 0.00 YChangeDuringOper.UserSetvalueRemarkU ParametersU01 Maximum compensation frequency U01 USER 01 0 to 6553575 A- 1during braking torque limitU02 1st S-shape level at acceleration U02 USER 02 1 to 50% % 1 10 NAU03 2nd S-shape level at acceleration U03 USER 03 1 to 50% % 1 10 NAU04 1st S-shape level at deceleration U04 USER 04 1 to 50% % 1 10 NAU05 2nd S-shape level at deceleration U05 USER 05 1 to 50% % 1 10 NAMain DC linkU08capacitor(Initial value) U08 USER 08 0 to 65535 - 1 xxxx AU09 (Measured value) U09 USER 09 0 to 65535 - 1 0 AU10 PC board capacitor powered on time U10 USER 10 0 to 65535h h 1 0 AU11 Cooling fan operating time U11 USER 11 0 to 65535h h 1 0 AU13 Magnetize current vibration damping gain U13 USER 13 0 to 32767 - 1 819 410 AU15 Slip compensation filter time constant U15 USER 15 0 to 32767 - 1 556 546 AU23 Integral gain of continuous operation U23 USER 23 0 to 655351738 1000 A- 1at power failureU24 Proportional gain of continuous U24 USER 24 0 to 655351024 1000 A- 1operation at power failureU48 Input phase loss protection U48 USER 48 0, 1, 2-75HP 100HP- NA- -0 1U49 RS-485 protocol selection U49 USER 49 0, 1 - - 1 NABraking-resistor function select(up to 30HP/CT,00 to A8(HEX)U59U59 USER 5900 NA40HP/VT)- 1Manufacturer's function(40HP/CT, 50HP/VT ormore)U60 Regeneration avoidance at deceleration U60 USER 60 0, 1- -0 NAU61 Voltage detect offset and gain adjustment U61 USER 61 --30HP/CT, 40HP/VT:0 (Fixed.)0 A- -40HP/CT, 50HP/CT--:0, 1, 2U89 <strong>Motor</strong> overload memory U89 USER 89 0.1 - - 1 AretentionNOTES_______________________________________________________________________<strong>TECO</strong> – <strong>Westinghouse</strong> <strong>Motor</strong> <strong>Company</strong> Parameters A01 – A18 ~ U01 – U89 45
5-2 Function ExplanationF00Setting can be made so that a set value cannot bechanged by keypad panel operation. Related functionsF 0 0 D A T A P R T C E01 to E09(Set values 19)Setting range 0 : The data can be changed.1 : The data cannot be changed.Setting procedure 0 to 1: Press the STOP and keys simultaneouslyto change the value from 0 to 1, then press theFUNCDATAto validate the change.1 to 0: Press the STOP and keys simultaneouslyto change the value from 1 to 0, then press theFUNCDATAData protectionkey to validate the change.F01 Frequency command 1This function selects the frequencysetting method.F 0 1 F R E Q C M D 1F:Fundamental functionRelated functionsE01 to E09(Set values 17, 18)C300 : Setting by keypad panel operation ( key)1 : Setting by voltage input (terminal 12 (0 to +10V)+ terminal [V2](0 to +10V) )2: Setting by current input (terminal C1 (4 to 20mA)).3: Setting by voltage input + current input (terminal 12+ terminal C1 ) (-10 to +10V + 4 to 20mA).4: Reversible operation with polarity ( terminal 12(-10 to +10V))5: Reversible operation with polarity ( terminal 12+[V2]+[V1](Option) (-10 to +10V))6: Inverse mode operationRelated functions:(terminal 12 +[V2] (+10V to 0 )) E01 to E097: Inverse mode operation(Set value 21)(terminal C1 (20 to 4mA))8: Setting by UP/DOWN control mode 1 Relatedfunctions:(initial value = 0) (Terminals UP and DOWN)E01 to E099: Setting by UP/DOWN control mode 2(Set value(initial value =last final value)17,18)(terminals UP and DOWN)See the function explanation of E01 to E09 for details.10: Setting by pattern operationRelatedfunctions:See the function explanation C21 to C28 for details.C21to C2811: Setting by digital input or pulse train* Optional. For details, see the instruction manual on options.Frequency setting valueMaximum frequencySet value:1,3-10 0 +10 [V]Set value:4,5- Maximum frequencyF02Frequency setting valueMaximum frequencyForward operation(set value: 1, 3, 4, 5)Inverse operation(set value::6)Analog input terminal[12] , [V2]Related functions:E01 to E09(Set value 21)00 4 20 [mA]Analog input terminal[C1]Forward operation(set value: 2)Inverse operation(set value: 7)This function sets the operation command inputmethod.Setting range 0: Key pad operation( FWD REV STOP keys).Press thePress theForward / Inverse operationOperation methodF 0 2 O P R M E T H O DFWDREVfor forward operation.for reverse operation.Press the STOP for deceleration to a stop.Input from terminals FWD and REV is ignored.(LOCAL)1: Terminal operation( STOP key active)2: Terminal operation( STOP key inactive)3: Terminal operation( STOP key active) throughsoftware.4: Terminal operation( STOP key inactive) throughsoftware.* - This function can only be changed when terminals FWDand REV are open.- REMOTE/LOCAL switching from the keypad panelautomatically changes the set value of this function.- REMOTE/LOCAL can be changed by pressing the STOPkey and RESET key simultaneously.<strong>TECO</strong>–<strong>Westinghouse</strong> <strong>Motor</strong> <strong>Company</strong> Function Explanation 46
Frequency setting signalsLEFrequency settingF01C30Hz2/Hz1Frequency setting by keypad panel #0FeedbackselectionH21H25Feedback filter12C1V2V1OptionIVSGainC31BiasC32#5++++InverseoperationInverse+ + operationC33 Analog input filter#4#3#2#7#6#1,#5Forward/ReverseoperationGainF17Bias frequencyF18Negative polarityprevention#1,#2,#3,#6,#7PID controlH20 Operation selectionH22 ProportionalH23 IntegralH24 DifferentialLimit signalUPDOWNSS1UP/DOWN controlD/I or pulse train (optional)Pattern operation controlC22C23C24C25C26C27C28C21#8,#9#11#10C12C05C13C06C14C07C15C08C16C09C17C10C18C11C19Multistep frequencyswitchingH30Set frequency valueby Link functionMultistep frequencies 1 to 15JOG frequencyC20Maximum frequencyUpper-limit frequencyJump frequencyC01C02C03C04Lower-limit frequencyLimiter processingF03 A01F15F16SetfrequencyvalueSS2SS4SwitchingcommandSS8JOGHz2/PIDJOGNote: The numbers marked "#" means the setting value of each functions.Frequency setting block diagram<strong>TECO</strong>–<strong>Westinghouse</strong> <strong>Motor</strong> <strong>Company</strong> Function Explanation 47
Output frequencyOutput frequencyF03 Maximum frequency 1This function sets the maximum output frequency formotor 1.This is a function for motor 1.F 0 3 M A X H z - 1Setting range <strong>EQ5</strong>: 50 to 120HzSetting a value higher than the rated value of the deviceto be driven may damage the motor or machine.Match the rating of the device.F04 Base frequency 1This function sets the maximum output frequency in theconstant-torque range of motor 1 or the outputfrequency at the rated output voltage. Match the ratingof the motor.This is a function for motor 1.F 0 4 B A S E H z - 1Setting range <strong>EQ5</strong>: 25 to 120HzNote: When the set value of base frequency 1 is higherthan that of maximum output frequency 1, the outputvoltage does not increase to the rated voltage becausethe maximum frequency limits the output frequency.OutputvoltageF06 Maximumoutput voltage 1F05 Rated voltage 1Constant-torque range0 F04 Basefrequency 1F05 Rated voltage 1F03 Maximumoutput frequencyOutput frequencyThis function sets the rated value of the voltage outputto motor 1. Note that a voltage greater than the supply(input) voltage cannot be output.This is a function for motor 1.F 0 5 R A T E D V - 1Setting range 230 V series: 0, 80 to 240V460 V series: 0, 320 to 480VValue 0 terminates operation of the voltage regulationfunction, thereby resulting in the output of a voltageproportional to the supply voltage.Note: When the set value of rated voltage 1 exceedsmaximum output voltage 1, the output voltage does notincrease to the rated voltage because the maximumoutput voltage limits the output voltage.F07 Acceleration time 1F08 Deceleration time 1This function sets the acceleration time for the outputfrequency from startup to maximum frequency and thedeceleration time from maximum frequency to operationstop.F 0 7 A C C T I M E 1F 0 8 D E C T I M E 1Setting range Acceleration time 1: 0.01 to 3,600 secondsDeceleration time 1: 0.01 to 3,600 secondsSet acceleration and deceleration times with respect tomaximum frequency. The relationship between the setfrequency value and acceleration/deceleration times isas follows:Set frequency = maximum frequencyThe actual operation time matches the set value.Acceleration timeMaximum frequencySTOPDeceleration timeSet frequencySet frequency < maximum frequencyThe actual operation time differs from the set value.Acceleration(deceleration) operation time = set value x(set frequency/maximum frequency)Accelerationoperation timeFWDFWDAcceleration timeMaximum frequencySTOPDecelerationoperation timeSet frequencyDeceleration timeNote: If the set acceleration and deceleration times aretoo short even though the resistance torque and momentof inertia of the load are great, the torque limiting functionor stall prevention function becomes activated, therebyprolonging the operation time beyond that stated above.TimeTimeF06 Maximum voltage 1This function sets the maximum value of the voltageoutput for motor 1. Note that a voltage higher than thesupply (input) voltage cannot be output.This is a function for motor 1.F 0 6 M A X V - 1Setting range 230 V series: 80 to 240V460 V series: 320 to 480VNote: When the set value of rated voltage 1 (F05) to "0",this function is invalid.<strong>TECO</strong>–<strong>Westinghouse</strong> <strong>Motor</strong> <strong>Company</strong> Function Explanation 48
Operation level current (%)F09 Torque boost 1This is a function for motor 1. The following can beselected:F 0 9 T R Q B O O S T 1-- Selection of load characteristics such as automatictorque boost, square law reduction torque load,proportional torque load, constant torque load.-- Enhancement of torque (V/f characteristics), which islowered during low-speed operation. Insufficientmagnetic flux of the motor due to a voltage drop in thelow-frequency range can be compensated.Setting range Characteristics selected0.0 Automatic torque boost characteristicwhere the torque boost value of a constanttorque load (a linear change) isautomatically adjusted.The motor tuning (P04 / A13) should be setto "2" for this function is valid.0.1 to 0.9 Square law reduction torque for fan andpump loads.1.0 to 1.9 Proportional torque for middle class loadsbetween square law reduction torque andconstant torque (linear change)2.0 to 20.0 Constant torque (linear change)Torque characteristics(30HP/CT, 40HP/VT or less) Output voltage V100%17%0#0.9Rated voltage 1#0.1Output frequency fOutput voltage V100%23%0#20.0#2.0Rated voltage 1Basefrequency 1Output frequency fBasefrequency 1Output voltage V100%17%0Rated voltage 1#1.9#1.0Basefrequency 1Output frequency fTorque characteristics(40HP or above) Output voltage VOutput voltage VOutput voltage V100%10%0#20.0#2.0Rated voltage 1Basefrequency 1Output frequency fNote: As a large torque boost value creates overexcitationin the low-speed range, continued operation may causemotor to overheat. Check the characteristics of the drivenmotor.F10F11F12The electronic thermal O/L relay manages the outputfrequency, output current, and operation time of theinverter to prevent the motor from overheating when150% of the set current value flows for the time set byF12 (thermal time constant).This is a function for motor 1.This function specifies whether to operate theelectronic thermal O/L relay and selects the targetmotor. When a general-purpose motor is selected,the operation level is lowered in the low speed rangeaccording to the cooling characteristics of the motor.Set value 0: Inactive1: Active (for general-purpose motor)2: Active (for inverter motor)This function sets the operation level (current value) ofthe electronic thermal. Enter a value from 1 to 1.1times the current rating value of the motor.The set value "2" is set for the inverter motor becausethere is no cooling effect decrease by the rotationalspeed.The setting range is 20 to 135% of the rated current of theinverter.(%)100959085Electric thermal O/L relay ( select)Electric thermal O/L relay (level)Electric thermal O/L relay (Thermal time constant)F 1 0 E L C T R N O L 1F 1 1 O L L E V E L 1When F10 = 2100%18%0#0.9Rated voltage 1#0.1Output frequency fBasefrequency 1100%18%0Rated voltage 1#1.9#1.0Basefrequency 1Output frequency f695440 30 to to 60HP 45kW(When F10 F10 = 1) = 1)0.25 to to 30HP 22kW(When F10 F10 = 1) = 1)fe= fb (fb60Hz)60Hz (fb60Hz)fb:Base frequencyFe x 0.33 Fe x 0.83 feOutput frequency f 0 (Hz)Operation level current and output frequency<strong>TECO</strong>–<strong>Westinghouse</strong> <strong>Motor</strong> <strong>Company</strong> Function Explanation 49
Operation level current (%)Operation level current (%)(%)100908553(%)100908575HP 110kW to or 125HP abovefe= fb(When F10 = 1)(fb60Hz)60Hz (fb60Hz)fb:Base frequencyFe x 0.33 Fe x 0.83 feOutput frequency f 0 (Hz)Operation level current and output frequency150HP 110kW or or above(When F10 = 1)F13This function controls the frequent use and continuousoperating time of the braking resistor to prevent theresistor from overheating.Related functions:F 1 3 D B R O LU59Inverter capacity<strong>EQ5</strong>:10HP/CT,15HP/VT or less<strong>EQ5</strong>: 15HP/CT,20HP/VT or moreElectric thermal O/L relay (for breaking resistor)Operation0: Inactive2: Active(DB***-2C/4C external braking resistor)0: InactiveWhen the setting value is selected to "2", the type ofbraking resistor and connection circuit are set by U59.The details are referred to the function : U59.53fe= fb(fb60Hz)60Hz (fb60Hz)fb:Base frequencyFe x 0.33 Fe x 0.83 feOutput frequency f 0 (Hz)Operation level current and output frequencyThe time from when 150% of the operation levelcurrent flows continuously to when he electronicthermal O/L relay activates can be set.The setting range is 0.5 to 75.0 minutes (in 0.1minute steps).F 1 2 T I M E C N S T 120Current-Operation time Characteristics15Operation time(min)10changed by F125F12=10F12=5F12=0.500 50 100 150 200(output current/operation level current)x 100(%)<strong>TECO</strong>–<strong>Westinghouse</strong> <strong>Motor</strong> <strong>Company</strong> Function Explanation 50
F14Restart mode after momentary power failureThis function selects operation if a momentary power failure occurs.The function for detecting power failure and activating protective operation (i.e., alarm output, alarm display, inverteroutput cutoff) for undervoltage can be selected. The automatic restart function (for automatically restarting a coastingmotor without stopping) when the supply voltage is recovered can also be selected.When setting value is selected "2" or "3", both integration constant and the proportional constant during operationride-though can be adjusted by the function code : U23 and U24. The details are referred to the function code : U23 andU24.Related functions:F 1 4 R E S T A R TU23, U24Setting range: 0 to 5The following table lists the function details.Setvalue0 Inactive(immediate inverter trip)Function name Operation at power failure Operation at power recovery1 Inactive(inverter trip at recovery)2 Inactive(inverter trip afterdeceleration to a stop atpower failure) Note13 Active(operation ride through,for high-inertia loads) Note14 Active(restart with thefrequency at powerfailure) Note15 Active(restart with the startfrequency, for low-inertialoads) Note1If undervoltage is detected, the drive will immediately trip andan undervoltage fault (LU) is displayed. The drive outputstops and the motor will coast to a stop.If undervoltage is detected, the drive output stops and themotor will immediately coast to a stop. A drive fault is notactivatedWhen the DC bus voltage reaches the continue operationvoltage level (H15), a controlled deceleration to a stop occurs.The inverter collects the inertia energy of the load to maintainthe DC bus voltage and controls the motor until it stops, thenan undervoltage fault (LU) is activated.The drive will automatically decrease the deceleration time ifnecessary. If the amount of inertia energy from the load issmall, and the undervoltage level is achieved before the motorstops, the undervoltage fault is immediately activated and themotor will coast to a stop.When the DC bus voltage reaches the continue operationvoltage level (H15), energy is collected from the inertia of theload to maintain the DC bus voltage and extend the ridethrough time. The drive will automatically adjust thedeceleration rate to maintain DC bus voltage level. Ifundervoltage is detected, the protective function is notactivated, but drive output stops and the motor coast to a stop.If undervoltage is detected, the protective function is notactivated. The drive output stops and the motor will coast to astop.If undervoltage is detected, the protective function is notactivated, but output stops.The drive operation is not automaticallyrestarted. Input a reset command andoperation command to restart operation.An undervoltage fault (LU) is activated atpower recovery. Drive operation is notautomatically restarted. Input a resetcommand to restart operation.The drive operation is not automaticallyrestarted. Input a reset command andoperation command to restart operation.Operation is automatically restarted.For power recovery during ride-through thedrive will accelerate directly to the originalfrequency. If undervoltage is detected,operation automatically restarts with thefrequency at the time that the undervoltageis detected.Operation is automatically restarted withthe frequency at power failure.Operation is automatically restarted withthe frequency set by F23, "Startingfrequency."Note1) When the function code H18(Torque control) is excluding "0" and <strong>Motor</strong> 1 is selected, the inverter will trip at powerrecovery if function code F14 is set to between "2" and "5". This operation is same as F14 is set to "1".Function codes H13 to H16 are provided to control a restarting operation after momentary power failure. These functionsshould be understood and used. The pick-up (speed search) function can also be selected as a method of restarting whenpower is recovered following a momentary failure. (For setting details, see function code H09.)The pick-up function searches for the speed of the coasting motor to restart the motor without subjecting it to excessive shock.In a high-inertia system, the reduction in motor speed is minimal even when the motor is coasting. A speed searching time isrequired when the pick-up function is active. In such a case, the original frequency may be recovered sooner when the functionis inactive and the operation restarted with the frequency prior to the momentary power failure.The pick-up function works in the range of 5 to 100 Hz. If the detected speed is outside this range, restart the motor using theregular restart function.WARNING Automatically restart could be provided at power recovered, if "Restart mode aftermomentary power failure" is valid. The machine should be designed to human safety when restarting.Otherwise accidents may result.<strong>TECO</strong>–<strong>Westinghouse</strong> <strong>Motor</strong> <strong>Company</strong> Function Explanation 51
Set value : 0Main circuit DCvoltagePower failureUnder voltagePower recoverySet value : 3Main circuit DCvoltagePower failurePower recoveryH15Operation continuation levelOutputfrequencyTimeOutputfrequency(motor speed)LV tripSet value : 1Main circuit DCvoltageONUnder voltageLV tripOutput(terminalsY1 to Y5)Set value : 4OutputfrequencyTimeMain circuit DCvoltageUnder voltageLV tripSet value : 2Main circuit DCvoltageONH15Operation continuation levelOutputfrequency(motor speed)LV tripH13:Waiting timeSynchronizationAccelerationOutputfrequencyTimeOutput(terminalsY1 to Y5)Set value : 5ONLV tripONMain circuit DCvoltageUnder voltageOutputfrequencyH13:Waiting time(motor speed)LV tripOutput(terminalsY1 to Y5)Note : Dotted-dashed lines indicate motor speed.<strong>TECO</strong>–<strong>Westinghouse</strong> <strong>Motor</strong> <strong>Company</strong> Function Explanation 52
F15F16 Frequency limiter (Low)This function sets the upper and lower limits for thesetting frequency .Setting range <strong>EQ5</strong>: 0 to 120Hz+ Maximum frequencyFrequency limiterSet frequency(High)F 1 5 H L I M I T E RF 1 6 L L I M I T E RF18Bias frequencyThis function adds a bias frequency to the setfrequency value to analog input.F 1 8 F R E Q B I A SSetting range <strong>EQ5</strong>: -120.0 to +120.0HzThe operation follows the figure below.When the bias frequency is higher than the maximumfrequency or lower than the - maximum frequency, it islimited to the maximum or - maximum frequency.Set frequency value Bias frequency(when positive)Upper limit value+Maximumfrequency-100%Lower limit valueUpper limit valueLower limit value+100%Set frequency-10 0 +10[V]4 20[mA]Analog input+10V terminal 1220mA terminal C1- Maximum frequency※ The inverter output starts with the start frequency whenoperation begins, and stops with the stop frequencywhen operation ends.※ If the upper limit value is less than the lower limit value,the upper limit value overrides the lower limit value.※ When lower limit value is set, the inverter operates withlower limit value at operation command is "ON" evenfrequency command is zero(0Hz).F17This function sets the rate of the set frequency valueto analog input.F 1 7 F R E Q G A I NOperation follows the figure below.+MaximumfrequencySet frequency value-10 0 +10[V]-MaximumfrequencyGain200%100%50%4 20[mA]Analog input+10V terminal 1220mA terminal C1-MaximumfrequencyBias frequency(when negative)※ Reversible operation is valid if the function codeF01/C30 is set to "4" or "5" only.※ This function is invalid if PID control is selected(H20 is"1" or "2").F20 DC brake (starting frequency)F21F22DC brakeDC brakeStarting frequency: This function sets the frequencywith which to start a DC injection brake to deceleratethe motor to a stop.F 2 0 D C B R K H zSetting range: 0 to 60HzOperation level: This function sets the output currentlevel when a DC injection brake is applied. Set apercentage of inverter rated output current in 1% steps.F 2 1 D C B R K L V LSetting range <strong>EQ5</strong>: 0 to 80%Time: This function sets the time of a DC injectionbrake operation.F 2 2 D C B R K tSetting range 0.0: Inactive0.1 to 30.0 seconds(Braking level)(Braking time)CAUTIONDo not use the inverter brake function formechanical holding.Injury may result.<strong>TECO</strong>–<strong>Westinghouse</strong> <strong>Motor</strong> <strong>Company</strong> Function Explanation 53
F23F24F25The starting frequency can be set to reserve the torque atstartup and can be sustained until the magnetic flux of themotor is being established.Frequency: This function sets the frequency at startup.Setting range: 0.1 to 60HzHolding time: This function sets the holding timeduring which the start frequency is sustained at startup.Set values: 0.1 to 10.0 secondsThe holding time does not apply at the time of switchingbetween forward and reverse.The holding time is not included in the acceleration time.The holding time also applies when pattern operation(C21) is selected. The holding time is included in thetimer value.This function sets the frequency at stop.Setting range: 0.0 to 60.0HzOutput frequencyStarting frequencyStopping frequencyHolding timeForward rotationTimeThe operation does not start when the starting frequencyis less than the stopping frequency or when the settingfrequency is less than the stopping frequency.This function adjusts the carrier frequency, correctadjustment of which prevents resonance with themachine system, reduces motor and inverter noise, andalso reduces leakage current from output circuit wiring.<strong>EQ5</strong>Starting frequencyStart frequencyF 2 3 S T A R TNominal applied motor30HP/CT or less40HP/VT or less40HP/CT to 100HP/CT50HP/VT to 125HP/VT125HP/CT or more150HP/VT or more(frequency)(Holding time)Stop frequencyH zF 2 4 H O L D I N G tF 2 5 S T O PF26 <strong>Motor</strong> sound (carrier frequency)F 2 6 M T RH zS O U N DSetting range0.75 to 15kHz0.75 to 10kHz0.75 to 6kHzCarrier frequency Low High<strong>Motor</strong> noise High LowOutput current waveform Bad GoodLeakage current Small amount Large amountNoise occurrence Extremely low HighNotes:1. Reducing the set value adversely affects the output currentwaveform (i.e., higher harmonics), increases motor loss, andraises motor temperature. For example, at 0.75 kHz, reducethe motor torque by about15%.2 Increasing the set value increases inverter loss and increasesthe inverter temperature.F27 <strong>Motor</strong> sound (sound tone)The tone of motor noise can be altered when the carrierfrequency is 7kHz or lower. Use this function asrequired.F 2 7 M T RSetting range: 0 , 1, 2 , 3F30 FMA (voltage adjust)F31Monitor data (e.g.,output frequency, output current) canbe output to terminal FMA as a DC voltage. The amplitudeof the output can also be adjusted.This function adjusts the voltage value of the monitoritem selected in F31 when the monitor amount is 100%.A value from 0 to 200 (%) can be set in 1% steps.Setting range: 0 to 200%Higher than 10V10VFMA terminal outputvoltage5VFMAThis function selects the monitor item to be output toterminal FMA.F 3 1 F M A F U N CSet Monitor itemvalue0 Output frequency 1(before slip compensation)T O N E(function)F 3 0 F M A V - A D J50%F30:200%F30:100%F30:50%F30:0%100%Definition of 100% monitor amountMaximum output frequency1 Output frequency 2 Maximum output frequency(after slip compensation)2 Output current Rated output current ofinverter x 23 Output voltage 230V series: 250V460V series: 500V4 Output torque Rated torque of motor x 25 Load rate Rated load of motor x 26 Power consumption Rated output of inverter x 27 PID feedback amount Feedback amount of 100%8 PG feedback amount Synchronous speed at(only when option is installed) maximum frequency9 DC link circuit voltage 230V series: 500V460V series: 1,000V10 Universal AO 0 to 10V output throughcommunication and not related toinverter operation.※The power consumption shows "0" during regenerative load.<strong>TECO</strong>–<strong>Westinghouse</strong> <strong>Motor</strong> <strong>Company</strong> Function Explanation 54
F33 FMP (pulse rate)F34F35Monitor data (e.g.,output frequency, output current) canbe output to terminal FMP as pulse voltage. Monitordata can also be sent to an analog meter as averagevoltage.When sending data to a digital counter or other instrumentas pulse output, set the pulse rate in F33 to any value andthe voltage in F34 to 0%.When data is sent to an analog meter or other instrumentas average voltage, the voltage value set in F34determines the average voltage and the pulse rate in F33is fixed to 2670 (p/s).This function sets the pulse frequency of the monitoritem selected in F35 within a range of 300 to 6000 (p/s)in 1 p/s steps.Setting range: 300 to 6,000 p/s0VT1FMPF 3 3 F M PV L :0.5V MAXFMP terminalTPulse cycle time(voltage adjust)Pulse frequency (p/s) = 1/TDuty (%) = T1/T x 100Average voltage (V) = 15.6 x T1/T(function)P U L S E SThe output terminal of the FMP terminal is composed ofthe transistor, therefore there is a saturation voltage(0.5V MAX ). When using in the analogue by the filterprocessing the pulse voltage, it should be make a 0Vadjustment by external equipment.This function sets the average voltage of pulse output toterminal FMP.F 3 4 F M P V - A D JAbout 15.6VSetting range0%: The pulse rate varies depending on themonitor amount of the monitor itemselected in F35. (The maximum value isthe value set in F33. The pulse duty is fixedat 50%.)1 to 200%: Pulse rate is fixed at 2,670 p/s. Theaverage voltage of the monitor itemselected in F35 when the monitor amount is100% is adjusted in the 1 to 200% range(1% steps).(The pulse duty varies.)This function selects the monitor item to be output toterminal FMP.F 3 5 F M PF U N CThe set value and monitor items are the same as thoseof F31.F36This function specifies whether to activate (excite) thealarm output relay (30Ry) for any fault at normal oralarm status.F 3 6 3 0 R Y M O D ESetOperationvalueAt normal 30A - 30C: OFF, 30B - 30C: ON0At alarm condition 30A - 30C: ON, 30B - 30C:OFFAt normal 30A - 30C:ON, 30B - 30C: OFF1At alarm condition 30A - 30C: OFF, 30B - 30C: ONWhen the set value is 1, contacts 30A and 30C areconnected when the inverter control voltage isestablished (about one second after power on).When the power is off, contacts 30A and 30C are OFF;30B and 30C are ON.30A30B30CF40 Torque limiter 1 (driving)F41 Torque limiter 1 (braking)The torque limit operation calculates motor torque fromthe output voltage, current and the primary resistancevalue of the motor, and controls the frequency so thecalculated value does not exceed the limit. Thisoperation enables the inverter to continue operationunder the limit even if a sudden change in load torqueoccurs.Select limit values for the driving torque and brakingtorque.When this function is activated, acceleration anddeceleration operation times are longer than the setvalues.The motor tuning (P04 / A13) should be set to "2" forthis function is valid.The increase frequency upper bound during torque limitoperation is set by function code : U01.When the setting value is selected "0" (prevent OU trip),the operation mode is selected by function code : U60.The details are referred to the functions: U01, U60.Function Setting range OperationTorquelimit<strong>EQ5</strong>:20% to 150% The torque is limited to the setvalue.(driving)999 Torque limiting inactiveTorquelimit(braking)<strong>EQ5</strong>:20% to 150%30Ry operation mode30F 4 0 D R V T R Q 1F 4 1 B R K T R Q 1Related functions:U01, U60The torque is limited to the setvalue.0 Prevents OU trip due topower regeneration effectautomatically.999 Torque limiting inactive<strong>TECO</strong>–<strong>Westinghouse</strong> <strong>Motor</strong> <strong>Company</strong> Function Explanation 55
WARNINGWhen the torque limit function is selected, an operationmay not match the set acceleration and deceleration timeor set speed. The machine should be so designed thatsafety is ensured even when operation does not matchset values.Otherwise accidents may result.WARNINGThe frequency may be stagnated / held constant whenusing the automatically OU trip prevention and set thefrequency limit(Low) to the setting frequency or less.Otherwise accidents may result.F42 Torque vector control 1This is a function for motor 1.To obtain the motor torque most efficiently, the torquevector control calculates torque according to load, toadjust the voltage and current vectors to optimumvalues based on the calculated value.Related functions:P01, P09F 4 2 T R Q V E C T O R 1Set value Operation0 Inactive1 ActiveWhen 1 (Active) is set, the set values of the followingfunctions differ from the written values: F09 Torque boost 1Automatically set to 0.0 (automatic torque boosting). P09 Slip compensation amount Slip compensation isautomatically activated.When 0.0 is set, the amount of slip compensation forthe TWMC standard 3-phase motor is applied.Otherwise, the written value is applied.Use the torque vector control function under thefollowing conditions: There must be only one motor.Connection of two or more motors makes accuratecontrol difficult.The function data (rated current P03, no-load currentP06, %R1 P07, and %X P08) of motor 1 must becorrect.When the standard TWMC 3-phase motor is used,setting the capacity (function P02) ensures entry of theabove data. An auto tuning operation should beperformed for other motors.The rated current of the motor must not be significantlyless than the rated current of the inverter. A motor tworatings lower in capacity than the nominal applied motorfor the inverter should be used at the minimum(depending on the model).To prevent leakage current and ensure accurate control,the length of the cable between the inverter and motorshould not exceed 164ft(50m).When a reactor is connected between the inverter andthe motor and the impedance of the wiring cannot bedisregarded, use P04, "Auto tuning," to rewrite data.If these conditions are not satisfied, set 0 (Inactive).<strong>TECO</strong>–<strong>Westinghouse</strong> <strong>Motor</strong> <strong>Company</strong> Function Explanation 56
OutputfrequencyE: Extension Terminal FunctionsE01~E09Each function of digital input terminals X1 to X9 can beset as codes.E 0 1 X 1E 0 2 X 2E 0 3 X 3E 0 4 X 4E 0 5 X 5E 0 6 X 6E 0 7 X 7E 0 8 X 8E 0 9 X 9X1 Terminal function~X9 Terminal functionF U N CF U N CF U N CF U N CF U N CF U N CF U N CF U N CF U N CSet valueFunction0,1,2,3 Multistep frequency selection (1 to 15 steps) [SS1],[SS2],[SS4],[SS8]4,5 Acceleration and deceleration time selection (3 steps) [RT1],[RT2]6 Self-hold selection [HLD]7 Coast-to-stop command [BX]8 Alarm reset [RST]9 External alarm [THR]10 Jogging [JOG]11 Frequency setting 2/frequency setting 1 [Hz2/Hz1]12 <strong>Motor</strong> 2/motor 1 [M2/M1]13 DC injection brake command [DCBRK]14 Torque limit 2/torque limit 1 [TL2/TL1]15 Switching operation from line to inverter (50Hz) [SW50]16 Switching operation from line to inverter (60Hz) [SW60]17 UP command [UP]18 DOWN command [DOWN]19 Edit permission command (data change permission) [WE-KP]20 PID control cancellation [Hz/PID]21 Forward/inverse switching (terminals 12 and C1) [IVS]22 Interlock (52-2) [IL]24 Link operation selection (Standard:RS-485, Option: BUS) [LE]25 Universal DI [U-DI]26 Start characteristics selection [STM]30 Forced stop command [STOP1]31 Forced stop command with Deceleration time 4 [STOP2]35 Frequency setting 1 / Frequency setting 2 [Hz1/Hz2]Note: Data numbers which are not set in the functionsfrom E01 to E09, are assumed to be inactive.Multistep frequency selection [SS1][SS2][SS4][SS8]The frequency can be switched to a preset frequency infunction codes C05 to C19 by switching the external digitalinput signal. Assign values 0 to 3 to the target digital inputterminal. The combination of input signals determines theselected frequency.Combination of setvalue input signals3[SS8]2[SS4]1[SS2]0[SS1]off off off off Assigned by F01 or C30off off off on C05 MULTI Hz-1off off on off C06 MULTI Hz-2off off on on C07 MULTI Hz-3off on off off C08 MULTI Hz-4off on off on C09 MULTI Hz-5off on on off C10 MULTI Hz-6off on on on C11 MULTI Hz-7on off off off C12 MULTI Hz-8on off off on C13 MULTI Hz-9on off on off C14 MULTI Hz-10on off on on C15 MULTI Hz-11on on off off C16 MULTI Hz-12on on off on C17 MULTI Hz-13on on on off C18 MULTI Hz-14on on on on C19 MULTI Hz-15Frequency selectedSetting range<strong>EQ5</strong>:0.00 to 120.00HzThe acceleration and deceleration time can be switched toa preset time in function codes E10 to E15 by switching theexternal digital input signal. Assign values 4 and 5 to thetarget digital input terminal. The combination of inputsignals determines the acceleration and deceleration times.Combination ofset value inputsignalsAcceleration and deceleration times selected5[RT2]offoffononAcceleration and deceleration time selection [RT1][RT2]4[RT1]offonoffonF07 ACC TIME1F08 DEC TIME1E10 ACC TIME2E11 DEC TIME2E12 ACC TIME3E13 DEC TIME3E14 ACC TIME4E15 DEC TIME43-wire operation stop command [HLD]Related functionC05 to C19Setting range0.01 to 3600sRelated functionF07~F08E10~E15This selection is used for 3-wire operation. The FWD orREV signal is self-held when [HLD] is on, and the self-holdis cleared when [HLD] is turned off. To use this [HLD]terminal function, assign 6 to the target digital inputterminal.ForwardrotationReverserotationFWDONIgnored.ONREVONONHLDONON<strong>TECO</strong>–<strong>Westinghouse</strong> <strong>Motor</strong> <strong>Company</strong> Function Explanation 57
Coast-to-stop command [BX]When BX and P24 are connected, inverter output is cut offimmediately and the motor starts to coast-to-stop. Analarm signal is neither output nor self-held. If BX andP24 are disconnected when the operation command(FWD or REV) is on, operation starts at the startfrequency. To use this BX terminal function, assign value"7" to the target digital input terminal.OutputFrequencyFWDREVBXWhen an inverter trip occurs, connecting RST and P24clears the alarm output (for any fault) ; disconnectingthem clears trip indication and restarts operation. Touse this RST terminal function, assign value "8" to thetarget digital input terminal.Disconnecting THR and P24 during operation cuts offinverter output (i.e., motor starts to coast-to-stop) andoutputs alarm OH2, which is self-held internally andcleared by RST input. This function is used to protect anexternal brake resistor and other components fromoverheating. To use this THR terminal function, assignvalue "9" to the target digital input terminal. ON input isassumed when this terminal function is not set.This function is used for jogging (inching) operation toposition a work piece. When JOG and P24 areconnected, the operation is performed with the joggingfrequency set in function code C20 while the operationcommand (FWD-P24 or REV-P24) is on. To use thisJOG terminal function, assign value "10" to the targetdigital input terminal.Note: It is possible to change to the JOG operation bykeypad panel when keypad panel operation.JOGInputForwardrotationONIgnoredONONAlarm reset [RST]ForwardrotationExternal fault [THR]Jogging operation[JOG]ONONONForwardrotationO FFONWARNING- When the JOG command and operation command(FWD/REV) are input at the same time, the inverter canNOT be changed to the JOG operation and will operate atset frequency.- When the JOG operation is used, the operationcommand should be input after the JOG command inputwhile the inverter is STOPPED.- When the JOG command and operation command areinput at the same time, the JOG command is assigned tothe "Multistep frequency selection (SS1 to SS8)".- The inverter can NOT be stopped and JOG operationwill continue even if JOG command is OFF during JOGoperation. The inverter will decelerate to a stop if theoperation command is switched OFF.Accidents may result.Frequency setting 2/frequency setting 1 [Hz1/Hz2]This function switches the frequency setting method set infunction codes F01 and C30 by an external digital inputsignal.Set value input signalFrequency setting method selected11off F01 FREQ CMD1on C30 FREQ CMD2Note: It can not be used with set value "35"simultaneously. When the set value "11" and "35" areselected, "Er6" is displayed.<strong>Motor</strong> 2/motor 1 [M1/M2]This function switches motor constants using an externaldigital input signal.This input is effective only when the operation commandto the inverter is off, operation has stopped, and does notapply to the operation at 0Hz.Set value input signalRelated function12 <strong>Motor</strong> selected A01~A18off <strong>Motor</strong> 1on <strong>Motor</strong> 2DC brake command [DCBRK]Operationcommand(FWD/REV)OperationmodeO FFONJO GO PR.O FFSTOP RUN STOPONRUNJO GO PR.O FFSTOPONRUNN O R.O PR.O FFSTOPONRUNN O R.O PR.When the external digital input signal is on, DC injectionbraking starts when the inverter's output frequency dropsbelow the frequency preset in function code F20 after theoperation command goes off. (The operation commandgoes off when the STOP key is pressed at keypad paneloperation and when both terminals FWD and REV go onor off at terminal block operation.) The DC injectionbraking continues while the digital input signal is on. Inthis case, the longer time of the following is selected:- The time set in function code F22.- The time which the input signal is set on.Set value input signalOperation selected13offNo DC injection brake command is given.onA DC injection brake command is given.<strong>TECO</strong>–<strong>Westinghouse</strong> <strong>Motor</strong> <strong>Company</strong> Function Explanation 58
Torque limit 2/torque limit 1 [TL2/TL1]This function switches the torque limit value set infunction codes F40 and F41, and E16 and E17 by anexternal digital input signal.Set value input signal14offonTorque limitvalue selectedF40 DRV TRQ1F41 BRK TRQ1E16 DRV TRQ2E17 BRK TRQ2Setting rangeDRV 20 to 200% ,999BRK 0, 20 to 200% ,999Switching operation between line and inverter (50Hz) [SW50]<strong>Motor</strong> operation can be switched from 50Hz commercialpower operation to inverter operation without stopping themotor by switching the external digital input signal.Set valueinput signal15offononoffFunctionInverter operation to line operation (50Hz)Line operation to inverter operation (50Hz)Switching operation between line and inverter (60Hz) [SW60]<strong>Motor</strong> operation can be switched from 60Hz commercialpower operation to inverter operation without stopping themotor by switching the external digital input signal.Set valueinput signalFunction16offon Inverter operation to line operation (60Hz)onoff Line operation to inverter operation (60Hz)When the digital input signal goes off, 50 or 60 Hz isoutput according to the set value input signal after therestart waiting time following a momentary power failure(function code H13). The motor is then directed toinverter operation.WARNING- After the LU(Low Voltage) trip is occurred and reset,the inverter will automatically restart because theoperation command is kept by internal sequence.Accidents may result.UP command [UP]/DOWN command [DOWN]When an operation command is input (on), the outputfrequency can be increased or decreased by an externaldigital input signal.The change ranges from 0 to maximum frequency.Operation in the opposite direction of the operationcommand is not allowed.Related functionF01, C30Related functionF40~F41E16~E17Related functionE01~E09(set value: 11, 35)Combination of setvalue input signalsFunction selected(when operation command is on)18 17off off Holds the output frequency.off on Increases the output frequencyaccording to the acceleration time.on off Decreases the output frequencyaccording to the deceleration time.on on Holds the output frequency.There are the two types of UP/DOWN operations asshown below. Set the desired type by setting thefrequency (F01 or C30).The data "8: UP/DOWN 1" is valid only when the <strong>Motor</strong>2 is selected.Frequencysetting(F01 or C30)8(UP/DOWN1)9(UP/DOWN2)Initial valueat powerinput on0HzPreviousfrequencyOperation command reentryduring decelerationOperates at the frequency at reentry.FrequencyFWD(REV)ONOFFReturns to the frequency beforedecelerationFrequencyFWD(REV)ONWrite enable for KEYPAD [WE-KP]OFFThis function allows the data to be changed only when anexternal signal is being input, thereby making it difficult tochange the data.19 Function selectedoffInhibit data changes.onAllow data changes.Note:If a terminal is set to value 19, the data becomes unableto be changed. To change the data, turn on the terminaland change the terminal setting to another number.The PID control can be disabled by an external digitalinput signal.Set valueinput signal20offonPID control cancel [Hz/PID]Function selectedRelated functionH20~H25Enable PID control.Disable PID control(frequency setting from keypad panel).<strong>TECO</strong>–<strong>Westinghouse</strong> <strong>Motor</strong> <strong>Company</strong> Function Explanation 59
Inverse mode changeover [IVS]The analog input (terminals 12 and C1) can be switchedbetween forward and inverse operations by an externaldigital input signal.Set valueinput signal21Function selectedForward operation when forwardoffoperation is set and vice versaInverse operation when forwardonoperation is set and vice versaThis function is invalid when the PID control isselected(H20: 1 or 2).Interlock signal (52-2) [IL]When a contactor is installed on the output side of theinverter, the contactor opens at the time of a momentarypower failure, which hinders the reduction of the DCcircuit voltage and may prevent the detection of a powerfailure and the correct restart operation when power isrecovered. The restart operation at momentary powerfailure can be performed effectively with power failureinformation provided by an external digital input signal.Set valueinput signal22offonFunction selectedRelated functionF01, C30Related functionF14No momentary power failure detectionoperation by digital inputMomentary power failure detectionoperation by digital inputPick up start mode [STM]The start characteristics function (pick-up mode) infunction code H09 can be enabled or disabled byswitching the external digital input signal. Assign value"26" to the target digital input terminal and enable ordisable the function in this input signal state.Set valueRelated functioninput signal Function selectedH0926off Start characteristic function disabledon Start characteristic function enabledNormally this terminal should be “ON”, when this terminalgoes off during motor running, the motor decelerates tostop, and outputs alarm “Er6 “. When the inverter is stopby STOP1/STOP2 signal, the signal should be kept on4ms or longer.In case of terminal [STOP2], the deceleration time isdetermined by E15( DEC TIME4).This function is prioritized under any operation (Terminal.Keypad, Communication...operation). However when thetorque limiter/regeneration avoidance at deceleration isselected, the time which is set by deceleration time maybe longer.OutputFrequencyForced stop command with Deceleration [STOP1]Forced stop command with Deceleration time 4 [STOP2]In case of [STOP2],time is fixed by E15(EDC TIME4)Frequency and operation commands from the link can beenabled or disabled by switching the external digital inputsignal. Select the command source in H30, "Linkfunction." Assign value "24" to the target digital inputterminal and enable or disable commands in this inputsignal state.FWD or REV[STOP1] or[STOP2]AlarmONONONONEr6Set valueinput signal24offonFunction selectedLink command disabled.Link command enabled.Related functionH30Universal DI (U-DI)Assigning value "25" to a digital input terminal renders theterminal a universal DI terminal. The ON/OFF state ofsignal input to this terminal can be checked through theRS-485 and BUS option.This input terminal is only used to check for an incominginput signal through communication and does not affectinverter operation.<strong>TECO</strong>–<strong>Westinghouse</strong> <strong>Motor</strong> <strong>Company</strong> Function Explanation 60
Frequency setting 1 / Frequency setting 2 [Hz1/Hz2]This function switches the frequency setting methodset in function codes F01 and C30 by an externaldigital input signal.This is the reverse-logic of setting value"11"(Frequency setting 2/Frequency setting 1[Hz2/Hz1]).Set value input signalFrequency setting method selected35off C30 FREQ CMD2on F01 FREQ CMD1Note: It can not be used with set value "11"simultaneously. When the set value "11" and "35" areselected, "Er6" is displayed.Settings when shipped from the factoryDigitalinputSetting at factory shipmentDescriptionSetvalueTerminal X1 0 Multistep frequency selection [SS1]Terminal X2 1 Multistep frequency selection [SS2]Terminal X3 2 Multistep frequency selection [SS4]Terminal X4 3 Multistep frequency selection [SS8]Terminal X5 4 Acceleration and deceleration selection [RT1]Terminal X6 5 Acceleration and deceleration selection [RT2]Terminal X7 6 Self-hold selection [HLD]Terminal X8 7 Coast-to-stop command [BX]Terminal X9 8 Alarm reset [RST]E10 Acceleration time 2E11 Deceleration time 2E12 Acceleration time 3E13 Deceleration time 3E14 Acceleration time 4E15 Deceleration time 4Acceleration time 1 (F07) and deceleration time 1 (F08)as well as three other types of acceleration anddeceleration time can be selected.The operation and setting ranges are the same as thoseof acceleration time 1 and deceleration time 1. Seeexplanations for F07 and F08.For switching acceleration and deceleration times, selectany two terminals from terminal X1 (function selection) inE01 to terminal X9 (function selection) in E09 asswitching signal input terminals. Set "4" (accelerationand deceleration time 1) and "5" (acceleration anddeceleration time 2) to the selected terminals and input asignal to each terminal to switch acceleration anddeceleration times. Switching is possible duringacceleration, deceleration, or constant-speed operation.E 1 0 A C C T I M E 2E 1 1 D E C T I M E 2E 1 2 A C C T I M E 3E 1 3 D E C T I M E 3E 1 4 A C C T I M E 4E 1 5 D E C T I M E 4Related functionsE01 to E09(Set values:14)Example: When 4 and 5 are set to terminals X2 and X3:OperationE16E17FWD(REV)X2X3P24OutputfrequencyONAcceltime1Deceltime1ONAcceltime2Deceltime2ONAcceltime3Deceltime3Torque limiter 2 (driving)Torque limiter 2 (braking)Acceltime4Deceltime4TimeThis function is used to switch the torque limit level setin F40 and F41 by an external control signal. Input anexternal signal by selecting any of the control inputterminals (X1 to X9) as torque limit 2/torque limit 1(value 14) in E01 to E09.The motor tuning (P04 / A13) should be set to "2" forthis function is valid.Maximum compensation frequency during braking torque limitis set by U01.Related functionsU01U60The operation mode is set by U60 when the settingvalue is "0%: Regeneration avoidance at deceleration".The detail is referred to the U01, U60.Related functionsE01~E09(Set value: 14)E 1 6 D R V T R Q 2E 1 7 B R K T R Q 2Maximumfrequency<strong>TECO</strong>–<strong>Westinghouse</strong> <strong>Motor</strong> <strong>Company</strong> Function Explanation 61
E20~E24Some control and monitor signals can be selected andoutput from terminals [Y1] to [Y5]. Terminals [Y1] to[Y4] use transistor output; terminals[Y5A] and [Y5C]use relay contacts.E 2 0 Y 1E 2 1 Y 2E 2 2 Y 3E 2 3 Y 4E 2 4 Y 5F U N CF U N CF U N CF U N CF U N CSetOutput signalvalue0 Operating [RUN]1 Frequency arrival [FAR]2 Frequency detection [FDT1]3 Stopping due to undervoltage [LV]4 Torque polarity detection [B/D]5 Torque limiting [TL]6 Restarting after momentary power failure [IPF]7 Overload early warning [OL1]8 During keypad panel operation [KP]9 Inverter stopping [STP]10 Ready for operation [RDY]11 Operation switching between line and inverter [SW88]12 Operation switching between line and inverter [SW52-2]13 Operation switching between line and inverter [SW52-1]14 <strong>Motor</strong> 2 switching [SWM2]15 Terminal AX function [AX]16 Pattern operation stage change [TU]17 Pattern operation cycle operation completed [TO]18 Pattern operation stage number [STG1]19 Pattern operation stage number [STG2]20 Pattern operation stage number [STG4]21 Alarm detail [AL1]22 Alarm detail [AL2]23 Alarm detail [AL4]24 Alarm detail [AL8]25 Cooling fan operating [FAN]26 Retry function operating [TRY]27 Universal DO [U-DO] 28 Heat sink overheat early warning [OH]29 Not Used 30 Life expectancy detection signal [LIFE]31 2nd Freq. level detection [FDT2]32 2nd OL level detection [OL2]33 Terminal C1 off signal [C1OFF]37 Torque limiting (Signal with delay) [TL2]Note: For output signals marked "" are used for RS-485communication.Inverter running [RUN]Y1 terminal function~Y5A and Y5C terminal function"Running" means that the inverter is outputting afrequency. “RUN” signal is output as when there is outputspeed (frequency). When the DC injection brakefunction is active, “RUN” signal is off.Frequency equivalence signal [FAR]See the explanation of function code E30 (frequencyarrival [detection width]).Frequency level detection [FDT1]See the explanation of function codes E31 and E32(frequency detection).Undervoltage detection signal [LV]If the undervoltage protective function activates, i.e.when the main circuit DC voltage falls below theundervoltage detection level, an ON signal is output. Thesignal goes off when the voltage recovers and increasesabove the detection level. The ON signal is retainedwhile the undervoltage protective function is activating.Undervoltage detection level: 230V series: 200V, 460Vseries: 400V.Torque polarity [B/D]This function determines the torque polarity calculated inthe inverter and outputs a signal indicating driving orbraking torque. An OFF signal is output for drivingtorque; an ON signal is output for braking torque.Torque limiting [TL]When the torque limiting activates, the stall preventionfunction is automatically activated to change the outputfrequency. The torque limiting signal is output to lightenthe load, and also used to display overload conditions onthe monitor device. This ON signal is output during thecurrent or torque is limited or power regeneration isprevented.Auto-restarting [IPF]Following a momentary power failure, this functionreports the start of the restart mode, the occurrence ofan automatic pull-in, and the completion of the recoveryoperation.Following a momentary power failure, an ON signal isoutput when power is recovered and a synchronization(pull-in) operation is performed. The signal goes offwhen the frequency (before power failure) is recovered.For 0Hz restart at power recovery, no signal is outputbecause synchronization ends when power is recovered.The frequency is not recovered to the frequency beforethe power failure occurrence.Overload early warning [OL1]Before the motor stops by the trip operation of anelectronic thermal O/L relay, this function outputs an ONsignal when the load reaches the overload early warninglevel. Either the electronic thermal O/L relay earlywarning or output current overload early warning can beselected.For setting procedure, see “E33 Overload early warning(operation selection)”, and "E34 Overload early warning(operation level)."Note: This function is effective formotor 1 only.Keypad operation mode [KP]An ON signal is output when operation command keys( FWD , REV and STOP ) on the keypad panel canbe used (i.e., 0 set in "F02 Operation") to issue operationand stop commands. This signal is OFF when thefunction H30(Serial link) is set to communication side.<strong>TECO</strong>–<strong>Westinghouse</strong> <strong>Motor</strong> <strong>Company</strong> Function Explanation 62
Inverter stopping [STOP]This function outputs an inverted signal to Running(RUN) to indicate zero speed. An ON signal is outputwhen the DC injection brake function is operating.Ready output [RDY]This function outputs an ON signal when the inverter isready to operate. The inverter is ready to operate whenthe main circuit and control circuit power is establishedand the inverter protective function is not activating.About one second is required from power-on to ready foroperation in normal condition.Line/Inv changeover [SW88] [SW52-2] [SW52-1]To perform switching operation between the line and theinverter, the sequence prepared in the inverter can beused to select and output signals for opening and closingthe magnetic contactors connected to the inverter. Asthe operation is complex, refer to technicaldocumentation for the <strong>EQ5</strong> series when using thisfunction.As the sequence will operate automatically when SW88or SW52-2 is selected, do not select when not using thesequence.<strong>Motor</strong> 2 /<strong>Motor</strong> 1 [SWM2]When a signal for switching to motor 2 is input from theterminal selected by terminals [X1] to [X9], this functionselects and outputs the signal for switching the magneticcontactor for the motor. As this switching signal is notoutput during running including when the DC injectionbraking function is operating, a signal must be re-inputafter output stops.Auxiliary terminal [AX]When an operation (forward or reverse) command isentered, this function outputs an ON signal. When astop command is entered, the signal goes off afterinverter output stops. When a coast-to-stop commandis entered and the inverter protective function operates,the signal goes off immediately.Time-up signal for pattern operation [TU]When the pattern operation stage changes, this functionoutputs a one-shot (100ms) ON signal to report a stagechange.Cycle completion signal for pattern operation [TO]When the seven stages of a pattern operation arecompleted, this function outputs a one-shot (100 ms) ONsignal to report the completion of all stages.Stage No. indication for pattern operation [STG1] [STG2] [STG4]During pattern operation, this function reports the stage(operation process) being operated.Pattern operation Output terminalstage No. STG1 STG2 STG4Stage 1 on off offStage 2 off on offStage 3 on on offStage 4 off off onStage 5 on off onStage 6 off on onStage 7 on on onWhen pattern operation is not activated (i.e., no stage isselected), the terminals do not output a signal.Alarm indication [AL1] [AL2] [AL4] [AL8]This function reports the operating status of the inverterprotective function.Alarm detail(inverter protective function)Output terminalAL1 AL2 AL4 AL8Overcurrent, ground fault, fuse blown on off off offOvervoltage off on off offUndervoltage shortage, input phase failure on on off off<strong>Motor</strong>s 1 and 2 overload off off on offInverter overload on off on offHeat sink overheating, inverter inside overheating off on on offExternal alarm input, braking resistor overheating on on on offMemory error, CPU error off off off onKeypad panel communication error, option communication error on off off onOption error off on off onOutput wiring error off off on onRS-485 communication error on off on onNot Used <strong>EQ5</strong> off on on onIn normal operation terminals do not output a signal.Fan operation signal [FAN]When used with "H06 Cooling fan ON/OFF control," thisfunction outputs a signal while the cooling fan isoperating.Auto-resetting [TRY]When a value of 1 or larger is set to "H04 Retryoperating," the signal is output while retry operation isactivating when the inverter protective function isactivated.Universal DO [U-DO]Assigning value "27" to a transistor output terminalrenders the terminal a universal DO terminal.This function enables ON/OFF through the RS-485 andBUS option.This function serves only to turn on and off the transistoroutput through communication and is not related toinverter operation.Overheat early warning [OH]This function outputs a early warning signal when heatsink temperature is (overheat detection level - 10℃) orhigher.Life expectancy detection signal [LIFE]When either of data for the Life expectancy judgmentof the function code:U09 to U11 reaches at the Lifeexpectancy judgment level, the ON signal is output.However, the inverter does not do alarm.Moreover, the alarm output for any fault (30A, 30B,30C ) does not operate.FunctioncodeParts ofLife expectancy judgmentLife expectancyjudgment levelU09 Capacitor in main circuit 85% or less of the initial valueU10 Electrolytic capacitor on PCB 61,000 hoursU11 Cooling fan 25,000 hoursU59 DC fan broken for stir internalunit up[40HP/CT, 50HP/VT or more isannunciated.]DC fan is broken<strong>TECO</strong>–<strong>Westinghouse</strong> <strong>Motor</strong> <strong>Company</strong> Function Explanation 63
In the following cases, normal life judgment of thecapacitor in main circuit may not be able to beperformed.1. When a power is turned off during inverter operation.2. When cooling fan ON/OFF control is operated.( function code : H 06= 1)3. When the power is supplied by the auxiliary inputterminals (R0,T0).4. When the option card is operated .5. When RS-485 communication is operated .6. When the power supply is turned off with digital input(FWD, REV, X1-X9) of a control terminal being ON.In the case of "3", "4", "5" and "6", life judgment isenabled by adjusting the function both code:U08 andU09.Related functionsU08~U11, U592nd Freq. level detection [FDT2]This function is same as Frequency detection [FDT1],the detection level of the output frequency and hysteresiswidth are determined by E36 and E32.2nd OL level early warning [OL2]This function outputs an ON signal when the outputcurrent exceeds “E37 OL2 LEVEL” for longer than “E35OL TIMER”.NOTE) This function is valid for both of <strong>Motor</strong> 1 and<strong>Motor</strong> 2.Terminal C1 off signal [C1OFF]This function outputs an ON signal when the inputcurrent of terminal C1 is less than 2mA.(When AIO option is connected, it can be detected thedisconnection of C2 terminal.)Torque limiting (Signal with delay) [TL2]The turning on signal is output by continuing thelimiting action(Torque limit operation, regenerationavoidance operation and overcurrent limitingoperation) of 20ms or more.Settings when shipped from the factoryDigital input Setting at factory shipmentSet valueDescriptionTerminal Y1 0 Operating [RUN]Terminal Y2 1 Frequency arrival [FAR]Terminal Y3 2 Frequency detection [FDT]Terminal Y4 7 Overload early warning [OL1]Terminal Y5 10 Ready output [RDY]This function specifies whether to excite the Y5 relay at“ON signal mode” or “OFF signal mode”.E 2 5 Y 5 R YSet valueOperation0 At “OFF signal mode” Y5A - Y5C: OFFAt “ON signal mode” Y5A - Y5C: ON1 At “OFF signal mode” Y5A - Y5C: ONAt “ON signal mode” Y5A - Y5C: OFFWhen the set value is "1", contacts Y5A and Y5C areconnected when the inverter control voltage isestablished (about one second after power on).E30This function adjusts the detection width when the outputfrequency is the same as the set frequency (operatingfrequency). The detection width can be adjusted from 0to 10 Hz of the setting frequency.E 3 0 F A RSetting range: 0.0 to 10.0 HzWhen the frequency is within the detection width, an ONsignal can be selected and output from terminals [Y1] to[Y5].Output frequencyFrequencydetectionsignal(terminalsY1 to Y5)E31E32+Detection width-Detection widthONM O D EFAR function signal (Hysteresis)H Y S T RSet frequency+Detection width-Detection widthONFDT1 function signal (Level)FDT1 function signal (Hysteresis)Set frequencyThis function determines the operation (detection) levelof the output frequency and hysteresis width foroperation release. When the output frequency exceedsthe set operation level, an ON signal can be selected andoutput from terminals [Y1] to [Y5].E 3 1 F D T 1 L E V E LE 3 2 F D T H Y S T RSetting range(Operation level) : <strong>EQ5</strong>: 0 to 120 Hz(Hysteresis width) : 0.0 to 30.0 HzTimeOutput frequencySet frequencyHysteresis widthOperation levelRelease levelFrequencydetectionsignal(terminalsY1 to Y5)ONTime<strong>TECO</strong>–<strong>Westinghouse</strong> <strong>Motor</strong> <strong>Company</strong> Function Explanation 64
E33 OL function signal (mode select)Select one of the following selection two types of overload earlywarning: early warning by electronic thermal O/L relayfunction or early warning by output current.E 3 3 O L W A R N I N GSet value 0: Electronic thermal O/L relay1: Output currentSet FunctionDescriptionvalue0 Electronic Overload early warning by electronicthermal thermal O/L relay (having inverse-timeO/L relay characteristics) to output current.The operation selection and thermaltime constant for the inverse-timecharacteristics are the same as thoseof the electronic thermal O/L relay formotor protection (F10 and F12).1 OutputcurrentAn overload early warning is issuedwhen output current exceeds the setcurrent value for the set time.The figure of OL2(E37) is referred.This function cannot be used when <strong>Motor</strong> 2 is selected.E34This function determines the operation level of theelectronic thermal O/L relay or output current.E 3 4 O L 1 L E V E LSetting range <strong>EQ5</strong>:Inverter rated output current x (5 to 150%)The operation release level is 90% of the set value.This function cannot be used when <strong>Motor</strong> 2 is selected.E35E 3 5 O L 1 T I M E RThis function is used when 1 (output current) is set to"E33 Overload early warning (operation selection)."Setting range: 0.1 to 60.0 secondsSet the time from when the operation level is attaineduntil the overload early warning function is activated.E36This function determines the operation (detection) levelof output frequency for “2nd Freq. level detection [FDT2]”.The hysteresis width for operation release is set by thefunction E32: FDT1 function signal (Hysteresis).Setting range(Operation level) : <strong>EQ5</strong>: 0 to 120 HzE37OL function signal (Level)OL function signal (Timer)FDT2 function (Level)E 3 6 F D T 2 L E V E LThis function determines the operation level of the outputcurrent for “2nd OL level detection [OL2]”.E 3 7 O L 2OL2 function (Level)L E V E LSetting range <strong>EQ5</strong>: Inverter rated output current x (5 to 150%)E37 OL2 LEVEL(E34 OL1 LEVEL)E40E41[OL2]Output currentOL2 LEVEL x 90%(OL1 LEVEL x 90%)E35OL TIMERONThese coefficients are conversion coefficients which areused to determine the load and line speed and the targetvalue and feedback amount (process amount) of the PIDcontroller displayed on the LED monitor.E 4 0 C O E F AE 4 1 C O E F BSetting rangeDisplay coefficient A:-999.00 to 0.00 to +999.00Display coefficient B:-999.00 to 0.00 to +999.00Load and line speedUse the display coefficient A.Displayed value = output frequency x (0.01 to 200.00)Although the setting range is ±999.00, the effectivevalue range of display data is 0.01 to 200.00. Therefore,values smaller or larger than this range are limited to aminimum value of 0.01 or a maximum value of 200.00.Target value and feedback amount of PID controllerSet the maximum value of display data in E40, "Displaycoefficient A," and the minimum value in E41, "Displaycoefficient B."Displayed value = (target value or feedback amount)x (display coefficient A - B)+BDisplayed valueABDisplay coefficient ADisplay coefficient BTarget value orfeedback amount0% 100%The operation release level is 90% of the set value.<strong>TECO</strong>–<strong>Westinghouse</strong> <strong>Motor</strong> <strong>Company</strong> Function Explanation 65
E43E44LED monitor (function)LED monitor (display at stop mode)The data during inverter operation, during stopping, atfrequency setting, and at PID setting is displayed on theLED.Display during running and stoppingDuring running, the items selected in "E43 LED monitor(display selection)," are displayed. In "E44 LED monitor(display at stopping)," specify whether to display someitems out of the set values or whether to display thesame items as during running.E 4 3 L E D M N T RE 4 4 L E D M N T R 2ValueE44=0E44=1set to At stopping During At DuringE43running stopping running0 Set frequency value(Hz)Output frequency(before slip compensation) (Hz)1 Set frequency value(Hz)Output frequency(after slip compensation) (Hz)2 Set frequency value (Hz)3 Output current (A)4 Output voltage (command value) (V)5 Synchronous speed Synchronous speed (r/min)set value (r/min)6 Line speed set Line speed (m/min.)value (m/min.)7 Load speed set Load speed (r/min)value (r/min)8 Calculated torque value (%)9 Output power (HP)10 PID target value 1 (direct input from keypad panel)11 PID target value 2 (input from "F02 Frequency 1")12 PID feedback amountNote: For the values 10 to 12 set to E43, the data isdisplayed only when selected in "H20 PID control(operation selection)."Display at frequency settingWhen a set frequency is checked or changed by thekeypad panel, the set value shown below is displayed.Select the display item by using "E43 LED monitor(display selection)." This display is not affected by "E44LED monitor (display at stopping)."Value set toFrequency settingE430,1,2,3,4 Set value of frequency (Hz)5 Set value of synchronous speed (r/min)6 Set value of line speed (m/min.)7 Set value of load speed (r/min)8,9 Set value of frequency (Hz)10,11,12 Set value of frequency (Hz)Note: For the values 10 to 12 set to E43, the data isdisplayed only when selected in "H20 PID control(operation selection)."E45This function selects the item to be displayed on the LCDmonitor in the operation mode.E 4 5 L C D M N T RSet valueDisplay item0 Operation status, rotating direction, operation guide1 Output frequency (before slip compensation), outputcurrent, calculated torque value in bar graphSet value: 0During running60.00RUN FWDPRGPRG MENUF/DLED SHIFTSet value: 160.00HzA%Fout/Iout/TRQLCD monitor (function)When stopping60.00STOPPRGPRG MENUF/DLED SHIFTFull-scale value of bar graphDisplay itemFull-scaleOutput frequency Maximum frequencyOutput current200% of inverter rated valueCalculated torque value 200% of motor rated valueNote: The scale cannot be adjusted.E46This function selects the language for data display on theLCD monitor.E 4 6 L A N G U A G ESet value LanguagedisplayedSet value Languagedisplayed0 Japanese 3 French1 English 4 Spanish2 German 5 ItalianNote: English language is used for all LCD screens in thismanual. For other languages, refer to the relevantinstruction manual.E47LanguageLCD monitor (contrast)This function adjusts the LCD contrast. Increase the setvalue to raise contrast and decrease to lower contrast.E 4 7 C O N T R A S TSet value 0,1,2 8,9,10Screen Low High<strong>TECO</strong>–<strong>Westinghouse</strong> <strong>Motor</strong> <strong>Company</strong> Function Explanation 66
C:Control Functions of FrequencyC01 Jump frequency 1Internal set frequency (Hz)C02Jump frequency 2C03 Jump frequency 3C04This function makes the set frequency jump so that theinverter's output frequency does not match themechanical resonance point of the load.Up to three jump points can be set.This function is ineffective when jump frequencies 1 to 3are set to 0Hz.A jump does not occur during acceleration or deceleration.When a jump frequency setting range overlaps anotherrange, both ranges are added to determine the actualjump area.C 0 1 J U M P H z 1C 0 2 J U M P H z 2C 0 3 J U M P H z 3Setting range:<strong>EQ5</strong> : 0 to 120HzIn 1Hz steps (min.)C 0 4 J U M P H Y S T RSetting range0 to 30HzIn 1Hz steps (min.)To avoid the resonance of the motor driving frequency tothe peculiar vibration frequency of the machine, the jumpfrequency band can be set to the output frequency up tothree point.During accelerating, an internal set frequency is keptconstant by the lower frequency of the jump frequencyband when a set frequency enters the jump frequencyband. This means that the output frequency is keptconstant according to an internal set frequency.When a set frequency exceeds the upper bound of thejump frequency band, an internal set frequency reachesthe value of a set frequency. The output frequencyaccelerates up to a set frequency while passing the jumpfrequency band according to the acceleration time at thistime.During decelerating, it has a relation opposite toaccelerating. Refer to figure below.When two jump frequency bands or more come insuccession mutually, the lowest and highest frequencybecome the lower bound and the upper bound frequencyof an actual jump frequency band respectively amongthem. Refer to upper right figure.Internal set frequency (Hz)Jump frequency (Hysteresis)Jump frequencywidthActualjump widthJump frequencywidthC05 Multistep frequency 1~C19 Multistep frequency 15Jump frequency 1Multistep frequencies 1 to 15 can be switched by turningon and off terminal functions SS1, SS2, SS4, and SS8.(See E01 to E09 for terminal function definitions.)OFF input is assumed for any undefined terminal of SS1,SS2, SS4, and SS8.C 0 5 M U L T I H z - 1C 0 6 M U L T I H z - 2C 0 7 M U L T I H z - 3C 0 8 M U L T I H z - 4C 0 9 M U L T I H z - 5C 1 0 M U L T I H z - 6C 1 1 M U L T I H z - 7C 1 2 M U L T I H z - 8C 1 3 M U L T I H z - 9C 1 4 M U L T I H z 1 0C 1 5 M U L T I H z 1 1C 1 6 M U L T I H z 1 2C 1 7 M U L T I H z 1 3C 1 8 M U L T I H z 1 4C 1 9 M U L T I H z 1 5Setting range<strong>EQ5</strong>: 0.00 to 120.00HzIn 0.01Hz steps (minOutput frequency(Hz)C05C06C07C08C09C10C11~C12C13C14C15C16C17C18C19Jump frequency 2Set frequency (Hz)Related functionsE01 to E09(Set value:0 to 3)Jump frequencywidthJump frequencywidthJump frequency 3FWD-P24SS1-P24ONON ON ON ON ON ON ON ONJump frequency 2SS2-P24ON ON ON ONJump frequency 1SS4-P24ONONSet frequency (Hz)SS8-P24ON<strong>TECO</strong>–<strong>Westinghouse</strong> <strong>Motor</strong> <strong>Company</strong> Function Explanation 67
C20This function sets the frequency for jogging operation ofmotor, which is different from the normal operation.C 2 0 J O G H zSetting range <strong>EQ5</strong> : 0.00 to 120.00 HzStarting with the jogging frequency is combined withjogging select signal input from the keypad panel orcontrol terminal. For details, see the explanations of"E01 Terminal X1" to "E09 Terminal X9."C21Pattern operation is an automatic operation according topreset operation time, direction of rotation, accelerationand deceleration time, and frequency.When using this function, set 10 (pattern operation) to"F01 Frequency setting."The following operation patterns can be selected.Related functionsC 2 1 P A T T E R N F01, C30(Set value:10)Set valueOperation pattern0 Perform a pattern operation cycle, then stop operation.1 Perform pattern operation repeatedly. Stop operationusing a stop command.2 Perform a pattern operation cycle, then continueoperation with the last frequency set.Set value:0ForwardFWDJOG frequencyPattern operation (mode select)End of a cycleC22 Pattern operation (stage 1)~~C28 Pattern operation (stage 7)Seven stages are operated in order (of function codes)according to the values set in "C22 Pattern operation(stage 1)" to "C28 Pattern operation (stage 7)." Eachfunction sets the operation time and the rotating directionfor each stage and assigns set values of the accelerationC 2 2 S T A G E 1C 2 3 S T A G E 2C 2 4 S T A G E 3C 2 5 S T A G E 4C 2 6 S T A G E 5C 2 7 S T A G E 6C 2 8 S T A G E 7and deceleration time.Set orValue rangeassign itemOperation time 0.00 to 6000sRotation F: Forward (counterclockwise)direction R: Reverse (clockwise)Acceleration 1: Acceleration time 1 (F07), deceleration time 1 (F08)and2: Acceleration time 2 (E10), deceleration time 2 (E11)deceleration 3: Acceleration time 3 (E12), deceleration time 3 (E13)time4: Acceleration time 4 (E14), deceleration time 4 (E15)Note: The operation time is represented by the three mostsignificant digits, hence, can be set with only threehigh-order digits.Outputfrequency0TimeSetting example100 F 3ReverseAcceleration and decelerationtime (code): 3Set value:1ForwardFWDEnd of a cycle<strong>Motor</strong> rotating direction:Forward (counterclockwise)Outputfrequency0TimeOperation time: 100sReverseSet value:2ForwardOutputfrequencyReverse0FWDEnd of a cycleTimeSet the operation time to 0.00 for stages not used, whichare skipped in operation.With regard to the set frequency value, the multistepfrequency function is assigned as listed in the table below.Set frequencies to "C05 Multistep frequency 1," to "C11Multistep frequency 7."Stage No.Stage 1Stage 2Stage 3Stage 4Stage 5Stage 6Stage 7Operation frequency to be setMultistep frequency 1 (C05)Multistep frequency 2 (C06)Multistep frequency 3 (C07)Multistep frequency 4 (C08)Multistep frequency 5 (C09)Multistep frequency 6 (C10)Multistep frequency 7 (C11)<strong>TECO</strong>–<strong>Westinghouse</strong> <strong>Motor</strong> <strong>Company</strong> Function Explanation 68
Output frequency(motor speed)Pattern operation setting exampleFunction Set value Operation frequency to be setC21 (operation selection) 1 -C22 (stage 1) 60.0F2 Multistep frequency 1 (C05)C23 (stage 2) 100F1 Multistep frequency 2 (C06)C24 (stage 3) 65.5R4 Multistep frequency 3 (C07)C25 (stage 4) 55.0R3 Multistep frequency 4 (C08)C26 (stage 5) 50.0F2 Multistep frequency 5 (C09)C27 (stage 6) 72.0F4 Multistep frequency 6 (C10)C28 (stage 7) 35.0F2 Multistep frequency 7 (C11)The following diagram shows this operation.ForwardMultistepdirectionfrequency 2Multistepfrequency 1(Stage 1)FWDACC2ACC1Multistepfrequency 5ACC2DEC4Multistepfrequency 6ACC4DEC2ACC4 ACC3 DEC2Multistepfrequency 7(Stage 7)DEC1TimeC30 Frequency command 2This function selects the frequency setting method.C 3 0 F R E Q C M D 2For the setting method, see the explanation for F01.C31 Bias (terminal[12])C32 Gain (terminal[12])This function sets the Gain and Bias of the analog input(terminals [12] ).C 3 1 B I A S 1 2C 3 2 G A I N 1 2The setting range :BIAS: -100 to +100%GAIN:0.0 to 200%Related functionsE01 to E09(Set value:11)F01ReversedirectionMultistepfrequency 3Multistepfrequency 460.0S 100S 65.5S 55.0S 50.0S 72.0S 35.0STerminal12GainBiasReferencevoltageSetvalue:16Setvalue:170.1SOutput signals from terminals Y1 to Y50.1SRunning and stopping are controlled by pressing the FWDand STOP keys and by opening and closing the controlterminals.When using the keypad panel, pressing the FWD keystarts operation. Pressing the STOP key pauses stageadvance. Pressing the FWD key again restarts operationfrom the stop point according to the stages. If an alarmstop occurs, press the RESET key to release operationof the inverter protective function, then press the FWDkey to restart stage advance.If required to start operation from the first stage "C22Pattern operation (stage 1)," enter a stop command andpress the RESET key.If an alarm stop occurs, press the RESET key to releasethe protective function, then press the key again.Output value of Gain 12+10V-10 0 +10[V]-10VOutput value of Bias 12+10V(+100%)200%100%50%Analog input voltage[terminal 12]Bias setting(when positive)Notes:1. The direction of rotation cannot be reversed by acommand issued from the REV key on the keypad panelor terminal [REV]. Any reverse rotation commands enteredare canceled. Select forward or reverse rotation by the datain each stage. When the control terminals are used foroperation, the self-hold function of operation command alsodoes not work. Select an alternate type switch when using.2. At the end of a cycle, the motor decelerates-to-stopaccording to the value set to "F08 Deceleration time 1."-10 0 +10[V]-10V(-100%)Output value of Gain 12Bias setting(when negative)C33Analog setting signal filter<strong>TECO</strong>–<strong>Westinghouse</strong> <strong>Motor</strong> <strong>Company</strong> Function Explanation 69
Analog signals input from control terminal 12 or C1 maycontain noise, which renders control unstable. Thisfunction adjusts the time constant of the input filter toremove the effects of noise.C 3 3 R E F F I L T E RSetting range: 0.00 to 5.00 secondsAn excessive setting delays control response thoughstabilizing control. A set value too small speeds upcontrol response but renders control unstable.If the optimum value is not known, adjust the setting whencontrol is unstable or response is delayed.Note:The set value is commonly applied to terminals 12 and C1.For input of PID feedback amount, the PID controlfeedback filter (set in H25) is used.<strong>TECO</strong>–<strong>Westinghouse</strong> <strong>Motor</strong> <strong>Company</strong> Function Explanation 70
<strong>Motor</strong> 1 (P: <strong>Motor</strong> Parameters)P01This function sets the number of poles of motor 1 to bedriven. If this setting is not made, an incorrect motorspeed (synchronous speed) is displayed on the LED.P 0 1 M 1 P O L E SSet values: 2, 4, 6, 8, 10, 12, 14P02The nominal applied motor capacity is set at the factory.The setting should be changed when driving a motor witha different capacity.P 0 2 M 1 - C A PSet value for models with nominal applied motor of 30HP or less: 0.01 to 60HPModels with nominal applied motor of 40HP or more: 0.01 to 800HPSet the nominal applied motor capacity listed in 9-1,"Standard Specifications." Also set a value in the rangefrom two ranks lower to one rank higher than the nominalapplied motor capacity. When a value outside thisrange is set, accurate control cannot be guaranteed. Ifa value between two nominal applied motor capacities isset, data for the lower capacity is automatically written forrelated function data. When the setting of this function is changed, the valuesof the following related functions are automatically set todata of the TWMC 3-phase standard motor.-- P03 <strong>Motor</strong> 1 (rated current)-- P06 <strong>Motor</strong> 1 (no-load current)-- P07 <strong>Motor</strong> 1 (% R1)-- P08 <strong>Motor</strong> 1 (% X1)Note:The set values for the TWMC 3-phase standard motor are230V, 50Hz, 4 poles for the 230V series; 460V, 50Hz, 4poles for the 460V series.P03This function sets the rated current value of motor 1.P 0 3 M 1 - I rSetting range: 0.00 to 2,000AP04Number of motor 1 poles<strong>Motor</strong> 1 (capacity)<strong>Motor</strong> 1 (rated current)<strong>Motor</strong> 1 (Tuning)This function measures and automatically writes motordata.P 0 4 M 1 T U N 1SetOperationvalue0 Inactive1 Measure the primary resistance (%R1) of themotor and leakage reactance (%X) of the basefrequency when the motor is stopping andautomatically write both values in P07 andP08.2 Measure the primary resistance (%R1) of themotor and leakage reactance (%X) of the basefrequency when the motor is stopping,measure the no-load current (lo) when themotor is running, and automatically write thesevalues in P06, P07, and P08.Put the motor into the state unit separatingfrom the machine for the tuning of the no-loadcurrent.In the state that the load is connected, cannotthe tuning correctly. Execute the auto tuning ofset value “1" after obtaining the test report etc.from the motor manufactures when not makingit in the state of the motor unit, and setting P06(no-load current) beforehand.Perform auto tuning when data in "P06 No-load current,""P07 %R1," and "P08 %X," differs from actual motor data.Typical cases are listed below. Auto tuning improvescontrol and calculation accuracy.・When a motor other than the TWMC standard 3-phasemotor is used and accurate data is required for closecontrol.・When output-side impedance cannot be ignored aswhen cable between the inverter and the motor is toolong or when a reactor is connected.・ When %R1 or %X is unknown as when a non-standardor special motor is used.Tuning procedure1. Adjust the voltage and frequency according to motorcharacteristics. Adjust functions "F03 Maximum outputfrequency," "F04 Base frequency," "F05 Rated voltage,"and "F06 Maximum output voltage."2. Enter untunable motor constants first. Set functions"P02 Capacity," "P03 Rated current," and "P06 No-loadcurrent," (input of no-load current not required whenP04=2, for running the motor at tuning, is selected).3. When tuning the no-load current, beware of motor rotation.4. Set 1 (motor stop) or 2 (motor rotation) to function "P04FUNCAuto tuning." Press the DATA key to write the setvalue and press the FWD key or REV key thenstart tuning simultaneously.5. Tuning takes several seconds to several tens of seconds(when 2 is set. As the motor accelerates up to half thebase frequency according to acceleration time, is tunedfor the no-load current, and decelerates according to thedeceleration time, the total tuning time varies dependingon set acceleration and deceleration times.)6. Press the STOP key after the tuning is completed.7. End of procedure.<strong>TECO</strong>–<strong>Westinghouse</strong> <strong>Motor</strong> <strong>Company</strong> Function Explanation 71
Note1:If REMOTE operation(F02: 1) is selected, operation signal isgiven from terminal [FWD] or [REV].Note2:Use function "A13 <strong>Motor</strong> 2 (auto tuning)," to tune motor 2. Inthis case, set values described in 1 and 2 above are for thefunction (A01 - ) of motor 2.P05WARNINGWhen the auto tuning value is set to 2,the motor rotates at a maximum of halfthe base frequency. Beware of motorrotation.Otherwise injury may result.Long-time operation affects motor temperature andmotor speed. Online tuning minimizes speed changeswhen motor temperature changes.Auto tuning(P04/A13: 2) should be done to use thisfunction.Set value Operation0 Inactive1 Active<strong>Motor</strong> 1 (On-line Tuning)P 0 5 M 1 T U N 2When connecting a reactor or filter to the output circuit,add its value. Use value 0 for cable values that can beignored.Changes in load torque affect motor slippage, thus causingP 0 9 S L I P C O M P 1variations in motor speed. The slip compensation controladds a frequency (proportional to motor torque) to theinverter output frequency to minimize variations in motorspeed due to torque changes.Auto tuning (P04/A13: 2) should be done to use thisfunction.Set value: 0.00 to 15.00HzCalculate the amount of slip compensation using thefollowing formula:Slip compensation amount=Base f requency×Slippage[r/min][ Hz]Sy nchronous speed[r/min]Slippage = Synchronous speed - Rated speedP06This function sets the no-load current (exciting current)of motor 1.P 0 6 M 1 - I OSetting range: 0.00 to 2,000AP07P08Write this data when using a motor other than the TWMCstandard 3-phase motor and when the motor constantand the impedance between the inverter and motor areknown.P 0 7 M 1 - % R 1P 0 8 M 1 - % XCalculate %R1 using the following formula:R1+Cable R%R1 ×100[%]V/ 3・I<strong>Motor</strong> 1 (no-load current)<strong>Motor</strong> 1 (%R1 setting)<strong>Motor</strong> 1 (%X setting)R1 : Primary coil resistance value of the motor []Cable R : Output-side cable resistance value []V : Rated voltage [V] I: <strong>Motor</strong> rated current [A]Calculate %X using the following formula:X1+X2・XM/ X2+XM+ Cable X%X ×100[%]V/ 3・IX1 : Primary leakage reactance of the motor []X2 : Secondary leakage reactance (converted to aprimary value)of the motor []XM : Exciting reactance of the motor []Cable X : Output-side cable reactance []V : Rated voltage [V] I : <strong>Motor</strong> rated current[A]Note:For reactance, use a value in the data written in "F04Base frequency 1."<strong>TECO</strong>–<strong>Westinghouse</strong> <strong>Motor</strong> <strong>Company</strong> Function Explanation 72
High Performance functions (H:High Performance function)H03This function returns all function data changed by thecustomer to the factory setting data. (initialization).H 0 3 D A T A I N I TSet value 0: Disabled.1: Initializing data.To perform initialization, press the STOP and keystogether to set 1, then press the key. The setvalues of all functions are initialized. The set value inH03 automatically returns to 0 following the end ofinitialization.H04H05Data initializingFUNCDATAAuto-reset(Times)Auto-reset (Reset interval)When retry is succesfulAlarmAutomaticreleasecommandofprotectivefunctionOutputfrequencyOccurrenceExtinctionWaiting time(H05)0.1SRestart5min. afterconstant speedTimeRESET the timesof auto-resetWhen the inverter protective function which invokes theretry operation is activated, this function releasesoperation of the protective function and restartsoperation without issuing an alarm or terminating output.H 0 4 A U T O - R E S E TH 0 5 R E S E T I N TSet the protective function release count and waitingtime from its operation startup to release.Setting range (Count) : 0, 1 to 10(Waiting time) : 2 to 20 secondsTo disable the retry function, set 0 to "H04 Retry (count)."Inverter protective functions that can invoke retryfunction.OC1,OC2,OC3dBH: Overcurrent: Braking resistor overheatingOV1,OV2,OV3OL1: Overvoltage: <strong>Motor</strong> 1 overloadOH1OL2: Heat sink overheating: <strong>Motor</strong> 2 overloadOH3OLU: Inverter inside overheating : Inverter overloadWhen the value of "H04 Retry (count)," is set from 1 to10, an inverter run command is immediately enteredfollowing the wait time set in H05, "Retry (wait time),"and the startup of the retry operation. If the cause ofthe alarm has been removed at this time, the inverterstarts without switching to alarm mode. If the cause ofthe alarm still remains, the protective function isreactivated according to the wait time set in "H05 Retry(waiting time)." This operation is repeated until thecause of the alarm is removed. The restart operationswitches to alarm mode when the retry count exceedsthe value set in "H04 Retry (count)."The operation of the retry function can be monitoredfrom terminals Y1 to Y5.WARNINGWhen the retry function is selected,operation automatically restarts dependingon the cause of the trip stop. (Themachine should be designed to ensuresafety during a restart)Otherwise accidents may result.OutputsignalsterminalsY1 to Y5When retry failedAlarmAutomaticreleasecommandofprotectivefunctionOutputfrequencyOutputsignalsterminalsY1 to Y5H06OccurrenceONExtinction0.1S 0.1S0.1SH05:WaittimeH05:WaittimeFirstONSecondFan stop operationAlarmresetRetryendCount set inH04 (count)This function specifies whether cooling fan ON/OFFcontrol is automatic. While power is applied to theinverter, the automatic fan control detects thetemperature of the cooling fan in the inverter and turnsthe fan on or off.When this control is not selected, the cooling fan rotatescontinually.H 0 6 F A N S T O PSet value 0: ON/OFF control disabled.1: ON/OFF control enabled.The cooling fan operating status can be monitored fromterminals Y1 to Y5.<strong>TECO</strong>–<strong>Westinghouse</strong> <strong>Motor</strong> <strong>Company</strong> Function Explanation 73
H07 ACC/DEC (Mode select) patternThis function selects the acceleration and decelerationpattern.H 0 7 A C CP T NSet value 0: Inactive (linear acceleration and deceleration)1: S-shape acceleration and deceleration (mild)2: S-shape acceleration and deceleration (*)3: Curvilinear acceleration and decelerationRelated functionsU02 to U05* The S-shape range is set by thefunction: U02 to U05 when the set value "2" is selected.The detail is referred to the function: U02 to U05.[S-shape acceleration and deceleration]This pattern reduces shock by mitigating output frequencychanges at the beginning/end of acceleration anddeceleration.H08OutputfrequencyMaximumoutputfrequencySetfrequencyBasefrequency0Acceleration timeDeceleration timet[sec]When accidental reversing is expected to cause amalfunction, this function can be set to prevent reversal.H 0 8 R E VSet value 0: Inactive1: ActiveRev. phase sequence lockL O C KOutput frequencyf[Hz]Mild S-shape ernArbitrary S-shapeWhen reversible operation with polarity(set value: "4" or"5") is selected in frequency command: F01, C30, theinverter operates as follows.Operation 0V to 10V input -10V to 0V inputcommandShort FWD-CM The inverter operates. The frequency displayterminals oris "0.00" Hz.FWD : ON0accaccdecWhen 1 is selected in H07(mild S-shape pattern)Range of0.05 x max. output freq. (Hz)S-shape()Time forS-shape atacceleration( acc)Time forS-shape atdeceleration( dec)0.10 x acceleration time (s)0.10 x deceleration time (s)dect[s]When 2 is selected in H07(arbitrary S-shape pattern)(U02 to U05) x max. outputfreq. (Hz)(U02, U03) x2 xacceleration time (s)U04, U05 x2 xdeceleration time (s) When acceleration and deceleration times are verylong or short, acceleration and deceleration are renderedlinear.It may be switched the acceleration and decelerationtime during constant speed or stopping by the function"acceleration and deceleration time selection"(E01 toE09: 4, 5).The signal may be ignored switched during S-shape atacceleration.The linear deceleration time is corresponded if switchedduring S-shape at deceleration.Short REV-CMterminals orREV : ONThe frequency displayis "0.00" Hz.The inverter operates.This function prevents a reversing operation resulting froma connection between the REV and P24 terminals,inadvertent activation of the REV key, or negative analoginput from terminal 12 or V1. During this function isoperating, "0.00Hz" is displayed on the LED monitor.This function cannot be prevented against H18: Torquecontrol function. It may be reverse because of the torquesignal and load.It may be switched to the S-shape operation if outputfrequency is reached to the setting frequency or changeto acceleration control.[ Curvilinear acceleration and deceleration ]This function is used to minimize motor acceleration anddeceleration times in the range that includes aconstant-output range.<strong>TECO</strong>–<strong>Westinghouse</strong> <strong>Motor</strong> <strong>Company</strong> Function Explanation 74
H09This function smoothly starts the motor which is coastingafter a momentary power failure or after the motor hasbeen subject to external force, without stopping motor.At startup, this function detects the motor speed andoutputs the corresponding frequency, thereby enabling ashock-free motor startup. Although the normal startupmethod is used, when the coasting speed of the motor is120 Hz or more as an inverter frequency, when the valueset to "F03 Maximum frequency," exceeds the value set to"F15 Frequency limiter (upper limit)." and when thecoasting speed is less than 5 Hz as an inverter frequency.H 0 9 S T A R T M O D ESet value 0,1,2Set value STM Restart after amomentary powerfailure orLine-to-inverterswitching0 OFF / Inactivenot selected (normal starting)1 Active(smoothly starting)OtheroperationInactive2 Activeany value ON ActiveSTM: Start characteristics selection signal(E01 to E09: 26)NOTE:-1: Automatically restart when overcurrent or overvoltage isdetected during smoothly starts.-2: The coasting speed is used 100 Hz or less as aninverter frequency.-3: When H09:2 or STM:ON, it needs the time more thannormal start even the motor is STOP because the motorspeed is detected on ALL situation. And it may berotated the motor when the load is too small.-4: Auto tuning(P04/A13: 2) should be done to use thisfunction.-5: When the used motor slippage is different from TWMCmotor, the "Slip compensation control (P09, A18)"should be set. The characteristics may not be satisfied.When the operation above is problematic, this function isnot used (inactive).This function may not be satisfied due to thecharacteristics because of the load condition, motorconstant, operating frequency, coasting speed, wirelength, momentary power failure time or external factor.P24STMFWDOutputfrequency(motor speed)0.1 s orlongerSpeedsearchStart modeON0.2 s orlongerONAccelerationTimeTimeIn this section, the outputvoltage is gradually increasedin steps to minimize shock.Note: The dotted-dashed line indicates motor speed.H10When the output frequency is fixed (constant-speedoperation) at light loads and except for”0.0” is set to F09,"Torque boost 1," this function automatically reduces theoutput voltage, while minimizing the product (power) ofvoltage and current.Auto tuning (P04/A13: 2) should be done to use thisfunction.The energy-saving operation does not be operated whenset below.- Under Torque control- Selected the Automatic torque boost- Selected the Torque vector controlH 1 0 E N E R G Y S A VSet value 0: Inactive1: ActiveNote:-Use this function for square law reduction torque loads(e.g., fans, pumps). When used for a constant-torqueload or rapidly changing load, this function causes a delayin control response.-The energy-saving operation automatically stopsduring acceleration and deceleration and when thetorque limiting function is activated.H11This function selects the inverter stopping method whena stop command is entered.H 1 1 D E C M O D ESet value 0: Deceleration-to-stop based on data set to"H07 Non-linear acceleration anddeceleration"1: Coasting-to-stopNote:This function is effective only when a stop command isentered and, therefore, is ineffective when the motor isstopped by lowering the set frequency.H12Instantaneous overcurrent limitingAn overcurrent trip generally occurs when current flowsabove the inverter protective level following a rapidchange in motor load. The instantaneous overcurrentlimiting function controls inverter output and prohibits theflow of a current exceeding the protective level evenwhen the load changes.As the operation level of the instantaneous overcurrentlimiting function cannot be adjusted, the torque limitingfunction must be used.As motor generation torque may bereduced when instantaneousovercurrent limiting is applied, set thisfunction to be inactive for equipmentsuch as elevators, which areadversely affected by reduced motorWARNING generation torque, in which case anovercurrent trip occurs when thecurrent flow exceeds the inverterprotective level. A mechanical brakeshould be used to ensure safety.Otherwise accidents may result.H 1 2 I N S T C LSet value 0: Inactive1: ActiveEnergy-saving operationDEC mode<strong>TECO</strong>–<strong>Westinghouse</strong> <strong>Motor</strong> <strong>Company</strong> Function Explanation 75
H13Instantaneous switching to another power line (when thepower of an operating motor is cut off or power failureoccurs) creates a large phase difference between theline voltage and the voltage remaining in the motor,which may cause electrical or mechanical failure. Torapidly switch power lines, enter the remaining voltageattenuation time to wait for the voltage remaining in themotor to attenuate. This function operates at restartafter a momentary power failure.H 1 3 R E S T A R T TSetting range: 0.1 to 5.0 secondsWhen the momentary power failure time is shorter thanthe wait time value, a restart occurs following the waittime. When the power failure time is longer than thewait time value, a restart occurs when the inverter isready to operate (after about 0.2 to 0.5 second).H14This function determines the reduction rate of the outputfrequency for synchronizing the inverter output frequencyand the motor speed. This function is also used toreduce the frequency and thereby prevent stalling undera heavy load during normal operation.H 1 4 F A L L R A T ESetting range: 0.00, 0.01 to 100.00 Hz/sWhen 0.00 is set, the frequency is reduced according tothe set deceleration time.Note:A too large frequency reduction rate is may temporarilyincrease the regeneration energy from the load andinvoke the overvoltage protective function. Conversely,a rate that is too small extends the operation time of thecurrent limiting function and may invoke the inverteroverload protective function.H15Auto-restart (Restart time)Auto-restart (Freq. fall rate)Auto-restart (Holding DC voltage)This function is for when 2 (deceleration-to-stop at powerfailure) or 3 (operation continuation) is set to "F14Restart after momentary power failure (operationselection)." Either function starts a control operation ifthe main circuit DC voltage drops below the set operationcontinuation level.H16As the power to an external operation circuit (relaysequence) and the main power to the inverter isgenerally cut off at a power failure, the operationcommand issued to the inverter is also cut off. Thisfunction sets the time an operation command is to beheld in the inverter. If a power failure lasts beyond theself-hold time, power-off is assumed, automatic restartmode is released, and the inverter starts operation atnormal mode when power is applied again. (This timecan be considered the allowable power failure time.)H 1 6 S E L F H O L D TSetting range: 0.0 to 30.0 seconds, 999When "999" is set, an operation command is held (i.e.,considered a momentary power failure) while control powerin the inverter is being established or until the main circuitDC voltage is about 100Vdc.This function controls motor torque according to acommand value.H19Auto-restart (OPR command selfhold time)Active driveThis function automatically extends accelerating timeagainst acceleration operation of 60 seconds or longer toprevent an inverter trip resulting from a temperature risein inverter due to overcurrent.H 1 9 A U T R E DSet value 0: Inactive1: Active(When the active drive function is activated, theacceleration time is three times the selected time.)H 1 5 H O L D VSetting range 230 V series: 200 to 300V460 V series: 400 to 600VWhen power supply voltage to the inverter is high,control can be stabilized even under an excessive loadby raising the operation continuation level. However,when the level is too high, this function activates duringnormal operation and causes unexpected motion.Please contact TWMC electric when changing the initialvalue.<strong>TECO</strong>–<strong>Westinghouse</strong> <strong>Motor</strong> <strong>Company</strong> Function Explanation 76
ReverseoperationH20~H25PID control detects the amount of control (feedbackamount) from a sensor of the control target, thencompares it with the target value (e.g., referencetemperature). If the values differ, this function performs acontrol to eliminate the deviation. In other words, thiscontrol matches the feedback amount with the targetvalue.This function can be used for flow control, pressure control,temperature control, and other process controls.Targetvalue+-PID++ +Feedback amountDrivesectionControltargetForward or reverse operations can be selected for PIDcontroller output. This enables motor revolutions to befaster or lower according to PID controller outputThis function cannot be used when the motor 2 isselected.H 2 0 P I D M O D ESet value 0: No operation1: Forward operation2: Reverse operationInverter outputfrequencyMaximumfrequencyPID control (Mode select)~PID control (Feedback filter)ForwardoperationH21This function selects the feedback amount input terminaland electrical specifications of the terminal. Select a valuefrom the table below according to sensor specifications.Set value Descriptions0 Control terminal 12, forward operation (0 to10V voltage input)1 Control terminal C1, forward operation (4 to20mA current input)2 Control terminal 12, reverse operation (10to 0V voltage input)3 Control terminal C1, reverse operation (20to 4mA current input)100%0%PID control (Feedback signal)H 2 1 F B S I G N A LFeedback amount0V4mAInputForward operationReverseoperation10V20mAOnly positive values can be input for this feedback amountof PID control. Negative values (e.g., 0 to -10V, -10 to 0V)cannot be input, thereby the function cannot be used for areverse operation by an analog signal.00% 100%PID outputThe target value can be entered using F01, "Frequencysetting 1," or directly from the keypad panel. Select anyterminal of Terminals X1 (E01) to X9 (E09) and set value11 (frequency setting switching).For entry from F01, "Frequency setting 1," input an OFFsignal to the selected terminal. For direct entry from thekeypad panel, turn on the selected terminal.For the target value and feedback amount, the processamount can be displayed according to the values set inE40, "Display coefficient A," and E41, "Displaycoefficient B."DisplayDisplay coefficient ADisplay coefficient B0% 100%Target value orfeedback amount<strong>TECO</strong>–<strong>Westinghouse</strong> <strong>Motor</strong> <strong>Company</strong> Function Explanation 77
OperationamountDeviationOperationamountDeviationH22H23H24These functions are not generally used alone but arecombined like P control, PI control, PD control, and PIDcontrol.P operationOperation using an operation amount (output frequency)proportional to deviation is called P operation, whichoutputs an operation amount proportional to deviation,though it cannot eliminate deviation alone.DeviationPID control (P-gain)PID control (I-gain)PID control (D-gain)D operationAn operation where the operation amount (outputfrequency) is proportional to the deviation differential iscalled a D operation, which outputs an operation amountas the deviation differential and, therefore, is capable ofresponding to sudden changes.TimeTimeOperationamountH 2 2 P - G A I NSetting range: 0.01 to 10.0 timesP (gain) is the parameter that determines the responselevel for the deviation of P operation. Although anincrease in gain speeds up response, an excessive gaincauses vibration, and a decrease in gain delays response.The value "1" is the P(gain) that is when the maximumfrequency 100% at deviation 100%.ResponseTime I operationAn operation where the change speed of the operationamount (output frequency) is proportional to thedeviation is called an I operation. An I operationoutputs an operation amount as the integral of deviationand, therefore, has the effect of matching the controlamount (feedback amount) to the target value (e.g., setfrequency), though it deteriorates response for significantchanges in deviation.H 2 3 I - G A I NTimeSetting range: 0.0 (Inactive), 0.1 to 3600 seconds"H23 I-gain" is used as a parameter to determine the effectof I operation. A longer integration time delays responseand weakens resistance to external elements. A shorterintegration time speeds up response, but an integrationtime that is too short causes vibration.H 2 4 D - G A I NSetting range: 0.00 (Inactive), 0.01 to 10.0 seconds"H24 D-gain" is used as a parameter to determine theeffect of a D operation. A longer differentiation timecauses vibration by P operation quickly attenuating at theoccurrence of deviation. Excessive differentiation timecould cause vibration. Shortening the differentiationtime reduces attenuation at the occurrence of deviation.PI controlP operation alone does not remove deviation completely.P + I control (where I operation is added to P operation)is normally used to remove the remaining deviation. PIcontrol always operates to eliminate deviation even whenthe target value is changed or there is a constantdisturbance. When I operation is strengthened,however, the response for rapidly changing deviationdeteriorates. P operation can also be used individuallyfor loads containing an integral element. PD controlIf deviation occurs under PD control, an operationamount larger than that of D operation alone occursrapidly and prevents deviation from expanding. For asmall deviation, P operation is restricted. When theload contains an integral element, P operation alone mayallow responses to vibrate due to the effect of the integralelement, in which case PD control is used to attenuatethe vibration of P operation and stabilize responses. Inother words, this control is applied to loads in processeswithout a braking function.PID controlPID control combines the P operation, the I operationwhich removes deviation, and the D operation whichsuppresses vibration. This control achievesdeviation-free, accurate, and stable responses.Adjusting PID set valueAdjust the PID value while monitoring the responsewaveform on an oscilloscope or other instrument ifpossible. Proceed as follows:-Increase the value of "H22 P-gain" without generatingvibration.- Decrease the value of "H23 I-gain" without generatingvibration.- Increase the value of "H24 D-gain" without generatingvibration.<strong>TECO</strong>–<strong>Westinghouse</strong> <strong>Motor</strong> <strong>Company</strong> Function Explanation 78
Response-To suppress vibration with a frequency roughly equivalentto the value "H24 D-gain," decrease the value of H24. Ifthere is residual vibration with 0.0, decrease the value of"H22 P-gain."BeforeadjustmentInternal resistance ofPTC thermistorRp2H25AfteradjustmentTimeThis filter is for feedback signal input from terminal [12]or [C1]. This filter stabilizes operation of the PID controlsystem. A set value that is too large, however,deteriorates response.H 2 5 F B F I L T E RSetting range: 0.0 to 60.0 secondsH26Set this function active when the motor has a PTCthermistor for overheat protectionH 2 6 P T CSet valuePID control (Feedback filter)PTC thermistor (Mode select)0: Inactive1: ActiveM O D EConnect the PTC thermistor as shown in the figurebelow.Turn on switch “PTC” on the control PCB.The trip mode is activated by “OH2:External thermalrelay tripped.”Rp1AlarmTemperaturetemperatureThe figure in "H26 PTC thermistor (Mode select)," showsthat resistor 250 and the thermistor (resistance valueRp) are connected in parallel. Hence, voltage Vc 1(Level) at terminal [C1] can be calculated by using thefollowing formula.250・Rp250 RpVc 110[ V]250・Rp1000 250 RpThe operation level can be set by bringing Rp in the Vc 1calculation formula into the following range.Rp 1 < Rp < Rp 2To obtain Rp easily, use the following formula.Rp1 Rp2Rp [Ω]213PTCDC10VPTCthermistorC1Resistor250 Ohom11ON1k OhomOFFH27(Level)ComparatorOH20VH27PTC thermistor (Level)The voltage input to terminal [C1] is compared to the setvoltage (Level). When the input voltage is equal to orgreater than the set voltage (Level), "H26 PTC thermistor(Mode select)," starts.H 2 7 P T CL E V E LSetting range: 0.00 to 5.00VThe PTC thermistor has its own alarm temperature. Theinternal resistance value of the thermistor largely changeat the alarm temperature. The operation (voltage) levelis set using this change in the resistance value.<strong>TECO</strong>–<strong>Westinghouse</strong> <strong>Motor</strong> <strong>Company</strong> Function Explanation 79
H30The link function (communication function) providesRS-485 (provided as standard) and bus connections(optional).The serial link function includes:1) Monitoring (data monitoring, function data check)2) Frequency setting3) Operation command(FWD, REV, and other commands for digital input)4)Write function dataH 3 0 L I N K F U N CSetting range: 0 to 3Communication can be enabled and disabled by a digitalinput. This function sets the serial link function whencommunication is enabled.Set value FrequencycommandOperationcommand0 Disabled Disabled1 Enabled Disabled2 Disabled Enabled3 Enabled EnabledThe data monitoring and function data write functions arealways enabled. Disabling communication using digitalinput brings about the same result as when "0" is set to thisfunction. When the bus option is installed, this settingselects the function of the option and the RS-485 interfaceis restricted to monitoring and writing function data.H31~H39Serial link (Function select)RS-485 (Address)~RS-485 (Response interval)These functions set the conditions of RS-485 Modbus-RTUcommunication. Set the conditions according to theupstream device. Refer to technical manual for theprotocol.This function sets the station address of RTU.H 3 1 4 8 5 A D R E S SSetting range: 1 to 247This function sets processing at communication error andsets the error processing timer value.H 3 2 M O D E O N E RSetting range: 0 to 3Set value Processing at communication error0 Immediate Er 8 trip (forced stop)1Continue operation within timer time, Er8 tripafter timer time.Continue operation and effect retry within timer2time, then invoke an Er8 trip if acommunication error occurs. If an error doesnot occur, continue operation.3 Continue operation.Set valueBaud rate0 19200 bit/s1 9600 bit/s2 4800 bit/s3 2400 bit/sThis function sets data length.H 3 5 L E N G T HSetting range: 0Set value Data length0 8 bitThis function sets the parity bit.H 3 6 P A R I T YSetting range: 0 to 2Set value Parity bit0 None1 Even2 OddThis function sets the stop bit.H 3 7 S T O P B I T SSetting range: 0, 1Set value Stop bit0 2 bit1 1 bitThe stop bit is automatically configured by the value of theparity bit. For parity “NONE” the stop bit is 2bits. Forparity “EVEN” or “ODD” the stop bit is 1 bit.In a system where the local station is always accessedwithin a specific time, this function detects that accesswas stopped due to an open-circuit or other fault andinvokes an Er 8 trip.H 3 8 N O R E S tSetting range: 0 (No detection)1 to 60 secondsThis function sets the time from when a request is issuedfrom the upstream device to when a response isreturned.H 3 9 I N T E R V A LSetting range: 0.00 to 1.00 secondH 3 3 T I M E RSetting range: 0.0 to 60.0 secondsThis function sets the baud rate.H 3 4 B A U D R A T ESetting range: 0 to 3<strong>TECO</strong>–<strong>Westinghouse</strong> <strong>Motor</strong> <strong>Company</strong> Function Explanation 80
<strong>Motor</strong> 2 (A: Alternative <strong>Motor</strong> Parameters)A01This function sets the maximum frequency for motor 2output by the inverter. This function operates the sameas "F03 Maximum frequency 1." For details, see theexplanation for F03.A 0 1 M A X H z - 2This function sets the maximum output frequency in theconstant-torque area of motor 2 (i.e., output frequency atrated output voltage). This function operates the sameas "F04 Base frequency 1." For details, see theexplanation for F04.A 0 2 B A S E H z - 2A03 Rated voltage 2This function sets the rated value of voltage output tomotor 2. This function operates the same as "F05Rated voltage 1." For details, see the explanation forF05.A 0 3 R A T E D V 2A04 Maximum voltage 2This function sets the maximum value of the inverteroutput voltage of motor 2. This function operates thesame as "F06 Maximum voltage 1." For details, see theexplanation for F06.A 0 4 M A X V - 2This function sets the torque boost function of motor 2.This function operates the same as "F09 Torque boost1." For details, see the explanation for F09.A 0 5 T R Q B O O S T 2This function sets the function of the electronic thermaloverload relay for motor 2. This function operates thesame as F10 to F12, "Electronic thermal overload relay1." For details, see the explanations for F10 to F12.A 0 6 E L C T R N O L 2A 0 7 O L L E V E L 2A 0 8 T I M E C N S T 2This function sets the torque vector function of motor 2.This function operates the same as "F42 Torque vectorcontrol 1." For details, see the explanation for F42.A 0 9 T R Q V E C T O R 2This function sets the number of poles of motor 2 to bedriven. This function operates the same as "P01 Numberof motor-1 poles." For details, see the explanation for P01.A 1 0 M 2Maximum frequency2A02 Base frequency 2A05 Torque boost 2A06A07A08Electronic thermal overload relay 2 (Select)Electronic thermal overload relay 2 (Level)Electronic thermal overload relay 2 (Thermal time constant)A09 Torque vector control 2A10Number of motor-2 polesP O L E SA11This function sets the capacity of motor 2. This functionoperates the same as "P02 <strong>Motor</strong> 1 (Capacity)." Fordetails, see the explanation for P02. However, therelated motor data functions change to "A12 <strong>Motor</strong> 2(Rated current)," "A15 <strong>Motor</strong> 2 (No-load current)," "A16<strong>Motor</strong> 2 (%R1 setting)," and "A17 <strong>Motor</strong> 2 (%X setting)."A 1 1 M 2 - C A PA12This function sets the rated current of motor 2. Thisfunction operates the same as "P03 <strong>Motor</strong> 1 (Ratedcurrent)." For details, see the explanation for P03.A 1 2 M 2 - I rA13This function sets the auto tuning of motor 2. Thisfunction operates the same as "P04 <strong>Motor</strong> 1 (Tuning)."For details, see the explanation for P04.A14A 1 3 M 2 T U N 1This function sets the online tuning of motor 2. Thisfunction operates the same as "P05 <strong>Motor</strong> 1 (On-linetuning)." For details, see the explanation for P05.A 1 4 M 2 T U N 2A15This function sets the no-load current of motor 2. Thisfunction operates the same as "P06 <strong>Motor</strong> 1 (No-loadcurrent)." For details, see the explanation for P06.A16A17A 1 5 M 2 - I o<strong>Motor</strong> 2 (Capacity)<strong>Motor</strong> 2 (Rated current)<strong>Motor</strong> 2 (Tuning)<strong>Motor</strong> 2 (On-line tuning)<strong>Motor</strong> 2 (No-load current)<strong>Motor</strong> 2 (%R1 setting)<strong>Motor</strong> 2 (%X setting)This function sets %R1 and %X of motor 2. Thisfunction operates the same as "P07 <strong>Motor</strong> 1 (%R1setting)," and "P08 <strong>Motor</strong> 1 (%X setting)." For details,see the explanations for P07 and P08.A 1 6 M 2 - % R 1A 1 7 M 2 - % XA18 Slip compensation control 2This function sets the amount of slip compensation formotor 2. This function operates the same as "P09 Slipcompensation control." For details, see the explanationfor P09.A 1 8 S L I P C O M P 2Set value : 0.00Hz to 15.00HzCalculate the amount of slip compensation using thefollowing formula:Slip compensation amountSlippage [r / min] Base frequency [ Hz]Synchronous speed[r / min]Slippage = Synchronous speed-Rated speed<strong>TECO</strong>–<strong>Westinghouse</strong> <strong>Motor</strong> <strong>Company</strong> Function Explanation 81
U : User functionU01This function becomes effective, when the torque limit(brake) is used. The inverter controls to increase theoutput frequency so that torque calculations do notexceed the torque limit (brake) setting ( F41 or E17).(When F41 or E17 is set to 999, it becomes invalid.)This function sets the increment of upper limit foroutput frequency.When the regeneration avoidance is selected, theresurrection ability can be improved by raising theincrement of upper limit. However, the output frequencyof the inverter is limited at the frequency limit(high):F15.U 0 1 U S E R 0 1Setting range : 0 to 65535The set value "15" becomes 1Hz.(The set value "1" becomes 1/15Hz)U02U03U04U051st S-shape level at acceleration (start)2nd S-shape level at acceleration (stop)1st S-shape level at deceleration (start)2nd S-shape level at deceleration (stop)When "2" is set in the function code: H07, bothcurvilinear acceleration and deceleration ranges ofS-shape can be set up arbitrarily.The range is the ratio for maximum output frequency 1(F03) or 2 (A01) .U 0 2 U S E R 0 2U 0 3 U S E R 0 3U 0 4 U S E R 0 4E U 0 5 U S E R 0 5Setting range : 1 to 50%Output frequencyf[Hz]f1f00Maximum compensation frequency during braking torque limitU03U02tacc100% value of this function means maximumfrequency (fmax) .Acceleration time “tacc” and deceleration time “tdec”of upper figure become longer than the linearacceleration time and deceleration time. When the setacceleration time(F07,E10,E12,E14) is assumed tobe “Ta” and deceleration time(F08,E11,E13,E15) isassumed to be “Td”, “tacc” and “tdec” can becalculated by the following expressions.tdecU04U05t[s]- At acceleration,U02 U03| f 1 f 0 | f maxor,100- At deceleration,U04 U05| f 1 f 0 | f max100f 1 f 0 U02 U03tacc ( ) Taf max 100f 1 f 0 U04 U05tdec ( ) Tdf max 100- At acceleration,U02 U03| f 1 f 0 | f maxor,100- At deceleration,U04 U05| f 1 f 0 | f max100 f 1 f 0 100 U02 U03 tacc 2 Ta f max U02 U03 100 f 1 f 0 100 U04 U05 tdec 2 Td f max U04 U05 100 U08U09linear Acceleration anddeceleration clauseS-shape clauseInitial value of main DC link capacitorMeasured value of main DC link capacitorData for the life expectancy judgment of the capacitorin main circuit is stored in this function. The electricaldischarge time of the capacitor can be measuredautomatically, and the time of part replacement can beconfirmed according to the decrement rate from thefactory shipment.U 0 8 U S E R 0 8U 0 9 U S E R 0 9Setting range : 0 to 65535The electrical discharge time which is measured in thefactory shipment is set to function code U08 as a initialvalue. This value is different in each inverter.The electrical discharge time of the capacitor ismeasured automatically, when the power supply isturned off. And, the result is stored in function codeU09.When the power supply is turned off under theconditions as follows, decrement rate (%) to the factoryshipment can be measured.Conditions: which has been described to "*Estimationof life expectancy based on maintenance information"of the instruction manual "8-2 periodical inspection".U09The result of 100 is displayed in CAP=xxx.x%U08of maintenance information. 85% becomes a standardat the part replacement time.<strong>TECO</strong>–<strong>Westinghouse</strong> <strong>Motor</strong> <strong>Company</strong> Function Explanation 82
◆When you make measurement of capacity and lifeexpectancy judgment of capacitor with an actualoperating condition, set the value “30” to the functioncode “E20 to E24”. And write the measurement resultU09 with an actual operating condition to the functioncode U08 as an initial value as early as possible sinceinverter operation starts.However, life judgment by the measurement resultcannot be performed in case of 1 and 2 as below.1. During inverter operation, a power supply is turnedoff and it stops.2. Cooling fan ON/OFF control is used.(function code : H 06= 1)Turn off the power supply of inverter, on the conditionsat which the inverter has stopped, and a cooling fan isoperated. It is not necessary to remove an option cardand the connection with a control terminal.As for this "measurement with an actual operatingcondition", carry out this measurement about 10 timesto minimize the error of a measurement result, andmake the average value into an initial value.Moreover, when there is 10% or more of change fromthe last measured value, measurement is disregardedin order to prevent incorrect measurement. Renewal ofa display is not carried out.◆Set measured value U09 to the initial value U08 afterexchanging capacitors.Related FunctionsE20 to E24(Set value:30)U10PC board capacitor powered on time◆The accumulation time of the capacitor on PC boardare displayed. The accumulation time of the controlpower supply multiplied by the life expectancycoefficient defined by the temperature inside theinverter are displayed. Hence, the hours displayedmay not agree with the actual operating hours. Sincethe accumulation time are counted by unit hours,power input for less than one hour will be disregarded.The accumulation time are displayed in TCAP=xxxxxhof maintenance information. The standard at thereplacement time is 61,000h. Refer to the manual "8-2regular check" for the maintenance.U 1 0 U S E R 1 0Setting range: 0 to 65535 hours◆Clear the accumulation time to 0 hour, after replacingthe PC board on which capacitors are equipped with.There is also PC Board without the capacitor(ex :Control circuit board) not to be cleared theaccumulation time. For details, contact TWMC.U11Related FunctionsE20 to E24(Set value:30)Cooling fan operating time◆The integrated operating hours of the cooling fan aredisplayed. Since the integrated hours are counted byunit hours, power input for less than one hour will bedisregarded. The integrated hours are displayed inTFAN=xxxxxh of maintenance information.The standard at the replacement time is 40,000h in theinverter of 5HP or less. The standard at thereplacement time is 25,000h in the inverter of 7.5HP ormore. (Estimated life expectancy of a cooling-fan atinverter ambient temperature of 40 degree.)The displayed value should be considered as a roughestimate because the actual life of a cooling fan isinfluenced significantly by the temperature. Refer tothe manual "8-2 regular check" for the maintenance.U 1 1 U S E R 1 1Setting range : 0 to 65535 hoursClear integrated operating time to 0 hour after replacingthe cooling fan.Related FunctionsE20 to E24(Set value:30)U13Magnetize current vibration damping gain◆Adjust if Magnetizing current vibration occurred in theinverter output current .U 1 3 U S E R 1 3Setting range: 0 to 32767◆Adjust the value from 0 to 2048 as a standard value.Vibration damping gain becomes 100% in set value4096.U15Slip compensation filter time constant◆The filter time constant of Slip compensation is set.U 1 5 U S E R 1 5Setting range : 0 to 32767◆Calculate the filter time constant using the followingformula.162Filter time constant [ms]"U15" set value◆The response time of the control slows because thefilter time constant is enlarged when a value is set tosmaller. However, system becomes steady.◆The response time of the control quickens because thefilter time constant becomes smaller, when a set valueis enlarged.Note : Response time quickens when a set value isenlarged. Therefore, there is a possibility that theoutput frequency becomes unstable. Please adjusta set value to smaller than factory setting value.U23U24Integral gain of continuous operation at power failureProportional gain of continuous operation at power failure◆This function becomes effective, when function codeF14 (Restart mode after momentary power failure) setvalue is 2 or 3.U 2 3 U S E R 2 3U 2 4 U S E R 2 4Setting range : 0~65535◆In case of F14 set value : 2.When the operation continuation level (H15) isreached, deceleration to a stop occurs. The DCvoltage of the main circuit sharpens the decelerationslope, and the inverter collects the inertia energy of theload to maintain the DC bus voltage and controls themotor until it stops, so that the undervoltage protectivefunction is not activated.The deceleration slope is adjusted with U23 and U24.However, the deceleration operation time never<strong>TECO</strong>–<strong>Westinghouse</strong> <strong>Motor</strong> <strong>Company</strong> Function Explanation 83
ecomes longer than the set deceleration time.◆In case of F14 set value : 3.The output frequency is lowered by the control bywhich the DC voltage of the main circuit is keptconstant from the regeneration energy, so that theinverter may continue operation when momentarypower failure occurs.The response is adjusted with U23 and U24 at thistime.◆Calculate the integral gain using the following formula.162Integral gain [ms]"U 23" set valueOutput frequencycommand|f * |U48H15Set valueDC voltage of themain circuitPIcalculator|f * |0I gain:U23P gain:U24Input phase loss protectionOutput frequencycommand|f ** |◆This function selects operation of input phase loss orpower supply unbalance protection.U 4 8 U S E R 4 8Setting range : 0 to 2U49Set valueOperation0 Active (without reactor (ACR/DCR))1 Active (with reactor (ACR/DCR))2 Inactive△ ! CAUTIONWhen "2" is set to U48, protectionoperation of the inverter to input phaseloss or power supply voltage unbalancedoes not work. If you use it as it is,there is a possibility of damaging aninverter andfailure may result.RS-485 protocol selection◆The protocol of RS-485 communication is changed.U 4 9 U S E R 4 9Set value : 0, 1Set valueOperation0 FGI-bus1 Modbus-RTU◆When function code F13 (electronic thermal)is set to 2,both the type of the braking resistor and connectioncircuit are set. Factory setting is set to nominal appliedresistor and the number of resistor is one. When thepower load capacities of resistor are increased, set thefactory setting properlyU 5 9 U S E R 5 9Setting range : 0 to A8 (HEX)Setting of ten’s digit ( type selection )DutySetvalueResistance[Ω]Capacity[W]cycle[%ED]0 - - 10%1 100 2002 40 4003 33 4004 20 8005 15 9006 200 2007 160 4008 130 4009 80 800A 60 900Setting of unit’s digit (connection circuit selection)Braking-resistor *1)DutySet valueUsenumber0 11 22 23 44 35 66 97 4PPPPPPPConnection circuitPDBDBDBDBDBDBDBDBcycle[%ED]Syntheticresistance[Ω]Powerconsumption perresistance[comparatively]10% R 100%20% 2R 50%20% (1/2)R 50%40% R 25%30% 3R 33%50% (3/2)R 17%50% R 11%40% 4R 25%Instruction manual and specifications are preparedabout communicative details. Contact TWMC.8 8PDB50% 2R 12.5%1) It is limited by the %ED value of the braking transistorinside the inverter.<strong>TECO</strong>–<strong>Westinghouse</strong> <strong>Motor</strong> <strong>Company</strong> Function Explanation 84
△ ! CAUTION◆Set the function code both “ F13” and “U59 ” beforeoperating the inverter, and don’t change the functionsduring operation. The integrated thermal data arecleared immediately, when function code “ F13” or“U59 ” are changed. The overheat protection ofresistor becomes invalid. When the function code“ F13” or “U59 ” are changed in the state wheretemperature rose, the overheat protection of resistorbecomes invalid, too.◆As there is a possibility of damaging the inverter, theresistor value less than standard applied value shouldnot be available.◆Make into one kind the resistor used as combinationconditions for a braking resistor, and connect it so thatthe electric power is consumed equally in eachresistor.◆When the resistor which is instead of DB***-2C/4C areused as External braking resistor, function code F13should be set to “0”.◆ When resistor values less than Standard appliedresistor value is set to the function code, regenerationoperation is invalid. OU alarm will be occurred.◆If connection of resistor and setting value of resistor isnot corresponded, there is a possibility of damagingthe resistor and the inverter.Caution or failure may result.U59Function for manufacturer[40HP or more is corresponded]This function is available to release the overheating alarm(OH1) at the DC fan broken.U 5 9 U S E R 5 9Set value : 00, 01Set valueOperation00 OH1 alarm at DC fan broken01 No alarm at DC fan broken△ ! CAUTION◆It causes overheating trip (OH1,OH3) in the inverter,and the life time decrease such as electrolyticcapacitors on the PCB in the unit by a partial risetemperature, and there is a possibility to the worst unitdamage when left with the DC fan for an internal stirstops.Be sure that set it to the fan exchange and the factorysetting value again promptly after the DC fan for aninternal stir stops. (Contact the fan exchangeprocedure TWMC Electric.)Failure may result.U60Regeneration avoidance at deceleration◆This function is available, when torque limit (brake) ofF41( or E17) is set to “0%”.U 6 0 U S E R 6 0Set value01OperationTorque limit operation(for high response use)OU alarm avoidance operation(for only deceleration or Large inertia use )◆If function code U60 is set to “0”, braking torque is keptto about “0%” under acceleration, deceleration,constant speed state. Output frequency is controlled incorrespond to the rapid change in motor load toprevent OU alarm. Deceleration time becomes longerthan the set deceleration time (F08).◆In case of setting value U60:1, Compared with settingvalue "0", it controls not to perform torque limitoperation only at the deceleration time, but to preventthe rise of the DC voltage of the main circuit, andavoid OU alarm.At this time, although deceleration time becomeslonger than a setting value of F08, it becomes shorterthan setting value"0" of U60. It may occur OU alarm, ifload changes rapidly during deceleration.U61Voltage detect offset and gain adjustment◆40HP/CT, 50HP/VT or more :It adjusts, only when a print board is replaced bymaintenance, etc. If not necessary, do not use thisfunction.U 6 1 U S E R 6 1Set value : 0, 1, 2Invertercapacity30HP/CT or40HP/VT orless40HPCT50HP/VT ormore0:Inactive(fixed)Operation0:Inactive1:Voltage detect offset adjustment2:Voltage detect gain adjustment◆Set the function code in the following procedure.If the inverter are operated without this adjustmentafter replacing the PC board, normal operation maynot be able to be performed.(Offset adjustment)1) Confirm that the main power supply is turned ON,the motor wiring are connected and the motor hasstopped (inverter operation command is OFF).2) When the data of U61 is changed to "1", and theFUNC/DATA key is ON, the offset self adjustment isstarted. The display of “storing" of the keypadpanel disappears several seconds later. When theset value returns to "0", adjustment is completed.If the main power supply is turned OFF, whileoutputting alarm, motor is driving, coast-to-stopcommand(BX) is ON and this adjustment is started,the inverter becomes “Er7:TUNING ERROR".In this case, start the adjustment after removing theabove-mentioned factor.Set value : 0, 1<strong>TECO</strong>–<strong>Westinghouse</strong> <strong>Motor</strong> <strong>Company</strong> Function Explanation 85
(Gain adjustment)1) Drive the motor in an arbitrary frequency of about10 to 60Hz (However, constant speed) afterexecuting the above-mentioned offset adjustment.(U61:1)At this time, gain adjustment is available unrelatedto the load state.2) When the data of U61 is changed to "2", and theFUNC/DATA key is ON, the gain self adjustment isstarted. The display of “storing" of the keypadpanel disappears several seconds to 30 secondslater. When the set value returns to "0", adjustmentis completed.If inverter is not operated, this adjustment is notavailable.U89<strong>Motor</strong> overload memory retention◆This is <strong>Motor</strong> overload memory (Electrical thermal O/Lrelay) retention selection at power up.U 8 9 U S E R 8 9Setting range: 0, 1Set value01OperationInactiveWhen power up the drive, <strong>Motor</strong>Overload data is reset.Active.When power is down, the drive stores<strong>Motor</strong> overload data and uses this dataat next power up.<strong>TECO</strong>–<strong>Westinghouse</strong> <strong>Motor</strong> <strong>Company</strong> Function Explanation 86
<strong>EQ5</strong> AC Drive <strong>Operations</strong> <strong>Manual</strong>6. Alarm Codes, Causes and TroubleshootingThe drive’s built-in protective features protect the drive against operation outside its design limits.6-1 Alarm Codes and CausesUpon activation of an Alarm, the LED display shows the alarm code and the motor coasts to a stop.A list of alarm codes and causes are shown in the following table.Table 6-6-1 List of Alarms and CausesAlarm NameOver currentKeypad panel displayLED LCDOC1OC2OC3OC DURING ACCOC DURING DECOC AT SET SPDGround fault EF GROUND FAULTOvervoltageOU1OU2OU3OV DURING ACCOV DURING DECOV AT SET SPDUndervoltage LU UNDERVOLTAGEInput openphaseLinPHASE LOSSDuringaccelerationDuringdecelerationRunning atconstantspeedContents of operationAlarm activates when one of followingconditions occur:• Inverter output current momentarilyexceeds the specified over-currentdetection level.• Short-circuit or ground fault in the outputcircuit occurs.Note: Ground Fault for inverters 40HP/CT,50HP/VT and above is covered by aseparate ground fault protection function(EF).Alarm activates when the following condition occurs:• Ground fault in the in the inverter output circuit isdetected.It is recommended to install a separate ground-fault / groundleakage protection relay to protect against personal injury orproperty damage.Note: For drives 30HP/CT, 40HP/VT and below GroundFault Detection is covered by the over-current protectionfunction.DuringaccelerationDuringdecelerationRunning atconstantspeedAlarm activates when the following conditionoccurs:• The DC link circuit voltage of the maincircuit exceeds the overvoltage detectionlevel (230V series: 400V DC, 460Vseries: 800V DC) due to an increase inthe regenerating current from the motor.Note: No protection is provided for a highvoltage inadvertently applied to the inverterthat exceeds the maximum overvoltage level(e.g. high voltage line.Alarm activates when the following condition occurs:• The DC link voltage of the main circuit falls below theundervoltage detection level (230V series: 400V DC,460V series: 800V DC) due to a low supply voltage.Note: The undervoltage alarm is not displayed / activatedwhen parameter F14 (Restart after momentary power failure)is selected or if the supply voltage falls below the level tomaintain control power.Alarm activates when the following condition occurs:• One of the input phases is lost (L1/R, L2/S, L3/T).Note: Loss of an input phase may damage rectifying diodesand / or bus capacitors.Cont._______________________________________________________________________<strong>TECO</strong> – <strong>Westinghouse</strong> <strong>Motor</strong> <strong>Company</strong> Alarm Codes & Causes 87
Overheating ofheatsinkOH1FIN OVERHEATExternal alarm OH2 EXT ALARMInverter internaloverheatingOverheating ofbraking resistor<strong>Motor</strong> 1overload<strong>Motor</strong> 2overloadInverteroverloadOH3dbHOL1OL2OLUHIGH AMB TEMPDBR OVERHEATMOTOR1 OLMOTOR2 OLINVERTER OLBlown fuse FUS DC FUSE OPENMemory error Er1 MEMORY ERRORDigital OperatorcommunicationerrorEr2KEYPD COM ERRCPU error Er3 CPU ERROROption errorEr4Er5OPTN COM ERROPTION ERROR<strong>EQ5</strong> AC Drive <strong>Operations</strong> <strong>Manual</strong>Alarm activates when the following condition occurs:• Temperature of the heatsink rises above the maximumallowed heatsink temperature due to a cooling fan failure.• Temperature falls below the minimum allowed heatsinktemperature.Alarm activates when one of following conditions occur:• Control Circuit Terminal: THR input is closed (see userconnection).• PTC Thermal Protection is enabled (H26 = 1) andtemperature level is reached.Alarm activates when one of following conditions occur:• Temperature inside the inverter rises above themaximum allowed temperature. (E.g. due to poorventilation)Current draw of terminal 13 exceeds 20mA (e.g. due to ashort circuit condition.)Alarm activates when the following condition occurs:Electronic thermal O/L relay is enabled (Parameter F13) andthe external braking resistor is overheating.Alarm activates when the following condition occurs:Electronic thermal O/L relay 1 is enabled (Parameter F10)and the motor current exceeds the motor rated current level.If the second motor current exceeds the preset level whenthe operation is switched to drive the second motor, theprotective function is activated, provided that electronicthermal O/L relay 2 of function code A04 is selected.If the output current exceeds the rated overload current, theprotective function is activated to provide thermal protectionagainst semiconductor element overheating in the invertermain circuit.If the fuse in the inverter is blown out following a short-circuitor damage to the internal circuit, the protective function isactivated (for 40HP/CT, 50HP/VT or more only).If a memory error occurs, such as missing or invalid data, theprotective function is activated.If a communication error or interrupt between the Digitaloperator and control circuit is detected, the protectivefunction is activated.If an CPU error occurs due to noise, etc., the protectivefunction is activated.Error when using an optional unitForced stop Er6 OPR PROCD ERR Error when using the forced stop commandOutput wiringerrorRS-485communicationerrorEr7Er8TUNING ERRORRS-485 COM ERRIf there is an open circuit or a connection error in the inverteroutput wiring during auto-tuning, the protective function isactivated.If an error occurs when using RS-485 communications, theprotective function is activated._______________________________________________________________________<strong>TECO</strong> – <strong>Westinghouse</strong> <strong>Motor</strong> <strong>Company</strong> Alarm Codes & Causes con’t 88
<strong>EQ5</strong> AC Drive <strong>Operations</strong> <strong>Manual</strong>DANGERIf an alarm reset is activated when the operating signalis ON, the inverter can restart suddenly, which may bedangerous. To ensure safety to personnel, disable theoperating signal before resetting the alarm.NOTES_______________________________________________________________________<strong>TECO</strong> – <strong>Westinghouse</strong> <strong>Motor</strong> <strong>Company</strong> Alarm Resetting 89
<strong>EQ5</strong> AC Drive <strong>Operations</strong> <strong>Manual</strong>6-3.Trouble shooting6-3-1 Protective function activation(1) OvercurrentOvercurrentduring accelerationOC1Overcurrentduring decelerationOC2Overcurrentrunning at constant speedOC3Remove the short-circuitand ground fault.YESAre the motor connecting terminals (U, V, W) short-circuited or grounded?NONONOReduce the load or increasethe inverter capacity.YESIs the load excessive?NONONOCan the torque boostamount be reduced?NOIs the torque boostcorrect?YESYESReduce the torque boost.NOIs the acceleration timesetting too shortcompared with the load?Faulty inverter or errordue to noise.Consult with TWMC.Prolong time settings.YESYESNONOCan the acceleration timesetting be prolonged?YESIs the deceleration timesetting too short comparedwith the load?YESNOCan the deceleration timesetting be prolonged?NOHas the load changedsuddenly?YESReduce the load or increasethe inverter capacity.The braking methodrequires inspection.Contact TWMC.Reduce the load or increasethe inverter capacity.(2) Ground faultRemove the grounded part.YESGround faultEFIs a part in the inverter outputcircuit (cable, motor) grounded?NOFaulty inverter or error due to noise.Contact TWMC.Note: The ground fault protective function is only available for inverters rated 40HP/CT,50HP/VT and above.(3) Fuse brownFuse blownFUSPossible short-circuitwithin the inverter.Contact TWMC.______________________________________________________________________<strong>TECO</strong> – <strong>Westinghouse</strong> <strong>Motor</strong> <strong>Company</strong> Trouble Shooting Chart 90
(4) Overvoltage<strong>EQ5</strong> AC Drive <strong>Operations</strong> <strong>Manual</strong>Overvoltageduring accelerationOU1Overvoltageduring decelerationOU2Overvoltagerunning at constant speedOU3Reduce the supply voltageto less than the specifiedupper limit.NOIs the power supply voltage within the specified value?YES YES YESIs start mode(H09) activated and its start-mode?NONOIs restart mode after momentary power failure oroperation switching between line and inverter?NONOYESNOYESNOCheck the motor and /orthe terminal(U, V, W)is shorted or ground fault.Restart time(H13) isset longer.NONONONODoes OU alarm activatewhen accelerationis completed?YESCan the accelerationtime be prolonged?NONOYESCan the deceleration time be prolonged?NOYESProlong.Reduce.YESDoes OU activated when the load is suddenly removed? YES Consider usingNOFaulty inverteror error due to noise.Contact TWMC.Does the main circuit DC link circuitvoltage exceed the protection level?YES YES YESNOCan the moment of load inertia be reduced?NONOIs the braking device or DC brake function in use?YESYESYESNOa braking systemor DC brake function.Inspect the braking method. Contact TWMC.(5) Low voltageLow voltageLUNOHas a (momentary) powerfailure occurred?NOFaulty parts or looseconnection in thepower circuit?YESReset and restartoperation.YES Replace the faulty partand repair the connection.Faulty of inverter controlcircuit or error dueto noise, etc.Contact TWMC.YESIs the power supplyvoltage within thespecified value?NOYESIs there a load requiringa large starting currentwithin the same powerdistribution group?YESNODoes LU activate whenthe circuit breaker ormagnetic contactor isswitched on?YESNOIs the main circuit DC voltage(between P-N) higher thanthe detection level specifiedin Section 6.1.1?NOModify power distribution systemto satisfy the specified value.Is power transformercapacity adequate?YESThe inverter may be faulty.Contact TWMC._______________________________________________________________________<strong>TECO</strong> – <strong>Westinghouse</strong> <strong>Motor</strong> <strong>Company</strong> Trouble Shooting Chart 91
<strong>EQ5</strong> AC Drive <strong>Operations</strong> <strong>Manual</strong>(6) Overtemperature at inside airand (6) overheating Overtemperature heatsink.inside airand overheating at heatsink.Overtemperature at inside airOH3Overtemperatureat inside air OH3Is between the controlterminals 13-11 closed?NOCheck the temperature ofthe heatsink using the alarminformation displayedon the keypad panel.Check the temperature ofthe heatsink using the alarminformation displayedon the keypad panel.Check the keypad paneldisplay.Display limit or not?Does the heatsinktemperature indicateNO-10Ž or lower?NO30HP or less: 20 degrees C.Is the peripheraltemperature of the(8) Inverter unit overload and motor overloadInverter unitoverload OLUIs the coolingfan rotating?YESIs the cooling airpassage blocked?NOYESinverter –10 degrees C NO YESIs or less the ? load excessive?YES NOIs the loadNOIs the coolingfan rotating?YESIs the cooling fan for mixinginside air rotating?(40HP/CT, 50HP/VT or more)Is the ambienttemperature withinthe NO specification?NOArrange peripheralconditions to meetthe specification.Overheatingat heatsink OH1YESNONONOYES<strong>Motor</strong> overloadOL1, OL2YESReduce the load.Replace the cooling fan.Remove obstacles.NOYES (30HP/CT, 40HP/VTFaulty detectionFaulty detectionor less)circuit on PCB.circuit on PCB.Contact TWMC Contact TWMC.YES (30HP/CT, 40HP/VT or less)Is the cooling airYESYESRemove obstacles.passage blocked?Is the ambienttemperature withinthe specification ?YESArrange peripheralconditions to meet thespecification.YESYESOverheating atheatsink OH1Is between the controlterminals 13-11 closed?NORemove the short circuit.Is the cooling fanfor mixing inside airrotating? (40HP/CT,50HP/VT or more)Make peripheraltemperature of theinverter to meetthe specification.Reduce the load.Replace the coolingfan.Replace the coolingfan for mixing insideair.Faulty inverter or errordue to noise, etc.Contact TWMC.Faulty inverter or errordue to noise, etc.Contract TWMC.(7) External thermal relay trippedExternal thermal relay trippedOH2NOIs PTC MODEH26 enabled?YESIs PTC operating?NOIs PTC levelH27 set correctly?YESIs the external circuit(including constants)regular?YESFaulty inverter or errordue to noise, etc.Contact TWMC.YESNONOIs data input tothe control terminalsTHR-X1 to X9?Are alarm signals fromNOexternal equipmentinput to the terminalsand the CM?YESIs the alarm functionof the externalequipment operatingcorrectly?YESNOIncorrect motor load orinadequate cooling.Check the motor side.Set to correctvalue.Change to regularexternal circuit.Connect the alarmsignal contact.Remove the causeof alarm functionactivation.Do the characteristicsof the electronic thermalO/L relay and motoroverload match?NOConnect a thermalO/L relay externally.Faulty inverter or errordue to noise, etc.Contact TWMC.YESIs the electronic thermalO/L relay setting correct?YESIs the load excessive?YESNONOSet to the correct levelFaulty inverter or errordue to noise, etc.Contact TWMC.Reduce the load orincrease invertercapacity_______________________________________________________________________<strong>TECO</strong> – <strong>Westinghouse</strong> <strong>Motor</strong> <strong>Company</strong> Trouble Shooting Chart 92
(9) Memory error Er1,Keypad panel communication error Er2,CPU(9) Memory error Er1,Keypad panel communication error Er2,error CPU Er3 error Er3<strong>EQ5</strong> AC Drive <strong>Operations</strong> <strong>Manual</strong>(10) Output wiring error(10) Output wiring errorEr1,2,3 indicated. Abnormaldisplay or indication goes out.Output wiringerror Er7Are the braking unit andbraking resistor connectedincorrectly?YESConnectcorrectlythe cable.Turn the power off then onagain after the CHARGE lamp(CRG) goes off.Is disappeared anerror code onthe LED monitor?NOYESIs Er1 displayed?YESIs the auxiliarycontrol power inputterminal used?YESNONOThe trouble part isimprovement.YESIs there noisesource around?NOYESYESIs Er7 displayed?NODid the error occurduring tuning?NOAre the braking unit andbraking resistor connectedincorrectly?NOFaulty inverter or errordue to noise, etc.Contact TWMC.YESConnectcorrectlyor replacethe cable.NOIs the wiring of CNRXTX(RED)correct on the power PCB?(When DC power supply, connect it to the YESR0-T0 side and AC power input isconnected to the auxilialy powerinput terminal.)NOFaulty inverter or errordue to noise, etc.Contact TWMC.Connectcorrectlythe cable.(11) Input phase lossNOYESIs it possible toreset the alarm afterthe initialize by H03?YESInverter is normal.Continue operation.Input phase lossLinIs the inverter ROM No.S09000 or more?YESIs the setting value ofinput phase loss protection(U48) is correct?YESAre all main circuit powersupply terminals L1/R, L2/Sand L3/T connected tothe power supply?YESDid the power offwhen the function datawas writing?NONONONOSet it correct value.Connect allthree phases.Inverter may be faulty.Contact TWMC.Is Is The the U,V,W W terminalwiringterminalnotwiringconnectednotconnected or is thereor is an there open an circuit? open circuit?NOIs the keypad panelconnector loose?NOIs the coast-to-stopsignal(BX) ON?YESYESIs it overcurrent limiting limitingbecause of small value value of of YESaccelaration/decelerationacceleration/decelerationtime time(F07/F08)?NONOFaulty inverter orerror due to noise, etc.Contact TWMC.YESConnectcorrectlyor replacethe cable.Securethe connector.Is the operation signalIs theOFFoperationduring autotuning?during auto-tuing?until finishing the auto tuning.signal OFF YES Do not operation signal OFFNOAcceleration/Decelerationtime is longer.It is OFF.Are there loose screwson the terminal block?NOYESTightenen the screwson the terminal block.Is there a significantimbalance voltagebetween phases?NOYESThe power supply is incorrect.The inspection of the power supplyis needed including the wiring.Faulty inverter or errordue to noise, etc.Contact TWMC.(12) Charging circuit errorCharging circuit errorEr7Is circuit power supply terminalsIs circuitL1/R,L2/SpowerandsupplyL3/TterminalssuppliedL1/R,theL2/Sand power L3/T voltage? supplied the power voltage?YESNOInput the voltage.Faulty inverter or errordue to noise, etc.Contact TWMC._______________________________________________________________________<strong>TECO</strong> – <strong>Westinghouse</strong> <strong>Motor</strong> <strong>Company</strong> Trouble Shooting Chart 93
<strong>EQ5</strong> AC Drive <strong>Operations</strong> <strong>Manual</strong>6-4 Abnormal motor rotation(1) If motor does not rotate<strong>Motor</strong> does not rotate.Remove the cause ofalarm function activationand reset the alarm,then run the motor.YESCharge lamp (CRG)lights and LCD monitorlights up?YESIs the LCD monitordisplaying an alarmmode screen?NONOAre the circuit breaker andNOmagnetic contactor on thepower supply side switched on?YESAre the voltageson the power terminals(R/L1, S/L2, T/L3) normal?YESNOTurn on.Check for problems(low voltage,an open-phase,a loose connection,poor contact) andremedy accordingly.If no error is detected,continue operation.KeypadpanelIs operation methodthe keypad panel orcontrol terminal input?ControlterminalsIs a jumper or DC reactorconnected betweenterminals P1 and P(+)?YESNOConnect.Inverter may be faulty.Contact TWMC.YESDoes the motor runif FWD or REV ispressed?NONOWas the forward orreverse operationcommand given?YESYESNOAre external wiring betweencontrol between circuit control terminals circuitFWD, terminals REV FWD, -CM REVconnectedCM connected correctly?NOYESReplace the faultyswitch or relay.Press the ∧key and setthe frequency.YESDoes the motor startwhen the ∧ keyis pressed?NOSet the frequencycorrectly.Faulty motorNOYESHas the frequencybeen set?YESNOYESNOAre the frequency limiter(High) and the frequencysetting lower thanthe starting frequency?Are the inverter outputNOterminals (U,V,W) providedwith the proper voltage?YESIs the external wiringbetween control terminals13, 12, 11, C1and V2 orbetween X1-X9 andCM for the multistepfrequency selectionconnected correctly?YESInverter may be faulty.Contact TWMC.NOCorrect the wiring error.Replace the faultyfrequency Replace the setting faulty POT (VR),signal frequency converter, setting switch, POT (VR)or , signal relay contacts converter, as required. switch,or relay contacts as required.NOExcessive load?YESYESAre the cables tothe motor connectedcorrectly?NOCorrect the wiring error.Is the torque boostset correctly?NOYESThe load is excessive,resulting in motor lock.Reduce the load and checkthat the brake is released(if a mechanical brake is used).Note: Monitor the operationcommand or frequency settingvalues, etc., on the LED or LCDmonitor after selectingthe respective functions.Raise the torque boost.The motor does not rotate if the following commands are issued.An operation command is issued while the coast-to-stop or DC braking command is outputA reverse operation command is issued with the “H08 Rev. phase sequence lock” value set to 1._______________________________________________________________________<strong>TECO</strong> – <strong>Westinghouse</strong> <strong>Motor</strong> <strong>Company</strong> Trouble Shooting Chart 94
<strong>EQ5</strong> AC Drive <strong>Operations</strong> <strong>Manual</strong>(2) If the motor rotates but the speed does not changeThe motor rotates butthe speed does not change.Is the maximumfrequencysetting too low?NOYESIncrease the setting.Change the setting.YESIs the higher or lowerfrequency limiteractivating?NOKeypad paneloperationSet the frequency.YESDoes the speed changewhen the ∧ or∨ key is pressed?NOYESYESPatternYESoperationIs the timertiming too long?NOIs the patternoperation complete?NOAre all accelerationand decelerationtimes identical?NOWhich frequency settingmethodis used: keypadpanel, analog signal,multistep frequency,or UP/DOWN control?Is the pattern operationactivated?Multistep frequencyUP/DOWNAre the externalconnections betweenX1-X9 and CM correct?YESNOAnalog signalCorrect theconnection error.Can the frequencysetting signal (0 to+/-10V / 4 to 20 mA)be changed?NONOYESAre the externalconnectionsbetween controlterminals 13, 12, 12,11 11,,V2 and C1 correct?YESAre the frequenciesfor each multistepfrequency different?YESNOChange thefrequency setting.Replace the faultyfrequency settingPOT (VR) or signalconverter as required.Faulty inverter or errordue to noise, etc.Contact TWMC.NOIs the accelerationor deceleration timeset too long?YESChange the time settingto conform to load values.In the following cases, changing the motor speed is also restricted:Signals are input from control terminals both 12 and C1 when “F01 Frequency command 1”and “C30Frequency command 2” are set to 3, and there is no significant change in the added valueThe load is excessive, and the torque limiting and current limiting functions are activated_______________________________________________________________________<strong>TECO</strong> – <strong>Westinghouse</strong> <strong>Motor</strong> <strong>Company</strong> Trouble Shooting Chart 95
<strong>EQ5</strong> AC Drive <strong>Operations</strong> <strong>Manual</strong>(3) If the motor stalls during accelerationThe motor stallsduring acceleration.Is the accelerationtime too short?YESProlong the time.NOIs the inertia momentof the motor orthe load excessive?NOYESIs a special motor used?YESNOContact TWMC.Use a thicker cablebetween the inverterand the motor orshorten the cable length.YESHas the motor terminalvoltage dropped?NOReduce the inertia momentof the load or increasethe inverter capacity.Reduce the torque ofthe load or increasethe inverter capacity.YESIs the torque ofthe load excessive?NOIs the torque boostset correctly?NOYESFaulty inverter or errordue to noise, etc.Contact TWMC.Increase the torque boost.(4) If the motor generates abnormal heatThe motor generatesabnormal heat.Is the torque YESboost excessive?NOReduce the torque boost.Has the motor beenoperated continuouslyat a very low speed?NOYESUse a motor exclusiveto the inverter.Is the load excessive?NOYESReduce the load orincrease motor capacity.Is the inverter outputvoltage (at terminalsU, V, W) balanced?NOYESFaulty motorFaulty inverter or errordue to noise, etc.Contact TWMC.Note: <strong>Motor</strong> overheating following a higher frequencysetting is likely the result of current waveform.Contact TWMC._______________________________________________________________________<strong>TECO</strong> – <strong>Westinghouse</strong> <strong>Motor</strong> <strong>Company</strong> Trouble Shooting Chart 96
7. Maintenance and InspectionIt is recommended that daily and periodic inspections be carried out to insure trouble-free operationand long-term reliability. The following are recommendations for conducting these inspections.7-1 Daily InspectionDuring operation, a visual inspection for abnormal operation can be completed externally withoutremoving the covers.The inspections should cover the following:(1) The performance is as expected and is within specifications.(2) The environment conforms to the drive specifications.(3) The digital operator is functioning normally.(4) There are no abnormal sounds, vibrations, or odors.(5) There are no indications of overheating or discoloration.7-2 Periodic InspectionsPeriodic inspections are carried out after stopping drive operations, disconnecting the power source,and removing the protective cover(s).• Because the large capacitors in the main DC circuit retain lethal voltage levels after poweris disconnected and take time to discharge, wait at least five minutes after turning off thepower supply for inverter rated at 30HP/CT, 40HP/VT or less, and ten minutes for inverterrated at 40HP/CT, 50HP/VT or more. (Check that the charge lamp (CRG) is off, and thatthe voltage is 25V DC or less between terminals P(+) and N(-). Otherwise, electric shockDANGER or injury may result.• Only authorized personnel should carry out maintenance and component replacementoperations. (Remove metal jewelry such as watches and rings and use insulated tools.)• Never modify the inverter. Otherwise, electric shock or injury may result.Table 7-2-1 Periodic Inspection ListArea to Check Items to Check How to Inspect Evaluation CriteriaEnvironmentDigital operatorStructure(frame & cover)Main circuitCommonConductor andwire1) Check the ambient temperature, humidity,Vibration and atmosphere (dust, gas, oil mist,water drops).2) Is the area surrounding the equipment free offoreign objects?1) Is the display hard to read?2) Are the characters complete?1) Is there abnormal sounds or vibration?2) Are fasteners loose?3) Is there deformation or damage?4) Is there discoloration as a result ofoverheating?5) Are there stains or accumulated dust?1) Are there loose or missing fasteners?2) Is there deformation, cracks, damage, anddiscoloration due to overheating ordeterioration in the equipment and insulation?3) Are there stains and accumulated dust?1) Is there discoloration or distortion of aconductor(s) due to overheating?2) Are there cracks, crazing or discoloration ofthe cable sheath?1) Conduct visualinspection and usethe appropriateequipment.2) Visual inspection.1) Visual inspection.2) Visual inspection.1) Visual and auralInspection.2) Tighten.3) Visual inspection.4) “5) “1) Tighten.2) Visual inspection.3) “1) Visual inspection.2) “1)Results complywith specifications.2) The area is clear.1) The display can beread.2) Characters arecomplete.1) No abnormalities2) “3) “4) “5) “1) No abnormalities2) No abnormalitiesNote: Discolorationof the bus bar does3) not indicate aproblem.1) No abnormalities2) “Cont._______________________________________________________________________<strong>TECO</strong> – <strong>Westinghouse</strong> <strong>Motor</strong> <strong>Company</strong> Maintenance & Inspection 97
Main circuitControl circuitCooling systemTerminal block Is there damage? Visual inspection No abnormalities1) Is there electrolyte leakage, discoloration, 1) Visual inspection 1) No abnormalitiescrazing, or swelling of the case?2) Is the safety valve not protruding or are 2) Visual inspection 2) “valves protruding too far?3) Measure the capacitance if necessary.Main DCCapacitor(s)ResistorTransformerand reactorMagneticcontactor andrelayControl PCboard andconnectorCooling fan1) Is there unusual odor or damage to theinsulation by overheating?2) Is there an open circuit?Is there abnormal buzzing or an abnormalodor?1) Is there chattering during operation?2) Are the contacts pitted or burnt?1) Are there any loose screws or connectors?2) Is there an unusual odor or discoloration?3) Are there cracks, damage, deformation, orrust?4) Is there electrolyte leakage or damage toany of the capacitors?1) Is there any abnormal sound or vibration?2) Are any fasteners loose?3) Is there discoloration due to overheating?Is there foreign matter on the heat sink or intakeVentilationand exhaust ports?Note: If equipment is stained, wipe with a clean cloth. Vacuum the dust.3) * Estimate lifeexpectancy frommaintenanceinformation and frommeasurements usingcapacitancemeasuringequipment.1) Visual andolfactory inspection.2) Conduct a visualInspection or usea multimeter byopening theconnection on oneside.Auditory, olfactory,andvisual inspection1) Auditory inspection2) Visual inspection1) Tighten.2) Visual and olfactoryinspection3) Visual inspection4) * Estimate lifeexpectancy by visualinspection andmaintenanceinformation.1) Auditory and visualinspection.2) Tighten.3) Visual inspection4) * Estimate lifeexpectancy bymaintenanceinformationVisual inspection3) Capacitance ≧initial value x 0.851) No abnormalities2) Less than ±10% ofthe indicatedresistance value.No abnormalities1) No abnormalities2) “1) No abnormalities2) “3) “4) “1) The fan mustrotate smoothly.2) No abnormalities3) “No abnormalities* The maintenance information is stored in the inverter digital operator and indicates the electrostaticcapacitance of the main DC circuit capacitors and the life expectancy of the electrolytic capacitors on thecontrol PC board and of the cooling fans. Use this data as the basis to estimate the life expectancy ofparts._______________________________________________________________________<strong>TECO</strong> – <strong>Westinghouse</strong> <strong>Motor</strong> <strong>Company</strong> Maintenance & Inspection 98
1) Determination of the capacitance of the main circuit capacitors.This inverter is equipped with a function to automatically indicate the capacitance of the capacitors inthe main DC circuit when powering up the drive after disconnecting the power according to theprescribed conditions.The initial capacitance values are set in the inverter when shipped from the factory, and the decreaseratio (%) to those values can be displayed.Use the procedure as next described.(a) Remove any option cards from the inverter. Also disconnect the DC bus connections to the main circuitP(+) and N(-) terminals from the braking unit or other inverters if connected. The existing power-factorcorrecting reactor (DC reactor) does not need to be disconnected.A power supply connected to the auxiliary input terminals (R0, T0) that provides control power should beisolated.(b) Disable all the digital inputs (FWD, REV, X1-X9) on the control terminals. Also disconnect RS485serial communication if used.Turn on the main power supply. Confirm that the cooling fan is rotating and that the inverter is notoperating. (There is no problem if the "OH2 External thermal relay tripped" trip function is activated due tothe digital input terminals being disabled.)(c) Turn the main power off.(d) Turn on the main power again after verifying that the charge lamp is completely off.(e) Open the maintenance information on the digital operator and confirm the capacitance values of thecapacitors.2) Life expectancy of the control PC board.The actual capacitance of a capacitors is not measured in this case. However, the integrated operatinghours of the control power supply multiplied by the life expectancy coefficient defined by thetemperature inside the inverter will be displayed. Hence, the hours displayed may not agree with theactual operating hours depending on the operational environment.Since the integrated hours are counted by unit hours, power input for less than one hour will bedisregarded.3) Life expectancy of cooling fan.The integrated operating hours of the cooling fan are displayed. Since the integrated hours arecounted by unit hours, power input for less than one hour will be disregarded.The displayed value should be considered as a rough estimate because the actual life of a cooling fanis influenced significantly by the temperature.Table 7-2-2 Estimate of Life Expectancy Using Maintenance InformationPartsLevel of JudgmentCapacitor in main DC circuit85% or less of the initial valueElectrolytic capacitor oncontrol PC board61,000 hoursCooling fan40,000 hours (5HP or less), 25,000 hours (Over 7.5HP/CT,10HP/CT) (*1)*1 Estimated life expectancy of the cooling fan at inverter ambient temperature of 40°C (104°F)_______________________________________________________________________<strong>TECO</strong> – <strong>Westinghouse</strong> <strong>Motor</strong> <strong>Company</strong> Caps, Control Board & Cooling Fan Life Expectancy 99
Inspection Notes and RecordsDATEITEM_______________________________________________________________________________________________________________________________________________________<strong>TECO</strong> – <strong>Westinghouse</strong> <strong>Motor</strong> <strong>Company</strong> Inspection Notes & Records 100
<strong>EQ5</strong> AC Drive <strong>Operations</strong> <strong>Manual</strong>7-3 Main Circuit Voltage, Current, and Power Measurements.When making main circuit voltage and current measurements, the resulting values depend on the typeof meter used due to the harmonic component included in the voltage and current of the main circuitpower (input) and the output (motor) side of the inverter. When measuring with a meter forcommercial power frequency, use the meters shown in Table 7-3-1.The power-factor cannot be measured directly using power-factor meters commercially available atpresent on the market, which measure the phase difference between voltage and current. Whenpower-factors must be measured, measure the power, voltage, and current on both the input side andoutput side, then calculate the power-factor using the following formula:P o w e r[W]P o w e r − f a c t o r =× 10 0[%]3 × V o l t a g e[V]× C u r r e n t[A]Table 7-3-1 Meters Used for measuring Main Circuit ValuesInput (power supply) SideOutput (motor) SideVoltage Current* Voltage CurrentDC LinkCircuitVoltage(P(+) - N(-))ItemMeternameMetertypeAmmeterA R,S,TMovingirontypeVoltmeterV R,S,TRectifieror movingirontypePowermeterW R,S,TDigital powermeterAmmeterA U,V,WMovingirontypeVoltmeterV U,V,WRectifiertypePowermeterW U,V,WDigital powermeterDC voltmeterVMoving-coiltypeSymbolNote: When measuring the output voltage using a rectifier type meter, an error may occur.Use a digital AC power meter to ensure accuracy.Meter Placement Diagram_______________________________________________________________________<strong>TECO</strong> – <strong>Westinghouse</strong> <strong>Motor</strong> <strong>Company</strong> Main Circuit Voltage, Current & Power Measurements 101
<strong>EQ5</strong> AC Drive <strong>Operations</strong> <strong>Manual</strong>7- 4 Insulation TestIt is not necessary to do an insulation test on the inverter as this was completed at the factory. If aninsulation test with a megger test must be completed, then proceed as described below as anincorrect testing method may result in product damage.If a dielectric strength test must be completed, the specifications for the test must be followed asImproper testing may result in damage to the inverter. Please contact your local distributor or nearestTWMC sales office for further guidance.(1) Megger test for the main power circuit.a - Use a 500V DC type megger and isolate the main power before commencing measurement.b - If the test voltage is connected to the control circuit, remove all connection cables to the controlcircuit.c - Connect the main circuit terminals together using common cables as shown in Fig. 7-4-1.d - Perform the megger test only between the common cables connected to the main circuit and theground (terminal G).e - A megger indicating a reading of 5MΩ or more is normal. (This is the value measured with onlythe inverter connected.)Fig. 7-4-1 Main Circuit Insulation Test(2) Insulation test in the control circuit.A megger test and a dielectric strength test must not be performed on the control circuit or damagewill result. To test the control circuit, use a high resistance range multimeter and proceed as follows.a - Remove all external cables from the control circuit terminals.b - Conduct a continuity test between the isolated control circuit grounds. A result of 1MΩ or more isnormal.(3) Exterior main circuit and sequence control circuit.Remove all cables from inverter terminals to ensure the test voltage is not applied to the inverter.7-5 Parts ReplacementThe life expectancy of a part depends on the type of part, the environment, and usageconditions. Parts should be replaced as shown in Table 7-5-1 Parts Replacement.Table 7-5-1 Parts ReplacementPart NameStandard Period forReplacementCommentsCooling fan 3 years Exchange for a new part.Smoothing capacitor 5 yearsExchange for a new part (determineafter checking).Electrolytic capacitorExchange for a new PC board7 yearson the PC board(determine after checking).Fuse 10 years Exchange for a new part.Other parts - Determine after checking.______________________________________________________________________<strong>TECO</strong> – <strong>Westinghouse</strong> <strong>Motor</strong> <strong>Company</strong> Insulation Testing &Parts Replacement 102
<strong>EQ5</strong> AC Drive <strong>Operations</strong> <strong>Manual</strong>7-6 Inquiries About Damaged ProductsIf there is damage, a fault in the product, or questions concerning the product, contact your localdistributor or nearest TWMC sales office with the following information:a - Inverter type (Model No.)b - Serial No. (equipment serial number)c - Purchase dated - Problem details (e.g., damaged part, extent of damage, questions, status of fault)7-7 WarrantyAll Low Voltage <strong>Motor</strong> Control Products, such as Solid State Starters and Inverters, (“products”) sold by<strong>TECO</strong>-<strong>Westinghouse</strong> <strong>Motor</strong>s <strong>Company</strong> (“TWMC”), are warranted to be free from defects in material andworkmanship for a period of 36` months from the date of shipment. A warranty of 36 months from the date ofmanufacture is applicable when a TWMC Low Voltage <strong>Motor</strong> Control Product and a TWMC Inverter Dutymotor (per NEMA MG1-31.4.2.2) are purchased together.This warranty is conditioned upon the installation, operation, and maintenance of the products in accordancewith TWMC’s recommendations or standard industry practice, and that the products have at all times beenoperated or used under the normal operating conditions for which they were designed. This warranty will notbe applicable to products that have been altered without prior written permission from TWMC.TWMC shall, at its sole option and expense, repair or replace, F.O.B. warehouse or TWMC designated servicecenter, any such products, which are defective within the warranty period. In the event of warranty claims,TWMC must be notified promptly following any product failure. The product shall be sent to a TWMCauthorized service center for diagnosis of the cause of failure. TWMC will not be responsible for any repair thathas been performed without prior written permission from TWMC.The repair or replacement of defective material and workmanship shall constitute complete fulfillment ofTWMC’s warranty liability, whether the warranty claims are based on contract, tort (including negligence andstrict liability), or otherwise. THERE ARE NO OTHER WARRANTIES, EXPRESS OR IMPLIED, INCLUDINGANY IMPLIED WARRANTY OF MERCHANTABILITY AND FITNESS FOR A PARTICULAR PURPOSE,AND ALL WARRANTIES ARISING FROM COURSE OF DEALING AND USAGE OF TRADE. UNDER NOCIRCUMSTANCES, SHALL TWMC BE LIABLE FOR ANY SPECIAL, INDIRECT, INCIDENTAL ORCONSEQUENTIAL DAMAGES, INCLUDING FREIGHT.Warranty Return ProcedureThe Product must be returned prepaid to <strong>TECO</strong>-<strong>Westinghouse</strong> <strong>Motor</strong> <strong>Company</strong> factory. A completed ReturnMaterial Authorization (RMA) form with an assigned RMA number must be included in the shipment. Contactthe nearest <strong>TECO</strong>-<strong>Westinghouse</strong> location or Factory directly for RMA forms.NOTES________________________________________________________________________<strong>TECO</strong> – <strong>Westinghouse</strong> <strong>Motor</strong> <strong>Company</strong> Damaged Product Inquiries & Warranty 103
<strong>EQ5</strong> AC Drive <strong>Operations</strong> <strong>Manual</strong>8. Specifications8-1 Standard Specifications<strong>EQ5</strong> CT (Constant Torque) – 230V SeriesType NEMA 1 OPEN CHASSISApplied <strong>Motor</strong>Nominal (HP)Model<strong>EQ5</strong>-2XXX-XXRated outputcapacity [kVA] (*1)Rated outputcurrent [A] (*2)OverloadcapabilityOutputratingsInput ratings0.25 0.5 1 2 3 5 5 7.5 10 15 20 25 30 30 40 50 60 75 100 1250P2-N10P5-N1001-N1002-N1003-N1005-N1007-N1010-N1015-N1020-N1025-N10.6 1.2 2.0 3.2 4.4 6.8 6.8 10 13 18 24 29 35 35 46 58 72 86 113 1381.5 3.0 5.0 8.0 11 17 17 25 33 46 59 74 87 87 115 145 180 215 283 346150% of rated output current for 1 min.200% of rated output current for 0.5 s150% of rated output current for 1 min.180% of rated output current for 0.5 sStarting torque 200% or more (under torque vector control) 180% or more (under torque vector control)Rated outputvoltage [V] (*3)3-phase, 200V/50Hz, 200V,220V,230V/60HzRated outputfrequency [Hz]50,60HzPhases, voltage,frequencyVoltage/frequencyvariationsMomentary voltagedip capability (*6)Required powersupply capacity[kVA] (*7)3-phase, 200 to 230V, 50/60HzVoltage: +10% to -15% (Imbalance rate between phases: 2% or less (*5) , Frequency: +5% to -5%030-N1032-N1040-C050-C060-C075-C100-C3-phase, 200 to 220V, 220 to 230V/50Hz3-phase, 200 to 230V/60HzOperation will continue with 165V or more. If voltage drops below 165V, operation will continue for up to 15 ms.If "Continuous operation" is selected, the output frequency will be lowered to withstand the load until normal voltage is resumed.0.4 0.7 1.3 2.2 3.1 5 5 7.2 9.7 15 20 24 29 29 38 47 56 69 93 111125-C150-C<strong>EQ5</strong> VT (Variable Torque) – 230V SeriesType NEMA 1 OPEN CHASSISApplied <strong>Motor</strong>0.25 0.5 1 2 3 5 7.5 10 15 20 25 30 30 40 50 60 75 100 125 150Nominal (HP)OutputratingsInput ratingsModel<strong>EQ5</strong>-2XXX-XXRated outputcapacity [kVA] (*1)Rated outputcurrent [A] (*2)OverloadcapabilityStarting torqueRated outputvoltage [V] (*3)Rated outputfrequency [Hz]Phases, voltage,frequencyVoltage/frequencyvariationsMomentary voltagedip capability (*6)Required powersupply capacity[kVA] (*7)0P2-N10P5-N1001-N1002-N1003-N1005-N1007-N1010-N1015-N1020-N1025-N10.6 1.2 2.0 3.2 4.4 6.8 8.8 12 17 22 27 31 35 46 58 72 86 113 138 1651.5 3.0 5.0 8.0 11 17 22 29 42 55 68 80 87 115 145 180 215 283 346 415110% of rated output current for 1 min.3-phase, 200V/50Hz, 200V,220V,230V/60Hz50,60Hz50% or more3-phase, 200 to 230V, 50/60Hz3-phase, 200 to 220V, 220 to 230V/50Hz3-phase, 200 to 230V/60HzVoltage: +10% to -15% (Imbalance rate between phases: 2% or less (*5) , Frequency: +5% to -5%Operation will continue with 165V or more. If voltage drops below 165V, operation will continue for up to 15 ms.If "Continuous operation" is selected, the output frequency will be lowered to withstand the load until normal voltage is resumed.0.4 0.7 1.3 2.2 3.1 5 7.2 9.7 15 20 24 29 29 38 47 56 69 93 111 139030-N1032-N1040-C050-C060-C075-C100-C125-C150-C*See notes 1 - 7 on the next pages._________________________________________________________________________<strong>TECO</strong> – <strong>Westinghouse</strong> <strong>Motor</strong> <strong>Company</strong> Standard Specifications Notes con’t 104
<strong>EQ5</strong> AC Drive <strong>Operations</strong> <strong>Manual</strong>Applied <strong>Motor</strong>Nominal (HP)OutputratingsInput ratings<strong>EQ5</strong> CT (Constant Torque) – 460V SeriesType Nema 1 Open Chassis0.5 1 2 3 5 5 7.5 10 15 20 25 30 30 40 50 60 75 100 125 150 200 250 300 350 350 400 450 500 600Outputratings<strong>EQ5</strong> VT (Variable Torque) – 460V SeriesType0P5 001- 002- 003 005 005 010 015 020 025 030 032 040 050 060 075 100 125 150 200 250 300 350 400 450 500 600 700 800<strong>EQ5</strong>-4XXX-XX -N1 -N1 -N1 -N1 -N1 -N1 -N1 -N1 -N1 -N1 -N1 -N1 -C -C -C -C -C -C -C -C -C -C -C -C -C -C -C -C -CRated capacity[kVA] (*1)1.2 2.0 2.9 4.4 7.2 7.2 10 14 19 24 31 36 36 48 60 73 89 120 140 167 202 242 300 331 331 414 466 518 590Rated outputcurrent [A] (*2)1.5 2.5 3.7 5.5 9 9 13 18 24 30 39 45 45 60 75 91 112 150 176 210 253 304 377 415 415 520 585 650 740Overloadcapability150% of rated output current for 1 min.200% of rated output current for 0.5 s150% of rated output current for 1 min.180% of rated output current for 0.5 sStarting torque 200% or more (under torque vector control) 180% or more (under torque vector control)Rated outputVoltage [V] (*3)3-phase, 380V, 400V, 415V(440V)/50Hz, 380V, 400V, 440V, 460V/60HzRated outputfrequency [Hz]50,60HzPhases, voltage,3-phase, 380 to 440V/50Hz (*5)3-phase,380 to 480V,50/60Hzfrequency3-phase, 380 to 480V/60HzVoltage/frequencyvariationsVoltage: +10% to -15% (Imbalance rate between phases: 2% or less (*5) , Frequency: +5% to -5%Momentary Operation will continue with 310V or more. If voltage drops below 310V, operation will continue for up to 15 ms.voltage dipcapability (*6)If "Continuous operation" is selected, the output frequency will be lowered to withstand the load until normal voltage is resumed.Required powersupply capacity 0.7 1.2 2.2 3.1 5.0 5.0 7.2 9.7 15 20 24 29 29 38 47 57 70 93 111 136 161 196 244 267 267 341 383 433 488[kVA] (*7)Type Nema 1 Open ChassisApplied <strong>Motor</strong>Nominal (HP)0.5 1 2 3 5 7.5 10 15 20 25 30 30 40 50 60 75 100 125 150 200 250 300 350 400 450 500 600 700 800Type0P5 001- 002- 003 005 005 010 015 020 025 030 032 040 050 060 075 100 125 150 200 250 300 350 400 450 500 600 700 800<strong>EQ5</strong>-4XXX-XX -N1 -N1 -N1 -N1 -N1 -N1 -N1 -N1 -N1 -N1 -N1 -N1 -C -C -C -C -C -C -C -C -C -C -C -C -C -C -C -C -CRated capacity[kVA] (*1)1.2 2.0 2.9 4.4 7.2 10 13 18 24 29 35 36 48 60 73 89 120 140 167 202 242 300 331 386 414 518 590 669 765Rated outputcurrent [A] (*2)1.5 2.5 3.7 5.5 9 12.5 16.5 23 30 37 44 45 60 75 91 112 150 176 210 253 304 377 415 485 520 650 740 840 960Overloadcapability110% of rated output current for 1 min.Starting torque50% or moreRated outputvoltage [V] (*3)3-phase, 380V, 400V, 415V(440V)/50Hz, 380V, 400V, 440V, 460V/60HzRated outputfrequency [Hz]50,60HzInput ratingsPhases, voltage,frequencyVoltage/frequencyvariationsMomentaryvoltage dipcapability (*6)Required powerSupply capacity[kVA] (*7)3-phase,380 to 480V,50/60Hz 3-phase, 380 to 440V/50Hz (*4)3-phase, 380 to 480V/60HzVoltage: +10% to -15% (Imbalance rate between phases: 2% or less (*5) , Frequency: +5% to -5%Operation will continue with 310V or more. If voltage drops below 310V, operation will continue for up to 15 ms.If "Continuous operation" is selected, the output frequency will be lowered to withstand the load until normal voltage is resumed.0.7 1.2 2.2 3.1 5.0 7.2 9.7 15 20 24 29 29 38 47 57 70 93 111 136 161 196 244 267 341 383 433 488 549 610(*1) Indicated capacities are at the rated output voltage 230V for the 230V series and 460V for the 460V series. The rated capacity will be lowered if thesupply voltage is lower.(*2) In the case of a low impedance load, such as a high-frequency motor, the current may drop below the rated value.(*3) The output voltage cannot exceed the input supply voltage.Cont._________________________________________________________________________<strong>TECO</strong> – <strong>Westinghouse</strong> <strong>Motor</strong> <strong>Company</strong> Standard Specifications Notes con’t 105
<strong>EQ5</strong> AC Drive <strong>Operations</strong> <strong>Manual</strong>NOTES(*4) The taps within the inverter must be changed for an input power supply rated at 380 to 398V/50 Hz or 380 to 430V/60 Hz.(*5) If the imbalance between phases exceeds 2%, use a power-factor correcting DC reactor (DCR).( Max. Voltage [V] - Min. Voltage [V] )Imbalance rate between phases [%] = x 67[%]3-phase average voltage [V](*6) The test was conducted under the standard load conditions stipulated by the JEMA committee (at the load equivalent to 85% of thenominal applied motor HP).(*7) Indicates the values required when using a power-factor correcting DC reactor (DCR) with a loaded nominal applied motor. (optional for inverters of75HP/CT, 100HP/VT or less)_________________________________________________________________________<strong>TECO</strong> – <strong>Westinghouse</strong> <strong>Motor</strong> <strong>Company</strong> Standard Specifications Notes con’t 106
<strong>EQ5</strong> AC Drive <strong>Operations</strong> <strong>Manual</strong>8-2 Common SpecificationsControlOperationOutput frequencyItemControl methodMaximumfrequencyBase frequencyStartingfrequencyCarrierfrequencyAccuracy(stability)SettingresolutionVoltage/frequencycharacteristicsTorque boostAccelerating/deceleratingtimeDC injection brakingFunction equippedOperation methodFrequency settingExplanationSinusoidal wave PWM control (with V/F control, torque vector control, PG feedback vector control (option))50-120Hz variable setting25-120Hz variable setting0.1 to 60Hz variable setting Holding time: 0.0 to 10.0 s0.75 to 15kHz (30HP/CT, 40HP/VT or less) 0.75 to 10kHz (40 to 100HP/CT, 50 to 125HP/VT) 0.75 to 6kHz (125HP/CT,150HP/VT or more)Analog setting: +/- 0.2% or less of the max. frequency @ (25 (77°F) +/- 10 (50°F))Digital setting: +/- 0.01% or less of the max. frequency @ (-10 (14°F) to +5 (122°F))Analog setting: 1/1000 of max. frequency (30HP/CT, 40HP/VT or less) 1/3000 of max. frequency (40HP/CT, 50HP/VT ormore)Digital setting: 0.01Hz (99.99Hz or less), 0.1Hz (100.0Hz or more)Output voltage at base frequency can be adjusted separately, such as 80 to 240V (230V series) or 320 to 480V (460Vseries).Output voltage at max. frequency can be adjusted separately, such as 80 to 240V (230V series) or 320 to 480V (460Vseries).Auto: Optimum control corresponding to the load torque.<strong>Manual</strong>: 0.1 to 20.0 code setting (energy saving reduced torque, constant torque, high starting torque, etc.)0.01 to 3600sFour accelerating and decelerating time settings are available independent of each other by selecting a combination of digitalinput signals. In addition to linear acceleration and deceleration, either S-shaped acceleration/deceleration (weak/strong) orcurve-linear acceleration/deceleration can be selected.Starting frequency: 0.0 to 60.0Hz, braking time: 0.0 to 30.0s,Braking level: 0-80%Frequency upper and lower limiter, bias frequency, frequency gain, jump frequency, pick-up operation, restart aftermomentary power failure, switching operation from line to inverter, slip compensation control, automatic energy savingoperation, regeneration avoiding control, torque limiting (2-step), PID control, second motor switching, cooling fan ON/OFFcontrol.Keypad panel: Run by FWD , REV keys, stop by STOP key.Terminal input: Forward/stop command, reverse/stop command, coast-to-stop command, alarm reset,acceleration/deceleration selection, multistep frequency selection, etc.Keypad panel: Setting by ∧,∨ keys.External potentiometer: POT (VR) (1 to 5kΩ)Analog input: 0 to +10V (0 to +5V), 4 to 20mA, 0 to +/- 10V (FWD/REV operation)+10 V to 0 (reverse operation), 20 to 4mA (reverse operation)Up/Down control: Frequency increases or decreases as long as the digital input signal is turned on.Multistep frequency selection: Up to 16 steps are selectable by a combination of digital input signals.Serial Communication operation: Operation by RS485 ModBus RTU.Program operation: Pattern operation by programming.Jogging operation: Jogging operation by FWD , REV key or digital input signals.IndicationEnvironment(4)Transistor outputs: Running, frequency arrival, frequency detection, overload early warning, etc.Operation status output signals(2) Relay outputs: Alarm output (for any fault), multi-purpose relay output signals, etc.(1) Analog: Output frequency, output current, output voltage, output torque, power consumption, etc.(1) Pulse output : Output frequency, output current, output power, output torque, power consumption, etc.Digital display (LED)Output frequency, setting frequency, output current, output voltage, motor synchronous speed, line speed, load rotation speed,calculated torque value, power consumption, calculated PID value, PID command value, PID feedback value, and alarm code.Operation information, operational guide, functional code/name/setting data, alarm information, tester function, motor load rateLiquid crystal display (LCD) measuring function (Maximum/average current (rms) during measuring period, maintenance information (Integrated operationhours, capacitance measurement for main circuit capacitors, heat sink temperature, etc.))LanguageSix languages (Japanese, English, German, French, Spanish, and Italian)Lamp displayCharge indication (voltage residual).Overcurrent, short-circuit, ground fault, overvoltage, undervoltage, overload, overheating, blown fuse, motor overload, externalProtective functionsalarm, input open-phase, output open-phase (when tuning), braking resistor protection, CPU and memory error, keypad panelcommunication error, PTC thermistor protection, surge protection, stall prevention, etc.Installation location Indoor, altitude less than 3300ft (1000m), free from corrosive gas, dust, and direct sunlight (Pollution degree 2)Ambient temperature-10 (14°F) to +50 (122°F) (ventilating cover must be removed under conditions exceeding +40 (104°F) for models at30HP/CT, 40HP/VT or less)Humidity5 to 95%RH (non-condenslng)Air pressureOperation/storage : 86 to 106 kPaTransport : 70 to 106 kPaVibration0.12inch(3mm) from 2 to less than 9Hz, 9.8m/s 2 t from 9 to less than 20Hz,2m/s 2 from 20 to less than 55Hz, 1m/s 2 from 55 to less than 200Hz,AmbientStorage temperature-25 (-13°F) to +65 (149°F)Humidity 5 to 95%RH (non-condensing)_________________________________________________________________________<strong>TECO</strong> – <strong>Westinghouse</strong> <strong>Motor</strong> <strong>Company</strong> Common Specifications 107
<strong>EQ5</strong> AC Drive <strong>Operations</strong> <strong>Manual</strong>8-3 Dimensions and Weights8-3-1 230V and 460V Series NEMA 1 (up to 30HP/CT, 40HP/VT )Model<strong>EQ5</strong>- 2XXX-N1230 V Series NEMA 1Dimensions Inches / mmH W D a b c d e MhWt.Lbs. / kg0P2 & 0P5 10.2/260 4.33/110 5.12/130 0.28/7 9.69/246 0.28/7 3.78/96 0.24/6 0.24/6 4.9/2.2001 10.2/260 4.33/110 5.71/145 0.28/7 9.69/246 0.28/7 3.78/96 0.24/6 0.24/6 5.5/2.5002,003 & 005 10.2/260 5.90/150 5.71/145 0.28/7 9.69/246 0.28/7 5.35/136 0.24/6 0.24/6 8.4/3.8007, 010 & 015 10.2/260 8.66/220 7.68/195 0.43/11 9.37/238 0.47/12 7.72/195 0.39/10 0.39/10 13/6.1020, 025, &030 15.7/400 9.84/250 7.68/195 0.43/11 14.88/378 0.47/12 7.72/195 0.39/10 0.39/10 23/10.5460 V Series NEMA 1ModelDimensions Inches / mmWt.<strong>EQ5</strong>- 4XXX-N1 H W D a b c d e Mh Lbs. / kg0P5 10.2/260 4.33/110 5.12/130 0.28/7 9.69/246 0.28/7 3.78/96 0.24/6 0.24/6 4.9/2.2001 10.2/260 4.33/110 5.71/145 0.28/7 9.69/246 0.28/7 3.78/96 0.24/6 0.24/6 5.5/2.5002,003 & 005 10.2/260 5.90/150 5.71/145 0.28/7 9.69/246 0.28/7 5.35/136 0.24/6 0.24/6 8.4/3.8007, 010 & 015 10.2/260 8.66/220 7.68/195 0.43/11 9.37/238 0.47/12 7.72/195 0.39/10 0.39/10 13/6.1020, 025, &030 15.7/400 9.84/250 7.68/195 0.43/11 14.88/378 0.47/12 7.72/195 0.39/10 0.39/10 23/10.5_________________________________________________________________________<strong>TECO</strong> – <strong>Westinghouse</strong> <strong>Motor</strong> <strong>Company</strong> Dimensions & Weights; Nema 1 108
<strong>EQ5</strong> AC Drive <strong>Operations</strong> <strong>Manual</strong>Model<strong>EQ5</strong>- 2XXX-C40 & 506075 & 1001251508-3-2 230V and 460V Series Open Chassis (30 – 350HP CT and 40 – 450HP VT)230 V Series Open ChassisDimensions Inches (mm)W W1 W2 W3 H H1 H2 H3 H4 H5 H6 D D1 D2 C13.4(340)14.8(375)14.8(375)20.9(530)26.8(680)9.45(240)10.8(275)10.8(275)16.9(430)22.8(580)12.8(326)14.2(361)14.2(361)20.1(510)26.0(660)N/A11.4(290)21.7(550)24.2(615)29.1(740)29.5(750)34.6(880)20.9(530)23.4(595)28.3(720)28.3(720)33.5(850)19.7(500)22.2(565)27.2(690)27.0(685)32.1(815)20.2(512)22.7(577)27.6(702)27.4(695)32.5(825)0.47(12)0.47(12)0.47(12)0.61(15.5)0.61(15.5)0.98(25)0.98(250.98(251.28(32.5)1.28(32.5)0.35(9)0.35(9)0.35(9)0.49(12.5)0.49(12.5)10.0(255)10.6(270)10.6(270)11.2(285)14.2(360)5.71(145)5.71(145)5.71(145)5.71(145)8.66(220)0.16(4)0.16(4)0.16(4)0.16(4)0.16(4)0.39(10)0.39(10)0.39(10)0.59(15)0.59(15)BoltSizeM8M8M8M12M12Wt.Lb(kg)64(29)79(36)97(44)154(70)254(115)Model<strong>EQ5</strong>- 4XXX-C40 & 506075 & 100125150 & 200250 & 300350, 400 & 450460 V Series Open ChassisDimensions Inches (mm)W W1 W2 W3 H H1 H2 H3 H4 H5 H6 D D1 D2 C13.4(340)14.8(375)14.8(375)14.8(375)20.9(530)20.9(530)26.8(680)9.45(240)10.8(275)10.8(275)10.8(275)16.9(430)16.9(430)22.8(580)12.8(326)14.2(361)14.2(361)14.2(361)20.1(510)20.1(510)26.0(660)N/A11.4(290)21.7(550)21.7(550)26.6(675)29.1(740)29.1(740)39.4(1000)39.4(1000)20.9(530)23.4(595)25.8(655)28.3(720)28.0(710)38.2(970)38.2(970)19.7(500)22.2(565)24.6(625)27.2(690)26.6(675)36.8(935)36.8(935)20.2(512)22.7(577)25.1(637)27.6(702)27.0(685)37.2(945)37.2(945)0.47(12)0.47(12)0.47(12)0.61(15.5)0.61(15.5)0.61(15.5)0.61(15.5)0.98(25)0.98(250.98(251.28(32.5)1.28(32.5)1.28(32.5)1.28(32.5)0.35(9)0.35(9)0.35(9)0.49(12.5)0.49(12.5)0.49(12.5)0.49(12.5)10.0(255)10.6(270)10.6(270)12.4(315)12.4(315)14.2(360)14.2(360)5.71(145)5.71(145)5.71(145)6.89(175)6.89(175)8.66(220)8.66(220)0.16(4)0.16(4)0.16(4)0.16(4)0.16(4)0.16(4)0.16(4)0.39(10)0.39(10)0.39(10)0.59(15)0.59(15)0.59(15)0.59(15)BoltSizeM8M8M8M12M12M12M12Wt.Lb(kg)64(29)75(34)88(39)106(48)154(70)220(100)309(140)Note: The <strong>EQ5</strong> Open Chassis can be mounted either (A)Surface Mount or (B)Through Panel Mount, where therear panel is cut out to allow the heatsink and cooling fans to protrude out of the back of the enclosure.In this case the mounting brackets (b) are moved to the (B) position (refer to Sec. 2-2, Fig. 2-2-3)._________________________________________________________________________<strong>TECO</strong> – <strong>Westinghouse</strong> <strong>Motor</strong> <strong>Company</strong> Dimensions & Weights; Open Chassis 109
<strong>EQ5</strong> AC Drive <strong>Operations</strong> <strong>Manual</strong>8-3-3 460V Series Open Chassis (400 – 600HP CT and 500 – 800HP VT)ModelDimensions Inches (mm)<strong>EQ5</strong>- 4XXX-C W W1 W2 W3 W4 W5 H H1 H2 H3 H4 H5 H6 H726.8 22.8 26 11.424 55.1 53.9 52.4 52.8 52.6 0.61 1.38 057500 & 600-(680) (580) (660) (290)(610) (1400) (1370) (1330) (1340) (1335) (15.5) (35) (14.5)34.6 30.7 33.9 10.2 10.2 31.9 55.1 53.9 52.4 52.8 52.6 0.61 1.38 057700 & 800(880) (780) (860) (260) (260) (810) (1400) (1370) (1330) (1340) (1335) (15.5) (35) (14.5)Bolt Wt.Con’t D D1 D2 D3 D4 D5 D6 CSize Lb (kg)17.7 11.2 0.25 1.97 3.94 1.38 4.53 0.59551500 & 600M12(450) (285) (6.4) (50) (100) (35) (115) (15)(250)17.7 11.2 0.25 1.97 3.94 1.38 4.53 0.59793700 & 800M12(450) (285) (6.4) (50) (100) (35) (115) (15)(360)_______________________________________________________________________<strong>TECO</strong> – <strong>Westinghouse</strong> <strong>Motor</strong> <strong>Company</strong> Dimensions & Weights; Open Chassis 110
<strong>EQ5</strong> AC Drive <strong>Operations</strong> <strong>Manual</strong>8-3-4 DC Link Choke for (75 –600HP CT and 100 – 800HP VT)230 V Series Open ChassisInverter ModelEQ-2XXX-CDC ChokeModelDimensions Inches (mm)A B C D E F G H JTerminalhole sizeWt.lbs (kg)100 DCR2-75B7.87(200)6.69(170)3.94(100)5.55(141)4.33(110)2.76(70)0.39(10)8.27(210)N/AM1240(18)125 DCR2-90B7.09(180)5.91(150)4.33(110)5.94(151)5.51(140)2.95(75)0.39(10)9.45(240)0.98(25)φ1544(20)150 DCR2-110B7.48(190)6.30(160)4.72(120)6.34(161)5.91(150)3.15(80)0.39(10)10.6(270)0.98(25)φ1555(25)Inverter ModelEQ-4XXX-CDC ChokeModel100 DCR4-75B125 DCR4-90B150 DCR4-110B200 DCR4-132B250 DCR4-160B300 DCR4-200B350 DCR4-220B400 & 450 DCR4-280B500 DCR4-355B600 DCR4-400B700 DCR4-450B800 DCR4-500B460 V Series Open ChassisDimensions Inches (mm)A B C D E F G H J K L7.48(190)7.48(190)7.48(190)7.87(200)8.27(210)8.27(210)8.66(220)8.66(220)8.66(220)9.45(240)10.2(260)10.2(2606.30(160)6.30(160)6.30(160)6.69(170)7.09(180)7.09(180)7.48(190)7.48(190)7.48(190)8.27(210)8.86(225)8.86(225)4.53(115)4.92(125)4.92(125)5.31(135)5.31(135)5.31(135)5.31(135)5.71(145)5.71(145)5.71(145)5.71(145)5.71(145)5.94(151)6.34(161)6.34(161)6.73(171)6.73(171)6.73(171)6.73(171)7.13(181)7.13(181)7.13(181)7.13(181)7.13(181)3.94(100)4.72(120)4.72(120)4.72(120)4.72(120)5.51(140)5.51(140)5.91(150)6.30(160)6.69(170)6.69(170)7.28(185)2.95(75)3.15(80)3.15(80)3.35(85)3.35(85)3.54(90)3.54(90)3.74(95)3.74(95)3.74(95)3.74(95)3.94(100)0.39(10)0.39(10)0.39(10)0.39(10)0.47(12)0.47(12)0.47(12)0.47(12)0.47(12)0.47(12)0.47(12)0.47(12)9.45(240)9.84(250)9.84(250)10.2(260)11.4(290)11.6(295)11.8(300)12.6(320)12.6(320)13.4(340)13.4(340)13.4(340)—0.98(25)0.98(25)1.18(30)1.18(30)1.18(30)1.57(40)1.57(40)1.57(40)1.57(40)1.97(50)1.97(50)N/A1.77(45)1.77(45)1.77(45)N/A8.86(225)8.86(225)8.86(225)Terminalhole sizeM10φ12φ12φ12φ12φ12φ15φ15φ15φ15φ15φ15Wt.lbs (kg)44(20)50(23)55(25)62(28)71(32)77(35)88(40)99(45)121(55)132(60)148(67)154(70)_______________________________________________________________________<strong>TECO</strong> – <strong>Westinghouse</strong> <strong>Motor</strong> <strong>Company</strong> Dimensions & Weights; DC Link Choke 111
<strong>EQ5</strong> AC Drive <strong>Operations</strong> <strong>Manual</strong>8-4 RS-485 Modbus RTU Serial CommunicationsThe serial communications interface supports operation, configuration and monitoring of inverterfunctions through an EIA/RS-485 connection. The serial interface is based on Modbus RTUprotocol. This protocol allows the inverter to function as an RTU slave on an industrial network.8- 4-1 Transmission SpecificationsItemSpecificationPhysical levelEIA/RS-485Transmission distance 1600 ft (500 m)Number of nodes 32 totalTransmission speed 19200, 9600, 4800, 2400 [bits/s]Transmission mode Half duplexTransmission protocol Modbus RTUCharacter codeBinaryCharacter length 8 bitsError checkCRC8- 4-2 ConnectionConnection method:Use shielded wire and connect to the control terminals (DX-, DX+ and SD). A terminatingresistor should be added between the data lines on the each end of the network. The value ofthe terminating resistor depends on the characteristic impedance of the cable. A commonvalue is 120 ohms.Control terminals:TerminalDesignationTerminal NameFunction DescriptionDX+ RS-485 communication data (+) Input/output terminals for RS-485DX- RS-485 communication data (–) communication.SD Cable shield Electrically floating8- 4-3 Serial Interface ConfigurationInverter function codes H30 to H39 are used to configure the serial interface parameters, suchas device address, baud rate and error response.8- 4- 4 Modbus RTU FunctionsThe following RTU functions are supported. The maximum number of consecutive parametersfor function 03 and 16 messages is 16.CodeDescription03 Read Holding Registers (16 registers maximum)06 Preset Single Register16 Preset Multiple Registers (16 registers maximum)_______________________________________________________________________<strong>TECO</strong> – <strong>Westinghouse</strong> <strong>Motor</strong> <strong>Company</strong> Serial Communications Modbus 112
<strong>EQ5</strong> AC Drive <strong>Operations</strong> <strong>Manual</strong>8-4-5 Inverter Function Code AccessAll of the inverter function codes are accessible through the RS-485 serial interface. Inverterfunction codes are mapped to RTU holding registers. An inverter function code RTU address is2 bytes in length. The high byte corresponds to a code that represents the inverter parametersort (F–M). The low byte corresponds to the inverter parameter number within the sort (0 -99).high byteinverter parameter sort codelow byteinverter parameter numberCode Sort Name Code Sort Name0 F Basic function 5 A <strong>Motor</strong> 2 function1 E Terminal function 6 o Option function2 C Control function 7 S Command/function data3 P <strong>Motor</strong> 1 function 8 M Monitor data4 H High level functionFor example, inverter function code M11 the output current, is addressed as RTU parameternumber 080B hexadecimal or 2059 decimal.8-4-6 Command and Monitor Data RegistersThe command and monitor function codes are used to control the operation of the inverter andmonitor the status variables through the serial interface. The command and monitor functioncodes are not accessible from the inverter keypad interface. Inverter parameter H30 and digitalinput signal LE must be enabled to operate the inverter from the Modbus interface. If LE is notassigned to a digital input (X1-X9), the signal will default to ON.Frequency Setting Registers:Address Code Name Unit Variable RangeMin.UnitRead/WriteDataFormat- -20000–20000 (max.1793 S01 Frequency command1 R/W 2frequency at ± 20000)1797 S05 Frequency command Hz 0.00–120.00 0.01 R/W 5Notes: 1) If both S01 and S05 are set, the inverter will ignore the setting of S05.2) A data setting that exceeds the setting range is possible, but the actual action will be limitedby the inverter configuration.Operation command data Registers:Address Code Name Unit Variable RangeMin. Read/ DataUnit Write Format1798 S06 Operation command - Refer to the data format [14] - R/W 141799 S07 Universal Do - Refer to the data format [15] - R/W 151804 S12 Universal Ao --20000–20000 (100% outputat ± 20000 )1 R/W 2Notes: 1) Since X1–X9 are configurable input commands, it is necessary to set the functions byE01–E09.2)The alarm reset is executed, when RST signal changes from ON to OFF even if there are noalarms.3) Universal Do is a function that utilizes the inverter’s digital outputs via communication._______________________________________________________________________<strong>TECO</strong> – <strong>Westinghouse</strong> <strong>Motor</strong> <strong>Company</strong> Serial Communications Modbus 113
<strong>EQ5</strong> AC Drive <strong>Operations</strong> <strong>Manual</strong>Function data RegistersAddress Code Name Unit Variable RangeMin. Read/ DataUnit Write Format1800 S08 Acceleration time F07 s 0.1–3600.0 0.1 R/W 31801 S09 Deceleration time F08 s 0.1–3600.0 0.1 R/W 31802 S10Torque limit level 120.00 –200.00, 999%(driving) F40(<strong>EQ5</strong>:20.00-150.00)1.00 R/W 51803 S11Torque limit level 20.00, 20.00–200.00, 999%(braking) F41(<strong>EQ5</strong>:20.00-150.00)1.00 R/W 5Notes: 1) The writing of data out of range is treated as out of range error.2) Use a value of 7FFF H to enter 999 for torque limit functions.Monitoring parameter registersAddress Code Description Unit Range2049 M012053 M052054 M06Frequency command(final command) -Frequency command(final command)Actual frequency- 20000–20000(max. frequency at ±20000)Min.UnitRead/WriteDataFormat1 R [2]Hz 0.00-120.00) 0.01 R [5]-- 20000–20000(max. frequency at ±20000)1 R [2]2055 M07 Actual torque value % - 200.00–200.00 0.01 R [6]2056 M08 Torque current % - 200.00–200.00 0.01 R [6]2057 M09 Output frequency Hz 0.00-120.00) 0.01 R [5]2058 M10<strong>Motor</strong> output (inputelectric power)% 0.00–200.00 0.01 R [5]2059 M11Output current r. m. s. 0.00–200.00 (inverter%rating at 100.00)0.01 R [5]2060 M12 Output voltage r. m. s. V 0.0–600.0 1.0 R [3]2061 M13Operation commandRefer to data format-(final command)[14]- R [14]2062 M14Operating stateRefer to data format-[16]- R [16]2063 M15Universal outputRefer to data format-terminal data[15]- R [15]2064 M16 Fault memory 02065 M17 Fault memory 1Refer to data format-2066 M18 Fault memory 2[10]- R [10]2067 M19 Fault memory 32068 M20Integrated operatingtimeh 0–65535 1 R [1]2069 M21 DC link voltage V 0–1000 1 R [1]2071 M23Type codeRefer to data format-[17]- R [17]2072 M24Inverter capacity code Refer to data format-[11]- R [11]Cont._______________________________________________________________________<strong>TECO</strong> – <strong>Westinghouse</strong> <strong>Motor</strong> <strong>Company</strong> Serial Communications Modbus 114
<strong>EQ5</strong> AC Drive <strong>Operations</strong> <strong>Manual</strong>2073 M25 ROM version - 0–64999 1 R [1]2074 M26 Transmission error processing code - Refer to data format [20] - R [20]2075 M27Frequency command at alarm (final - 20000–20000 (max. frequency-command)at ±20000 )1 R [2]2079 M31Frequency command at alarm (finalcommand)Hz 0.00-120.00) 0.01 R [5]2080 M32Actual frequency at alarm- 20000–20000-(max. frequency at ± 20000)1 R [2]2081 M33 Actual torque at alarm % - 200.00 – 200.00 0.01 R [6]2082 M34 Torque current at alarm % - 200.00 – 200.00 0.01 R [6]2083 M35 Output frequency at alarm Hz 0.00 – 120.00 0.01 R [5]2084 M36 <strong>Motor</strong> output at alarm (input power) % 0.00–200.00 0.01 R [5]2085 M37Output current rms. at alarm0.00 – 200.00 (inverter rating at%100.00)0.01 R [5]2086 M38Output voltage effective value atalarmV 0.0 – 600.0 1.0 R [3]2087 M39 Operation command at alarm - Refer to data format [14] - R [14]2088 M40 Operating state at alarm - Refer to data format [16] - R [16]2089 M41Universal output terminal data atalarm- Refer to data format [15] - R [15]2090 M42 Integrated operation time at alarm h 0–65535 1 R [1]2091 M43 DC link voltage at alarm V 0–1000 1 R [1]2092 M44 Inverter internal air temp.at alarm °C 0–120 1 R [1]2093 M45 Cooling fin temp. at alarm °C 0–120 1 R [1]2094 M46 Life of main circuit capacitor. % 0.0–100.0 0.1 R [3]2095 M47 Life of printed circuit board capacitor. h 0–65535 1 R [1]2096 M48 Life of cooling fan. h 0–65535 1 R [1]8-4-7 Data Format SpecificationAll data in the data field of communication frame shall be represented by a 16 bit length word.15 14 13 12 11 10 9 8 7 6 5 4 3 2 1 016 bits binary dataData format [1] Unsigned Integer data (Positive): Min. unit 1Example: F15 (Frequency limit, upper)= 60Hz60 = 003C HData format [2] Integer data (Positive, negative): Min. unit 1Example: data = -20 -20 = FFEC HData format [3] Unsigned Decimal data (Positive): Min. unit 0.1Example: F17 (frequency gain setting signal) = 100.0% 100.0 X 10 = 1000 =03E8 HData format [4] Decimal data (Positive, negative): Min. unit 0.1Example: C31 (Analog input offset adjust, term.12) = - 5.0% - 5.0 X 10= - 50 =FFCE HData format [5] Unsigned Decimal data (Positive): Min. unit 0.01Example: C05 (multi-step frequency 1) = 50.25Hz50.25 X 100 = 5025 = 13A1 H_______________________________________________________________________<strong>TECO</strong> – <strong>Westinghouse</strong> <strong>Motor</strong> <strong>Company</strong> Serial Communications Modbus 115
<strong>EQ5</strong> AC Drive <strong>Operations</strong> <strong>Manual</strong>Data format [6] Decimal data (Positive, negative): Min. unit 0.01Example: M07 (actual torque value)= - 85.38%- 85.38 X 100= - 8538=DEA6 HData format [7] Unsigned Decimal data (Positive): Min. unit 0.001Example: If o05 (follow - up side ASR 1 constant) = 0.105s 0.105 X 1000 = 105 =0069 HData format [8] Decimal data (Positive, negative): Min. unit 0.001Example: Data = -1.234 - 1.234 X 1000 = - 1234 = FB2E HData format [9] Unsigned Integer data (Positive): Min. unit 2Example If P01 (<strong>Motor</strong> 1 number of poles) =2pole 2 = 0002 HData format [10] Alarm code:Code Description Code Description0 No alarm - 22 Overheat, DB resistor dbH1 Overcurrent, during acceleration (INV output ) OC1 23 Overload, motor 1 OL12 Overcurrent, during deceleration (INV output ) OC2 24 Overload, motor 2 OL23Overcurrent, during steady state operation(INV output )OC3 25 Overload, inverter OLU5 Ground fault EF 27 Overspeed OS6 Overvoltage, during acceleration OU1 28 PG wire break Pg7 Over voltage, during deceleration OU2 31 Memory error Er18 Overvoltage, during steady state operation OU3 32 Keypad error Er210 DC undervoltage LU 33 CPU error Er311 Power supply open phase Lin 34 Option comm. error Er414 Blown DC fuse FUS 35 Option error Er516 Output wiring error Er7 36 PL error Er617 Overheat, heat sink, inverter OH1 37 Output wiring error Er718 Overheat, outside thermal OH2 38 RS-485 comm. error Er819 Overheat, unit inside temp. OH3Data format [11] Capacity code:CodeCapacityCapacityCapacityCodeCode(HP)(HP)(HP)7 0.07(spare) 2000 20 20000 20015 0.15(spare) 2500 25 25000 25025 0.25 3000 30 30000 30050 0.5 4000 40 35000 350100 1 5000 50 40000 400200 2 6000 60 45000 450300 3 7500 75 50000 500500 5 10000 100 60600 600750 7.5 12500 125 60700 7001000 10 15000 150 60800 8001500 15 17500 175_______________________________________________________________________<strong>TECO</strong> – <strong>Westinghouse</strong> <strong>Motor</strong> <strong>Company</strong> Serial Communications Modbus 116
<strong>EQ5</strong> AC Drive <strong>Operations</strong> <strong>Manual</strong>Data format [12] Index data (ACC/DEC time, display coefficient):15 14 13 12 11 10 9 8 7 6 5 4 3 2 1 0Polarity 0 0 0 Index portion Data portion0: Positive (+), 0: 0.01 X 001–999 (0.00–9.99)1: 0.1 X 100–999 (10.0–99.9)1: Negative ( - ) 2: 1 X 100–999 (100–999)3: 10 X 100–999 (1000–9990)Example: F07 (acceleration time 1) = 20.0 s10.0 < 20< 99.9 → index =120.0 = 0.1 X 200 → 0400 H + 00C8 H = 04C8 HData format [13] Pattern operation:15 14 13 12 11 10 9 8 7 6 5 4 3 2 1 0Directionofrotation0 Time Index portion Data portion0: 1st ACC/DEC time 0: 0.01 X 001–999 (0.00–9.99)0: FWD 1: 2nd ACC/DEC time 1: 0.1 X 100–999 (10.0–99.9)1: REV 2: 3rd ACC/DEC time 2: 1 X 100–999 (100–999)3: 4th ACC/DEC time 3: 10 X 100–999 (1000–9990)Example: C22 (Stage1) = 10.0s R2 (10s, reverse rotation, acceleration time 2/deceleration time 2)Since 10.0 = 0.1 X 100 > 9000 H + 0400 H + 0064 H = 9464 HData format [14]Operation command:15 14 13 12 11 10 9 8 7 6 5 4 3 2 1 0RST 0 0 0 0 X9 X8 X7 X6 X5 X4 X3 X2 X1 REV FWD(All bit are ON by 1)Example: S06 (operation command) = FWD, X1 and X5 = ON0000 0000 0100 0101 b = 0045 HData format [15]Universal output terminal:15 14 13 12 11 10 9 8 7 6 5 4 3 2 1 00 0 0 0 0 0 0 0 0 0 0 Y5 Y4 Y3 Y2 Y1(All bit are ON by 1)Example: M15 (Universal output terminal)=Y1 and Y5 = ON0000 0000 0001 0001 b = 0011 H_______________________________________________________________________<strong>TECO</strong> – <strong>Westinghouse</strong> <strong>Motor</strong> <strong>Company</strong> Serial Communications Modbus 117
<strong>EQ5</strong> AC Drive <strong>Operations</strong> <strong>Manual</strong>Data format [16] Operating state:15 14 13 12 11 10 9 8 7 6 5 4 3 2 1 0BUSY WR RL ALM DEC ACC IL VL TL NUV BRK INT EXT REV FWD(All bit are ON or active by 1)FWD: Forward operation IL: Current limitingREV: Reverse operation ACC: Under accelerationEXT: DC braking active (or pre-excitation) DEC: Under decelerationALM: Inverter faultINT: No Output RL: Transmission validBRK: Braking active WR: Function writing privilegeNUV: DC link voltage is established 0: Keypad panel(undervoltage at 0)1: RS-485TL: Torque limiting 2: Fieldbus (option)VL: Voltage limiting BUSY: Processing data writeData format [17] Type code:15 14 13 12 11 10 9 8 7 6 5 4 3 2 1 0Type Generation Series Voltage seriesCode Type Generation Series Voltage series1 - <strong>EQ5</strong> - -2 - - - -3 <strong>EQ5</strong> - - 230V three phase4 - - - 460V three phase5 - - USA 575V three phase6 - - - -Data format [18] Code setting (1–4 figures):15 14 13 12 11 10 9 8 7 6 5 4 3 2 1 0Data 4 Data 3 Data 2 Data 1Data format [19] Amperage value Decimal data (positive ):Min. unit 0.01 inverter capacity is not more than 30HP/CT, 40HP/VT.Min unit 0.01 for not less than 40HP/CT, 50HP/CT.Example: F11 (electronics thermal overload relay 1 level) 107.0A (40HP)F11 (electronics thermal overload relay 1 level) =3.60A (1HP)107.0 X 10=1070=042E H3.60 X 100=360=0168 H_______________________________________________________________________<strong>TECO</strong> – <strong>Westinghouse</strong> <strong>Motor</strong> <strong>Company</strong> Serial Communications Modbus 118
<strong>EQ5</strong> AC Drive <strong>Operations</strong> <strong>Manual</strong>Data format [20]Transmission error code:Code Description Code Description1 FC (function code) error 71 CRC error (no response)2 Illegal address 72 Parity error (no response)Other errors (no response)3 Illegal address (Data range error) 73-Framing error-Overrun error-Buffer full error7NAK-Priority for comm.-No privilege for writing error-Forbidden writing errorData format [21] Auto tuning:15 14 13 12 11 10 9 8 7 6 5 4 3 2 1 00 0 0 0 0 0 REV FWD Data portion0: Without forward rotation command1: With forward rotation command.0: Without reverse rotation command.1: With reverse rotation command.Example: P04 (motor 1 auto - tuning)=1: Forward rotation0000 0001 0000 0001 b =0101 H8-4-8 Communication Errors (Exception Response)When the inverter receives a message that does not contain communication errors but the messagecan not be processed, the inverter will return an exception response. The exception responsecontains an error sub-code in the data field that represents the problem.Exception Response Errors:Sub-NameCausesCode1 Illegal Function Received RTU Function other than 03, 06 or 162 Illegal Data Address• The starting parameter address is an unused inverter parameter.• The starting parameter address plus the offset refers to inverterparameter greater than the last parameter in a Function Codesort.• The number of registers is greater than 16.3 Illegal Data Value Data contains an out of range value for an inverter parameter7• Requested data cannot be changed while the inverter is running.Negative• The inverter parameter function is owned by the network interfaceAcknowledgeoption card and cannot be changed.Communication errors:Communication errors occur when the inverter receives an invalid message. The inverter will notreturn a response to a communication error. A code that represents the last communication error isstored in inverter parameter M26. Typical communication message errors include parity, framing, andCRC errors._______________________________________________________________________<strong>TECO</strong> – <strong>Westinghouse</strong> <strong>Motor</strong> <strong>Company</strong> Communications Errors 119
<strong>EQ5</strong> AC Drive <strong>Operations</strong> <strong>Manual</strong>9. OptionsThe inverter supports two internally mounted cards. One option card is mounted under the main cover(Location A) and the other option card is mounted in a special adapter under the keypad (Location B).Only one card can be mounted in these locations. There are two different types of option cards, Type 1and Type 2. You cannot use two Type 1 or Two Type 2 cards but you can mix any combination of Type1 and Type 2 provided you only have one option per mounting location. Each option card must bemounted in the designated location. The chart below lists the option card, their types, and theirmounting locations.Name Type Loc.OPC-G11S-RY(Relay output card)OPC-G11S-DIO(Digital interface card)2ndOptionType/Loc1 A 2/B2 A NoneOPC-G11S-AIO(Analog interface card) 2 A NoneOPC-G11S-PDP(Communication card)OPC-G11S-DEV(Communication card)OPC-G11S-COP(Communication card)OPC-G11S-MBP(Communication card)OPC-G11S-IBS(Communication card)2 B 1/A2 B 1/A2 B 1/A2 B 1/A2 B 1/AFunction• Relay output cardThe transistor output from the inverter controloutput terminals Y1 and Y4 are converted tothe relay output (1SPDT).• Frequency setting by binary code (max. 16 bits)• Monitoring (8 bits) of frequency, output current,and output voltage• Auxiliary input for analog frequency setting (0 to+/-10 V)• Monitoring of inverter output frequency, current,and torque in analog voltage, analog output 0-10 VDC and 4-20mA• Serial communication card for Profibus-DP• Serial communication card for Device Net• Serial communication card for CAN• Serial communication card for Modbus plus• Serial communication card for Interbus-S__________________________________________________________________________<strong>TECO</strong> – <strong>Westinghouse</strong> <strong>Motor</strong> <strong>Company</strong> Options 120
<strong>EQ5</strong> AC Drive <strong>Operations</strong> <strong>Manual</strong>10. Electromagnetic Compatibility (EMC)10-1 GeneralIn accordance with the provisions described in the European Commission Guidelines Document onCouncil Directive 89/336/EEC, the <strong>EQ5</strong> series of inverters is chosen to be classified as "ComplexComponents". Classification as a "Complex Components" allows a product to be treated as an"apparatus", and thus permits compliance with the essential requirements of the EMC Directive to bedemonstrated to both an integrator of <strong>EQ5</strong> Inverters and to his customer or the installer and theuser.<strong>EQ5</strong> Inverters are supplied `CE-marked', signifying compliance with EC Directive 89/336/EEC whenused with a specified filter installed and grounded in accordance with this sheet. This Specificationrequires the following performance criteria to be met.EMC product standard EN61800-3/1997 +A11/2000Immunity : Second environment ( Industrial environment )Emission : First environment ( Domestic environment )Distribution class of Emission:Unrestricted DistributionRestricted Distribution<strong>EQ5</strong>-4025-C or less. Without Options installed (See Sec. 9)Without Options installed <strong>EQ5</strong>-4025-C or more.(See Sec. 9)<strong>EQ5</strong>-2XXX-CWith Options installed (See Sec. 9)<strong>EQ5</strong>-2XXX-C / <strong>EQ5</strong>-4XXX-C all models with any of the following options.Card option :OPC-G11S-AIO, DIO, RY, PGDIO,PGRY, TLBus option :OPC-G11S-PDP, DEV, MBP, IBS, COPWARNINGThis is a product of the restricted sales distribution class according toIEC61800-3.In a domestic environment this product may cause radio interference inwhich case the user may be required to take adequate measures.Note: It is customer’s responsibility to check whether the equipment conforms to EMC directive.10-2 Recommended Installation InstructionsIt order to conform to the EMC Directive, these instructions must be followed. Please followall safety procedures when working with electrical equipment. All electrical connections to thefilter, Inverter and motor must be made by a qualified electrical technician.1) Use the correct filter according to Table 10-2-1.2) Install the Inverter and filter in an electrically shielded metal enclosure.3) The back panel of the enclosure should be prepared for the mounting of the filter. Care should betaken to remove any paint etc. from the mounting holes and surface area of the panel to ensurethe best possible grounding of the filter and other components.4) Use shielded cable for the control, motor and other wiring connected to the Inverter, and properlyground the shields. (See Fig. 10-2-5)5) It is important that all wire lengths are kept as short as possible and that incoming power andoutgoing motor cables are kept well separated.Note: To minimize the conducted radio disturbance in the power distribution system, the length of themotor-cable should be as short as possible._________________________________________________________________________<strong>TECO</strong> – <strong>Westinghouse</strong> <strong>Motor</strong> <strong>Company</strong> EMC Compatibility 121
<strong>EQ5</strong> AC Drive <strong>Operations</strong> <strong>Manual</strong>InverterModel No.Filter TypeRatedCurrentTable 10-2-1 RFI filtersMax.RatedVoltageDimensionsL x W x H [inch (mm)]RFI FilterMount. Dims.Y x X [inch (mm)]<strong>EQ5</strong> – 40P5 – N1 FS5536-5-07<strong>EQ5</strong> – 4001 – N1 (EFL-0.75G11-4)5A12.6(320)×4.57(116)×1.65(42) 11.5(293)×3.54(90)<strong>EQ5</strong> – 4002 – N1FS5536-12-07<strong>EQ5</strong> – 4003 – N1(EFL-4.0G11-4)<strong>EQ5</strong> – 4005 – N112A 12.6(320)×6.10(155)×1.77(45) 11.5(293)×4.13(105)<strong>EQ5</strong> – 4007 – N1 FS5536-35-073ph35A<strong>EQ5</strong> – 4010 – N1 (EFL-7.5G11-4)460Vac13.4(341)×8.86(225)×1.87(47.5) 12.2(311)×6.57(167) 10 -1<strong>EQ5</strong> – 4015 – N1 FS5536-50-07<strong>EQ5</strong> – 4020 – N1 (EFL-15G11-4)50A 19.7(500)×9.84(250)×2.76(70) 17.7(449)×7.28(185)<strong>EQ5</strong> – 4025 – N1FS5536-72-07<strong>EQ5</strong> – 4030 – N1(EFL-22G11-4)EQ 5 - 4032 –N172A 19.7(500)×9.84(250)×2.76(70) 17.7(449)×7.28(185)EQ 5 - 4040 –N1 RF 3100-F11 100A17.1(435)×7.87(200)×5.12(130) 16.0(408)×6.54(166)EQ 5 - 4050 –N1EQ 5 - 4060 –N1EQ 5 - 4075 –N1 RF 3180-F11 180A 19.5(495)×7.87(200)×6.30(160) 18.4(468)×6.54(166)10 -2EQ 5 - 4100 –N1EQ 5 - 4125–N13phEQ 5 - 4150 –N1RF 3280-F11 280A 460Vac 9.84(250)×23.11(587)×8.07(205) 22.1(560)×3.35(85)EQ 5 - 4200–N1EQ 5 - 4250 –N110 -3EQ 5 - 4300–N1 RF 3400-F11 400A 9.84(250)×23.11(587)×8.07(205) 22.1(560)×3.35(85)EQ 5 - 4350 –N1EQ 5 - 4400–N1EQ 5 - 4450–N1RF 3880-F11 880A 27.1(688)×14.33(364)×7.09(180) 25.5(648)×5.91(150) 10 -4Fig.Fig.10-2-1 Outline Dimensions_________________________________________________________________________<strong>TECO</strong> – <strong>Westinghouse</strong> <strong>Motor</strong> <strong>Company</strong> EMC Compatibility 122
<strong>EQ5</strong> AC Drive <strong>Operations</strong> <strong>Manual</strong>Filter TypeDimensions [inch(mm)]W W1 H H1 DRF3100-F11 7.87 (200) 6.54 (166) 17.1 (435) 16.1 (408) 5.12 (130)RF3180-F11 7.87 (200) 6.54 (166) 19.5 (495) 18.4 (468) 6.30 (160)Fig.10-2-2 Outline Dimensions_________________________________________________________________________<strong>TECO</strong> – <strong>Westinghouse</strong> <strong>Motor</strong> <strong>Company</strong> EMC Compatibility 123
<strong>EQ5</strong> AC Drive <strong>Operations</strong> <strong>Manual</strong>Fig.10-2-3 Outline DimensionsFig.10-2-4 Outline DimensionsMetal enclosureRCD orMCCBRFIInverterShielded motor cable<strong>Motor</strong>L1 L1’L2 L2’L3 L3’PEL1/R UL2/S VL3/T WM3phPower supplyShielding must be electricallycontinuous and grounded atthe cabinet and the motor.Fig.10-2-5 Enclosure and Shielding_________________________________________________________________________<strong>TECO</strong> – <strong>Westinghouse</strong> <strong>Motor</strong> <strong>Company</strong> EMC Compatibility 124