
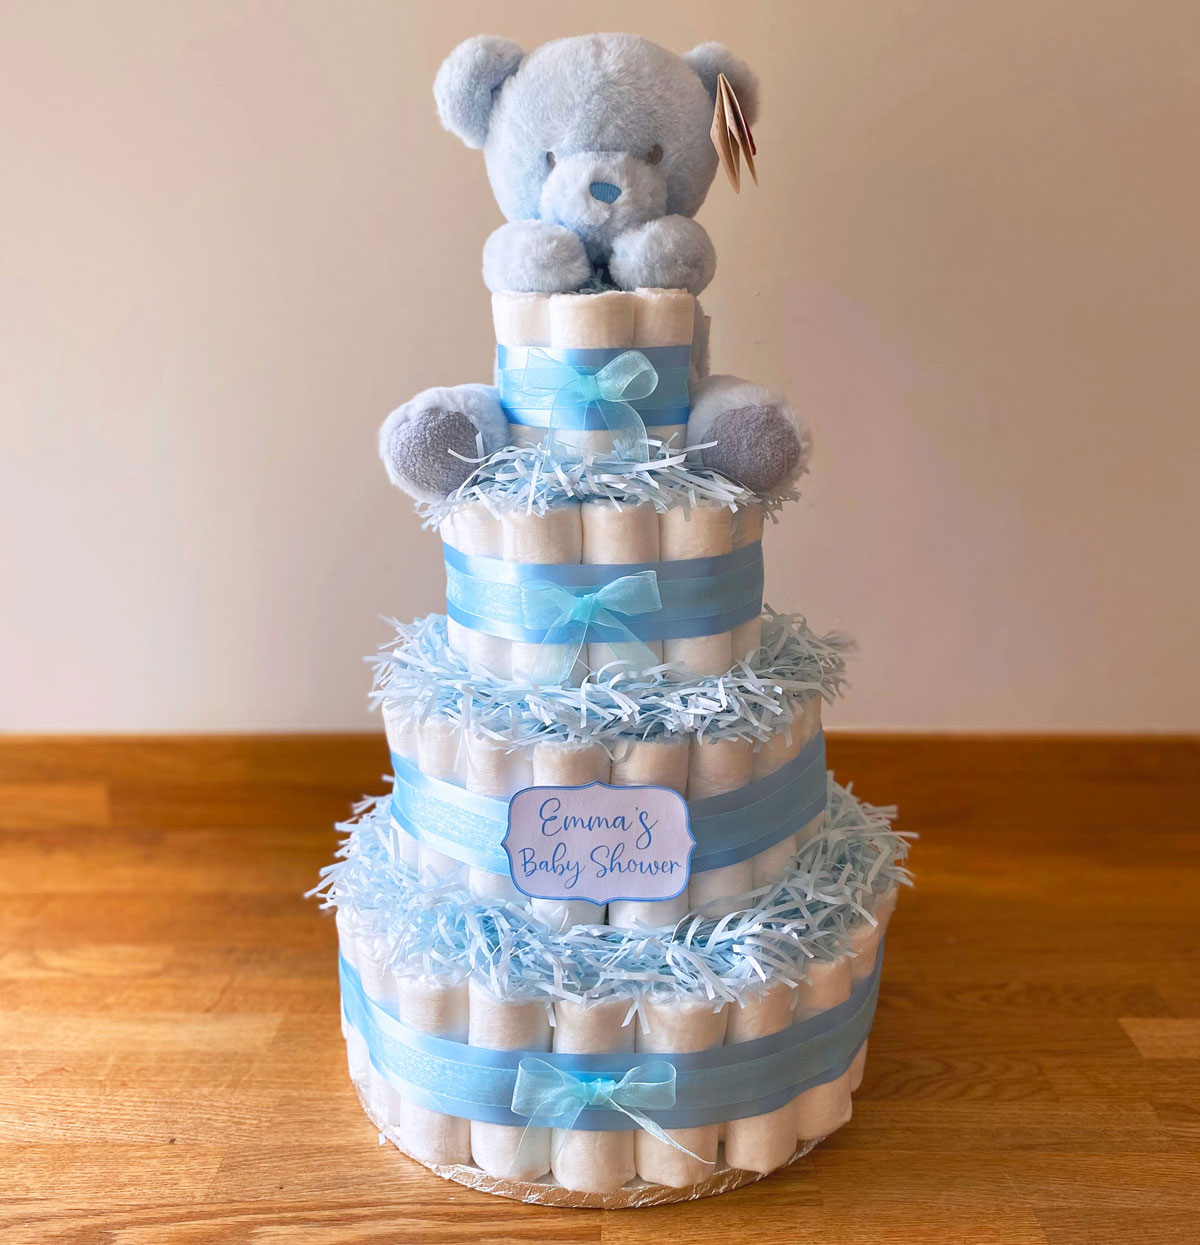
This is a fun and simple way of making a four tier nappy cake. It makes for a lovely gift for a mum-to-be and has a big impact due to it being so tall.
Nappy cakes are a really creative way to gift nappies, they can also double up as a table centrepiece for a baby shower and can be decorated in all sorts of ways to suit a theme. Making one yourself will keep costs low and you can make it extra special for the mum-to-be.
What’s great about this style of nappy cake is that as long as you get white nappies for the outside, it doesn’t matter what colour nappies you have for the inside, as they will be concealed.
For this nappy cake, the nappies on the inside are green! But you would never have known this just by looking at the finished nappy cake.

You can make your nappy cake with any size nappies of your choice. I have personally chosen size 2 & 3 because I could only find white nappies in size 2 and wanted to keep the tiers at the same height.
The total nappies used for this cake is 108. The white nappies are size 2 and the green nappies are size 3. If you are only using the white nappies on the outside like I have, the total number of white nappies used is 55.
For the middle of the nappy cake I have used a 36cm tube which has come from the inside of a cling film roll (cling film sized 35cm on the packaging). You will need a tube at least this tall to be able to make a four tier cake and we can top up any difference in height, which will be shown later.
So let’s get started, here is what you will need:


- Nappies (size is your choice)
- 12″ Cake board
- 36cm Tube (e.g. from a 35cm cling film roll)
- Shredded tissue paper
- 4cm Satin ribbon
- 2cm Organza ribbon
- 3.8cm Rubber bands (x 130)
- 20cm Rubber bands (x 6)
- Scissors
- Double sided sticky tape
For the nappy cake topper (optional)…
- 16cm Teddy bear
- Paper straws
- 4mm Ribbon (or string)
Firstly roll up some nappies with the 3.8cm rubber bands. I found the best way to roll was from the top of the nappy down and to roll as tightly and neatly as possible, then wrap around the rubber band at the middle.
Having them neatly rolled makes the nappy cake look really professional once all put together, so it’s worth getting it right at this stage.

To get started with the first tier, pop the rolled nappies around the bottom of the tube within a 3.8cm rubber band. Remember you can use any coloured nappies on the inside as these will not be visible and ensure to keep your white nappies for the outside.

Add another layer of nappies around the outside and secure with a 20cm rubber band.

Add a third layer of nappies around the outside and secure with another 20cm rubber band.

For the final outside layer, ensure to use the white nappies. Make sure all of the ends of the white nappies are facing inside the cake, which will give a nice uniform look when finished. Secure this layer with a 20cm rubber band.

On the cake board, add double sided sticky tape to the four places as shown below. Carefully pop the first tier (with the tube still in place) onto the cake board and gently press down. This will keep the base of the cake tethered to the board.


For the 2nd tier, repeat the layers of nappies as above but only make three layers of nappies.

For the third tier, repeat and make only two layers of nappies. For the forth tier just do one layer of white nappies and secure within a 3.8cm rubber band.

If there are any gaps at the top of the tube on the forth tier, find some card from your recycling box, roll it up into a tube and pop this in the middle.

Once you have completed this, you will be able to remove (and put back) the tiers two, three and four to add in the shredded tissue paper. Add a generous amount of shredded tissue paper above each tier, focusing on the outer edges.

Once you have added the shredded tissue paper between the tiers, use your scissors to tidy this up to your liking. FYI, I found myself tidying up the shredded tissue paper at various stages, right up until the finished nappy cake!
Now it’s time to add the ribbon… Wrap the 4cm satin ribbon around each tier over the rubber bands and secure at the back with double sided sticky tape.

Then wrap the 2cm organza ribbon around each tier, over the middle of the 4cm satin ribbon and secure with double sided sticky tape at the back.

With the 2cm organza ribbon, make some bows and stick these onto the front of each tier with double sided sticky tape. You can also add bows to the back to cover up where the edges of ribbons meet. This really makes your nappy cake look pretty!
For the nappy cake topper you can add anything you like such as a teddy bear, personalised sign, lampshade, nursery mobile, toy or balloon to give you some ideas…

For this nappy cake I have used a 16cm teddy bear. If your topper does not fully cover the top tier, you can add shredded tissue paper in the middle to cover the recycled card like the above picture.
If you plan to use a teddy bear like I have, you can use four paper straws to make a “seat” for the teddy bear. Place the straws securely behind the ribbon on the forth tier, with the teddy bear in place.

Then use 4mm ribbon (or string) around the teddy bear and tie it within the nappies of the forth tier to secure the teddy bear. Make sure this 4mm ribbon is hidden from the front view.
*If you want to wrap up your nappy cake like a hamper, you can use a clear piece of cellophane (200cm length x 80cm width) and tie it at the top with the 4cm satin ribbon. Cut off any excess at the top with scissors. I did do this extra step just before transporting the nappy cake to the baby shower and it made the cake look extra fabulous! *
And that’s all there is to it! Your four tier nappy cake should now be complete. I hope you are happy with your results.
You can always make this nappy cake in different colours such as pink, yellow or white with different toppers or themes, there are so many ways you can decorate this cake!

For this nappy cake, I decided to replace one of the ribbons with a sign printed onto card. This was a lovely way to make the nappy cake personalised for the mum-to-be. Perhaps you can do something like this too?
Thank you for taking the time to read this post. Feel free to share this tutorial and let me know what you think in the comments, I would love to hear about your results.
Happy nappy cake crafting! 🙂
If you enjoyed this post and want to be notified of the latest Craft with Mei tutorials, enter your email below to subscribe.
Leave a Reply