Article 37 Engine Rebuild Part 4
Last month’s article addressed rebuilding the Jaguar XK engine. Since there is a lot to discuss regarding engine rebuilds we are continuing with a fourth article. As we discussed last month, my engine is a 4.2 litre XK engine for my 1967 E-Type 2+2. Dis-assembly of the engine revealed damage to the combustion chambers, rings, pistons, and cylinder walls. I decided to send the engine to Dick Maury at Coventry West for a professional rebuild, not to mention repair of the damaged parts so that I could continue with a “numbers matching” engine combination. When we left off in last month’s article, Dick’s team had finished preparation of the block and was ready for the head.
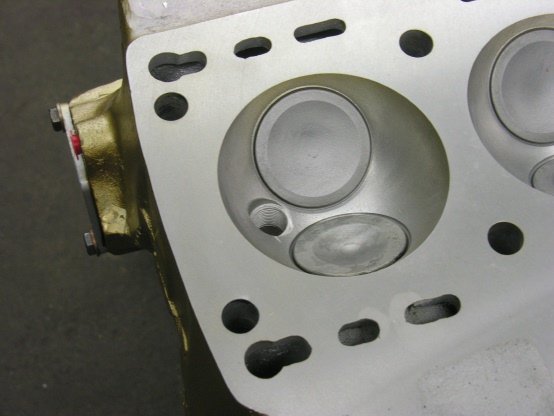
In case you have lost track, some of the combustion chambers on my head looked pretty rough. Looking at the pistons, the rings were broken and in some cases missing. Small pieces of the rings had been pounded into the head. Not pretty! Note that as Jaguar developed the XK engine from its original 3.4 liter displacement up to 4.2 liters, the diameter of the cylinder bores came to exceed that of the combustion chambers. This was not all bad, as it created a “squish zone” where the piston develops a very narrow space around the edge of the combustion chamber in the head, which squishes
the fuel/air mixture violently towards the center of the chamber, increasing turbulence and promoting better burning of the fuel. I know, engineering stuff, but you will find that many of the performance gains in modern engines over the years since the 60’s have been realized by clever configurations in the cylinders to promote more turbulence. So Jaguar was on to something. One downside is that any small item that finds its way into the combustion chamber, like a screw from your throttle butterflies, will manage to beat up this small space pretty badly. My broken ring parts certainly had an adverse affect!
The sight of this carnage caused me to contact Dick
for advice. He advised me that the damage could be welded up and the original head preserved. The heads are made out of aluminum so an expert welder was needed. Dick “has people”, just like H&R Block, and was able to get the damage repaired. Another common area of damage is at the passageways for the coolant. This is caused by folks that go for years without changing their anti-freeze. The anti-freeze anti-corrosion properties fade in a few years and aluminum heads are especially venerable. Can you remember the last time you changed your antifreeze? If not, change it! Damaged spark plug threads can also be repaired. For all rebuilds, Coventry pressure checks the water passages in the heads at 60 psi to
verify that there are no cracks, corrosion, or other hidden damage. If the head passes this test, it is ready to be rebuilt. A very light skim cut will be made across the gasket face of the block to make sure it is perfectly flat.
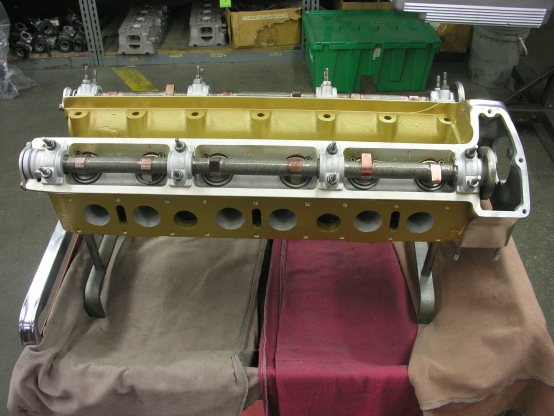
The XK engine is a dual overhead cam engine with 2 valves per cylinder. It is also a “cross flow head” which means the fuel/air enters on one side and the exhaust exits the other side. Very efficient but, strangely, not a common design feature in the 60’s. Dual overhead cams allow separate timing profiles, if required, for the intake and exhaust valves. Overhead cams also simplify the valve
opening/closing mechanism. The crew at Coventry inspects all of the components for the head, those being valves, valve seats, valve guides, cams, cam followers, and cam buckets and replaces any parts that are damaged or out of spec. All of these parts are then cleaned and readied for assembly.
An important step is to ensure that the surface between the valves and their seats are in perfect contact. Machining of the surfaces may be required and in most cases the valves are “lapped” to ensure perfect contact. Lapping is simply a process where the valve is positioned into its seat with some “lapping paste”, a slurry of liquid with fine abrasive powder, applied to the contact surface. When I do this at home (and you can try this at home!) I use a small rubber suction cup mounted on the end of a dowel which I stick to the flat end of the valve. I then spin the dowel in the palms of my hands, which rotates the valve against the abrasive slurry and brings the contact surfaces into perfect contact.
Dick notes that if requested, Coventry can source valves from a later XJ6 head, which are slightly larger and flow a little more air. Once the valves and guides are ready to go, each of the 12 valves has its valve spring and keeper installed. Coventry locks all of the valve tappet guides into place using small screws. Tappet guides have been known to work loose in some XK engines. I believe the later engines from the Series 2 cars are more prone to this due to their increased operating temperatures from efforts to meet emissions regs.
Now the cam shafts can be installed, along with new camshaft bearings. If requested by the customer, later camshafts can be sourced and installed which have superior profiles for quieter operation, although there will be no change to engine performance. Note that these later camshafts have substantially different cold gap requirements so if you have this done try and placard the engine, discretely, for the benefit of future owners and mechanics. Dick’s crew will of course set the cold cam clearances spot on and they should require zero maintenance for years to come, as the clearance properties of an overhead cam engine are very stable.
The renewed head is now almost ready. The correct color of paint is applied to the spark plug valley, in my case gold. A new head gasket is laid on the block and the head is positioned into place. The studs from the block stick up through the head and are tightened up in a methodical uniform way to the final “torque” or tension value. Be prepared to spring for new chrome acorn nuts for your head stud bolts. They are not cheap but are a very distinctive part of the XK engine.
Next, the timing chains are loosely assembled into place onto their sprockets on the ends of the camshafts. The relationship of the chains to each cam is very critical to overall engine performance. This is referred to as setting the cam timing, which I discuss in more detail on my website. Dick’s crew will get it right! Finally, new valve cover gaskets are put into place and the valve covers installed. Again, spring for new chrome acorn nuts. With the installation of the front breather cover and properly gapped spark plugs, your rebuilt engine is done! It will be safely ensconced on a shipping pallet and securely wrapped for shipment by truck. Be sure and have Coventry arrange the truck shipment, they get a much better deal than I could arrange!


Discussion
No comments yet.