Jack Olsen (of the awesome 12-Gauge Garage) wrote in about using our flickering LEDs to line the deck and pergola he had just built.
He says, “The LED candle effect is great, and really gives the place a relaxed feel at night.” You can read more about the deck project over at the Garage Journal forums, where he describes the build in more detail:
It has 28 real candles on it that I’ve hollowed out to accommodate flickering LED lights. It’s pretty convincing.
I have a pair of 3 v power supplies — each feeds half the light set. They’re plugged into a switched outlet with wire running down along the edge/underside of the deck and up through one of the pillars, then sneaking around the back of the wooden frieze thing and into holes drilled in the backside of the frame.
He even sent us a before shot, so you can see just how from-the-ground-up building the deck was. Thanks for sharing your project with us!
The Open Hardware Summit is the world’s first comprehensive conference on open hardware; a venue to discuss and draw attention to the rapidly growing Open Source Hardware movement. The Open Hardware Summit is a venue to present, discuss, and learn about open hardware of all kinds. The summit examines open hardware and its relation to other issues, such as software, design, business, law, and education.
We are seeking proposals for talks, posters, and demos from individuals and groups working with open hardware and related areas.
Submissions are due by JUNE 21, 2013. Please see the complete call for papers for additional details.
The 2013 Open Hardware Summit has also opened its call for sponsors; please click here if you are interested in helping to sponsor the summit.
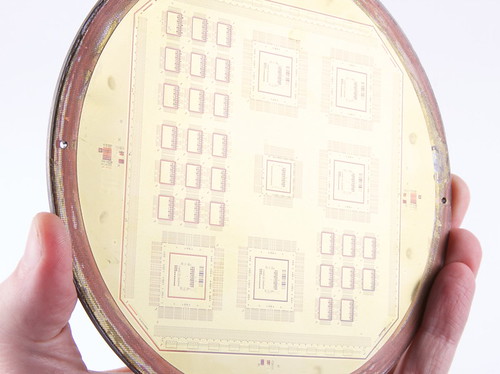
In cooperation with Bunnie Studios, the blog of renowned hardware hacker Bunnie Huang (of Hacking the xbox and Chumby fame), we’re pleased to present an unusual “ware” that we acquired from one of our local Silicon Valley electronics surplus dealers.
(If you’re unfamiliar with the game, “Name that Ware” is a regular contest on Bunnie’s blog, where the goal is to learn about reverse engineering by analyzing unusual— or common but seldom-seen —hardware. You can read about the contest rules here, and you can see many pictures of past entries with this google image search, or even get a calendar featuring Name that Ware entries from prior years.)
In the detail photos that follow, we’ll show some close-up photos, and provide a little more physical description (without speculating too much as to the purpose of the different features). Can you identify this piece of hardware?
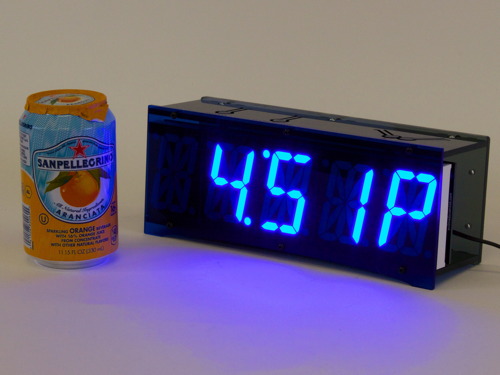
Introducing our newest open source hardware kit: The Blue Edition of Alpha Clock Five.
Alpha Clock Five is our flagship clock kit, which thus far has been available only in a Red Edition and in a White Edition. Whichever color you happen to like, it is a full-featured, beautiful, and extraordinarily easy-to-read desk clock based around oversized 2.3″ alphanumeric LED displays. It’s designed to work equally well as a bedside alarm clock and as a computer-controlled alphanumeric data display device.
We’ve already written extensively about the core design of Alpha Clock Five. We’ve also written about the modes and features added in version 2.0 of our Arduino-compatible firmware (such as date display and daisy chained scrolling text), and about the hardware changes necessary to support the White Edition of the kit. Fortunately, the changes that we made in order to support the White Edition also allow us to support the use of blue LEDs, just as easily. And so— by popular request —we now present the Blue Edition.
Here, the Blue Edition is shown with a soda can for scale. These LEDs are big and bright, and cast a heavy glow on the soda can and tabletop. (The usual caveats about the difficulty of photographing LEDs apply: A camera cannot capture the apparent intensity of pure blue LEDs in the same way that your eyes can.)
As with the other Alpha Clock Five kits, the control buttons are cut as flexures into the top of the laser-cut acrylic case, that can bend down to contact right-angle tactile button switches at the top edge of the circuit board. The top and bottom sides of the case are made of black acrylic, and the rear panel is made from smoke-gray acrylic.
For the Blue Edition, the front face of the case is made of deep blue transparent acrylic, which helps to increase display contrast, especially in brightly lit office environments.
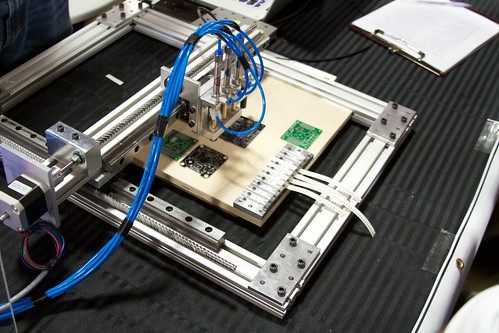
Without the top and back panels, you can see the electronics within: the AVR microcontroller, LED driver chips, transistors, Chronodot RTC module and the other parts that make it all work.
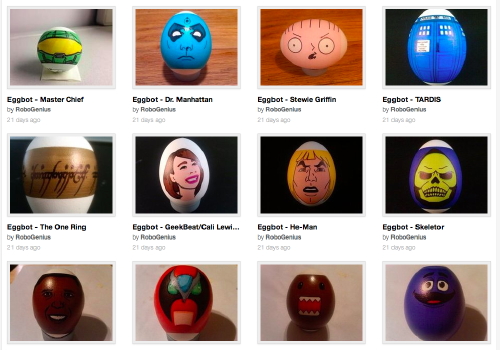
We’ve been watching the work of RoboGenius for quite some time. He has created some of the neatest non-geometric work anybody has done on the Egg-Bot. Recently, he uploaded a number of his designs to thingiverse, which means you can try them out, too. He has also been posting great pictures of them to flickr. When asked in the Egg-Bot user list how he created them, he posted:
The short answer is that it’s all done line by line in Inkscape.
The slightly more tedious answer is that it starts with an image (generally something off the web, or that has some significance to me), then I import that image onto my 3200px X 850px template in Inkscape and position it where I want it on the egg/ball. I then take a look at the image and decide how many color layers I’ll be needing for the plot and add those to the project, naming them sequentially followed by the color I use for the layer (for example: 1 – Yellow, or 5 – Black). I always begin with the lightest colors first, and generally end in black. Then it’s simply a matter of tracing over the picture on the correct layer using the bezier line tool (Shift + F6), and bending those lines with the path editing tool (F2). Once I get the basic lines created, I’ll create and fill any solid shapes using the EggBot Contributed Hatch fill extension (spacing should be set to 6 for eggs). To add shading, you simply go over the same places a couple of times with the same color, which can be achieved with Copy and Paste, and occasionally the shading can be enhanced by altering the angle of the line to match the angle of the shape or intended shadow (the Master Chief design is a good example of this technique).
That’s pretty much it. To finish off the project, I like to color all of the lines in a layer to match the marker used in that layer, then delete the layer with the picture in it.
Thank you for generously sharing both your designs and your techniques, RoboGenius!
They used a Peggy 2 to drive a field full of LED illuminated spheres, along with IR sensors to detect visitors entering the array. Each new person would trigger a new sphere to light up and move through the field.
This is the largest installation we’ve ever seen based on the Peggy 2.
Thanks for sharing your incredible project with us!
Links to many more Peggy 2 projects are on the wiki.
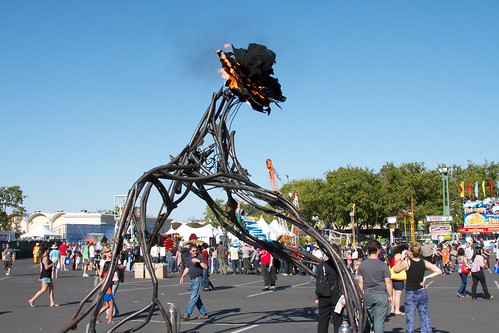
The 2013 Bay Area Maker Faire is a wrap— and it was amazing. And we took pictures. We’ve uploaded 362 photos from maker faire right here for your browsing pleasure. But first, a little preview.
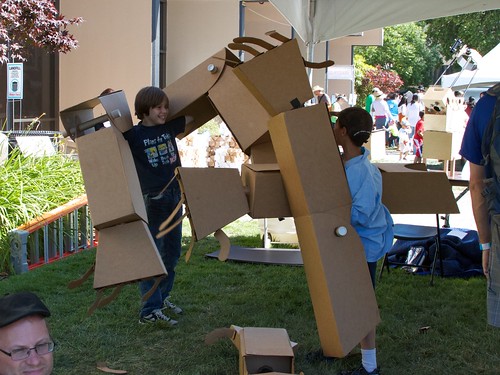
Kids play with giant cardboard robot arms at the Giant Cardboard Robots booth. As they say, “The revolution will be corrugated.”
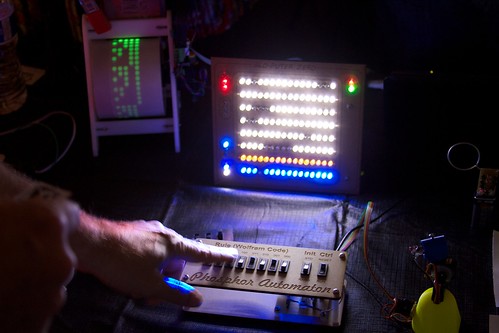
Glo-Puter Zero, by Alan Yates, with its phosphor-based memory. Truly a highlight of the show.
Lenore shares a nerdy moment with Akiba from Freaklabs.
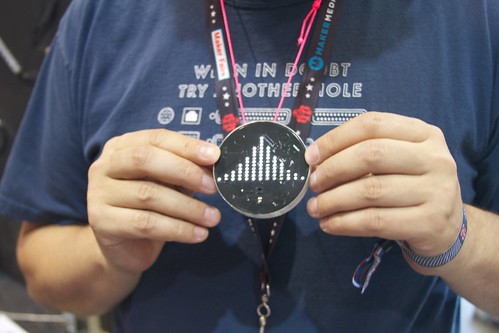
An unusual LED badge, from the Bay Lights project.
The Western Pyrotechnics Association is a club for people that make their own fireworks. It’s incredible to see the complexity and artistry of the fireworks and the tooling that makes them.
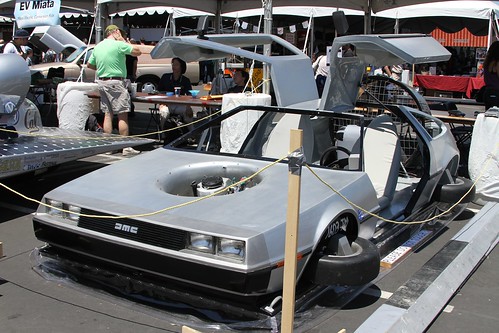
A beautiful hovercraft, designed to look like a flying DeLorean; you can see video of it on the project site.
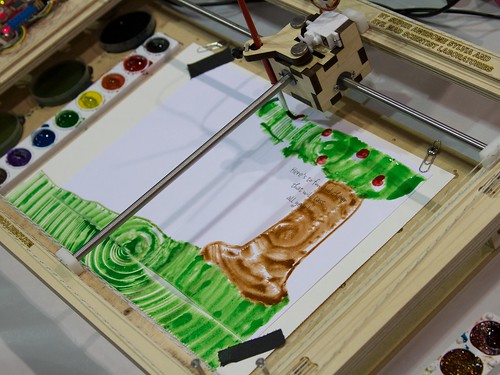
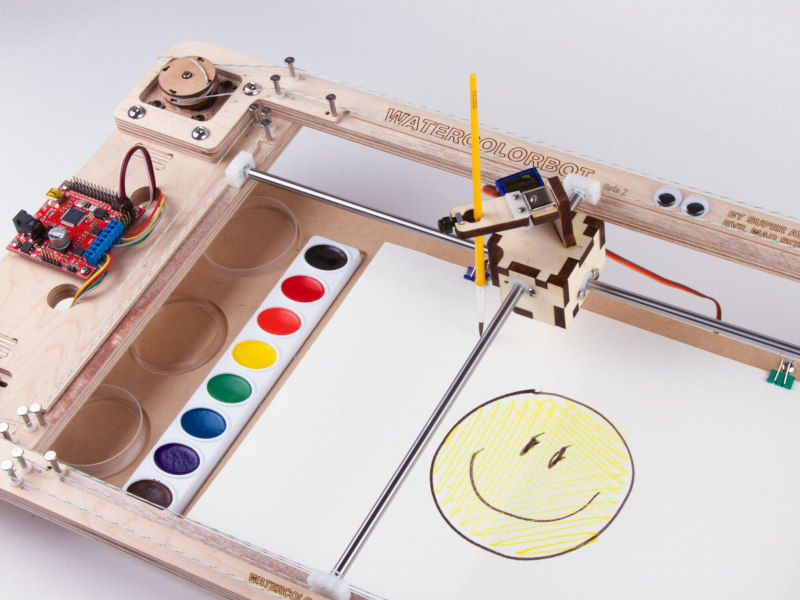
Back at our booth, the WaterColorBot was a constant hit. Above, Sylvia shows visitors how to sketch with it in real time.
An unexpected application: Our friend Bilal Ghalib stopped by and enlisted the WaterColorBot to help him make a birthday card for another friend.
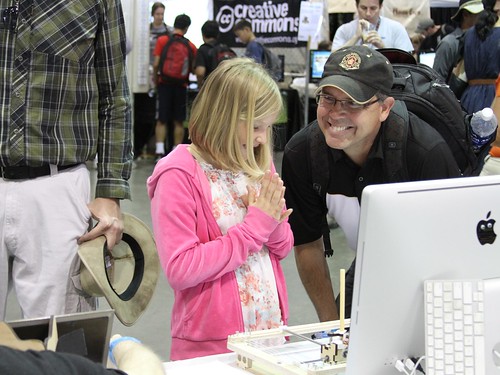
And one of our favorite moments of Maker Faire: a young visitor, tickled pink as she tries out the WaterColorBot, watching it paint a drawing that she had just sketched.
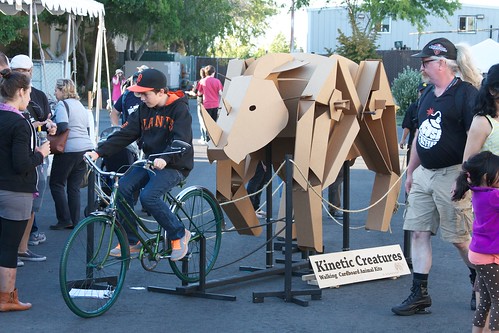
A bicycle-powered cardboard walking rhino, by Kinetic Creatures, makers of walking cardboard robot kits, with Theo Jansen inspired walking mechanisms.
Some of the creations are simpler, like this sidewalk-chalk wielding vibrobot, spinning on a tabletop chalkboard at the Exploratorium booth.
Some of the creations are more technical, like the OpenPNP project to create open source pick and place machines for electronics assembly. We’re excited by where this is headed, along with a few related projects.
And of course, there’s no shortage of LED goodness.
Please click right here for the rest of our 2013 Bay Area Maker Faire photo album.
This is a fantastically busy week in the bay area for makers and hardware folk.
On Tuesday and Wednesday, the Hardware Innovation Workshop will be held at San Mateo College. Windell will be speaking on Wednesday afternoon; check out the agenda to see the full lineup of presenters.
On Thursday, we’ll be participating in Maker Faire Education Day with Super Awesome Sylvia and the WaterColorBot. If you’re a bay area teacher, you and your class should be there! If you’re a bay area student, make sure your teacher knows about this!
On Saturday and Sunday, the Bay Area Maker Faire is in full swing at the San Mateo County Event Center. We’ll be there with Super Awesome Sylvia and the WaterColorBot. Windell and I also mentor FIRST Robotics team 3501 from Fremont High School in Sunnyvale, and they will be there with their robot, Oddjob. I will be participating in the Parenting Young Makers panel on the Make: Education Stage at 2:00 pm on Sunday as well. The full Maker Faire schedule has been posted, and advance tickets are still available. If you’re planning on driving, check out the list of free parking lots with shuttles or in walking distance. 110,000 attendees were there last year— not a small party!
To spread the celebration a little further, we’re holding a DIY Fever sale in our shop now through Monday.
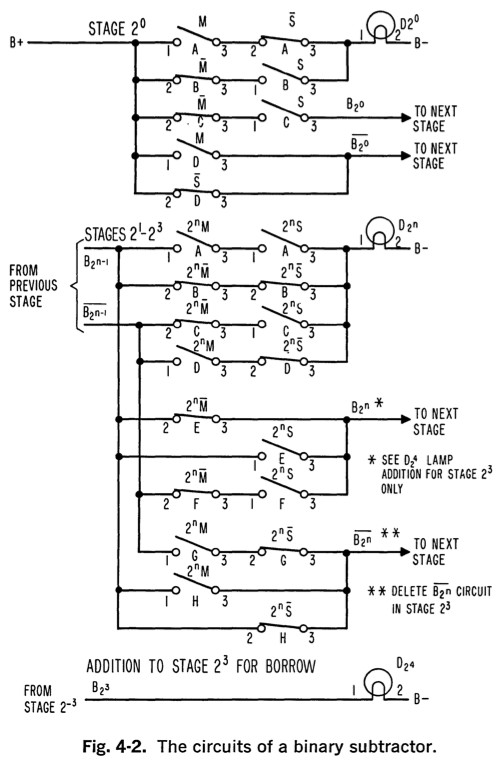
It was the 1960’s, and people were building some very interesting digital computers. One of them was the Digi-Comp II, which we have written about extensively: a binary mechanical computer based on rolling marbles and flip-flop gates.
For an entirely different approach, look no further than How to Build a Working Digital Computer (1967) by Edward Alcosser, James P. Phillips, and Allen M. Wolk. You can download it as a free e-book (PDF, EPUB, Kindle) at Archive.org, thanks to the BitSavers PDF Document archive.
How to Build a Working Digital Computer is both an introduction to the “new and exciting field of digital computers” and a set of plans to build one. What’s especially interesting is that the plans don’t call for any specialized electronic components, but instead show how to build everything from parts that you might find at a hardware store: items like paper clips, little light bulbs, thread spools, wire, screws, and switches (that can optionally be made from paper clips).
That’s not to say that such a computer is necessarily simplistic. Arrays of paperclip logic gates can get pretty big, pretty fast.
The instructions include a read-only drum memory for storing the computer program (much like a player piano roll), made from a juice can, with read heads made from bent paper clips. A separate manually-operated “core” memory (made of paper-clip switches) is used for storing data.
So can this “paper clip” computer actually be built, and if so, would it work? Apparently yes, on both counts. Cleveland youngsters Mark Rosenstein and Kenny Antonelli built one named “Emmerack” in 1972 (albeit substituting Radio Shack slide switches for most of the paper clips), and another was built in 1975 by the Wickenburg High School Math Club in Arizona. And, at least one modern build has been completed, as you can see on YouTube.
Photo credit: History of Computers, Computing and Internet
Perhaps more surprisingly, the “paper clip” computer was also the basis of the Arkay (later, Comspace) CT-650 computer trainer, a rare, early computer that seems to have been built directly from the plans in How to Build a Working Digital Computer.
Photos of an original Comspace CT-650 posted recently at the Vintage Computer Forums show that this computer was a beautiful piece of work— no paper clips or tin cans in sight.
Although it’s a too small to see in the pictures, the fine print below the “core” memory switch array reads “PATENT PENDING.” The brains of the computer being adapted from an existing design, the patent, D210728, claims only the “Ornamental design for the data entry keyboard console.”
So go download this excellent book and make your own wonderful paper clip computer. Link: Archive.org via Friends Of DigiComp


![?? [Senko] - Tokushima LED Art Festival](https://bcdn.evilmadscientist.com/media/2013/05/senkoflash2daylight.jpg)
![?? [Senko] - Tokushima LED Art Festival](https://bcdn.evilmadscientist.com/media/2013/05/senkoflash3dark.jpg)