
Subscribe to continue reading
Subscribe to get access to the rest of this post and other subscriber-only content.
Subscribe to get access to the rest of this post and other subscriber-only content.

In today’s article, we will be taking a look at the U-M-I ProQuest 900 Series Workstation, a 286-class computer. There also seem to of been versions of this machine using the same case simply labeled as NCR or NCR-286. The motherboard components including CPU, video chip, and chipset seem to be mostly the same, only oriented differently. The motherboard in my ProQuest 900 Series may be a later revision as it does include a spot for a 386 socket to be soldered onto the PCB.
The case is a very slimline design fairly similar in proportion to the Tandy 1000RL HD (though a bit taller) leaving only enough room for a single 3 1/2-inch bay in the middle of the case. mine was outfitted with a 1.44MB 3 1/2 inch floppy drive which is the standard drive one would expect to be installed. To the right of the floppy drive are two LED lights for HDD activity and power. Finally, to the far right, we have a nice large oval power button.

On the rear of the case, we have a fan exhaust port on the far left followed by a standard three-prong power cable connector. Next to that, we have what appears to be a small unused cutout of some sort with the I/O starting below it. First, we have a single PS/2 port labeled KBD, which is for a keyboard. Next, we have dual serial ports of different sizes, which is very slightly unusual since in my experience the serial ports are either one or the other but usually not one of each type. Lastly, we have a parallel printer port and a standard VGA port for the built-in video. all in all between the PS/2 and VGA ports we have a fairly modern assortment for a 286-class machine.
Above the I/O and on the right of the case we also have dual expansion ports for adding two discrete cards.

Here we have a look at the inside with the case cover removed. Next to the power supply we have removable sleds for both the floppy drive and the HDD, though my machine was missing the hard drive. From my understanding, these PCs can be quite picky about hard drives and lack any user HDD input in the BIOS setup.
We can also see a riser card labeled NCR-286 which has two 16-bit ISA slots allowing the installation of various cards such as a sound card or network cards if desired.

My machine also had one of those very handy stickers on the inside of the cover outlining the motherboard as well as jumper and switch box settings.
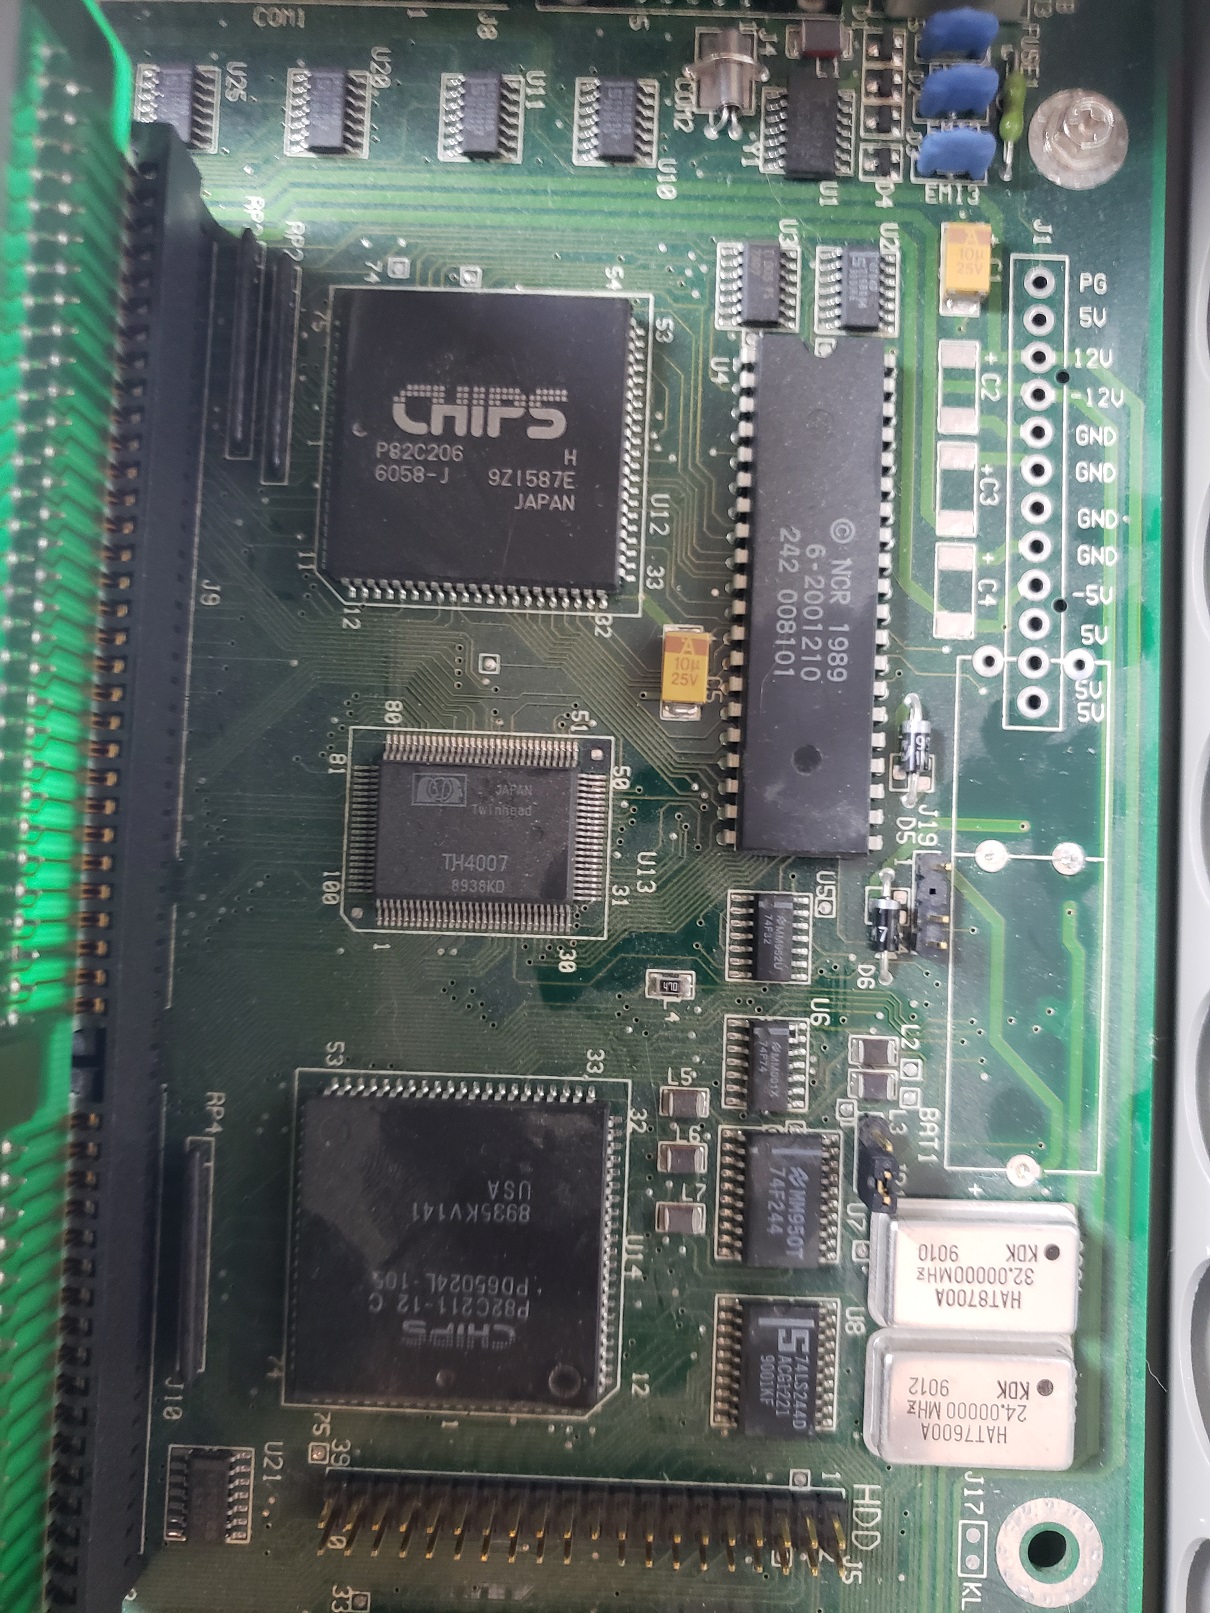
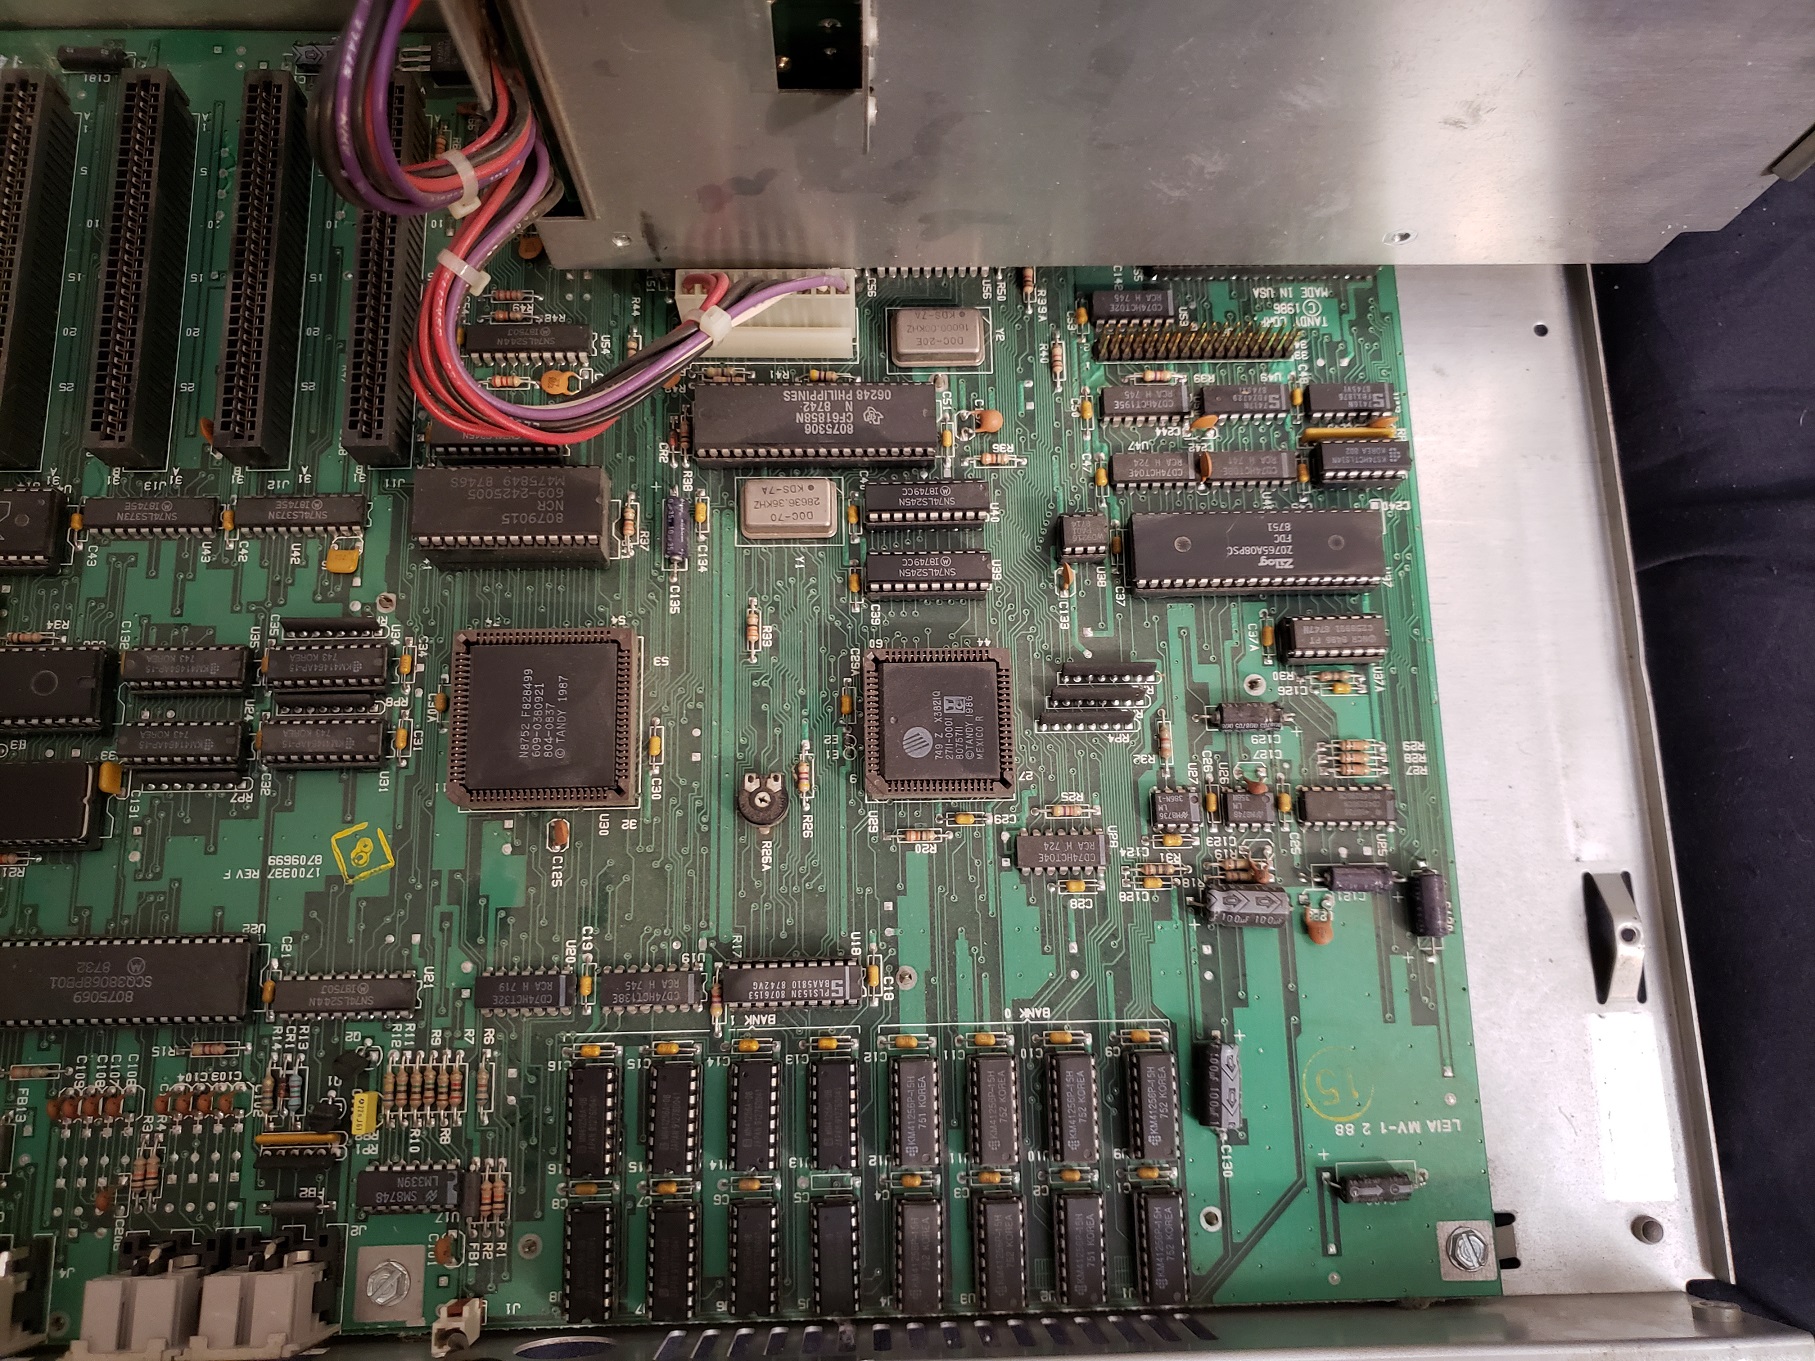
Here is a look at the board with the drive sleds removed.

1) CPU – The CPU is an Intel 12MHz 286. Overall this is a great CPU as far as 286 boards go and should be able to play all of your late 80s and early 90s EGA games without issue as well as some early VGA titles. As far as I can tell the CPU is not upgradeable though there is a jumper for switching to a 16MHz 386 and a solder point for a 386 socket. It may be possible to swap out the crystal oscillators and install a 16MHz 286 but I can’t confirm this.

2) Co-Processor – There is a socket for adding a math Co-Processor though mine is unoccupied. This will help speed up some programs such as CAD design as well as a small handful of games from the time.

3) RAM – the ProQuest comes with a full 1MB of memory on the motherboard. On this board, the memory is located between the ROM chips and the Piezo speaker. Unfortunately, this memory is soldered onto the board as opposed to socketed making swapping out bad RAM somewhat difficult. 1MB should be sufficient for a large number of games that will run well on a 12MHz 286.

4) RAM – The ProQuest does feature four slots for expanding your RAM. I can confirm you can at least expand your system to a total of 2MB via 4x256k memory sticks though you may be able to expand it even greater I can’t confirm this. It has also been reported that this board is very picky about what kind of memory it will accept.

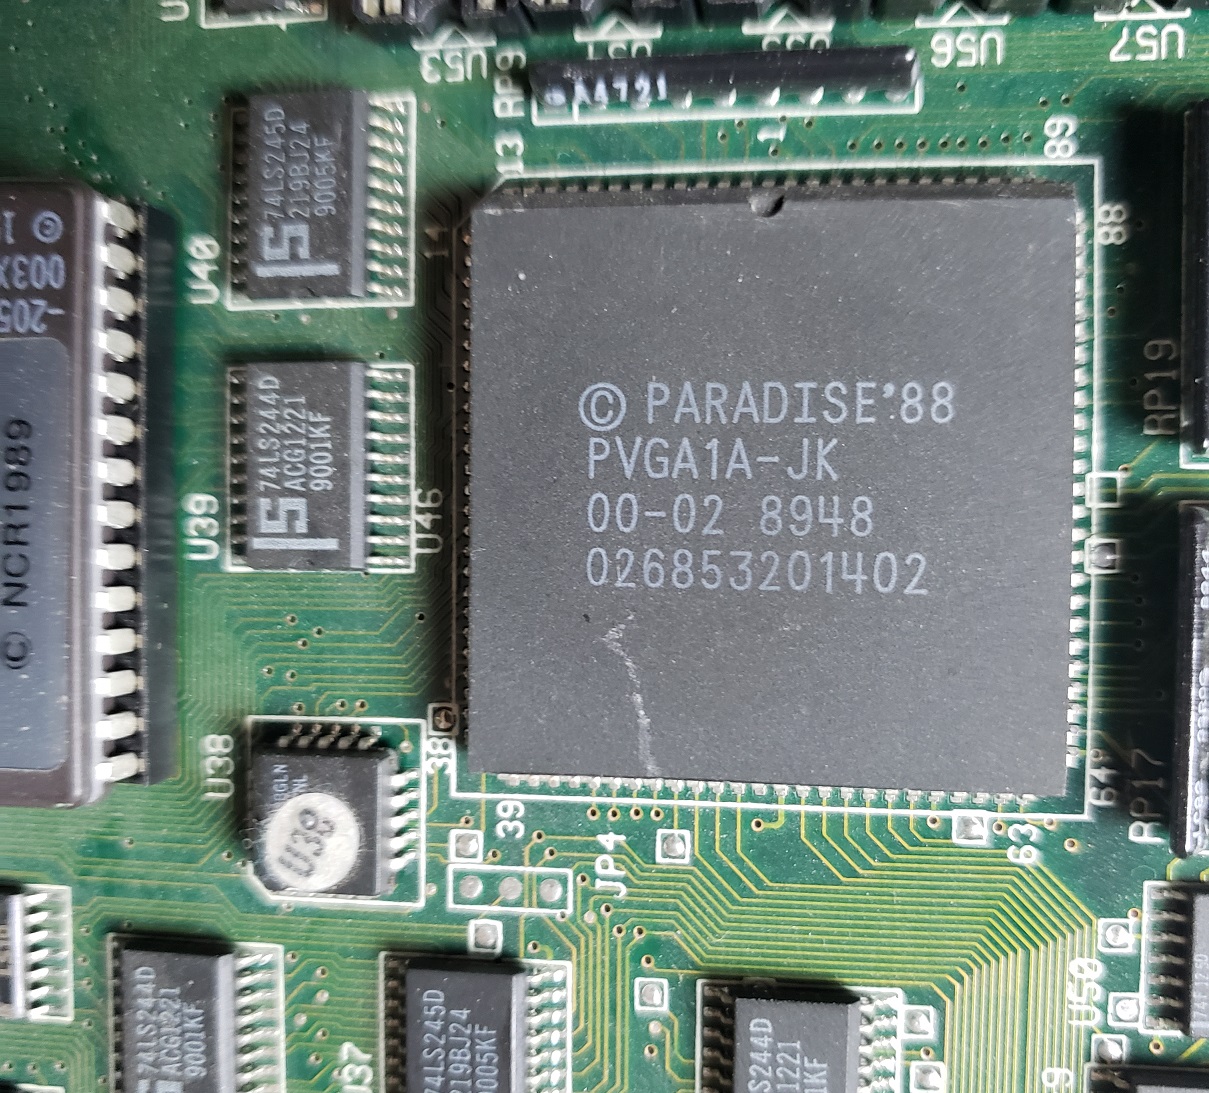
5) VGA video – The board features a Paradise PVGA1A -JK chip as well as 256K of video memory. This was the first SVGA chip from WDC and was considered quite fast for its time. The video memory can be expanded to a full 512K via the sockets next to the soldered-on memory. This chip could be considered a highlight of this machine providing very fast and competent VGA and SVGA output.

6) Switch for enabling and disabling various ports and video modes.
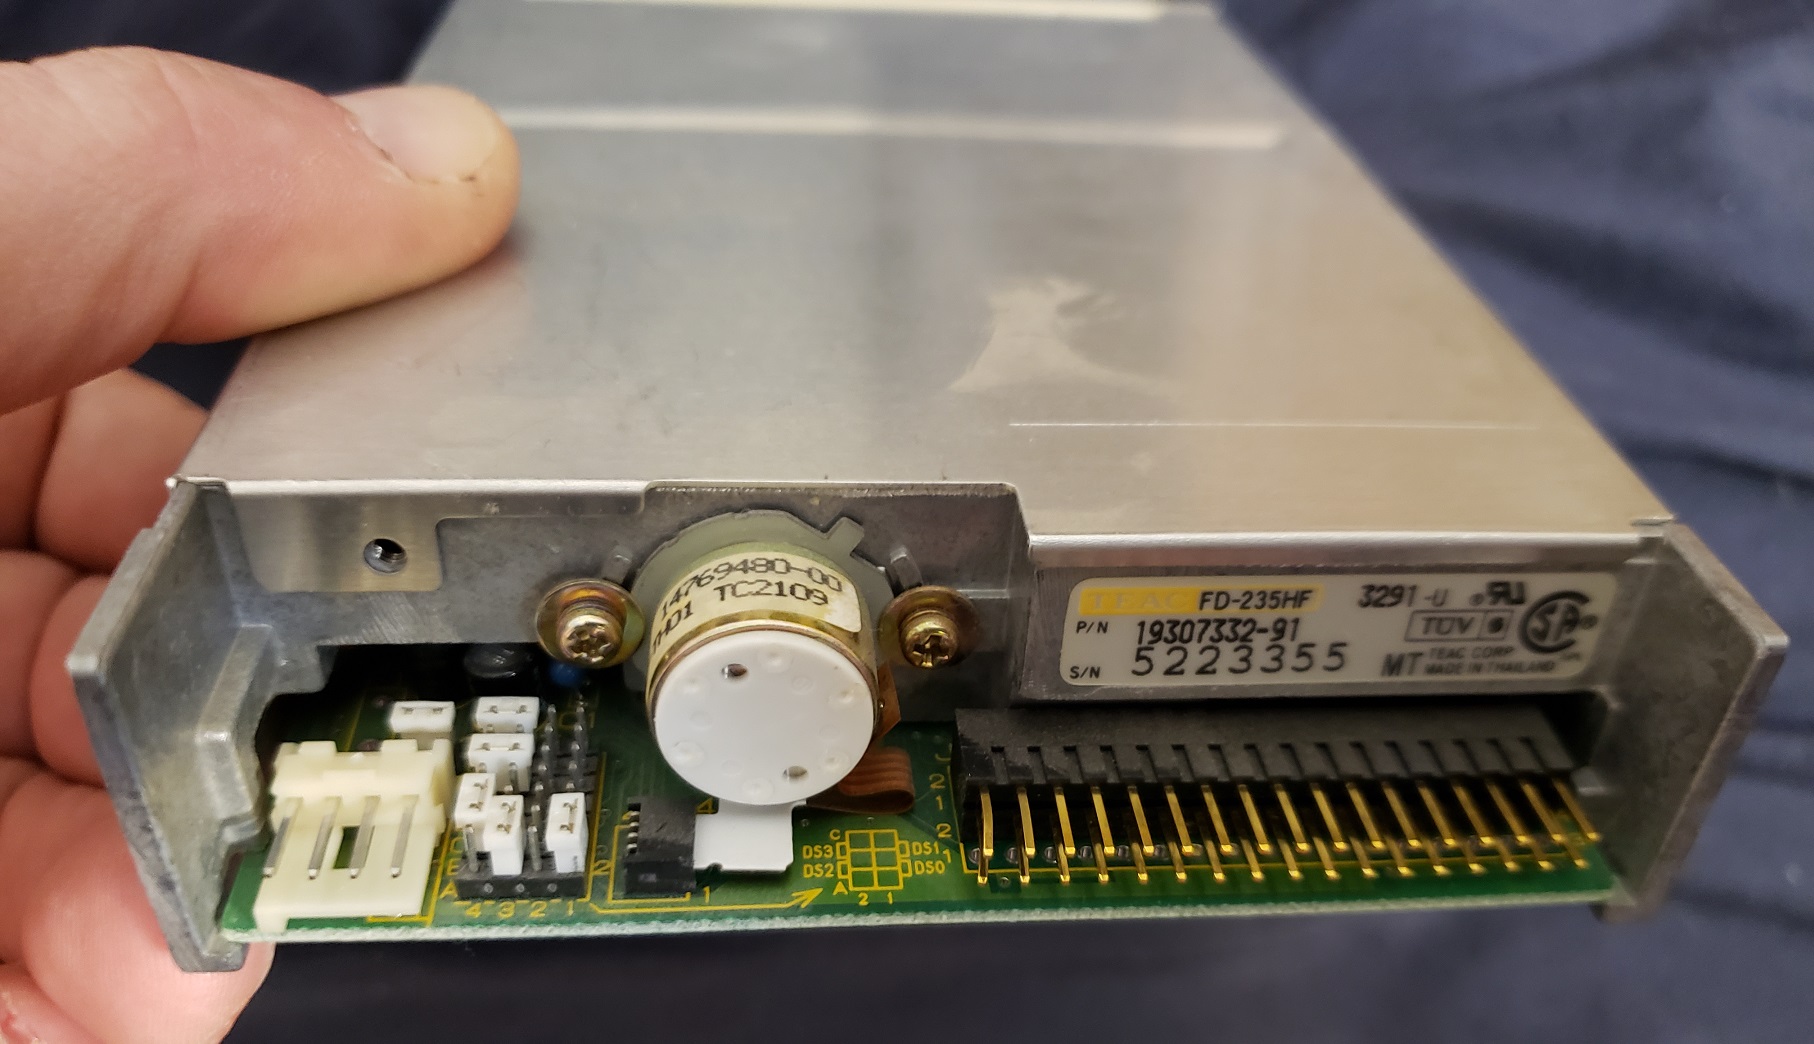
7) Built-in FDD and HDD connectors. The floppy drive controller does support high-density 1.44MB floppy drives. The hard drive controller is IDE but as said before does not support user input in the BIOS for custom drives.

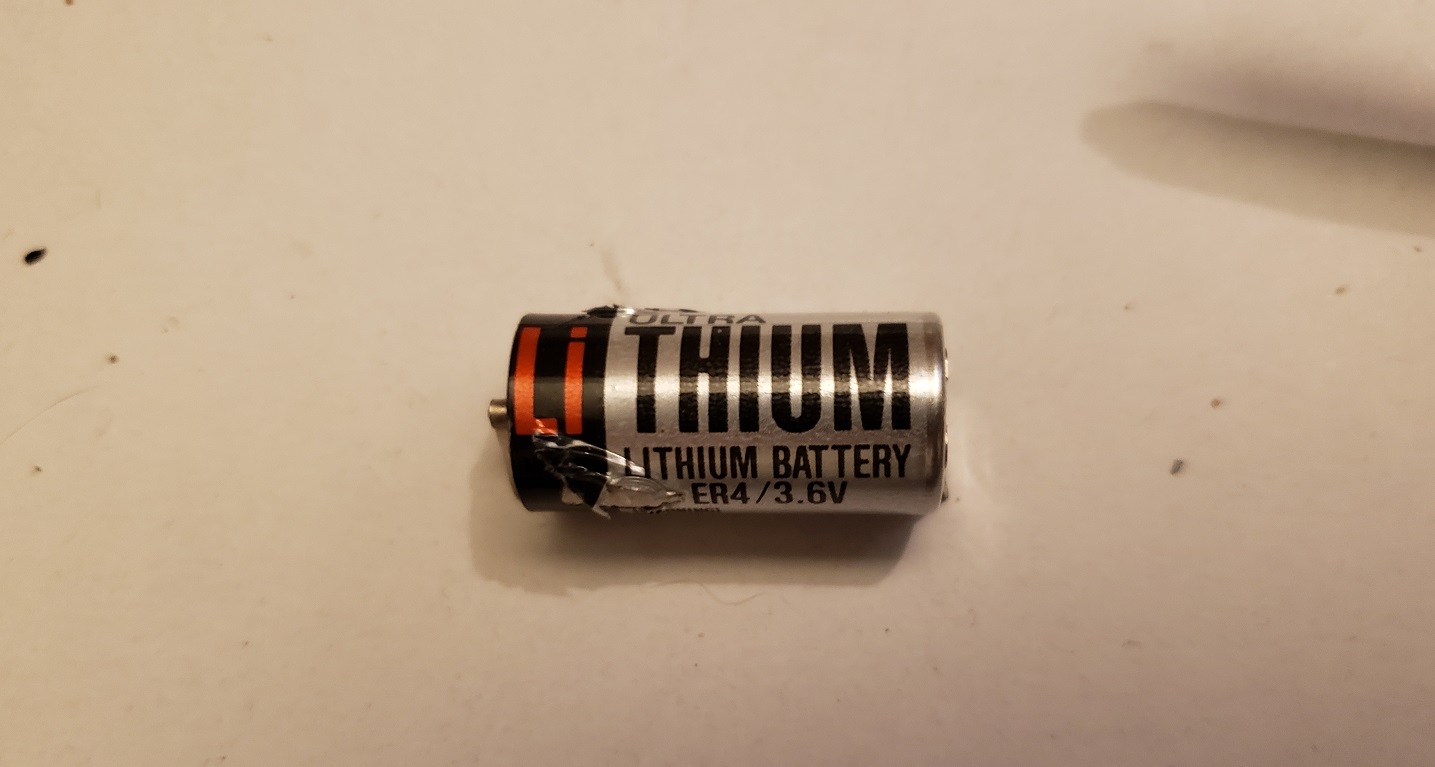
8) Battery – The board uses a barrel-style Lithium battery for the CMOS. Mine was long dead so I removed it. Luckily my board does have pins for using an external battery
9) Power Connector
10) Piezo Speaker – The board does feature a piezo speaker for sound as opposed to a full speaker cone though it does feature a volume control next to the speaker which is nice. You do need to remove the top of the case to change the volume but it’s nice that the option is there at all as this feature is missing on many motherboards.
Overall this is a nice 286-class PC with the Paradise video chip being a particular stand-out feature. The CPU is also quite adequate for a large selection of older games from the 90s and early 90s. Although a full-cone speaker would have been nice it’s good to be able to adjust the volume on it. The case is small and compact and the lack of drive bays could be an issue but the two 16-bit ISA slots and ability to support 1.44mb Floppy drives do make it much more convenient than a PC of slightly smaller size like the Tandy 1000RL (though you do miss out on Tandy video and sound). Throw in a nice Sound Blaster card or Adlib and you have yourself a competent retro PC for EGA and early 90s VGA titles that also won’t take up too much desktop space or break your back to move.

Released in 1987 the Tandy 1000 SX was an evolution of the original Tandy 1000 which itself was a clone of the IBM PCjr. The Tandy 1000 line featured several advantages over standard IBM compatibles of the time such as built-in “Tandy video” which offered CGA video modes along with 160×200 and 320×200 16 color modes. The Tandy 1000 also offered enhanced Tandy 3- voice sound. Both Tandy video and audio were very widely supported in games.
The 1000 SX is an enhanced version of the original Tandy 1000 offering many improvements that more or less correct every issue that the original Tandy 1000 had such as making upgrading and expanding the PC easier and adding a faster CPU “turbo mode” as well as a DMA controller to speed up certain processes. Many retro PC enthusiasts consider the Tandy 1000 SX one of if not the best bang for your buck IBM compatibles of the 1980s.

The 1000 SX case when compared to a IBM PC is noticeably smaller which saves desk space. It’s also mostly made of plastic which also makes it a significantly lighter PC. The SX came stock with dual 360k 5 1/4 floppy drives in its dual 5 1/4 bays though the built-in floppy controller also supports 720k drives. We will detail the process of upgrading to one of these larger capacity drives later in the article.
At the bottom of the front of the case there are two screws on the far left and right. Removing these is all that is necessary for removing the cover. On the bottom left of the front we have a large red reset button. Next to this we have a keyboard port. The Tandy 1000 SX uses a proprietary style keyboard port like most of the early Tandy 1000 line. This port is not compatible with standard IBM type PC/XT/AT keyboards so a Tandy keyboard is required though there are modern adaptors that allow the use of standard PS/2 keyboards.
To the right of the keyboard port are dual round 6-pin joystick ports. These joystick ports are also proprietary and require joysticks compatible with the Tandy 1000 and Tandy color computer line.
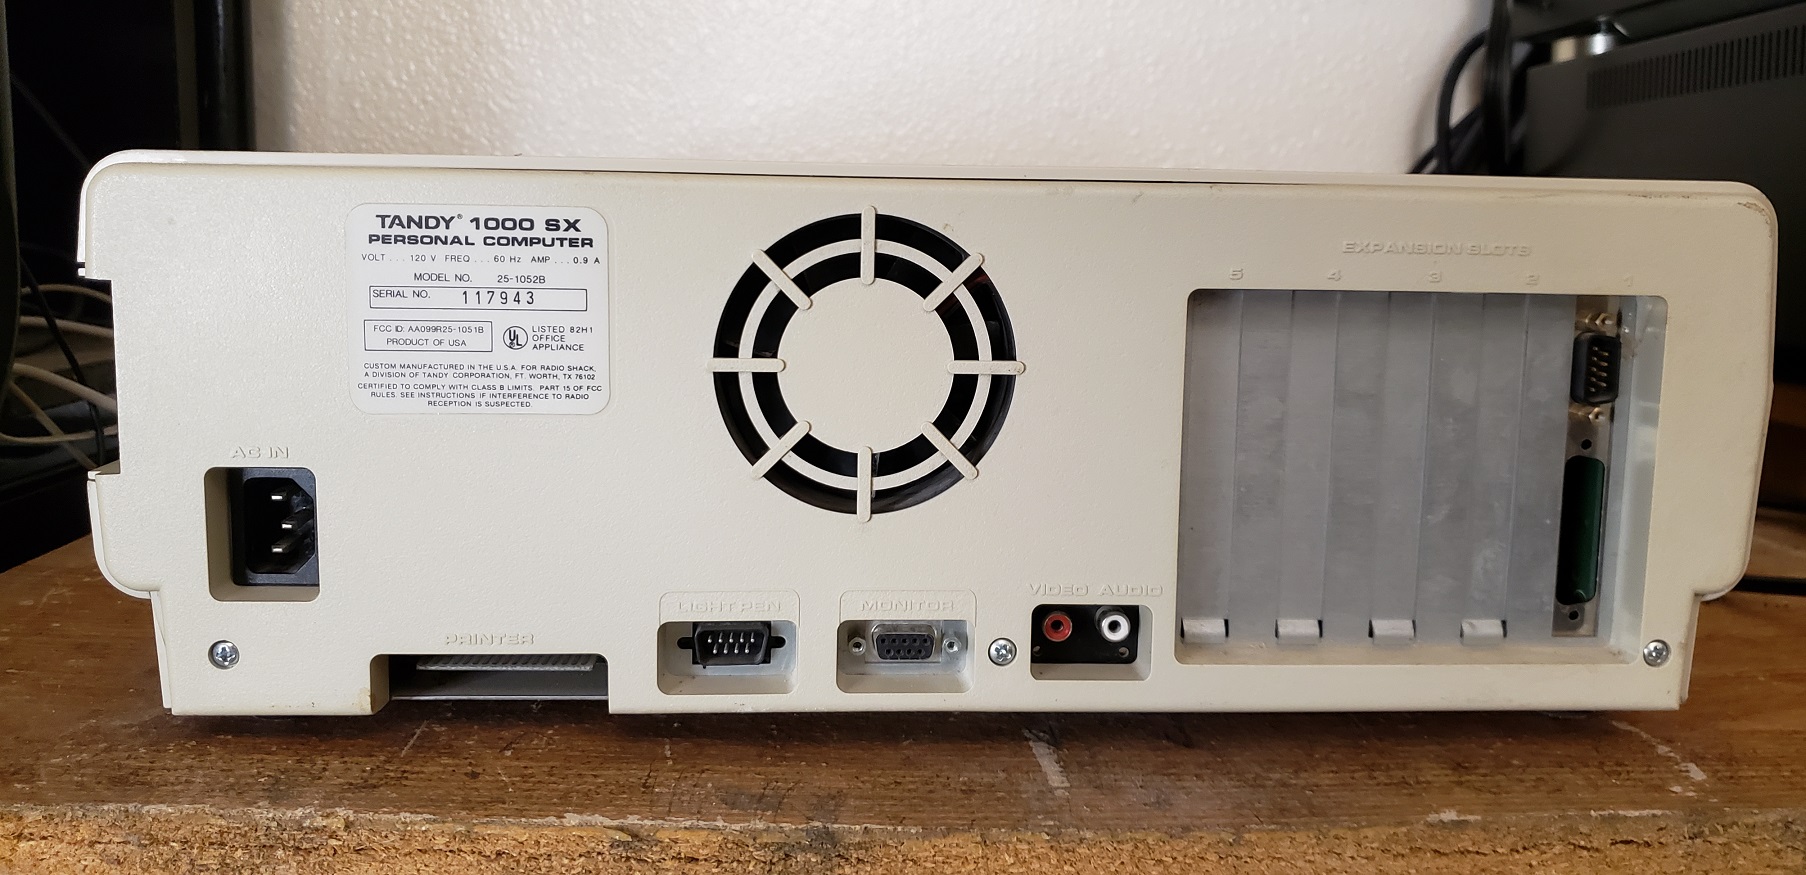
Turning the Tandy 1000 SX around and we can see the various rear connectors. The power switch like the one on the IBM PC/XT/AT is on the rear left side though the switch itself is not visible in this image. Starting from left to right we have a standard 3 prong connector for the power cord. Next is a card edge style connector located directly under the model label. This is actually an edge-style parallel port and is intended to be used with specific Tandy printers. Adaptors were made to connect non-Tandy parallel port devices to the edge connector. Next is the seldom if ever used DE-9 lightpen connector followed by the built-in video and audio jacks.
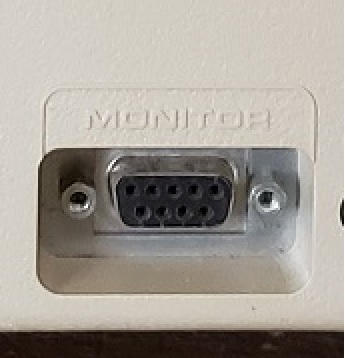
First up is a standard DE-9 connector for connecting to TTL RGB monitors. Tandy made several Tandy specific monitors of differing quality like the CM-5 that I’m using and the higher quality CM-11 but any standard CGA type monitor will work. The video output of the Tandy 1000 SX is based on the video capabilities of the failed PCjr but since the PCjr failed this video standard became known as TGA or Tandy Graphics Adaptor. The Tandy 1000 SX can output standard CGA as well as the TGA modes which allow 16 colors on screen at one time. This more or less resembles the look of EGA in low resolutions though they are not the same.

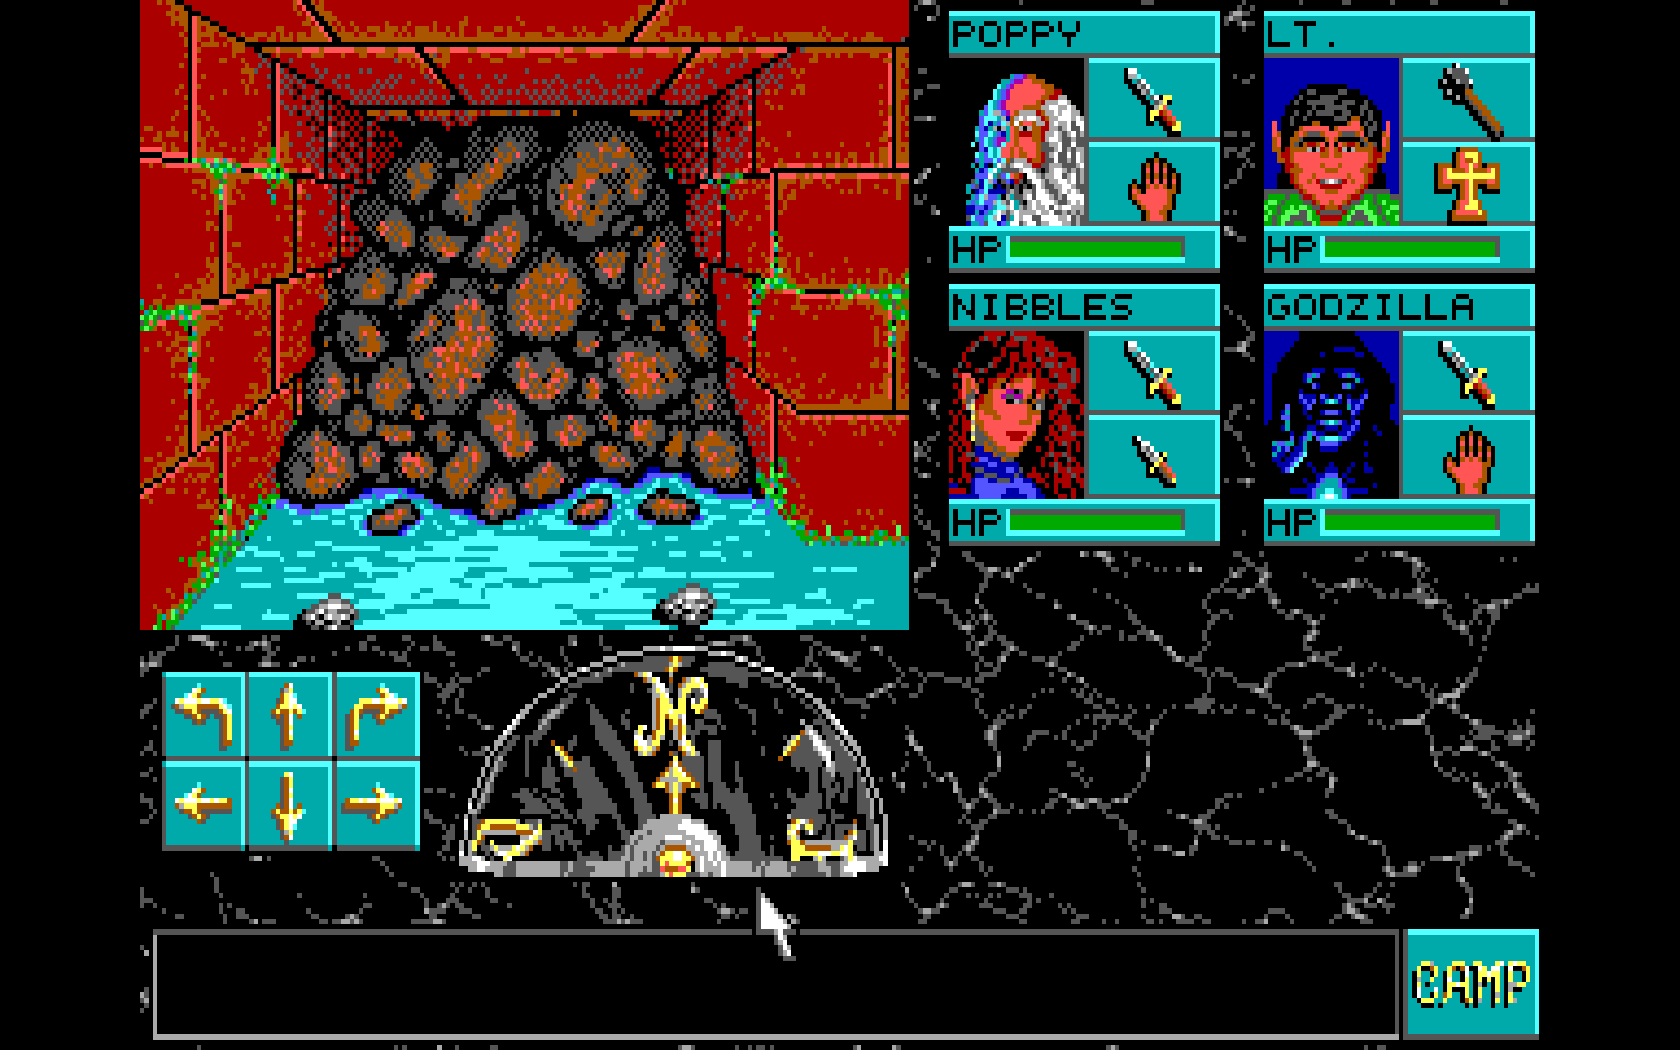
CGA compatibility on the Tandy 1000 line is almost 100% and is CGA register compatible though due to slight differences in text characters used very few games (ex. ICON : Quest for the Ring and The Seven Spirits of RA) may show some minor graphical issues. As for the extended TGA modes available the Tandy 1000 also supports 160×200 with 16 colors, 320×200 with 16 colors and 640×200 with 4 colors out of the palette of 16 colors. A very significant number of games do support Tandy 16 color graphics. Some of these games allow the user to choose the color mode between CGA and TGA but some games will automatically detect if a Tandy is present and force 16 color TGA mode. Some games such as ArcticFox only support 16 color mode via the Tandy graphics adapter.

Next up we have the RCA style A/V jacks for video and audio. At first glance it looks like stereo audio jacks but the red jack is for color composite out for connecting usually to a TV but also to some monitors. Some games may also show differences in colors when displayed in color composite mode on a Tandy 1000 as opposed to an IBM compatible CGA card.
The audio out is very useful if you don’t want to output sound through the internal speaker and instead wish to use an external speaker. The audio out though is disabled by default and some games may fail to initialize. there is a program called tdyspkr.com which should allow you to select the A/V audio jack as active on boot up for those programs which fail to see it.
Since we are talking about sound It’s worth mentioning the Tandy 1000 SX “Tandy sound” which is a bit more advanced than the standard PC speaker and uses 3 voice channels and 1 sound channel is a clone of the PCjr sound. Tandy sound or Tandy 3-voice sound as it’s also known is generated by either a SN76496 or NCR8496 Chip. Some games such as Thexder only support PC speaker or Tandy speaker sound with Tandy sound being noticeably superior and less grating on the ears. If you opt to not use external speakers Tandy 1000 SX also sports a nice sounding large cone speaker at the front of the case

Removing the case to get inside is relatively easy and only requires removing two screws located on the front face of the case.

The only expansion card for my Tandy 1000 SX is an I/O card for a serial and parallel port and this is the only card that was installed in this machine when I received it. The metal bar going across the motherboard from the side to the dual 5 1/4 bays is actually a support beam that is easily removed. Its purpose is to help support a monitor if one is placed on top of the case as was a common practice of the time.
Removing the dual 360k 5 1/4 floppy drives gives us a better view of the motherboard.


Like the original IBM PC the 1000 SX only has 5 8-bit ISA slots. Unlike the IBM PC though, the Tandy 1000 SX has the floppy drive controller as well as the video built-in. The motherboard of the 1000 SX also has a built-in DMA chip to speed up certain processes, something the earlier Tandy 1000, 1000A and 1000 HD lacked.
1) CPU – The 1000 SX uses an 8088 like previous models although the SX runs default at 7.16MHz with the ability to downclock to 4.77MHz for compatibility with older software. The SX has no turbo button so to slow the CPU back down to 4.77MHz you need to use the DOS commands “MODE SLOW” and “MODE FAST” in order to switch speeds. The default speed is 7.16MHz though at boot up you can also press the F4 key on the keyboard to boot into 4.77MHz slow mode. The MODE command which sets the CPU speed is only available in the OEM version of Tandy DOS 3.x.

2) Math Co-Processor – The SX does have a socket next to the CPU for adding a math co-pro. I elected to add an 8MHz capable 8087-2. Adding a math co-pro is hardly necessary and only a handful of programs and games from the time can take advantage of it.
Next to the CPU is a small switch box. These switches can be used to disable several features mostly for the purpose of adding discrete cards. All switches are set to “on” by default. switch 1 disables the built-in video. Switch 2 controls the IRQ the built-in video uses. Switch 3 disables/enables the internal floppy controller and lastly switch 4 will enable/disable the parallel port.

3) RAM – By default the 1000 SX came with 384k of memory but is easily upgradable to a full 640k of memory. My 1000 SX only came with the original 384k of memory but I upgraded to the full 640k via eight 256k x 1 150ns (or faster) DRAM chips. After adding the additional memory jumpers E1 and E2 also need to be removed for the system to detect the change.
640k should be enough memory for any game that will run well on the SX and there is even evidence that expanding past 640k on a 1000 series can cause issues and incompatibilities with games.

4) System ROM BIOS / Smartwatch Battery – This socket is used for both the system BIOS chip on the SX as well as the battery which holds time for the system clock.

you’ll notice that on my machine the BIOS chip is in a socket that is a little high. that’s because my SX has a separate battery module in between the motherboard socket and the BIOS ROM. I don’t believe all SX’s have this module but mine does. its purpose is to hold the date which needs to be entered every time Tandy DOS 3.x loads up on boot. To access the battery you have to first remove the ROM chip which is socketed over it.

You can still purchase a modern replacement for this battery HERE which allows the use of a coin-style battery.
5) Speaker Volume control – Unfortunately there is no way to control the volume of the speaker from outside of the case but Tandy did include a volume adjustment on the motherboard. If turned down all the way the speaker can be completely muted.

6) floppy connector – Built-in connector for connecting floppy disk drives to the SX. The built-in controller supports both 360k 5 1/4 disk drives as well as 720k 3 1/2 style disk drives.

7) Tandy sound chip – As mentioned earlier the Tandy 3-voice sound is generated by either an SN76496 or NCR8496 Chip. For the Tandy 1000 SX it can be either chip. My SX uses the NCR8496 which is a clone of the original Texas Instruments SN76496 chip.

It is almost a perfect clone though there are slight audible differences in the noise channel. I suppose since it’s socketed an original SN76496 could be sourced and swapped out with the clone chip. If you are interested more information on the sound chips can be found HERE.
There are common upgrades that apply to most all PC and XT machines such as an NEC V20 for a small speed boost or XT-IDE adaptor. There isn’t any place to really mount a hard drive and I use a XT-IDE compact flash adaptor myself which works well. I am using a 32MB card with Tandy DOS 3.2 installed but DOS 6.22 with a larger CF card works just as well.

A hardcard or hard drive on an ISA a card would be a more period correct, though slower option.
I don’t recommend adding an EGA or VGA video card to the SX though you certainly can I just find the whole point to using a machine like this is to take advantage of the Tandy sound and video that so many games supported.
A serial card or bus mouse card could also be useful if you are planning on using a mouse with your Tandy.
I did however add a Sound Blaster 1.5 w/ CMS chips. I’ll be using this machining mostly for older titles that support PC speaker or Tandy sound only though I wanted the option for games that do support digital sound and or adlib/CMS sound.

The upgrade I would definitely recommend is replacing one of the 360k 5 1/4 floppy drives with a 720k 3 1/2 drive. I replaced my drive B with a 720k drive as opposed to drive A since the primary format of the time was 360k disks and thus many “booter” type games came in that format which may require being read from drive A. Since there are no 3 1/2 size bays on the SX case you will need a 5 1/4 to 3 1/2 bay adaptor. Keep in mind you can press the F3 key on bootup to swap the A and B drives.
Some things to consider when adding a 720k drive is that the cable the SX uses is very short and also uses edge connectors so it’s very likely you will need some kind of adaptor and or extension to reach for the floppy drive or you’ll need to use a different cable altogether.
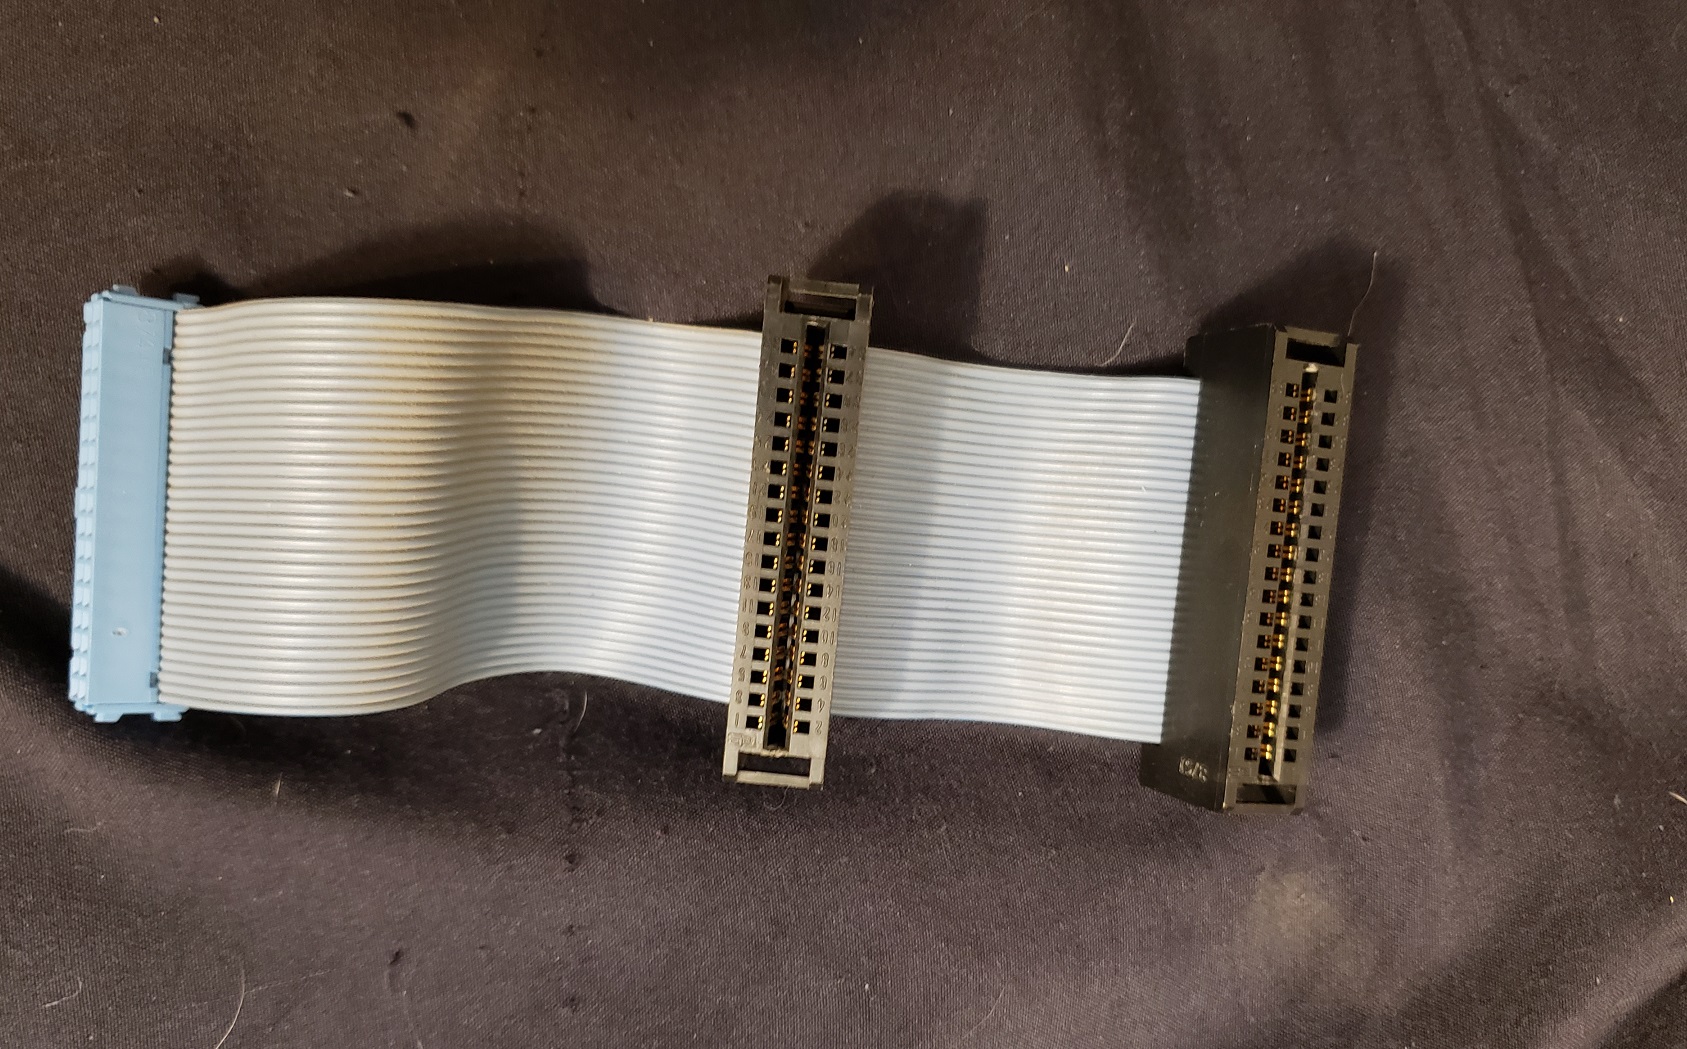
Another thing to keep in mind is the Tandy 1000 SX uses floppy cables without a twist in them so you will need a 720k floppy drive with jumpers that allow you to designate what drive it is.
D0 designates the drive as drive A while setting the jumper to D1 sets the drive as the B drive.
If you can’t find an adaptor and or extension which allows you to use the original short floppy cable that came with the Tandy 1000 SX you will either need to find a longer floppy drive cable without the twist or modify a more common “twisted” floppy cable by untwisting the cable as seen below.

Unfortunately, I had no luck getting my modified cable to work though I know others have. I did end up finding an edge connector adaptor that also had an extension cable attached to it which allowed me to use the original cable that came with my SX and everything works fine.
So is the Tandy 1000 SX a great computer for 80’s PC gaming? I’d say so and I would at the very least say it was one of if not the best value for the money at the time. The built-in Tandy sound and video were far superior to PC speaker and CGA common at the time and many, many games supported the standard. There are a number of games that are just best experienced with Tandy color and or sound. You could have bought an EGA card but those would have been quite expensive and sound cards weren’t really supported until the late ’80s. The option to run the CPU at both 7.16MHz and 4.77MHz for compatibility is also a nice bonus. The 1000 SX is also lighter and takes up a little less desktop space than comparable IBM models and as mentioned at the beginning of the article the SX fixes most of the issues that hampered the original Tandy 1000. I like the Tandy 1000 SX so much I’ve actually replaced my primary 8088 based XT PC with it despite that machine still holding a few advantages over the Tandy.

I was doing my usual rounds at my usual thrift when a PC caught my eye. I knew from the stickers it was a mid 90’s machine and sported a Pentium II. Unfortunately I’m already up to my eyeballs in mid 90’s P1 and II machines and I had no reason whatsoever to buy this machine. Whats more it was priced at $24.99 which is a deal more then I normally would be willing to pay for a machine like this. Despite this it called to me. that case, the normal off white color of the era yet also sporting aggressive frontal styling and slimness. I knew of the Dell Dimension series, a mid-high end line from Dell and despite not owning one in their hey-day I have a sort of soft spot for the series and regularly preferred using them previously for Win 9x machines. After attempting to open the case and gaze on the goodies inside, and failing, I gave up and left. I know I didn’t need this machine yet I felt regret for not picking it up. A few days later I returned to the thrift and to my mild surprise the Dell was still there and the case was open. I took a peek inside and saw it sported an AWE64 which I could defiantly use in other machines as well as an Nvidia RIVA 128, A card I never really played around with. There was no hard drive and it was still overpriced at $24.99 but I gave in and despite my better judgment I bought it. At the very least it would make good material for a blog article I thought. That said, without further adue, the Dell Dimension XPS D300.

The Dell Dimension line was the name Dell gave to their line of PC’s for homes and small offices and they were usually of decent quality. The XPS line was at least at first reserved for there high end cutting edge machines with XPS standing for Xtreme Performance System, because as we know everything in the 90’s was EXTREME! sometimes even omitting the E for extra XTREMNESS!. The XPS D300 here came out in late 1997 from what I can figure and indeed uses very high end parts for the time. This machine would be one of the last and faster machines “designed for windows 95” before win 98 came out the following year. The D300 here was one of the highest spec PC’s of the D series of XPS computers. I’m not 100% sure whats stock on this machine but I’m pretty sure the second CD drive with the blue highlighting was added by the previous owner but it does match the upper blue case label and goes well with everything. I’m also not 100% sure about that Zip 100 drive below it either but from the pictures I’ve seen online of the D300 most have one installed in the same place so I’m betting the Zip drive is stock. The power button is easily accessible mid case and the smaller reset button a little below it. I don’t know what it is about these machines but I’ve always loved the case styling of the Dell XPS and Dimensions series. The case itself is also thinner then an average PC case.

We can see here that the case is tool-less to get into and only requires unscrewing one screw that can be done by hand. Under the PSU we have a really nice and large case fan to assist with cooling. Built in ports are a little sparse with two ps/2 ports (that are interestingly none color coded for the time). Two USB ports most likely 1.1, as well as a printer and serial port. Absent is the built in video and to a lesser extent built in audio. This is actually a mark of quality though as usually built in video/audio is of the low quality sort and is easily blown away by most add on video/audio cards. As I don’t think its likely at all that Dell sold their machines without any video or audio cards I can only assume the cards I found installed in mine were stock from the factory. This would make sense as the cards are period correct for 1997 and of higher quality which would also go along with the rest of the D300. Usually I go into the cards near the end but It feels right to go over them now since were on the subject. Keep in mind I don’t know for sure if these are stock cards.
First we will talk about the video card.

This is the video card I found inside. An AGP Nvidia RIVA 128 from 1997. Since in depth spec information on this model seems to be scarce I can only assume this is the card that came stock with the D300. It does make sense this being a high end machine as the date of the card matches the computer and the RIVA 128 would of been a higher end card to use in 1997 when it was pretty hot stuff competing with the 3DFX Voodoo. It was one of the earlier cards to use the then new AGP bus slot and was one of the earlier cards to integrate 2d and 3d into one card. The Riva 128 makes a decent card for DOS as well as early Windows 3d stuff. Its a great all around card and I’d suggest keeping it installed if you want to keep the machine 1997 stock correct. If not, toss in something more powerful, perhaps from the next generation Nvidia TNT or TNT2 line.
for audio we have…

A AWE64 CT4500. This would make it the AWE64 Value with only 512kb of RAM. Overall its still a decent card and as I suspected with the video card I also suspect this was the card that came stock with this machine though I was hoping it was a non value edition. Its doesn’t have true OPL FM or a waveblaster daughter board header but its not a half bad card. In DOS it will mostly act like a AWE32 with clearer output and If you hook up an external midi module the AWE64 is free of the “hanging midi note” bug found on just about all Sound Blaster cards from the SB16 to the AWE32. Its a good all around card for DOS compatibility and Windows 9x. Stick with this card or upgrade to the AWE64 gold if you want to stay period correct or plan on using the D300 for DOS heavy gaming. If not, A PCI sound blaster live! or something using the Vortex chip from Aureal. You’ll lose some ease of use and compatibility in DOS as is the case with all PCI sound cards but they will make better overall Windows sound cards in my opinion. (I actually replaced the AWE64 in my machine with a PCI Monster MX300 with a Aureal chip)
Now for the motherboard itself.

One of the first things to catch the eye is the CPU and the massive copper heatsink. The motherboard itself is a slot 1 motherboard and features the Intel 440LX chipset and the at the time new AGP slot for video cards as well as PCI and ISA slots giving a lot of nice expansion options for building a DOS or Windows machine. The PC speaker is a “beeper” type so it doesn’t produce as great a sound as a true PC speaker. You can also notice in the image above the vertical bay to the left where normally a PC speaker or case fan would go. That bay is for a hard drive but on my system I simply mounted my drive in a more traditional manner In a bay under the Zip drive. I don’t know the type or size of the hard drive that came with this model as it was removed when I received it but my guess is that it was a 2GB+ model hard drive. I installed a simple 1GB model IDE drive to replace the missing drive.

There is no L2 cache on the motherboard since slot 1 CPU’s have L2 cache on the CPU package itself.
1) CPU – The CPU in the D300 as the name may suggest is a 300mhz “Klamath” Pentium II. This CPU was pretty hot stuff in late 1997 and would of been a good choice for a higher end PC. The heatsink on this CPU is huge.

As you can see there is no fan directly on the CPU and my guess is the design here called for the oversized heatsink to be cooled by the case fan behind it.
2) – CMOS battery
3) RAM – 3 sockets for up to 384MB of PC66 SDRAM as I have here.
4) two IDE connectors and above them a floppy drive connector
5) this cable connects the reset/power buttons on the front of the machine to the motherboard.
Even with the praise I’ve given it the machine does have its faults. First of which is the case. Just let me say again I love the case. I love the look and the ease of taking the side panel off with one hand screw BUT I still have not figured out how to take the other side panel off. This prevents me from removing any dead drives and the ones currently installed are screwed in on both sides. I know it sounds silly and there’s probably a manual online…wait, let me Google that real fast…..no, nothing I could find in 5 minutes anyways. just dead ends. its unacceptable when you have to hunt down a manual to take a case apart or maybe I’m just missing something here.
Second issue I had is the password which is set to be there by default. Usually the user sets a password and then if the CMOS battery dies the password dies with it but in the case of the D300 and I suspect most Dells of the time the opposite is true. I received this PC with an obvious dead CMOS battery so after POST I was presented with a road block in the form of a password. What you have to do is find this jumper on the motherboard.

Jumper pins 2-3 to set the machine to “config mode”. reboot and then go into BIOS and set things to no password. make sure you have also replaced the CMOS battery with a working one or else you will need to do this again after you power down. Power down and replace the jumper to pin 1-2 for “normal mode” Its not a huge deal but it was kinda annoying.
Lastly we have the proprietary Dell power connector.

This is the bane of most all Dell PC’s from 1996 until about 2000 and you can actually fry your system if you decide to try and use a standard ATX power connector. Basically if your PSU dies its not as easy as grabbing a spare ATX PSU you may have lying around or can find at goodwill for $5 the same day. There are a few adapters I found on eBay that let you hook up a regular ATX power supply for about $6 so that may be an option though I cant comment on there reliability.
The machine performs adequately and truth be told makes a pretty cool Windows 9x machine or even a good DOS PC depending on what video/audio cards you decide to go with though even the stock cards are well up to either task. The biggest real downside is the Dell PSU but that’s only really an issue if it decides to die on you. As far as OEM machines I would recommend it though I currently definitely prefer using generic cases and building your own machines from scratch this would of been a pretty nice PC for 1997.
Benchmarks for DOS
300mhz Pentium II MMX, 384MB SDRAM, Nvidia RIVA 128
3DBENCH – 179.2
PCPBENCH – 78.5
DOOM – 70.07
Quake – 58.3
 This is the Dell Dimension XPS R450 which is at the highest end of the Dimension Pentium II line. Its uses the exact same motherboard as the D300 with the only difference being the CPU is a 450mhz Pentium II. It even still has the oversized heatsink with no fan. Obviously the front of the case is redesigned but offers the same number of expansion options though the lowest slot now needs to be a floppy drive or ZIP drive. I think this machine was altered by the former owner but the Video card was an Nvidia TNT card
Before we had Ipads and notebooks and even laptop computers we had “luggables”. Luggables were an early type of portable computer. Closer in many respects to a desktop then to what we know as a laptop this was the best early designers could do to make a PC portable and in many cases had to implement bulky technology of the time like large 5 1/4 disk drives and CRT monitor screens. The name comes from the fact that often they were more like luggage that needed to be lugged around then like a laptop that was easily portable and light. In many cases a luggables exceeded 15+ pounds. Another general trait is the need for a power cord and a wall outlet and no battery power severely restricting use while “on the go”. We will be going over two such luggable machines from two ends of the spectrum. The Kaypro 10 a more traditional luggable from earlier days and a later Toshiba T3100 that uses technology like a early gas-plasma screen to reduce weight and size and almost enter the era of the laptop.
Kaypro 10
First up is the Kaypro 10 from 1983.

First off I have to say I had two of these systems and both had the same issues of not being able to detect the hard drive as well as freezing up after a few minutes after booting from a floppy. That said I don’t have a lot of experience in using these machines. Also I sold off my two units and forgot to take that many images so :(. The kaypro 10 was part of the successful Kaypro line. From what I’ve read it was one of the first computers to come with a hard drive. In this case a 10 MB MFM drive. The K10 came with a 5 1/4 double sided double density 390k floppy drive, a 4mhz Z80 CPU, 64kb of RAM and ran CP/M. As you can see the K10 came with a 9′ green screen CRT monitor built in. In the rear there is a printer, serial and modem port as well as the reset and power switch. The keyboard latches on and covers the screen and there is a handle on the back of the machine so you can lug it around like a bulky 15+ pound briefcase. I really wished I could get either of mine working but even if I did these are CP/M machines and CP/M is not known for its gaming.

The metal box to the far right is the floppy drive and directly to its left is the hard drive enclosure. Under that motherboard is the CRT tube.

Here is the motherboard. not to much to say. That chip directly above the cable labeled MOBO J9 is the Z80 CPU and I think those little chips under the cable are the RAM chips.

This is the controller board. It is located on the right side of the machine screwed onto the side of the floppy drive enclosure. This board controls the HDD and FDD. Other then that I don’t have a whole lot to say about the Kaypro 10. I didn’t get to use it much due to the fact both my machines had issues and also I’m not very experienced with the CP/M OS which is primarily a business OS. It is though, a very good example of an early portable PC. The large built in CRT was typical and in the K10s favor the screen is actually big enough to be usable and having a actual hard drive is a huge plus. The thing is not easy to carry around. You don’t need to be the hulk to carry it but its certainly not without effort. I would hate to be the businessman that had to lug this thing to the office and up a flight a stairs on a hot day while in a business suit. Two Kaypro 10’s were apparently used by the medical team in the 1984 Paris-Dakar race and powered by the car battery which I guess at the time was very hi-tech.
Now lets look at the other end of the spectrum at a machine that acts as sort of a missing link between luggables and laptop the
Toshiba T3100

This machine came out in 1986 and in many ways is far more closely related to the laptop. The main difference is that the T3100 still relies solely on wall outlets for power and has no battery ability like a laptop does. This machine is also in general heavier and more bulky then many early laptops. I found this machine at a local thrift chain and as you can see the screen is a little messed up with vertical lines through it and barely readable. Other then a broken screen the machine boots up with no issues and luckily there is a way around the screen issues I’ll get to in a bit.
The T3100 uses a amber gas-plasma display greatly reducing size and weight from the large CRT in systems such as the Kaypro 10. This machine is powered by a Intel 7.16mhz 286 and sports 640kb of RAM upgradable to 2.6MB. Unlike the K10 this machine is a DOS machine opening up many possibilities. Mine came with DOS 3.2 on its 10MB hard drive. The manual states the CPU can be down clocked to a compatibility mode of 4.77mhz to help run older software but to do this the manual states ” [this] can be done by depressing some keys of the keyboard”. What those keys actually are though is anyone’s guess.

My T3100 has a standard configuration of a hard drive and a 3 1/3 inch 720kb floppy drive, another technological leap from the K10.

There is also a port on the rear to add and external 5 1/4 drive and a switch on the left side of the machine to configure A: and B: drives. Now will take a look at the rear of the machine.

Other then the Power switch and starting from the left we have an expansion port that has a proprietary connector for adding things like a modem or I think memory expansion cards as well. There was also an external base that housed up to five ISA cards that could be used to expand the T3100 abilities. This though would obviously come at the price of the portability. Next to that we have a serial port and then a printer port that also acts as a port for an optional external 5 1/4 drive. Next to that are some DIP switches to set things such as memory and display. I’ll post a chart on that here.
 And lastly we have a very convenient RGB port for hooking the T3100 up to an external CGA monitor.

This is very nice for situations such as my own where the built in gas-plasma screen is damaged. The CGA chip is fully CGA compatible and has a hi-res 640×400 mode which is very much like the mode in the AT&T 6300 PC which is well, unusual, but in a good way. Lastly I’ll include a layout of the internal motherboard.

I’m not really a laptop or portable PC guy and prefer the expansion and sturdiness of desktop systems but the T3100 is a decent DOS game machine for what it is, if you can get past the amber monochrome screen. You could add an expansion bay and a CGA monitor but when you do that you defeat the purpose of portability and may as well use a desktop. I think the Kaypro 10 and the T3100 make a good and interesting example of how luggable PC’s evolved in just a short period of time.

In this article we will be looking at what I consider the ideal setup for a 386 based PC. The 386 is the predecessor of the 486 CPU that we looked at in my Anatomy of a 486 DOS PC article. The CPU was produced from 1985 to 2007 but I think the heyday of this CPU and PC’s based around it is roughly from the late 80’s to early 90’s. The 386 is really the first CPU that was powerful enough to take full advantage of things like VGA and acceptably run games like Wolfenstein 3d. The golden age of DOS gaming lies with the 486 but it really started with the 386.
So why would you want to build a 386 based machine? Well that answer depends on you. Some people just consider it a cut down 486 and a somewhat uninteresting CPU. To a degree This is somewhat accurate and I myself would usually suggest a 486 or Pentium 1 over a 386 machine if you could only have one. So other then building an era correct machine for fun is there any practical reasons?
I would say yes though in all honestly like the Windows 3.1 based machine I covered earlier Putting a 386 together is more of a hobbiest pursuit then a mandatory build for classic PC gaming but I can provide two reasons.
1) sound options. This really only applies if you already have a 486. If you do you probably already have a sound blaster 16, maybe a midi card as well? multiple sound cards can be a pain to configure in DOS and some older sound blasters have been reported to have some mild speed issues with fast 486 machines and Pentiums. with a slower 386 you can experiment with different lesser known sound cards or if you went with the old stand by sound blaster 16 in your 486 you can mix it up and throw a older sound blaster or sound blaster pro in a 386 machine. Many games sound better on a SB or SB pro and the later SB pro cards tend to be less “noisy” cards then the later SB 16’s.
2) earlier games with speed issues. Probably the best reason to build a 386 machine. There is a limited era where games were coming out for 386 based PC’s and some of these games are rather CPU speed sensitive. The best known example of this is Wing Commander, a rather well known and beloved game that is terribly speed sensitive. Even a faster 386 or a slow 486 feels “off” with this game and a slower 386 around the 25mhz mark seems to be the sweet spot. Bubble Ghost and Test Drive III (as demonstrated via the 386 and 486 videos by LGR) are other games that come to mind that are very speed sensitive to faster 486 systems. With a faster 386 and a decent video card you can run games like Wolf3d extremely well and late EGA games just “feel right” on this machine.
Then again if your reading this page your probably a classic PC enthusiast and don’t really need much reasoning to put a classic build together. I know for a lot of people the 386 was their first real gaming PC so nostalgia can play an important roll in PC building. With that out of the way I’m going to commence detailing what I think is the ideal 386 machine and what I put together myself.
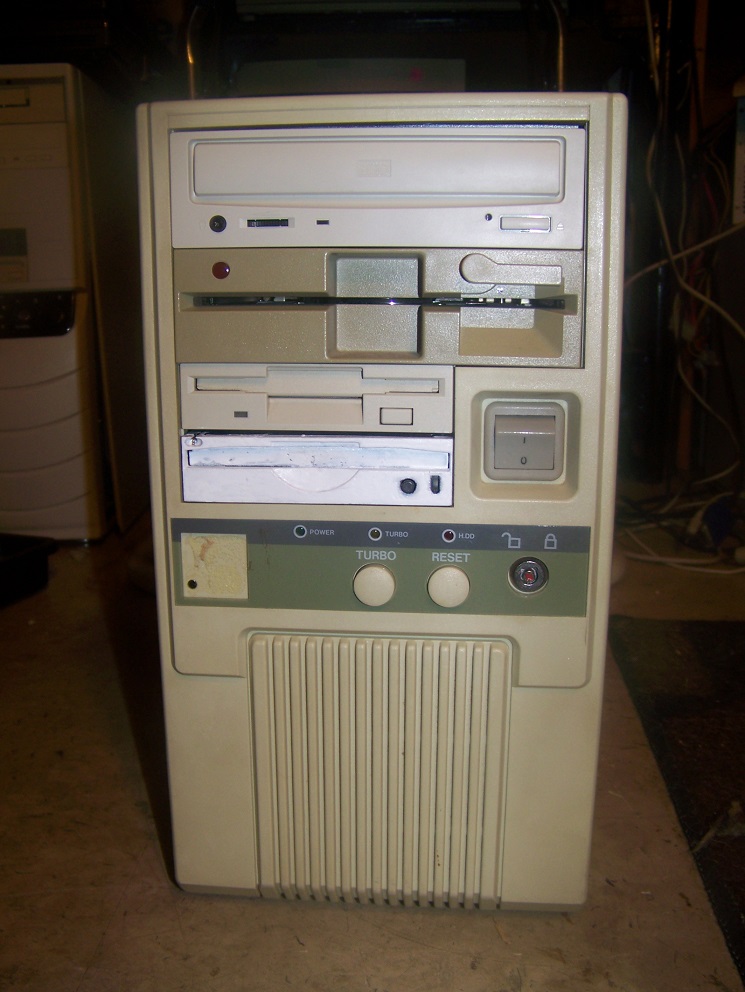
Here’s my 386 PC in a tower case. I try to use a case that captures the look of whatever era I’m going after and I think this tower suits the time. The 386 era seems to be when tower cases really started to come in vogue as opposed to desktop cases. I’m personally partial to desktops and that’s the form I used with my 486 build but I rather like the styling of the 386 era cases. There IS a style difference in my opinion though it may be subtle. In my opinion towers of the earlier era seemed to have more “flair” if that makes sense. With this case you can see it at the bottom with the large reset and turbo buttons (turbo button slows down the CPU BTW for compatibility with older games) and the extra big power button and then the grooved base. I think later cases starting around the 486 felt more utilitarian, boxy and plain with small buttons. It was still pretty common to find big power switches on the cases as opposed to press buttons as well.
So if we look at the case starting from the top we have my SCSI CD ROM drive. I believe mine is 12x speed. The CD drive is a bit of an extravagance for the era but definitely not unheard of. Having a CD drive installed makes things much more convenient especially for playing CD rereleases of games that came out at the time of the 386. Below that is a standard 5 1/4 inch 1.2 MB floppy drive. Essential if you want to get the right look of the time for the 386. Also many games and applications were still being released on this format in the late 80’s early 90’s. in the smaller bays we have a standard 1.44MB floppy drive that gets a lot of use in this machine and below that is my SCSI Zip drive. I like to try to include a Zip drive in all my classic machines for convenience and definitely recommend adding one. Mine like in my 486 is the rarer SCSI variety since I went SCSI for this setup, which I’ll get into later. If your wondering why it looks so odd its because the only drive I had was a horribly ugly purple. Why Iomega decided to put out drives with purple face plates is beyond me and unfortunately I couldn’t just swap it with a white plate from a common IDE type drive thus I was forced to paint the face white. Trust me it still looks better then the original purple.

Other then being very shiny the back is not to interesting. Were stuck with the AT keyboard and serial mouse again like on the 486 but that’s not a big deal. we have the standard parallel and serial ports along with the AT keyboard port and the multitude of expansion slots to the bottom.
Note in some of the images below the board is in an earlier case. I found the case above early on and transferred over to it but some images were already taken in the older case.
Operating System – For this machine I wanted to be a little different and more period correct so I have DOS 5.0 installed. I would suggest DOS 6.22 since its just a better OS but if you want to be more “correct” 5.0 is the one. There’s not to much difference except 6.22 is just a lot more user friendly but all games that run on 5 should run on 6 and vise versa. Besides it “installs in minutes” and of course “no PC should be without it!”

Now to get into the guts of the machine, I’ll start with the motherboard and its components before we get into the expansion cards I recommend.
Motherboard – For the motherboard I went with a late era 386 board in order to get the best options for expandability. The board I used is a Chaintech 340SCD which uses the SIS “Rabbit” chipset which from my research and the prior owner of this board is one of the faster 386 chipsets.


Its a later board so it offers some feature not common on earlier 386 boards that I highly recommend having such as L2 cache and higher Ram limits which I’ll touch on in a moment. When dealing with 386 and earlier were limited to ISA expansion slots. My board has quite a few slots with two 8 bit and five 16 bit ISA slots. Luckily 16 bit slots were common place with the 386 so our expansion possibilities are wide and fairly cheap. Actually putting together a good 386 can be substantially cheaper then a 486 when you consider top of the line sound/video cards. Though keep in mind ISA is slower then VLB found on some 486 machines and of course later PCI slots. My board also has a pin for an external battery which is always desired to leaking barrel batteries.

1) CPU – When talking about picking a CPU for a 386 board there is really only one CPU you should look at, the AMD DX-40, the greatest 386 and considered by many to be one of the greatest processors of all time. The DX-40 is a rock solid CPU that is both powerful and reliable. The DX-40 is very common so its not very expensive to acquire and it easily outperforms early 486 CPU’s. After all that praise I guess its odd to say that it is NOT the CPU I originally wanted for my 386. The answer to that is very simple though. Its simply to fast for what I was going for and If your running a DX-40 you may as well just run a 66mhz 486 which I already had. Fortunately at least on my board the CPU is speed adjustable via swapping the DIP-14 oscillator next to the CPU socket. By this method the CPU speed can be set to its rated 40mhz, 33mhz or my choice 25mhz. (speed of the CPU is half that of the oscillator so mine is 50mhz, originally 80mhz). Now if you don’t have a 486 and dont care so much about earlier DOS games then I would defiantly say keep the speed at 40mhz to allow you to play a multitude of games that stretch into the 486 era but if your like me and already have a 486 (or several in my case) then I think a slower 386 at 25mhz opens up a new earlier period of games and makes those earlier speed sensitive games playable with no fuss. After the fact I’ll say I do prefer the reliability and option to kick my speed back up to 33mhz or 40mhz with the DX-40 that I wouldn’t get with a standard 25mhz chip. I should also point out that CPU’s being soldered directly onto the motherboard was pretty common in this era as mine is. look for a socketed CPU motherboard if possible.

Also of interest if you look slightly to the right of my CPU on the motherboard you will notice an empty socket. This for a Cyrix 486DLC chip. Basically it was a “upgrade” option as a 386 with 486 instructions and a very small amount of L1 cache on the chip. Its advantage over the on board DX-40 is debatable and its said to create stability issues on occasion. Best avoided and for my build purposes useless.
2) FPU math coprocessor – Unlike my 486 DX2-66mhz the AMD DX-40 (and as far as i recall) all 386 CPU’s have no built in math coprocessors to help with complex math calculations. This board though has a socket for the optional 387 math coprocessor. Mine came with a Cyrix x87DLC coprocessor installed. In reality though only a very small amount of applications and games take advantage of the 387. SimCity and Falcon come to mind, probably CAD programs if for some reason you feel the need to to do computer aided drafting on a 386.

3) L2 cache – These are the sockets for the optional L2 cache or very fast memory the CPU can access for common tasks. Adding L2 cache like on a 486 board can dramatically help speed up your system. This is a feature to look out for even if your going for slower 25mhz or 33mhz machines. Many 386 boards seem to lack on board L2 cache. My board supports 256kb of cache which seems to be the max found on 386 boards. Since this image was taken I have fully upgraded my machine to 256kb of cache.
4) RAM – Again, since my board is a later model board it can support up to 32MB of RAM on 30-pin SIMMs which is massively overkill. I currently have my RAM at 16 MB which is still more then enough RAM and is more in line with the period. I do not know if there are any stability issues or game incompatibilities that may come up with large unexpected amounts of RAM such as 32MB on a 386. I would say its probably very unlikely and instances are few and far between but for stability and period correctness sake 16MB is enough. It lets me feel like I have a lot of wiggle room RAM wise while not being to ridiculous overkill. One could easily get by with 4MB for the intended games of the time. If though your going for a maxed out build or don’t have a 486 machine by all means 32MBs.

5) Hard Drive – This is a 50 pin SCSI hard drive 2GB. I went with SCSI completely for this machine with the CD drive, Hard drive and Zip drive all being SCSI. using SCSI for my hard drive let me set up larger partitions easier and I think is a little faster then if I went IDE. The downside being 50 pin SCSI hard drives are nowhere near as common as the IDE variety.
6) Since most 386 boards, even my late model have very little built in your most likely going to require a 16 bit ISA I/O card for various things like serial and parallel ports. I’m just using a pretty generic controller here. It also had pins for IDE devices but since I went SCSI they are currently disabled. No drivers needed or anything. Its all set up by the jumpers. just plug it in and it should work.

7) Video card – Like the 486 the Tseng Labs based cards are regarded as the DOS king in the 386 era as well. Unlike the 486 with its VLB slots we are limited again to 16 bit ISA. The card I’m using is the Tseng ET4000AX with 1MB of RAM. Widely regarded as one of the better if not best ISA DOS VGA card. Mine is a Cardex card but the manufacturer doesn’t make much difference. The ET4000AX offers vibrant colors and is fast as far as 16 bit ISA goes. Best of all they are relatively cheap and common, at least compared to their later VLB versions.

8) SCSI card – This is my SCSI controller card I use to well, control my SCSI devices like my CD-ROM drive, Hard drive and Zip drive. I went with SCSI because I had the parts already and its a generally recommended option over IDE for a classic system. It supports more devices over IDE and is considered a little faster and more reliable with the downside being more expensive. I’m using an Adaptec AHA-1522A which is a little bit of an older card but unlike some SCSI cards it gave me no trouble to set up and also sports a floppy controller which I’m using to run my 5 1/4 and 3 1/3 floppy drives.

9) Sound card – For sound card my recommendation once again goes to old sound stand by Creative. In this case in particular the Sound Blaster Pro 2.0 and its FM OPL3 chip. It will basically work with all games from the era that use FM synth and earlier and is of course adlib compatible. The card is noticeably better sounding then many of the early Sound Baster 16’s is more period correct and many games of the 386 vintage sound better on it. No drivers are needed, simply add
SET BLASTER=A220 I7 D1 T4
to your Autoexec.bat via the EDIT command

10) Midi card – I would say if you care about sound at all you want to add either a Roland or a 100% Roland compatible midi card. The 486 may of been a golden age for general midi but it got its start in the 386 era and many, many games can take advantage of the Roland MT-32 sound module for vastly better music. You could replace the above Sound Blaster Pro with a SB 16 for a crippled midi interface and noisier FM or you can use something like software emulation which I believe will allow you to use the SB pro’s game port as a midi interface at a cost of system performance but the absolute best route is to just get your hands on a midi card. I’m using a Music Quest MPU-401 Roland compatible card I grabbed off Ebay for a decent price. This is a known 100% compatible card but make sure you get one with firmware version 10 as earlier firmware versions are definitely known to have compatibility issues, especially with games from Origin such as Wing Commander. Also try to get one with a midi interface attached with it. Mine did not come with one so I’m using a hand made interface graciously made for me by a member at the Vogons forum whom I will leave unnamed since I’m unsure if he would want random people messaging him for cables in the future.

In the end my 386 build was really fun to put together. It lacks the WOW factor of my 486 as far as cramming it with every possibly option but its a machine for a slightly simpler, yet not to archaic PC gaming era with less options but still a lot of power as well as character. You’ll notice like in just about all my builds I left out a network card of any sort. There is certainly a wide range of 16 bit ISA network cards you can find if you so choose but for me they just take space as I would never have a use for them. So is a 386 worth building? Its was certainly cheaper at least when compared to my monster high end 66mhz 486 with all the perks and trimmings. If you already have a reliable 486 I may say pass on a 386. On the other hard if your into retro PC building or want to experience games like Wing Commander on actual hardware I say put one together. A high or low end 386 shouldn’t break the bank.
*UPDATE*
I recently came across a old PC at a thrift store that has the exact “look” of the era I mentioned at the beginning of this article. Sure enough it sported a 386 inside but unfortunately the board was damaged beyond repair due to a battery leak. I did manage to eventually secure a smaller and possibly superior board that I replaced my old one with
I did replace the mother board with another smaller late era 386 board, the MS-3124 or Contaq-386.

This board has all the same abilities and features of the previous board that I want in a 386 plus is smaller and has a socketable 386 in case the CPU dies I can now actually replace it.

 Here is the original board that came in the case that was damaged beyond repair due to battery acid though its a little hard to tell from the Image. The board I replaced it with is identical in every way to this board with the exception of the chipset. My new one is SIS as opposed to the UMC chipset present on this board.
Benchmarks (AMD DX40 @ 25 mhz 386, 256 L2 Cache, 16MB FPM RAM, Tseng labs ET4000AX)
3DBENCH – 10.0
PCPBENCH – 2.5
DOOM -4.43
Quake – N/A
Speedsys – 4.19
I know, for a guy that’s “not a Mac guy” and doesn’t really care that much for them I sure have a lot of them to talk about. Well that’s just been my luck lately and what I’ve come across in my thrift store/Craigslist scouring. Today were going to look at the classic black and white Macintosh SE or more specifically the FDHD version which is basically the exact same machine with support for high density 1.44mb floppy disk drives.

Here we have the front view of the machine as its running some early version of system 7. No, I do not know who “Peg Johnson” is or how to change the hard drive name from what I’m guessing is the previous owner’s name. This machine is sporting the hard drive in the upper section and a 1.44mb floppy drive or “superdrive” as Apple liked to call them in the lower section.

Usually you can tell if an SE is upgraded for high density floppy use by the badge on the front though there’s nothing stopping anyone from simply doing the upgrade to a SE and not worrying about swapping the front of the case. Originally the Macintosh SE that came out in 1987 were only capable of reading and writing 400kb and 800kb floppies but in 1989 the FDHD version was released that allowed the use of high density 1.44mb disks making things way more convenient.

Here we have the rear of the machine. Pretty standard as we have two ADB ports for a mouse and keyboard. This is a little different from most later Macs like the Macintosh Classic which only had one ADB port in the rear. My guess is that later keyboards have ADB ports on them so you would plug your keyboard into the Mac then your mouse into the keyboard and at the time of the SE that wasn’t an option on the keyboard. I currently don’t have an old Mac keyboard so I don’t know. Next is a floppy port for an external floppy drive, a db-25 SCSI port, printer port, modem port and finally a audio out jack for headphones or speakers outputting four voice sound with 8-bit analog conversion using 22khz sampling rate. Which from what I can tell is pretty much the same as later compact black and white Macs.
I’ve outlined how to get into one of these in my Mac classic article that I linked to above so I won’t go into that again but once inside it looks pretty much as you would expect, cramped.

Here we see the cramped innards of a compact Mac once again. The 1.44mb drive is in the lower bay and in the upper is from what I can tell by the label as well as what was standard issue on these things a 20mb Apple SCSI hard drive yet mine comes up as 10mb in the OS. Also the fan is mounted in the upper section to the back. You can see the grating for it in the rear picture and in the one above in the upper right. This is different from the later versions that have a downward bottom mounted fan.

Here is the motherboard. If you compare it to the Macintosh Classic and Macintosh Classic II you will notice its about twice as big.
1) These are the two floppy drive connectors. I’m only utilizing one but you can always have a duel floppy configuration and no hard drive if desired.
2) SCSI connection for the hard drive
3) 3.6V PRAM battery for keeping time/settings
4) power connector to the PSU
5) ROM chips and Floppy controller – these three chips are your ROM and floppy controller chips. the original chips should be labeled
342-0352-A  HI ROM
342-0353-A  LO ROM
344-0043-A  IWM
these are the original chips for the 800kb SE units. mine have the newer chips labeled
342-0701 HI ROM
342-0702 LO ROM
344-0062-01 SWM
If you have the newer chips your good to use 1.44mb floppy drives and disks. older SE’s can be converted just by replacing these chips and then adding a drive. *there may be slight number variations to the chips*
6) the Motorola 68000k CPU running at 8mhz. This CPU is in a long rectangle form factor of the time where the later 68000k CPU’s on the Classic I, II are smaller square CPU’s.
7) SE PDS expansion slot for things like CPU accelerators and such.
8) RAM – the SE can take up to 4MB of 30 pin RAM. mine originally came with 1MB but I have upgraded it here with a full 4MB.
I rather like the boxer case style of the SE as opposed to the later more curved Classic compact Macs. The SE is surly an improvement over earlier models like the Plus and 512k Mac but its still a very limited machine. the FDHD version with support for the 1.44mb floppy is a great boon but I stick with my earlier assessment. The only compact B/W Mac really worth using seriously is the SE/30.


As I write this article the G3 that is the topic of concern is sitting several feet from me in a large box waiting to be shipped across the country to a new waiting owner. This is not because its a bad machine but because I can basically do everything I personally need to do as far as Mac gaming on the older more portable 7600 that coupled with the fact the Power Mac 9600 still has my eye for eventually being my go to high end classic Mac. So before this machine leaves my life lets take a look at it and let me give you my impressions.

The G3 minitower uses a case like the 8600 and 9600 but according to Wikipedia it is slightly shorter. First off let me say this thing has a fair bit of weight to it. On top we have a 1.22 floppy followed by a CD-ROM drive and under that is a 100mb Zip drive. The Zip was optional but I see them on a large number of G3’s I come across. The Zip and CD-Rom drives are both IDE. As you can see my machine has a Sonnet badge on it since it received a G4 CPU upgrade at some point. Middle bottom you can see the speaker and on the right is the little power button.

Now we have the back of the machine with its various ports. On the very top left is the external SCSI port followed by the ADB port for your Macintosh keyboard/mouse. Below that is the Ethernet port, your printer/modem port and finally the VGA port. The G3 still does not use a standard VGA port so if your using a PC VGA monitor your going to need one of those adapters.
 A few MAC to VGA adapters
Below that you have the A/V ports. There were three levels of a “personality card” that would go here. The lowest version known as “Whisper” was just the sound card for the system and offered no A/V capability. The card installed here is the mid level card known as “Wings” and offered sound as well as some A/V capture and output abilities. The highest level card known as “Bordeaux” featured improved sound capabilities for the system as well as better A/V capture quality and DVD movie playback ability. Finally there are 3 expansion slots for three PCI devices, somewhat of a step down from the six PCI slots in the Power Mac 9600.
The machine is very simple to open. The side comes off by depressing the aquamarine colored “button” on top and pulling out.

From here you just flip up those two colored plastic tabs near the bottom and both sides easily just pull up and out of the way.

Here is the motherboard exposed.
1) First off the CPU is a little more traditional looking at this point compared with some older MAC models from the mid/late 1990’s that used PDS slots for CPU cards. The G3 tower came with a G3 CPU anywhere from 233 to 33mhz. The G3 is roughly equivalent to the Pentium II of similar speed though most tests place is as slightly faster. My machine came with a 500mhz G4 upgrade, something I didn’t especially want or need. This upgrade placed this machine on par with a Pentium III PC.
2) Here is the personality card as I mentioned before. It is installed in a special PERCH slot. The one installed here is the mid level “Wings” card that acted as the machines sound card as well as a video capture and A/V out card offering composite and S-video connections.
3) This is the built in video and video SGRAM. Early motherboards had an ATI Rage II+ chip used for graphics but mine was a later revision and had the updated ATI Rage Pro Turbo onboard graphics chip. The slot below the graphics chip is for the SG video RAM. Mine here has been fully expanded to 6MB of video RAM. The ATI chip, especially the later Rage Pro Turbo is a decent video chip and can handle most games of the time competently.
4) Here is the ROM slot with said ROM inserted which are common on most older MAC’s.
5) Three slots for RAM. Officially the G3 tower model supported up to 128MB of PC66 SDRAM but can easily support up to 768MB via three 256MB sticks. 768MB is the amount currently installed in this machine.
6) These are the the IDE ports and above that one 50 pin SCSI slot. Early ROM A G3’s only support one device per IDE cable but this was corrected in later revisions of the ROM.
7) Floppy cable for the 1.44 MB floppy drive

So final impressions on this machine. The G3 Mac is really the last and fastest of the old world Macintosh computers and as such The G3 minitower makes a excellent “tweener” Mac, meaning that its really good at transferring files between newer macs and older macs where a direct process may have format incompatibility issues. It can run early versions of OS X as well as OS 8 and 9 without issue. The built in ability to use SCSI and IDE is also very convenient as you can enable and format and enable SCSI hard drives on it for use in older Mac’s if you wanted. For me though it seemed just a bit to fast for the era of Mac games I was looking to play as well as not offering the enhanced expandability I was looking for in more PCI slots. It gave me a lot of audio and video stuttering issues with games like Sim Isle and Full Throttle and I never could figure out why. Its possible to much Ram was at fault but I never bothered to check. Games like Quake though ran beautifully on this machine and the option to add USB or a Mac Voodoo card via the PCI is a great bonus. I would definitely recommend picking one of these up if you see them locally for a good sub $50 price. If you have one shipped though they are heavy so be prepared to pay a hefty shipping cost.
At first I was just going to roll this article in with my Tandy 1000A article I did awhile back but after more research I found out there wasn’t a whole lot of specifics out there on the 1000 HD so in the end I think it deserved its own post, even if it is a rather short one.

The Tandy 1000 HD looks pretty much identical to the standard Tandy 1000 and 1000A. The HD doesn’t stand for “high definition” but “hard drive” and as a matter of fact before I got this unit I just assumed it was a Tandy 1000 with a hard drive and controller card slapped inside by the factory….and it is but at least they went through the effort of badging it differently as well as add a ram and DMA card (at least I think the ram/DMA card are stock from the factory.
 Simplest way to tell its a 1000 HD, check the badge on the front

As we can see from the back the 1000 HD uses the same wattage power supply as a 1000A and I assume 1000. If you look on the right at the expansion slots you can see the cards are sticker labeled. The middle card is a modem which I don’t know if it was added later or came standard from the factory but the memory PLUS card does specifically say Tandy 1000 HD so I suspect it came stock with the hard drive controller card which would make sense as The extra memory and DMA controller would be very helpful with an added hard drive. All the other ports are same as on a stock Tandy 1000.

Here is the machine after being opened with all three expansion slots filled. Notice the massive hard drive circa early 1980’s. Its so large that they had to install it parallel with the case rather then a more traditional bay setup. These drives installed factory were in the 10 to 20MB range. I don’t have a Tandy keyboard at the moment (you need one, its a proprietary keyboard port) so I couldn’t do much checking. On powering mine up it gives a boot screen and a memory check of 640kb but then nothing so I assume my floppy drive and hard drive are dead. My motherboard and power supply seem in fine shape though.

Here we have the motherboard with the expansion cards removed. Comparing images It seems to use the exact same motherboard as the standard Tandy 1000 and you can see no slot for a 8087 next to the CPU. Mine seems to have a rather low serial number so I’m not sure if later models of the 1000 HD used the improved 1000A motherboard but from what I could find they do not. I could not fully remove the hard drive and floppy drive cover and holder because one screw is particularly hard to get if not impossible with standard tools unless I wanted to go through a lot of trouble or damage the brackets securing the hard drive so I left it alone. I assume Tandy expected you to ship the unit back to them if you ever decided to replace the hard drive.
Now for the two important expansion cards that I believe must of came stock with this PC to facilitate the added hard drive.

Here we have the 8-bit hard drive controller card. A Western Digital wd10025-wx2 controller card. the Bios “G” version of this card can handle 10 and 20mb hard drives as seem stock on the Tandy 1000 HD but cards with a “H” Bios can handle drives up to 62MB in size. Its not a proprietary controller card so you could potentially pull and use this controller in any old PC you have that requires an 8-bit hard drive controller for MFM drives.

Lastly is the Tandy memory PLUS expansion card. This card bumps the RAM up to 640kb and adds a DMA controller or “Direct memory access” controller to greatly help speed up hard drive and various other operations. I believe the pins in the lower right hand of the card are for an optional RS-232 serial port expansion.

Finally we have the Tandy 300 baud modem. I don’t really mess with old networking and what not so not much to say about it.
I would say if you can find one of these machines for a reasonable price or free the 8-bit hard drive controller alone is worth the effort not to mention the nice Tandy memory expansion PLUS card. A fully working system would also make a nice vintage gaming machine for the early era of PC gaming plus you get a hard drive and that great Tandy graphics and sound.
The PB 500 is as far as I can discover the Packard Bell companies first attempt at a IBM compatible machine and I believe was released around 1988 but possibly earlier. The PB 500 has a fairly standard design unlike there later Pentium era cases and seems to run fairly reliably as opposed to the massive reliability issues the company would face later with its products. The PB 500 is basically an IBM XT class clone running on the 8088 CPU but being capable of far greater speed and expandability compared the earlier original PC specs of the IBM 5150.

Here we have the front view of the machine. It is a little lighter and more compact then an IBM XT computer. Nothing to fancy on the front. On the lower left is the keyboard port for an XT keyboard. As you can see on the right I have a 20MB hard drive installed in the lower bay and in the upper bay is a 720k floppy drive. This machine originally came stock with a 5.25 inch 360k floppy drive but is capable of being upgraded to the 3 1/2 inch 720k floppy as they previous owner has done here. Generally this is an advised upgrade and I find the 720K drive much more convenient. Since 720k drives are a little scarce if you install a standard and plentiful 1.44mb drive it will function flawlessly in these machines as a 720k drive. I’m running DOS 3.3 on this machine which I believe is the operating system that this machine came standard with.

here we have the rear of the machine. there are 5 slots available for expansion cards as well as two built in ports. The port on the right is a parallel port and to the left of it is a serial port. To the left of these ports we have a small dip switch that can be used for setting the ports.

Here we have the motherboard in the case with all the drives and expansion cards removed. You can see the five 8 bit ISA expansion slots for add on cards.
1) This is the onboard beeper. This generates all your PC speaker sounds.

2) Here we have the CPU of the PB 500. This machine comes stock with a 4.77mhz Intel 8088 which was standard for the IBM PC. The PB 500 though is a “turbo” XT board so by pressing [Ctrl]-[Alt]-[ + ] on the keyboard the CPU kicks into 10mhz or more precisely 9.54mhz mode. Pressing [Ctrl]-[Alt]-[ – ] returns the CPU to standard 4.77mhz. The change in CPU speed is accompanied by a change in the power LED light from orange to green which is a nice touch. When I received this machine as you may be able to tell from the motherboard image it had a NEC V20 installed which is pin compatible with the 8088. The V20 is very compatible with 8088 software but due to improved efficiency boosts the speed of this particular machine to the equivalent of 8mhz when running in 4.77mhz mode and 15mhz when in 10mhz mode. Although the NEC upgrade is generally an advised upgrade for these machines I decided to use this PC as a sort of base line machine and for complete 8088 compatibility I replaced the V20 with an AMD 8088 CPU. Also to note a very minor side effect of the V20 upgrade is that the LED will not color change when turbo mode is selected.
3) This is the slot for the optional math coprocessor the 8087-1. As you can see this machine is without one.
4) The connection for the XT keyboard port.
5) The chips to the left of the # 5 are the RAM chips. This machine is expanded to its max of 640k of ram. To the right of the #5 is the wire that connects the LED to the motherboard.
6) This is the onboard interface for the floppy controller. The PB 500 supports 360k and 720k floppy drives. Unfortunately this cannot be deactivated so you can’t upgrade to a high density disk controller via an expansion slot.
7) This is the standard AT power connector for the board. Below that you can also make out the blue barrel nickel cadmium battery. These need replaced every few years else they can leak and corrode your motherboard.

Here is a shot of the internals with all the drives and expansion cards in place. As I said before the hard drive that came installed with this machine is a MFM half height 20MB hard drive that you can barely see below the floppy drive and cables. Since this machine was found at a thrift neither I nor the buyer I received this from knows if the video card and HDD controller came stock with this machine.
1) The PB 500 lacks any onboard video so in order to have the machine display a video card is required. In a way this is nice since you get the option to choose your video card and not have to worry about disabling any onboard video chip. The PB 500 can accept any 8 bit video card. I decided to go with CGA over VGA or EGA since most VGA games run far to slow on this machine and I have much better machines for EGA. The card that came with this PC was the ATI small wonder CGA card which is a very nice CGA card in my opinion. The ATI small wonder can do CGA as well as Hercules/MDA, Plantronics, and ATI’s own 16-color 320×200 and 640×200 graphics modes. It also has a header for a composite jack. This card has a home made composite connection routed through the gap where the cards dip switch is. It looks a bit crude but I like it since it means I do not need to take up another expansion slot for the composite jack bracket.

I really like this card and it seems to work really well.

Here’s a shot of Leisure Suit Larry in the Hercules mono mode and next to it is F-15 Eagle in CGA mode. This is taken on my Tandy CM-4 CGA monitor.
2) This is the 8 bit MFM hard drive controller. Since the motherboard doesn’t have a built in controller an expansion card controller is required. This particular card is from Western Digital and supports 10 or 20 MB MFM drives.

Overall the PB 500 is a pretty nice compact XT class machine for playing older CGA games that require that slower 4.77mhz CPU. Couple that with the turbo mode and the option to replace the 8088 with a NEC V20 if you desire and you have a pretty capable early to mid 80’s machine. You also have the option to add an 8 bit VGA card or EGA card if you wanted to play some later games though in my opinion even in turbo with the V20 most VGA games are just going to be to taxing. One of my issues first off is the fact you cant disable the onboard floppy controller and cant add a controller for high density 1.2MB and 1.44MB drives. Also from what I’ve read this machine is very picky about what 360k drives it will work with. Finally by this time many XT class machines like the IBM 5160 came with eight 8 bit ISA expansion slots so the mere 5 found on the PB 500 is a very minor disadvantage overall. Despite that it’s still a nice 8088 machine and doesn’t take up a lot of desk space.

Update 7/19/16
I recently picked up another PB 500 that appears to me more or less stock so I just wanted to post a few images of what it looks like and the expansion cards I found inside.\


The CPU I found installed was a Siemens produced chip.

A place for the pc collector
Probabilmente il miglior blog bilingue al mondo*
Game-related ramblings.
My Gaming Timeline
Lynn talks about video games, records and books ...
Sharing My Retro Video Game Collection.
Random electronics and gaming crap
Chronogaming project featuring reviews, screenshots, and videos of the entire Super Nintendo library in release order.
Random mutterings on retro computing, music, plus radio controlled scale modelling.
Work(s) in Progress!
1001 video games and beyond
retro computers and stuff
Stay Jispy!
