AWS announced general availability for Amazon Elastic Kubernetes Service (Amazon EKS) Anywhere in September 2021. Amazon EKS Anywhere provides another deployment option for Amazon EKS that enables users to deploy Kubernetes clusters on-premises running on VMware vSphere, with support for bare metal nodes coming later this year. EKS Anywhere is built using EKS Distro, an open-source distribution for Kubernetes used by Amazon EKS, which means that users get a consistent experience across their cloud and on-premises environments.
In this blog, we look at how you can deploy EKS Anywhere on your VMware vSphere environment and then install Portworx as the Kubernetes storage layer so you get a consistent set of data management features across your cloud and on-premises environments. Installing and using Portworx as the Kubernetes data management layer on Amazon EKS and EKS Anywhere clusters allows you to leverage features like replication, high availability, security, role-based access control, snapshots, io-profiles, and unified block and file storage across your hybrid cloud deployment.
To get started with EKS Anywhere, we will create an admin machine to run the eksctl-anywhere utility, and then we will create a production workload cluster.
- For your admin machine, you can either use Mac OS (10.15) or deploy a new Ubuntu Server (20.04.2 LTS) VM on your VMware vSphere cluster.
- The admin machine should meet the following prerequisites:
- Docker 20.x.x: If you are using Ubuntu, use the Docker CE installation instructions and not Snap installation.
- 4 CPU cores / 16GB memory / 30GB free disk space
- Once the admin machine is up and running, install eksctl and the eksctl-anywhere plugin.
### Install eksctl on the admin machine
curl "https://github.com/weaveworks/eksctl/releases/latest/download/eksctl_$(uname -s)_amd64.tar.gz" \
    --silent --location \
    | tar xz -C /tmp
sudo mv /tmp/eksctl /usr/local/bin/

### Install eksctl-anywhere plugin
export EKSA_RELEASE="0.7.0" OS="$(uname -s | tr A-Z a-z)" RELEASE_NUMBER=5
curl "https://anywhere-assets.eks.amazonaws.com/releases/eks-a/${RELEASE_NUMBER}/artifacts/eks-a/v${EKSA_RELEASE}/${OS}/amd64/eksctl-anywhere-v${EKSA_RELEASE}-${OS}-amd64.tar.gz" \
    --silent --location \
    | tar xz ./eksctl-anywhere
sudo mv ./eksctl-anywhere /usr/local/bin/

### Verify installed eksctl anywhere version
eksctl anywhere version
- Next, let’s go ahead and confirm that your VMware environment meets the following prerequisites:
- A vSphere 7+ environment running vCenter with capacity to deploy 6-10 VMs
- DHCP service running in vSphere environment in the primary VM network for your workload cluster
- One network in vSphere to use for the cluster. This network must have inbound access into vCenter.
- An Ubuntu OVA imported into vSphere and converted into a template for the workload VMs. For this blog, we have used the Ubuntu template to run EKS Anywhere nodes.
- User credentials to create VMs and attach networks, etc.
- One IP address routable from the cluster but excluded from the DHCP offering
- Each VM will require 2 vCPUs / 8GB RAM / 25GB disk at a minimum.
- The administrative machine and the target workload environment will need network access to. These endpoints allow the installer to download the necessary binaries.
- public.ecr.aws
- anywhere-assets.eks.amazonaws.com (to download the EKS Anywhere binaries, manifests and OVAs)
- distro.eks.amazonaws.com (to download EKS Distro binaries and manifests)
- d2glxqk2uabbnd.cloudfront.net (for EKS Anywhere and EKS Distro ECR container images)
- api.github.com (only if GitOps is enabled)
- Next, let’s generate a management cluster config. This command generates a configuration file that needs to be customized to match your environment-specific details.
CLUSTER_NAME=mgmt
eksctl anywhere generate clusterconfig $CLUSTER_NAME \
   --provider vsphere > eksa-mgmt-cluster.yaml
- Here is a sample configuration that was customized for our lab environment:
apiVersion: anywhere.eks.amazonaws.com/v1alpha1
kind: Cluster
metadata:
  name: mgmt-eks-demo-1
spec:
  clusterNetwork:
    cni: cilium
    pods:
      cidrBlocks:
      - 192.168.0.0/16
    services:
      cidrBlocks:
      - 10.96.0.0/12
  controlPlaneConfiguration:
    count: 3
    endpoint:
      host: "10.21.143.55"
    machineGroupRef:
      kind: VSphereMachineConfig
      name: mgmt
  datacenterRef:
    kind: VSphereDatacenterConfig
    name: mgmt-dc
  externalEtcdConfiguration:
    count: 3
    machineGroupRef:
      kind: VSphereMachineConfig
      name: mgmt
  kubernetesVersion: "1.21"
  managementCluster:
    name: mgmt
  workerNodeGroupConfigurations:
  - count: 3
    machineGroupRef:
      kind: VSphereMachineConfig
      name: mgmt
    name: md-0
---
apiVersion: anywhere.eks.amazonaws.com/v1alpha1
kind: VSphereDatacenterConfig
metadata:
  name: mgmt-dc
spec:
  datacenter: "eks-px"
  insecure: false
  network: "VM Network"
  server: "<<vcenter IP>>"
  thumbprint: "<<vcenter thumbprint>>"
---
apiVersion: anywhere.eks.amazonaws.com/v1alpha1
kind: VSphereMachineConfig
metadata:
  name: mgmt
spec:
  datastore: "EKS-Infra-1"
  diskGiB: 25
  folder: "eksvm"
  memoryMiB: 8192
  numCPUs: 2
  osFamily: ubuntu
  resourcePool: "/eks-px/host/eks-cluster/Resources/eks-rp"
  users:
  - name: capv
- Next, let’s set environment variables for your vCenter credentials on your EKS Anywhere admin machine. The deployment automation verifies these variables have been set and passes these credentials to the EKS Anywhere VMs that get deployed. Ensure that these credentials have the needed privileges.
export EKSA_VSPHERE_USERNAME='administrator@vsphere.local'
export EKSA_VSPHERE_PASSWORD='t0p$ecret'
- Next, let’s create the management cluster using the following command. You can also add a -v 6 or -v 9 to get verbose output.
eksctl anywhere create cluster -f eksa-mgmt-cluster.yaml
- This creates a bootstrap cluster on the admin machine, followed by deployment of ETCD VMs, control plane VMs and worker VMs on your VMware environment. Once all the VMs are up and running, the cluster management is moved from the bootstrap cluster to the new VM-based management cluster. Once the migration is successful, the bootstrap cluster is deleted, and you will see a cluster creation successful message.

https://anywhere.eks.amazonaws.com/docs/overview/
- Now that you have your EKS Anywhere management cluster installed, you can deploy a workload cluster that will be used to install Portworx and run your stateful applications.
- We will follow a similar set of steps to deploy the workload cluster. We will generate a configuration file and customize the config file
CLUSTER_NAME=w01
eksctl anywhere generate clusterconfig $CLUSTER_NAME \
   --provider vsphere > eksa-w01-cluster.yaml
## Example workload cluster configuration:
apiVersion: anywhere.eks.amazonaws.com/v1alpha1
kind: Cluster
metadata:
  name: w01
spec:
  clusterNetwork:
    cni: cilium
    pods:
      cidrBlocks:
      - 192.168.0.0/16
    services:
      cidrBlocks:
      - 10.96.0.0/12
  controlPlaneConfiguration:
    count: 1
    endpoint:
      host: "10.21.143.65"
    machineGroupRef:
      kind: VSphereMachineConfig
      name: w01-cp
  datacenterRef:
    kind: VSphereDatacenterConfig
    name: w01
  externalEtcdConfiguration:
    count: 1
    machineGroupRef:
      kind: VSphereMachineConfig
      name: w01-etcd
  kubernetesVersion: "1.21"
  managementCluster:
    name: w01
  workerNodeGroupConfigurations:
  - count: 3
    machineGroupRef:
      kind: VSphereMachineConfig
      name: w01
    name: md-0
---
apiVersion: anywhere.eks.amazonaws.com/v1alpha1
kind: VSphereDatacenterConfig
metadata:
  name: w01
spec:
  datacenter: "eks-px"
  insecure: false
  network: "VM Network"
  server: "<<vCenter IP>>"
  thumbprint: "<<vCenter thumbprint>>"
---
apiVersion: anywhere.eks.amazonaws.com/v1alpha1
kind: VSphereMachineConfig
metadata:
  name: w01-cp
spec:
  datastore: "EKS-Infra-1"
  diskGiB: 25
  folder: "eksworkload"
  memoryMiB: 8192
  numCPUs: 2
  osFamily: ubuntu
  resourcePool: "/eks-px/host/eks-cluster/Resources/eks-workload-rp"
  users:
  - name: capv
---
apiVersion: anywhere.eks.amazonaws.com/v1alpha1
kind: VSphereMachineConfig
metadata:
  name: w01
spec:
  datastore: "EKS-Infra-1"
  diskGiB: 25
  folder: "eksworkload"
  memoryMiB: 8192
  numCPUs: 2
  osFamily: ubuntu
  resourcePool: "/eks-px/host/eks-cluster/Resources/eks-workload-rp"
  users:
  - name: capv
---
apiVersion: anywhere.eks.amazonaws.com/v1alpha1
kind: VSphereMachineConfig
metadata:
  name: w01-etcd
spec:
  datastore: "EKS-Infra-1"
  diskGiB: 25
  folder: "eksworkload"
  memoryMiB: 8192
  numCPUs: 2
  osFamily: ubuntu
  resourcePool: "/eks-px/host/eks-cluster/Resources/eks-workload-rp"
  users:
  - name: capv
- Next, we will deploy the workload cluster using the config file.
eksctl anywhere create cluster \
    -f eksa-w01-cluster.yaml  \
    --kubeconfig mgmt/mgmt-eks-a-cluster.kubeconfig
- Once the workload cluster is deployed, you can find the kubeconfig file to access the cluster in the generated subdirectory. The path should be ${PWD}/${CLUSTER_NAME}/${CLUSTER_NAME}-eks-a-cluster.kubeconfig. You can access your EKS Workload cluster either from the admin machine or any other VM that has kubectl installed on it. You can use the following commands to access it from the admin machine.
export CLUSTER_NAME=w01
export KUBECONFIG=${PWD}/${CLUSTER_NAME}/${CLUSTER_NAME}-eks-a-cluster.kubeconfig
- Now that you have your workload cluster up and running, the next step is to install Portworx. Since EKS Anywhere is running on VMware vSphere, Portworx can automate the provisioning of disks and attach them to your EKS Anywhere worker nodes, and then it can create a Portworx storage cluster that can be leveraged by your stateful applications.
- Before we generate a Portworx specification, let’s go ahead and create a secret in the kube-system namespace for your vSphere username and password.
VSPHERE_USER: Use output of printf <vcenter-server-user> | base64
VSPHERE_PASSWORD: Use output of printf <vcenter-server-password> | base64

### px-vsphere-secret yaml file using the base64 versions of your vSphere ###username and password
apiVersion: v1
kind: Secret
metadata:
 name: px-vsphere-secret
 namespace: kube-system
type: Opaque
data:
 VSPHERE_USER: YWRtaW5pc3RyYXRgtkB2c3BoOPJlLmxvY2Fs
 VSPHERE_PASSWORD: cLgxLjPuMVZUPw==

### Create the secret on your EKS Anywhere workload cluster
kubectl apply -f px-vsphere-secret.yaml
- Next, let’s navigate to Portworx Central and generate a specification. Select Portworx Enterprise and click Next. We will select the Portworx operator and select the latest version of Portworx. You can choose to use either a built-in or external etcd instance.
- Next, let’s select Cloud and vSphere and provide the vCenter server IP address and the vSphere datastore you want to use for Portworx virtual disks. Click Next. You can leave the network settings as default or customize them as needed. Click Next.
- Here, select None and leave the other options as default. Click Finish, read through the EULA, and click Agree.
- You can use the two commands generated to deploy the Portworx operator followed by the Portworx storage cluster custom resource. The commands below are specific to our environment. You can generate your own using Portworx Central.
kubectl apply -f 'https://install.portworx.com/2.9?comp=pxoperator'

kubectl apply -f 'https://install.portworx.com/2.9?operator=true&mc=false&kbver=&b=true&kd=type%3Dlazyzeroedthick%2Csize%3D32&vsp=true&vc=10.21.143.140&vcp=443&ds=Tanzu-Infra-1&s=%22type%3Dlazyzeroedthick%2Csize%3D150%22&c=px-cluster-143d6da0-e92b-49df-8310-38191d487fbf&stork=true&csi=true&mon=true&tel=false&st=k8s&promop=true'
- At this point, Portworx will automate the disk provisioning and mount operations and install a storage cluster on your Amazon EKS Anywhere cluster. You can monitor the deployment using the following commands:
### Create the secret on your EKS Anywhere workload cluster
kubectl get pods -n kube-system

kubectl logs -f <<Portworx-pod>> -n kube-system portworx
At this point, Portworx has deployed a few storage classes that you can start using for your stateful applications. You can also create your own custom storage class using the parameters defined here. If you want to check out a video of how to follow these steps and get Portworx running on Amazon EKS Anywhere clusters in your on-premises VMware vSphere datacenter environment, click below:
Share
Subscribe for Updates
About Us
Portworx is the leader in cloud native storage for containers.
Thanks for subscribing!

Bhavin Shah
Sr. Technical Marketing Manager | Cloud Native BU, Pure StorageExplore Related Content:
- Amazon EKS
- kubernetes
- portworx
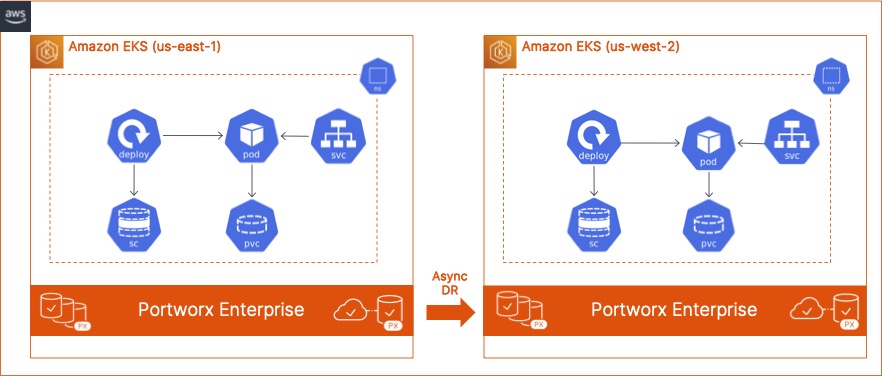
How to build an Async Disaster Recovery Solution for Amazon EKS clusters using Portworx PX-DR

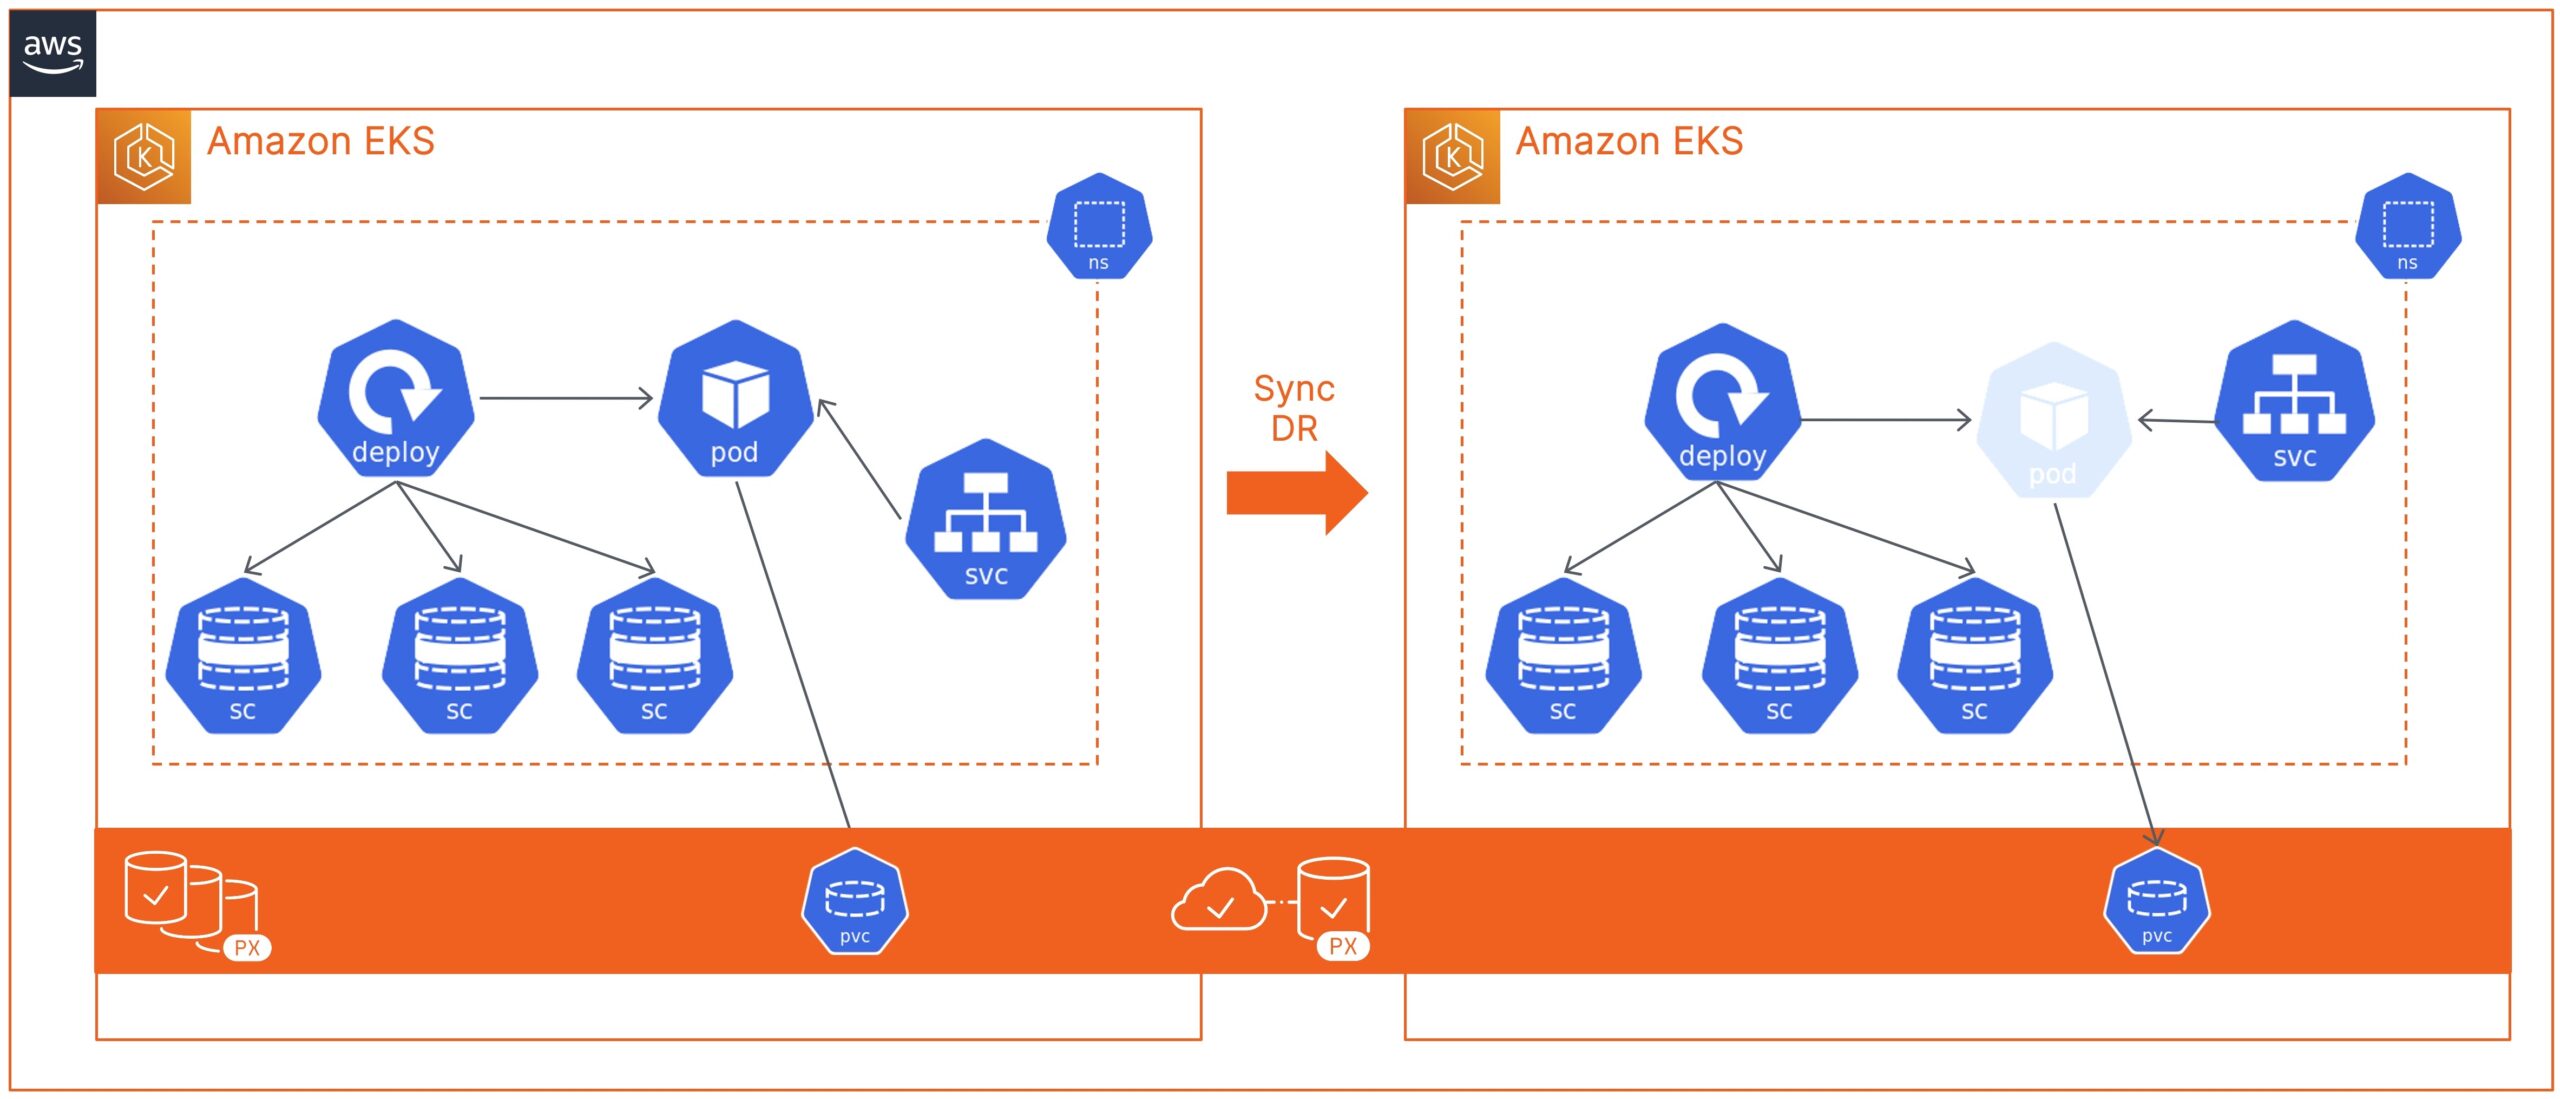
How to build a Sync Disaster Recovery Solution for Amazon EKS clusters using Portworx PX-DR
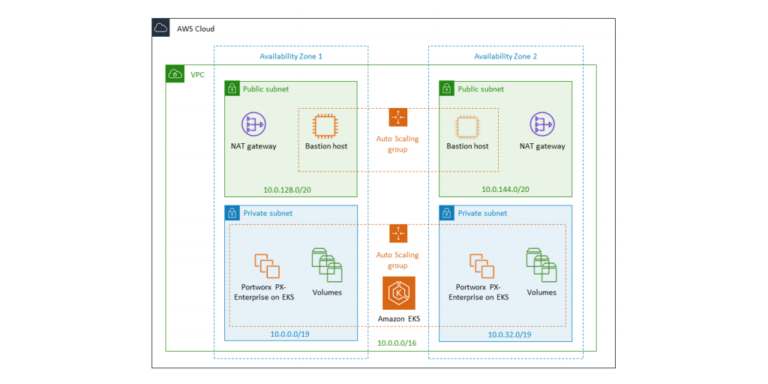
Automatically deploy Portworx Enterprise on Amazon EKS on the AWS Cloud