Table of Contents
Advertisement
Quick Links
Advertisement
Table of Contents

Related Manuals for Olivetti ECR 7790


Summary of Contents for Olivetti ECR 7790
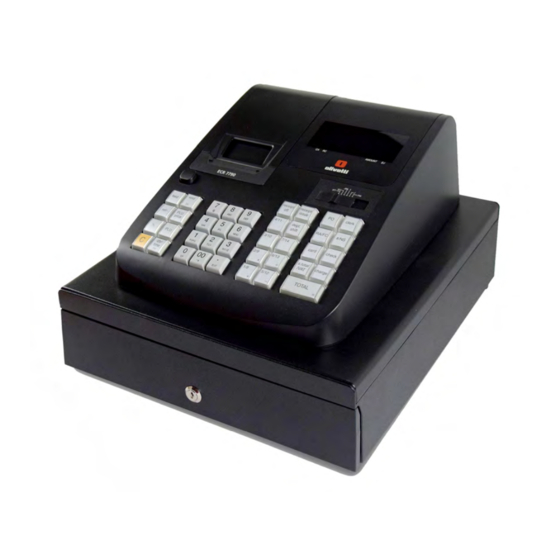
- Page 1 ECR 7790 Cash Register USER'S GUIDE Code: 598103...
- Page 2 PUBLICATION ISSUED BY: Olivetti S.p.A. www.olivetti.com Copyright © 2018, Olivetti All rights reserved Your attention is drawn to the following actions that could compromise the characteristics of the product: • incorrect electrical supply; • incorrect installation; incorrect or improper use, or, in any case, not in accordance with the warnings given in the User Manual supplied with the product;...
- Page 3 SAFETY INFORMATION 1. POWER SUPPLY: refer to the voltage rating plate on the Cash Register. 2. DO NOT place metallic objects or containers with liquid on top or near the Cash Register. This situation presents a danger of fire or electrical shock. 3.
- Page 4 FIGURES III IIII II 10 11 13 20 21 16 18 19...
- Page 5 SAFETY INFORMATION 1. Connect the power cord to an electrical outlet that is near the product and easily accessible. 2. Install your cash register on a flat and stable surface, at a location where no one can step on or trip over the power cord. 3.
- Page 6 INSERTING MEMORY BACKUP BATTERIES 6 6 6 8 8 8 9 9 9...
- Page 7 LOADING PAPER...
-
Page 8: Table Of Contents
Content Major Features ....................................1 Cash Register Components ..............................1 The Control Switch ..................................1 Removable Cash Drawer with Lock ............................1 Keypad Functions ..................................2 Operator Display ..................................4 Error Conditions .................................... 5 Error Codes ....................................5 Clearing an Error ..................................5 Cash Register Reset Operations .............................. - Page 9 Management Reports ................................27 X and Z Reports ..................................27 X and Z Financial Report ..............................27 Clerk Report ....................................29 PLU Sales Report ..................................29 Department Programming Report ............................30 PLU Programming Report ..............................30 Cash Register Programming Report ............................. 31 Training Report ..................................
-
Page 10: Major Features
Major Features 40 departments and up to 999 Price Look-Up (PLU) settings; • 8 clerk numbers to monitor the sales of individual employees; • 9-digit operator numeric Liquid Crystal Display (LCD); • Quantity entries using the decimal point; • Training mode facility with related password; •... -
Page 11: Keypad Functions
Keypad Functions With reference to figure 5: - Advances the receipt or journal paper one line feed; advances the paper continuously when held down. - [Void] Deletes the last item entered, and used for correcting a particular entry after it is processed and printed. - Page 12 - Allows price entries for Departments 8-40. Press this key before entering applicable department keys. For Departments 8-14 Example: Select department 8 1. Insert price. 2. Press 3. Press the related Department key For departments 15-40 Example: Select department 15 1.
-
Page 13: Operator Display
Operator Display Your cash register is equipped with a 9-digit numeric Liquid Crystal Display (LCD). With reference to figure 15, the display is read from left to right as follows: C1...C8 (5) - With the Clerk System active, indicates the clerk number entered before working in the REG or JRNL mode, or when is pressed. -
Page 14: Error Conditions
Error Conditions Error Codes The following error codes can be displayed: Operation error Sales amount exceeded Zero-price entry error Incorrect full-void entry Clerk number and password requested Manager password requested Clearing an Error Press to clear an error. The tone ends, the displays clear and the keypad unlocks, allowing you to continue with the transaction or restart the program. -
Page 15: Full Reset W/O Language - B Reset
Full Reset W/O Language – B Reset A Full Reset W/O Language operation erases the cash register's working memory, all totals and counters (all report data) and cancels all cash register programming data without language. Set the Control Switch to OFF. Press and hold down If the cash register still remains in an error condition, proceed with the Full Reset - All Data operation. -
Page 16: Printing And Clearing The Contents Of The Electronic Journal
Printing and Clearing the Contents of the Electronic Journal Make sure that plenty of paper is loaded in the printer. Control key position: Z. Press To interrupt report printing, press To resume printing, press again. To stop report printing, press When the contents of the electronic journal are printed, a message is displayed along with a beep to indicate that the EJ memory capacity has been restored to its maximum programmed line capacity. -
Page 17: Quick Start
Quick Start This section allows you to program basic cash register features so that you can start to work right away with your new product. Programs and transaction information for management re- ports are stored in the memory of the cash register which is protected by back-up batteries. -
Page 18: Set The Time
2. Set the Time 1. Control switch position: PRG. 2. Type the current time in the HH:MM, 24-hour format. 3. Press Example: Set the time at 3:30 PM. Type/Press: Hour Minutes 3. Set a Fixed VAT Rate 1. Control switch position: PRG. 2. -
Page 19: Program A Fixed Price Look-Up (Plu)
4. Type a maximum 7-digit [unit price] to assign to a specific item and then assign it to a department by pressing the related key. Use for departments from 8 to 14. Use , the related numeric keys ..and for departments from 14 to 40. Example: Program a multiple positive item sale, VAT 2 and a price of €2.50 to an item in Department 2. -
Page 20: Cash Register Programming And Features
Cash Register Programming and Features Programs and transaction information for management re- ports are stored in the memory of the cash register which is protected by back-up batteries. Before beginning to program the cash register or to perform sales transactions, insert the batteries to save this information if a power failure occurs or if you unplug the cash register from the power outlet. -
Page 21: Foreign Currency Exchange Rates
Foreign Currency Exchange Rates You can program up to two different foreign currency exchange rates. The foreign currency value is displayed whenever is pressed during a sales transaction. switch 1. Control position: PRG. 2. Type the identification number corresponding to the foreign currency exchange rate that you wish to define and then press 3. -
Page 22: Decimal Point Position
Decimal Point Position 1. Control switch position: PRG. 2. Type system option followed by the status number [0, 1, 2 or 3] to select the desired format as indicated in the following table: Status Number Format x.x: x.xx (default setting) x.xxx 3. - Page 23 Receipt With Sum of all VAT Amounts Calculated (TOTAL VAT) - Machine Condition 37 VAT totals per programmed rate Programmed VAT rates Sum of the individual VAT totals Receipt With Taxed Sales Totals Split per Rate (AMT VAT INCL) - Machine Condition 38 VAT totals per programmed rate Programmed...
-
Page 24: Calculator Mode
Calculator Mode The calculator mode is a non-print mode that can only be accessed in the REG or JRNL position outside of a sales transaction. The calculator mode can only be accessed if Calculator Mode Password is setted up. The following keys can be used in the calculator mode: Entering the Calculator Model 1. -
Page 25: Clerk System
Clerk System The Clerk System is a security feature that enables you to control access to the cash register and monitor the number of transactions and the sales of up to 8 Clerks. Your cash register is configured at the factory with the Clerk System deactivated. You can activate the Clerk System for a degree of protection and sales monitoring or deactivate it again so that the cash register can be used freely without restrictions. -
Page 26: Entering A Clerk Number/Secret Code Before Cash Register Operations
Entering a Clerk Number/Secret Code Before Cash Register Operations With the Clerk System active: In the event that the Clerk Security Setting is set to 0 (Not Compulsory), it is possible to enter only the clerk number for starting transaction registration (only for the Clerk that do not set any security code): 1. -
Page 27: Using The Cash Register In A Password Protected Mode
Clearing the Z Mode Manager Password 1. Control switch position: PRG. • Press • Press Using the Cash Register in a Password Protected Mode If a manager password was defined to protect unauthorized access to the Z mode, proceed as follows to enter the specific password so that you can print the Z management report: 1. -
Page 28: Programming A Training Mode Password
Programming a Training Mode Password A training mode password prevents unauthorized access to the training mode and allows training to be performed in the REG or JRNL mode. 1. Control switch position: PRG. 2. Press enter the [4-digit password] and press NOTE: If you define a password by 0000 or you leave it as default value, the training mode will not be accessible. - Page 29 0 = Clerk System Inactive 1 = Clerk System Active 0 = Clerk Security Code Not Compulsory 1 = Clerk Security Code Compulsory 0 = Clerk login at each transaction Not Compulsory 1 = Clerk login at each transaction Compulsory 0 = Zero price entry allowed 1 = Zero price entry not allowed 0 = Reserved...
- Page 30 0 = Line distance 1.25 mm 1 = Line distance 1.50 mm 2 = Line distance 1.75 mm 3 = Line distance 2.00 mm 4 = Line distance 2.25 mm 5 = Line distance 2.50 mm 6 = Line distance 2.75 mm 7 = Line distance 3.00 mm 8 = Line distance 2.25 mm 9 = Line distance 3.50 mm...
- Page 31 0 = Print NO SALE receipt 1 = Do not print NO SALE receipt 0 = Print X/Z report header 1 = Do not print X/Z report header 0 = Print Z1/Z2 counter on Z1/Z2 report 1 = Do not print Z1/Z2 counter on Z1/Z2 report 0 = Print GT on Z1/Z2 report 1 = Do not print GT on Z1/Z2 report 0 = Print PAYMENT MEDIA counter on Z1/Z2 report...
-
Page 32: Changing The Cash Register's Standard Settings
Changing the Cash Register's Standard Settings 1. Control switch position: PRG. 2. Type the [number] of the machine condition (1 to 90 as indicated in the table) that you wish to change. 3. Type the [number] of the required setting. 4. -
Page 33: Selecting Caption Number
Selecting Caption Number DISPLAY PL001 PLU caption programming mode PL002 Increment PLU number PL003 PL002 Decrement PLU number Area of caption number per classification of caption PLU: 1 - 999 Department: 1 -40 Clerk: 1 – 8 1 – 4 Header message: 1 - 6 Footer message:... - Page 34 DISPLAY OFFSET Value for the character key. Example: DISPLAY Ł ł NOTE: in this model, the characters will be shown as in the example reported here. But, following in detail the table on the previous page, the characters will be reproduced correctly in all types of impressions.
- Page 35 Ex: PLU001 caption presetting. DISPLAY PL001 PLU# 001 caption programming mode APPJ APPK APPL APPLD APPLE Set PLU#001 caption. PL002 Caption number will be accumulated by one after presetting. “SPACE”can be applied in case of less than max. digits of caption PLU001 APPLE...
-
Page 36: Management Reports
Management Reports Transaction data is maintained in the memory of the cash register as long as the battery back-up system is in effect. This data can be printed as a report for management review. The Management Report can be printed from either the X or Z position. -
Page 38: Clerk Report
X2 and Z2 Financial Reports 1. Control switch position: X or Z (bear in mind that a Z2 printout resets all totals to zero). 2. If a Z-mode manager password was defined, type the [4-digit password] and press 3. Type and press Clerk Report 1. -
Page 39: Department Programming Report
PLU Stock Report This report provides a printout showing the number of items in stock for each individual PLU. It can only be issued in the X mode. 1. Control key position: X. 2. Press PLU number Number of PLU or assigned Items in stock name... -
Page 40: Cash Register Programming Report
Cash Register Programming Report This report provides a printout showing how your cash register is programmed. It lists the values that are programmed for all system options, the VAT rates, foreign currency exchange rates and percent minus value programmed, the manager password and training mode pass- word assigned, and the three-digit security code assigned to the clerks. - Page 41 Electronic Journal Reports An electronic journal report executed with the control key in the X position does not clear the electronic journal memory (and therefore all transaction data are retained) while the report executed with the control key in the Z position cancels electronic journal memory thus restoring it to its maximum line capacity programmed.
-
Page 42: Sales Transactions
Sales Transactions Entering and Exiting the Register Mode switch 1. Turn the control to the REG or JRNL position. Remember that the JRNL position registers all sales transactions on the journal record while the REG position provides customer receipts. 2. If the Clerk System option was set to active and a clerk code was programmed, enter the related Clerk number assigned and press , type its associated three-digit secret code and then press If the Clerk System option was set to active and a secret code was not programmed, type any Clerk number... -
Page 43: Sample Receipts
Sample Receipts The following receipt is a typical receipt issued by the cash register. It is possible to print a receipt containing the least information possible. To obtain this receipt, program system options 36 to 41 accordingly. See "System Options" for details. After Receipt Operation ( Transaction ) ... -
Page 44: Receipt On/Off
Receipt On/Off Outside of a sales transaction, the cash register can be switched to the non-print mode where the transactions performed in the REG mode will not be printed. In the non- print mode, the sales totals will be maintained and the management reports will print. -
Page 45: Registering A Multiple Item Sale With Exact Cash Tender In Foreign Currency
Registering a Multiple Item Sale with Exact Cash Tender in Foreign Currency Example: Register a €10.00 item to Department 1, a €20.00 item to Department 2, with an exact tender in foreign currency. 1. Press 2. Press 3. Press to display and print the current balance due in Local currency. 4. -
Page 46: Registering A Charge Transaction
5. Press for foreign currency number 1 programmed and press to display the current balance due in foreign currency. 6. Type the amount tendered in foreign currency. and press . The change due to the customer is displayed. Registering a Charge Transaction Example: Register a €2.50 item to Department 1 and a €3.00 item to Department 2 as a charge transaction. -
Page 47: Card Tendering
Card Tendering Example: Register a €120.00 item to Department 2 and a €50.00 item to Department 3. Complete the transaction with payment using a credit or debit card. 1. Press 2. Press 3. Press Check Tender with Change Example: Register a €19.50 item to Department 4, a €2.50 item to Department 5 and a €5.00 item to Department 13. Compute the change for a €30.00 check tender. -
Page 48: Split Check/Cash Tender
Split Check/Cash Tender Example: Register a €24.00 item to Department 1, a €36.00 item to Department 3 and a €4.00 item to Department 4. Split the tender between €60.00 check and €4.00 cash. 1. Press 2. Press 3. Press 4. Press 5. -
Page 49: Discounting The Total Sale By Using A Random Discount Rate
Discounting the Total Sale by Using a Random Discount Rate Example: Register a 20% discount to a sales transaction. Compute the change tender. 1. Press 2. Press 3. Press 4. Press . The amount discounted is displayed. 5. Press 6. Press . -
Page 50: Overwriting A Preset Plu Price
Overwriting a Preset PLU Price Example: Register the sale of programmed PLU 1 and then overwrite the preset PLU 1 with € 3.50. Computer change for a € 10.00 tender. 1. Press 2. Press 3. Press 4. Press 5. Press The change due to the customer is displayed. -
Page 51: Refunding Multiple Items
Refunding Multiple Items Example: Refund a €4.99 item to Department 4 and three €2.00 items to Department 5. 1. Press 2. Press The amount to be refunded is displayed. 3. Press The amount to be refunded is displayed. 4. Press Registering Multiple Void and Refund Transactions Example: Overwrite the preset PLU 6 with €3.00, register the sale of a €2.50 item to Department 1, and of a €1.00 item to Department 2. -
Page 52: Registering Money Received On Account
Registering Money Received on Account Up to 7 digits can be used for registering money received on account. Example: Register €200.00 received on account. 1. Press The cash drawer opens and the transaction is recorded on receipt. Registering Negative Department Transactions As prerequisite to negative department transactions, pro- gram a normal department to a negative status as explained in section "Link Multiple/Single Item Sale, Tax Status and Item Price to a Department". -
Page 53: Registering An Identification Number To A Transaction
Registering an Identification Number to a Transaction Up to 7 digits can be used for the identification number. This entry can be made prior to any operation. The identification number is not added to the management report or totals. Example: Assign the identification number 3459 to a €1.00 sale to Department 4. Enter an exact cash tender sale. 1. -
Page 54: Merchandise Return Operations
Merchandise Return Operations Merchandise Return of a Single Department Entry enter amount ( )-[DEPARTMENT] {TENDER} Merchandise Return of a Multiple Department Entry enter quantity (*) ( ) [DEPARTMENT] {TENDER} (*) 0.001 – 99.999... -
Page 55: Cash Register Specifications
Cash Register Specifications Listed below are the technical characteristics of this cash register model: • Type: Electronic cash register with printer • 40 departments, 8 clerks, up to 999 PLU settings • Display: 9-digit operator LCD • Symbols for error, change, subtotal, minus, total, foreign currency value and item count shown •... - Page 56 FIGURES AMOUNT...
- Page 57 - When it to be disposed of, the device is to be taken to the equipped waste collection centres and is to be handled separately from urban waste; - Olivetti guarantees the activation of the treatment, collection, recycling and disposal procedures in accordance with Directive 2012/19/EU (and subsequent amendments).
- Page 58 Olivetti S.p.A. Via Jervis, 77 10015 IVREA (TO) Italy www.olivetti.com...