Table of Contents
Advertisement
Quick Links
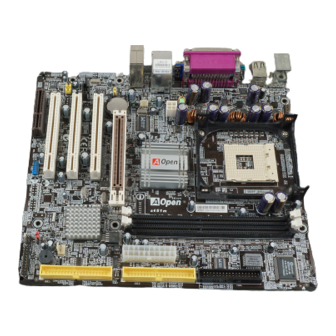
s651m
JP28 PS2 KB/Mouse Wakeup Jumper
S/PDIF Connector
Front Audio Connector
Onboard AC'97 CODEC
CD-IN Connector
SIS 10/100Mbps LAN Chip
CNR Expansion Slot
32-bit PCI Expansion Slots x3
AGP Protection LED
USB 2.0 Connector
JP14 CMOS Data Clear Jumper
STBY LED
IrDA Connector
SYSFAN2 Connector
Front Panel Connector
IDE Connectors x 2
(ATA33/66/100/133 supported)
AOpen reserves the right to revise all the specifications and information contained in this document, which are subject to change without notice.
PS/2 Mouse
SPP/EPP/ECP Parallel Port
Connector
USB 2.0
Ports
PS/2
COM Port
VGA Port
Keyboard
RJ45
LAN Jack
Line-In
Speaker
Out
MIC-In
USB 2.0 Ports
SYSFAN1 Connector
Resetable Fuse
COM2 Connector
4-pin 12V ATX Power Connector
Functional Polymer Capacitor
AGP 4X Expansion Slot that
supports 4X AGP card(1056MB/s)
478-pin CPU socket with Voltage
and
Frequency
Auto-detection
®
®
that supports Intel
Pentium
4
CPU
SIS
651/962L Chipsets that
®
support 400/533 MHz FSB,
DDR 333/266 and AGP 4X
CPUFAN Connector
184-pin DIMMsx2 support
DDR333/266
Max. To 2GB
ATX Power Connector
DieHard BIOS Lite
FDD Connector
Advertisement
Table of Contents

Related Manuals for AOpen s651M


Summary of Contents for AOpen s651M
- Page 1 ATX Power Connector SYSFAN2 Connector DieHard BIOS Lite Front Panel Connector IDE Connectors x 2 FDD Connector (ATA33/66/100/133 supported) AOpen reserves the right to revise all the specifications and information contained in this document, which are subject to change without notice.
- Page 2 (Keyboard, Mouse, Disk, etc etc) CPU Retention Module x 1 5. Connecting Front 8. Installing Other Devices Panel Cable (USB, Front Audio, etc) 6. Connecting ATX 7. Installing AGP & PCI Cards Power Cable PART NO: 49.8EM02.EE1 DOC. NO:S651M-EG- E0405A...
- Page 3 1. Installing CPU 3. Installing Memory Modules This socket supports FC-PGA2 package CPU, which is the latest CPU package DIMM slots are designed in black which are very easy to recognize. Insert the developed by Intel. Other forms of CPU package are impossible to be fitted in. module straight down to the DIMM slot with both hands and press down firmly until the DIMM module is securely in place.
-
Page 4: Connecting Atx Power Cables
Warning: Please avoid of using "Load Turbo Defaults", unless you are sure your system components (CPU, RAM, HDD, etc.) are good enough for turbo setting. 8. AOpen Bonus Pack CD and EzInsatll 6. Connecting Front Panel Cable Attach the power LED, speaker, and reset switch connectors to the corresponding You can use the autorun menu of Bonus CD disc. - Page 5 Setting CPU Voltage & Frequency JP14 Clear CMOS Setting CPU Core Voltage You can clear CMOS to restore system default This motherboard supports Voltage ID (VID) function to detect CPU voltage setting. To clear the CMOS, follow the procedure automatically during power-on. below.
-
Page 6: S/Pdif Connectors
USB 2.0 Connectors Front Audio Connectors This motherboard provides six USB 2.0 ports to connect USB devices, such as If the housing has been designed with an audio port on the front panel, you’ll be mouse, keyboard, modem, printer, etc. There are four ports on the back panel. able to connect onboard audio to front panel through this connector. -
Page 7: Model Name And Bios Version
Gold member of Club AOpen, and to ensure high service quality and priority from AOpen. You will also have a chance to play slot machine game to win prize from AOpen. Please prepare the following information before you start: Model Name, Part Number (P/N), Serial Number (S/N) and Purchase Date. - Page 8 Gold Member of Club AOpen so as to ensure quality service in the future. In order to maintain the best service to every customer of us, we recommend you to follow the procedures below and seek help from our branches according to the region you buy the product.